

Wall Mounted Vegetable Garden: Imagine stepping outside your door and harvesting fresh, flavorful herbs and vegetables, all grown vertically on your patio or balcony! Sounds dreamy, right? Well, it doesn’t have to be just a dream. In this article, I’m going to share some fantastic DIY tricks and hacks to help you create your very own stunning and productive wall mounted vegetable garden.
Vertical gardening, in general, has a rich history, dating back to the Hanging Gardens of Babylon, one of the Seven Wonders of the Ancient World. While we might not be building anything quite that elaborate, the principle remains the same: maximizing space and bringing the beauty and bounty of nature closer to home. Today, with smaller living spaces becoming increasingly common, the need for innovative gardening solutions like a wall mounted vegetable garden is greater than ever.
Why should you consider this DIY project? Well, for starters, it’s a fantastic way to overcome limited space. Whether you have a tiny balcony, a small patio, or even just a sunny wall, you can create a thriving garden. Plus, a wall mounted garden adds a touch of visual appeal to your outdoor space, transforming a plain wall into a vibrant, living work of art. But beyond the aesthetics, it’s about having access to fresh, healthy produce right at your fingertips. No more trips to the grocery store for wilted herbs or flavorless tomatoes! So, let’s dive in and explore the wonderful world of wall mounted vegetable gardens and discover how you can create your own edible oasis.
DIY Wall-Mounted Vegetable Garden: A Step-by-Step Guide
Hey there, fellow gardening enthusiasts! Are you dreaming of fresh veggies right outside your door but short on space? Well, I’ve got just the project for you: a DIY wall-mounted vegetable garden! This is a fantastic way to bring the garden to you, even if you only have a small balcony or patio. Plus, it looks super stylish! Let’s get started.
Materials You’ll Need
Before we dive in, let’s gather our supplies. This list might seem long, but trust me, it’s all pretty straightforward.
* Wooden Pallets: Look for pallets that are heat-treated (HT) rather than chemically treated (MB). You can usually find these for free at local businesses, construction sites, or online marketplaces. Make sure they’re in good condition, without any broken or severely damaged boards. The size depends on how big you want your garden to be.
* Landscape Fabric: This will line the inside of your planting pockets and prevent soil from washing out.
* Staple Gun and Staples: A heavy-duty staple gun is essential for securing the landscape fabric.
* Gloves: Protect your hands from splinters and dirt.
* Measuring Tape: For accurate measurements.
* Scissors or Utility Knife: For cutting the landscape fabric.
* Sandpaper: To smooth out any rough edges on the pallet.
* Wood Stain or Paint (Optional): To give your garden a personalized look. Choose something weather-resistant.
* Paintbrushes or Rollers (If painting or staining): For applying the finish.
* Potting Soil: Choose a high-quality potting mix specifically designed for vegetables.
* Vegetable Seedlings or Seeds: Select plants that are suitable for container gardening and your local climate. Herbs like basil, mint, and thyme, as well as smaller vegetables like lettuce, strawberries, and radishes, work well.
* Drill and Screws: For reinforcing the pallet structure if needed and for mounting it to the wall.
* Wall Mounting Hardware: Heavy-duty brackets or hooks that can support the weight of the pallet and soil. Make sure they’re appropriate for the type of wall you’re mounting to (brick, wood, etc.).
* Level: To ensure your garden is straight when you mount it.
* Safety Glasses: To protect your eyes from dust and debris.
* Dust Mask: To avoid inhaling dust while sanding.
Preparing the Pallet
This is a crucial step to ensure your pallet is safe and ready for planting.
1. Inspect the Pallet: Carefully examine the pallet for any loose nails, staples, or broken boards. Remove any hazards and reinforce any weak spots with screws.
2. Clean the Pallet: Use a brush or vacuum to remove any dirt, debris, or cobwebs. You can also wash it with soap and water, but make sure it’s completely dry before proceeding.
3. Sand the Pallet: Use sandpaper to smooth out any rough edges or splinters. Pay particular attention to the areas where you’ll be reaching in to plant. This step is important for safety and comfort.
4. Stain or Paint (Optional): If you want to give your garden a more polished look, now’s the time to stain or paint it. Apply the stain or paint evenly, following the manufacturer’s instructions. Let it dry completely before moving on. I personally love using a natural wood stain to enhance the pallet’s rustic charm.
Creating the Planting Pockets
This is where the magic happens! We’ll transform the pallet into a series of individual planters.
1. Measure and Cut the Landscape Fabric: Measure the width and depth of each section you want to use as a planting pocket. Add a few extra inches to each measurement to allow for overlap and securing the fabric. Cut the landscape fabric into appropriately sized pieces.
2. Line the Pockets: Carefully line each section with the landscape fabric, creating a pouch or pocket. Make sure the fabric extends up the sides of the section.
3. Secure the Fabric: Use the staple gun to secure the landscape fabric to the inside of the pallet. Start at the top and work your way down, overlapping the fabric as you go. Make sure the staples are firmly embedded in the wood. You want to create a sturdy, leak-proof pocket.
4. Reinforce the Bottom (Optional): For added security, you can add an extra layer of landscape fabric to the bottom of each pocket. This will help prevent the soil from pushing through.
Planting Your Garden
Now for the fun part – bringing your garden to life!
1. Fill the Pockets with Potting Soil: Carefully fill each planting pocket with high-quality potting soil. Leave a little space at the top to prevent the soil from spilling out when you water.
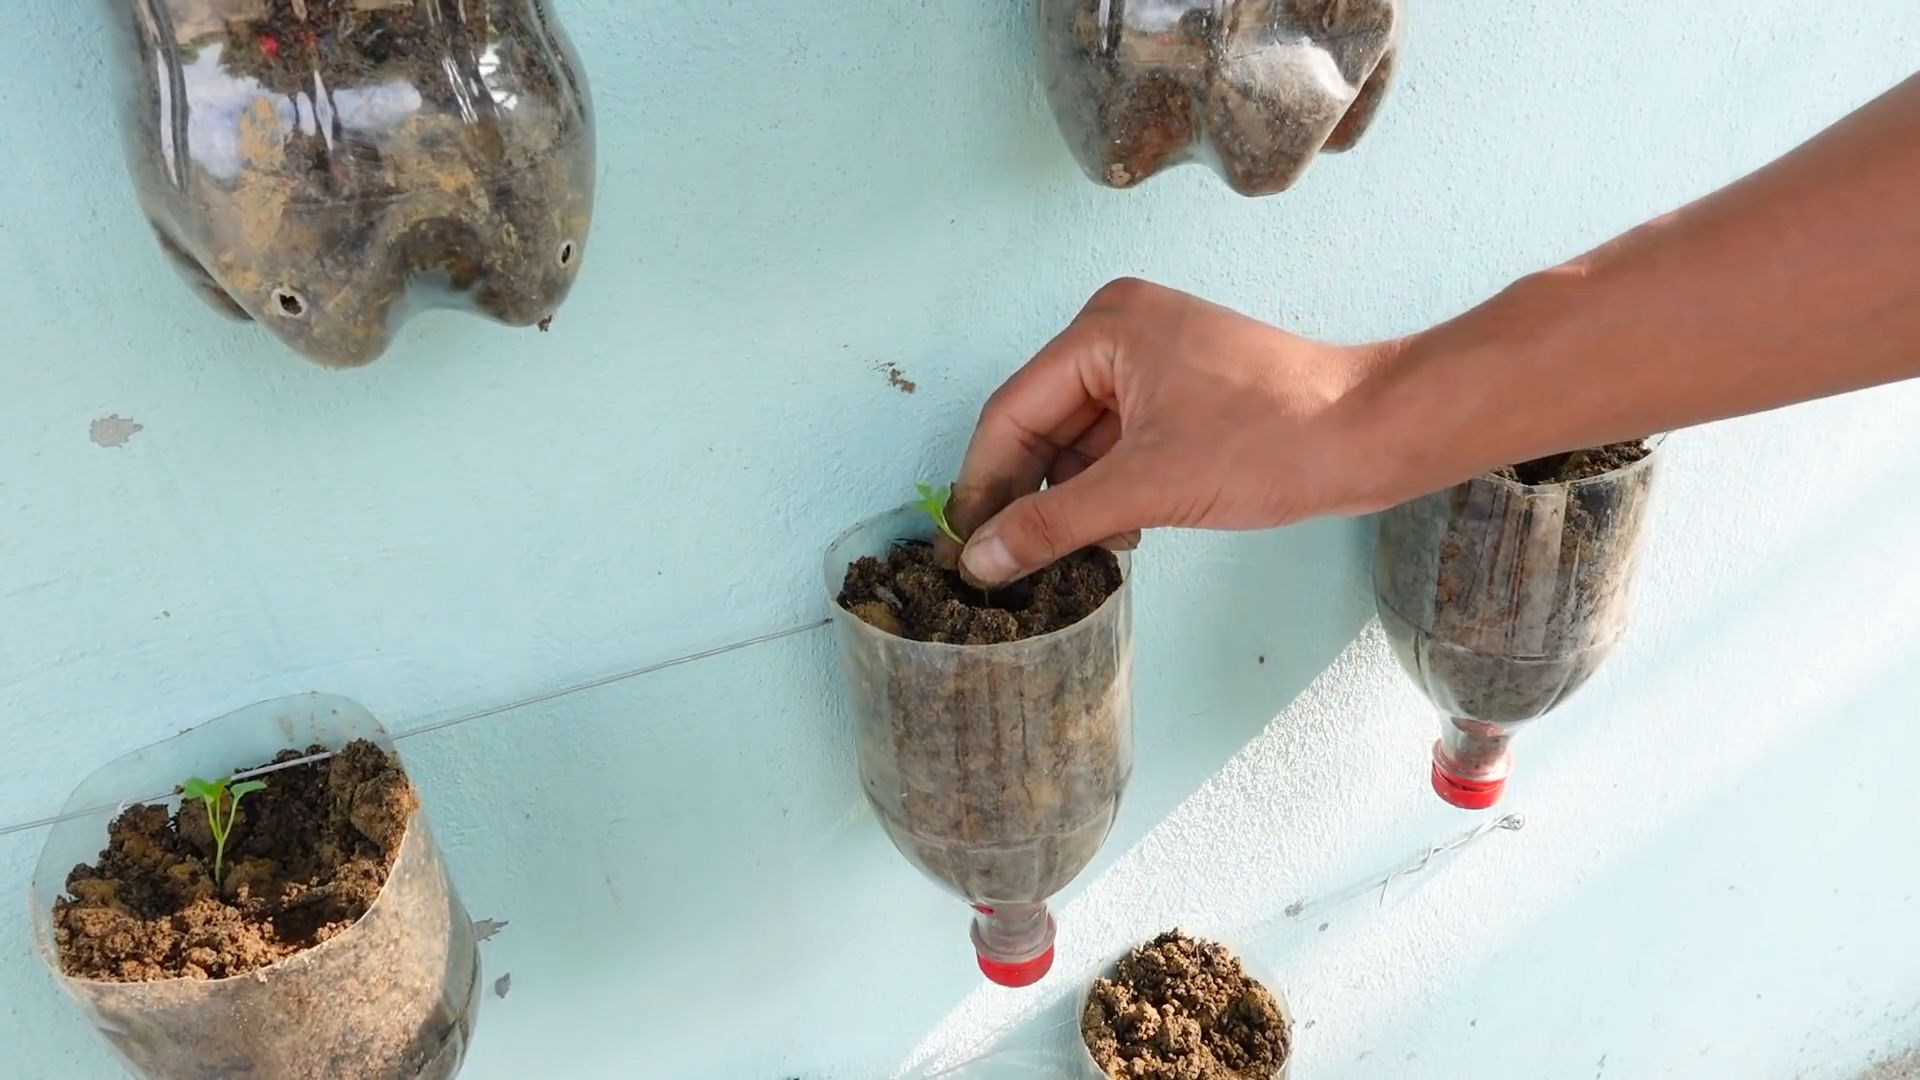
2. Plant Your Seedlings or Seeds: Gently plant your vegetable seedlings or seeds in the potting soil, following the instructions on the seed packet or plant label. Be sure to choose plants that are appropriate for the size of the pockets and the amount of sunlight your garden will receive.
3. Water Thoroughly: Water your plants thoroughly after planting. Make sure the soil is evenly moist, but not waterlogged.
4. Add Support (Optional): If you’re growing plants that need support, such as tomatoes or cucumbers, you can add small trellises or stakes to the planting pockets.
Mounting Your Garden to the Wall
This is the final step, and it’s important to do it safely and securely.
1. Choose Your Location: Select a location that receives adequate sunlight for your chosen vegetables. Make sure the wall is strong enough to support the weight of the pallet, soil, and plants.
2. Mark the Mounting Points: Use a level to mark the desired location for your garden on the wall. Use a stud finder to locate wall studs for added support.
3. Install the Mounting Hardware: Install the heavy-duty brackets or hooks according to the manufacturer’s instructions. Make sure they’re securely attached to the wall.
4. Lift and Mount the Pallet: Carefully lift the pallet and position it onto the mounting hardware. Make sure it’s level and secure. This step might require a helper, especially if the pallet is heavy.
5. Secure the Pallet (Optional): For added security, you can use screws to attach the pallet directly to the wall through the mounting brackets.
Tips for Success
Here are a few extra tips to help you keep your wall-mounted vegetable garden thriving:
* Water Regularly: Wall-mounted gardens tend to dry out more quickly than traditional gardens, so water your plants regularly, especially during hot weather. Check the soil moisture daily and water when the top inch feels dry.
* Fertilize Regularly: Vegetables need nutrients to grow, so fertilize your plants regularly with a balanced fertilizer. Follow the instructions on the fertilizer label.
* Choose the Right Plants: Select plants that are well-suited for container gardening and your local climate. Herbs, lettuce, strawberries, and radishes are all good choices.
* Provide Adequate Sunlight: Most vegetables need at least six hours of sunlight per day, so choose a location that receives plenty of sun.
* Protect from Pests: Keep an eye out for pests and diseases, and take action promptly if you notice any problems.
* Rotate Your Crops: To prevent soil depletion, rotate your crops each season.
* Consider Drip Irrigation: For easy watering, consider installing a simple drip irrigation system. This will deliver water directly to the roots of your plants, saving you time and water.
* Add Drainage: While the landscape fabric helps retain soil, ensure adequate drainage by adding a layer of gravel or small stones at the bottom of each planting pocket before adding soil. This will prevent waterlogging and root rot.
* Monitor Soil pH: Regularly test the pH of your soil to ensure it’s within the optimal range for your chosen vegetables. You can purchase a soil pH testing kit at most garden centers.
* Prune Regularly: Prune your plants regularly to encourage bushier growth and prevent them from becoming too leggy.
* Harvest Regularly: Harvest your vegetables regularly to encourage continued production.
* Consider Vertical Growth: Train vining plants like tomatoes or cucumbers to grow upwards using trellises or string. This will maximize space and create a beautiful vertical display.
* Mulch Your Plants: Add a layer of mulch to the top of the soil to help retain moisture, suppress weeds, and regulate soil temperature.
* Be Patient: Gardening takes time and patience. Don’t get discouraged if things don’t go perfectly right away. Just keep learning and experimenting, and you’ll eventually have a thriving wall-mounted vegetable garden.
Troubleshooting
Even with the best planning, you might encounter a few challenges. Here are some common issues
Conclusion
So, there you have it! Creating your own wall mounted vegetable garden isn’t just a trendy DIY project; it’s a game-changer for anyone looking to maximize space, add a touch of green to their surroundings, and enjoy the unparalleled satisfaction of harvesting their own fresh produce. We’ve explored the simplicity and adaptability of this method, highlighting how it can transform even the smallest balcony or patio into a thriving edible oasis.
But why is this DIY trick a must-try? Beyond the obvious aesthetic appeal, a wall mounted vegetable garden offers a multitude of benefits. It’s an excellent solution for urban dwellers with limited ground space, allowing you to grow a surprising amount of food vertically. It also elevates your plants, making them less susceptible to pests and diseases that might lurk in the soil. Plus, let’s be honest, it’s incredibly rewarding to pluck a ripe tomato or snip some fresh herbs right from your wall!
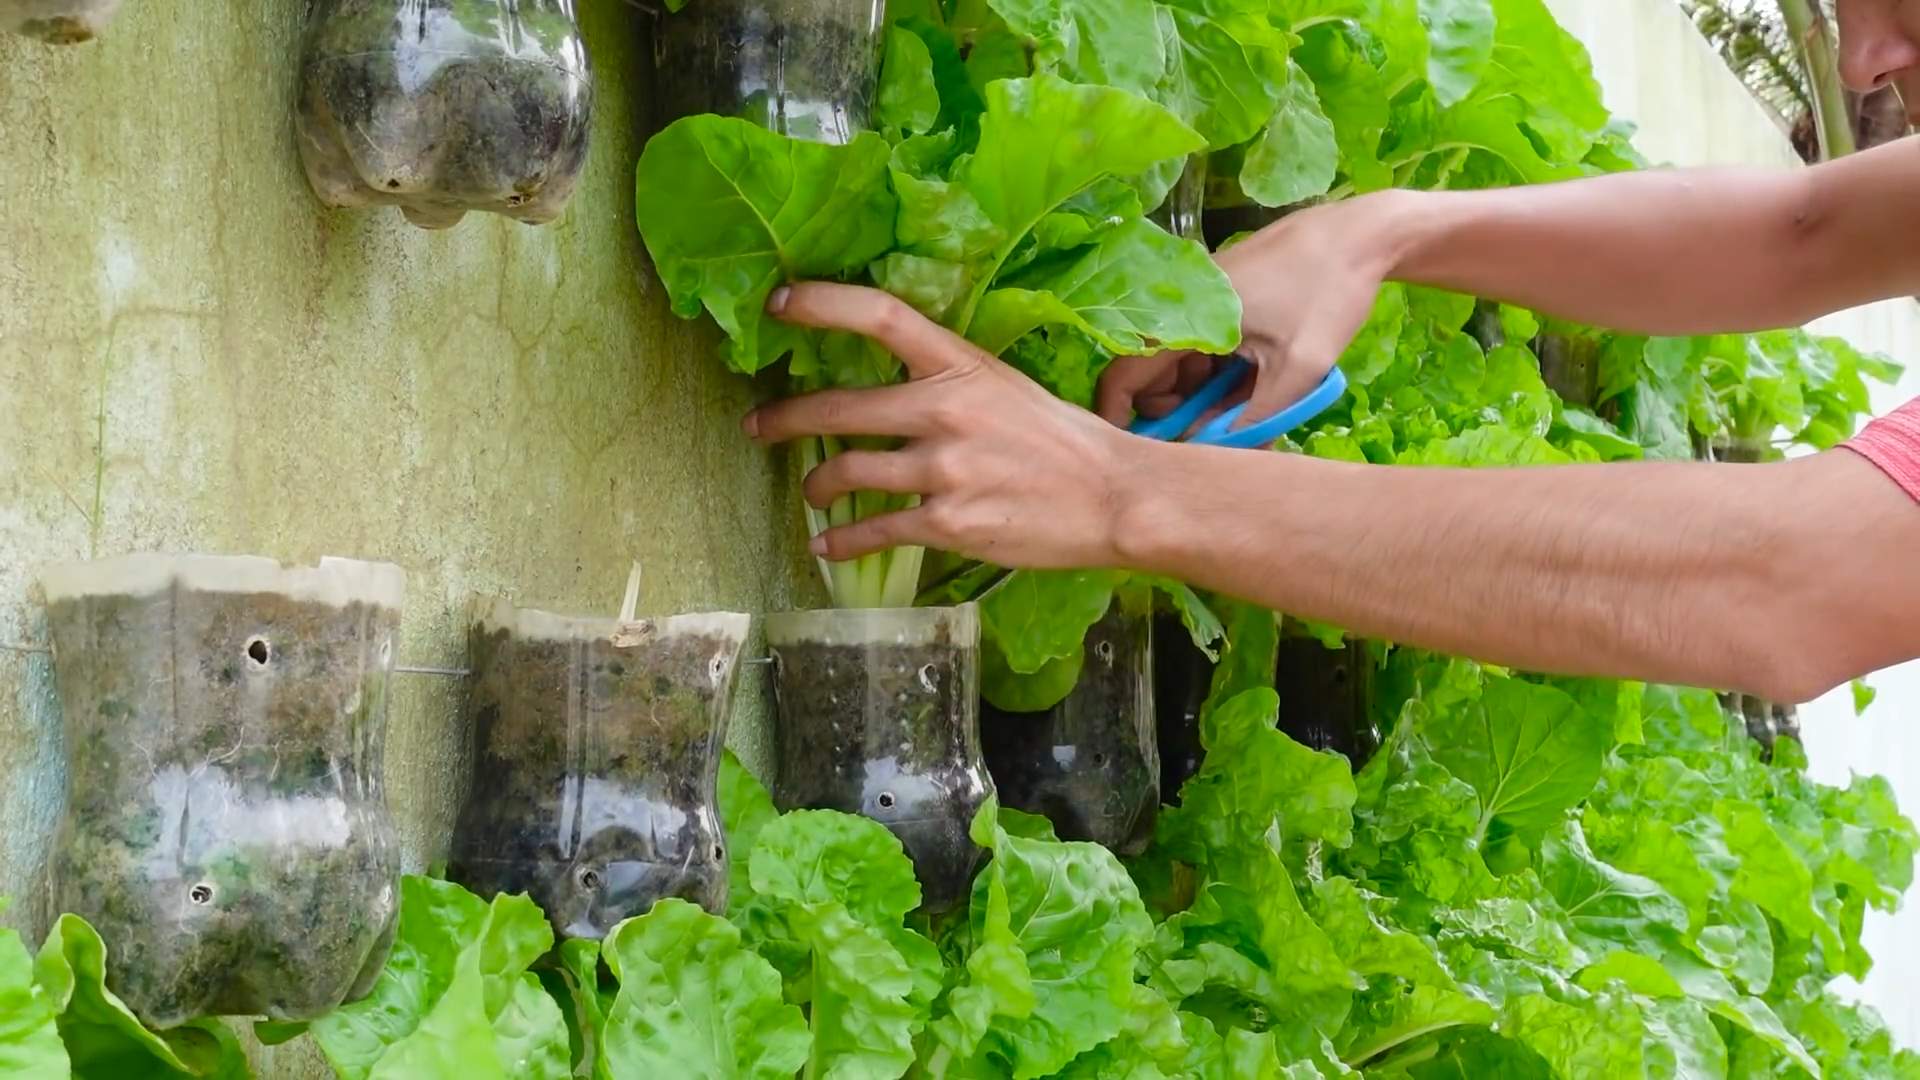
Don’t be afraid to get creative with your wall mounted vegetable garden! Consider using repurposed materials like old pallets, wooden crates, or even plastic bottles to build your planters. This not only adds a unique, rustic charm to your garden but also promotes sustainability by giving discarded items a new lease on life.
For those looking to add a touch of elegance, consider using decorative pots and trailing plants like strawberries or cascading herbs. You can also experiment with different planting arrangements to create visually stunning displays. Think about incorporating colorful flowers alongside your vegetables to attract pollinators and add a splash of vibrancy to your wall.
Another variation to consider is incorporating a self-watering system. This is particularly useful if you’re prone to forgetting to water your plants or if you’re planning a vacation. There are numerous DIY self-watering systems you can easily build using readily available materials.
Remember, the key to a successful wall mounted vegetable garden is proper planning and preparation. Choose a location that receives adequate sunlight, select the right type of soil, and ensure your wall is strong enough to support the weight of your planters.
We wholeheartedly encourage you to give this DIY project a try. It’s a fun, rewarding, and sustainable way to grow your own food, regardless of your space constraints. And most importantly, don’t forget to share your experiences with us! We’d love to see your creations, hear about your successes (and even your challenges), and learn from your unique approaches to wall mounted vegetable gardening. Share your photos and stories on social media using #WallMountedVegetableGardenDIY and inspire others to embark on their own gardening adventures. Let’s cultivate a community of vertical gardeners and spread the joy of homegrown goodness!
Frequently Asked Questions (FAQ)
What vegetables are best suited for a wall mounted garden?
The beauty of a wall mounted vegetable garden is its versatility, but some plants thrive better than others in this environment. Generally, smaller, bushier varieties are ideal. Consider these options:
* **Leafy Greens:** Lettuce, spinach, kale, and arugula are excellent choices. They have shallow root systems and don’t require a lot of space. Plus, you can harvest them continuously by snipping off leaves as needed.
* **Herbs:** Herbs like basil, mint, thyme, oregano, and rosemary are perfect for wall mounted gardens. They’re relatively low-maintenance and add a wonderful aroma to your outdoor space.
* **Strawberries:** These delicious berries are well-suited for hanging planters and will cascade beautifully over the edges of your wall mounted garden.
* **Tomatoes (Determinate Varieties):** Choose determinate or bush tomato varieties, as they stay compact and don’t require extensive staking. Cherry tomatoes are also a great option.
* **Peppers (Smaller Varieties):** Opt for smaller pepper varieties like chili peppers or bell peppers. They’re relatively easy to grow in containers and add a pop of color to your garden.
* **Radishes:** These fast-growing root vegetables can be easily grown in containers and harvested within a few weeks.
* **Bush Beans:** Similar to determinate tomatoes, bush beans are compact and don’t require a lot of support.
Avoid large, sprawling plants like pumpkins, watermelons, or indeterminate tomato varieties, as they require too much space and support for a wall mounted garden.
How much sunlight does my wall mounted vegetable garden need?
Sunlight is crucial for the success of your wall mounted vegetable garden. Most vegetables require at least 6-8 hours of direct sunlight per day. However, some leafy greens and herbs can tolerate partial shade (4-6 hours of sunlight).
Before setting up your garden, observe the sunlight patterns in your chosen location throughout the day. If your wall receives less than 6 hours of direct sunlight, consider supplementing with grow lights. You can also choose shade-tolerant vegetables and herbs.
What type of soil should I use for my wall mounted vegetable garden?
Using the right type of soil is essential for healthy plant growth. Avoid using garden soil, as it can be too heavy and compacted for containers. Instead, opt for a high-quality potting mix specifically designed for container gardening.
A good potting mix should be lightweight, well-draining, and rich in organic matter. You can also amend your potting mix with compost or other organic materials to improve its fertility and water retention.
How often should I water my wall mounted vegetable garden?
Watering frequency depends on several factors, including the type of plants you’re growing, the weather conditions, and the type of containers you’re using. Generally, you should water your plants when the top inch of soil feels dry to the touch.
During hot, dry weather, you may need to water your plants daily. In cooler, wetter weather, you may only need to water them every few days. Be sure to check the soil moisture regularly and adjust your watering schedule accordingly.
Overwatering can be just as harmful as underwatering, so avoid letting your plants sit in standing water. Ensure your containers have adequate drainage holes to prevent waterlogging.
How do I fertilize my wall mounted vegetable garden?
Container-grown plants require regular fertilization, as the nutrients in the potting mix are quickly depleted. You can use a variety of fertilizers, including organic and synthetic options.
Organic fertilizers, such as compost tea, fish emulsion, and seaweed extract, are a great way to provide your plants with essential nutrients while also improving the soil health. Synthetic fertilizers are more concentrated and provide a quick boost of nutrients, but they can also harm beneficial soil microorganisms.
Follow the instructions on the fertilizer label carefully and avoid over-fertilizing, as this can burn your plants.
How do I protect my wall mounted vegetable garden from pests and diseases?
Prevention is key when it comes to pests and diseases. Start by choosing disease-resistant varieties of vegetables and herbs. Also, ensure your plants have adequate sunlight, water, and nutrients, as healthy plants are less susceptible to problems.
Regularly inspect your plants for signs of pests or diseases. If you spot any problems, take action immediately. You can use organic pest control methods, such as insecticidal soap, neem oil, or diatomaceous earth, to control pests. For diseases, you can use copper-based fungicides or other organic treatments.
How do I choose the right containers for my wall mounted vegetable garden?
The type of containers you choose will depend on the size and type of plants you’re growing, as well as your personal preferences. Consider these factors when selecting containers:
* **Size:** Choose containers that are large enough to accommodate the root systems of your plants.
* **Material:** Containers can be made from a variety of materials, including plastic, terracotta, wood, and metal. Each material has its own advantages and disadvantages.
* **Drainage:** Ensure your containers have adequate drainage holes to prevent waterlogging.
* **Weight:** Consider the weight of the containers, especially if you’re hanging them on a wall.
* **Aesthetics:** Choose containers that complement your outdoor decor.
How do I ensure my wall can support the weight of the garden?
This is a critical safety consideration. Before installing your wall mounted garden, assess the structural integrity of your wall. If you’re unsure, consult with a professional contractor or structural engineer.
Use appropriate mounting hardware that is designed to support the weight of your planters. Consider using heavy-duty brackets, anchors, and screws. Distribute the weight evenly across the wall to avoid overloading any one area. Regularly inspect the mounting hardware to ensure it’s still secure.
Can I grow a wall mounted vegetable garden indoors?
Yes, you can grow a wall mounted vegetable garden indoors, but you’ll need to provide adequate lighting. Natural sunlight may not be sufficient, so you’ll likely need to supplement with grow lights. Choose grow lights that are specifically designed for plants and provide the appropriate spectrum of light.
Also, be sure to choose plants that are well-suited for indoor growing conditions. Leafy greens, herbs, and some smaller vegetables like cherry tomatoes and peppers can thrive indoors with proper care.

Leave a Comment