

Tennis ball scuff mark removal – sounds like a niche problem, right? But trust me, if you’ve ever had a rogue tennis ball (or energetic kids!) wreak havoc on your walls, you know the frustration is real. I’ve been there, staring at those unsightly black streaks, wondering if I’d have to repaint the entire room.
The good news is, you don’t! Before you reach for the paint can, let’s explore some surprisingly simple and effective DIY tricks to banish those blemishes. Think of it as a modern-day cleaning ritual, a way to restore your home’s pristine beauty without breaking the bank or spending hours scrubbing. While the history of tennis balls causing wall damage isn’t exactly documented (though I’m sure it’s a tale as old as tennis itself!), the desire to maintain a clean and inviting home is deeply ingrained in our culture.
Why do you need these DIY hacks? Because life is too short to live with scuffed walls! More importantly, these methods are often gentler on your paint than harsh chemicals, saving you money and preserving your home’s finish. I’m going to share my go-to methods for tennis ball scuff mark removal, using common household items you probably already have. Get ready to say goodbye to those annoying marks and hello to a fresh, clean space!
DIY Tennis Ball Scuff Mark Removal: A Comprehensive Guide
Hey there! Are you tired of those unsightly tennis ball scuff marks decorating your walls, floors, or even your car? Don’t worry, you’re not alone! As a tennis enthusiast (and someone who’s accidentally created my fair share of these marks), I’ve experimented with various methods to banish them. I’m here to share my tried-and-true techniques for removing tennis ball scuff marks, leaving your surfaces looking pristine. Let’s dive in!
Understanding Tennis Ball Scuff Marks
Before we get started, it’s helpful to understand what we’re dealing with. Tennis ball scuff marks are typically caused by the transfer of rubber and felt from the ball onto the surface it impacts. The severity of the mark depends on factors like the force of the impact, the type of surface, and the age of the mark. Fresh scuff marks are generally easier to remove than older, set-in ones.
Materials You’ll Need
The beauty of these methods is that they often involve items you already have around the house. Here’s a list of common supplies you might need:
* Clean, soft cloths: Microfiber cloths are ideal, but any soft cloth will do.
* Warm water: Essential for most cleaning solutions.
* Mild dish soap: A gentle yet effective cleaning agent.
* Baking soda: A natural abrasive that can help lift stubborn marks.
* Magic Eraser: These melamine sponges are fantastic for removing scuffs.
* Pencil eraser: Works well on smaller, lighter marks.
* Rubbing alcohol (isopropyl alcohol): A solvent that can dissolve some scuff marks.
* White vinegar: Another versatile cleaning agent.
* Toothpaste (non-gel): A mild abrasive that can be effective on certain surfaces.
* Hair dryer: Can help soften the rubber for easier removal (use with caution).
* Soft-bristled brush: For scrubbing textured surfaces.
* Protective gloves: To protect your hands.
* Spray bottle: For applying cleaning solutions.
Testing Your Cleaning Solution
Important! Before applying any cleaning solution to a large area, always test it on an inconspicuous spot first. This will ensure that the solution doesn’t damage or discolor the surface. Apply a small amount of the solution, let it sit for a minute or two, and then wipe it away. Check for any adverse reactions before proceeding.
Method 1: The Soap and Water Approach
This is my go-to method for fresh, light scuff marks. It’s gentle and effective for most surfaces.
1. Prepare the solution: Mix a few drops of mild dish soap with warm water in a bowl or bucket.
2. Dampen a cloth: Dip a clean, soft cloth into the soapy water and wring out the excess. You want the cloth to be damp, not soaking wet.
3. Gently wipe the scuff mark: Use the damp cloth to gently wipe the scuff mark in a circular motion. Avoid scrubbing too hard, as this could damage the surface.
4. Rinse with clean water: Once you’ve removed the scuff mark, dampen another clean cloth with plain water and wipe the area to remove any soap residue.
5. Dry the surface: Use a dry, clean cloth to dry the surface thoroughly.
Method 2: The Magic Eraser Wonder
Magic Erasers are like little cleaning superheroes. They’re incredibly effective at removing scuff marks, but it’s important to use them with caution, as they can be abrasive.
1. Dampen the Magic Eraser: Lightly dampen the Magic Eraser with water. Don’t soak it.
2. Gently rub the scuff mark: Gently rub the scuff mark with the Magic Eraser, using light pressure. Avoid scrubbing too hard, as this can damage the surface.
3. Rinse with clean water: After removing the scuff mark, wipe the area with a damp cloth to remove any residue from the Magic Eraser.
4. Dry the surface: Dry the surface with a clean, dry cloth.
Method 3: Baking Soda Paste Power
Baking soda is a mild abrasive that can help lift stubborn scuff marks. This method is best for surfaces that can withstand a bit of scrubbing.
1. Make a paste: Mix baking soda with a small amount of water to form a thick paste.
2. Apply the paste to the scuff mark: Apply the baking soda paste to the scuff mark, covering it completely.
3. Gently scrub: Use a damp cloth or a soft-bristled brush to gently scrub the scuff mark with the baking soda paste.
4. Rinse thoroughly: Rinse the area thoroughly with clean water to remove all traces of the baking soda paste.
5. Dry the surface: Dry the surface with a clean, dry cloth.
Method 4: Rubbing Alcohol Rescue
Rubbing alcohol is a solvent that can dissolve some scuff marks. Use this method with caution, as it can damage certain surfaces.
1. Dampen a cloth with rubbing alcohol: Dampen a clean, soft cloth with rubbing alcohol.
2. Gently wipe the scuff mark: Gently wipe the scuff mark with the damp cloth.
3. Rinse with clean water: After removing the scuff mark, wipe the area with a damp cloth to remove any rubbing alcohol residue.
4. Dry the surface: Dry the surface with a clean, dry cloth.
Method 5: White Vinegar Victory
White vinegar is another versatile cleaning agent that can be effective on scuff marks.
1. Dilute the vinegar: Mix equal parts white vinegar and water in a spray bottle.
2. Spray the scuff mark: Spray the vinegar solution onto the scuff mark.
3. Let it sit for a few minutes: Allow the solution to sit for a few minutes to loosen the scuff mark.
4. Wipe with a clean cloth: Wipe the area with a clean, soft cloth.
5. Rinse with clean water: Rinse the area with clean water to remove any vinegar residue.
6. Dry the surface: Dry the surface with a clean, dry cloth.
Method 6: Toothpaste Tactic
Believe it or not, non-gel toothpaste can be a surprisingly effective scuff mark remover.
1. Apply toothpaste to the scuff mark: Apply a small amount of non-gel toothpaste to the scuff mark.
2. Gently rub: Gently rub the toothpaste into the scuff mark with a clean, soft cloth.
3. Rinse thoroughly: Rinse the area thoroughly with clean water to remove all traces of the toothpaste.
4. Dry the surface: Dry the surface with a clean, dry cloth.
Method 7: The Hair Dryer Heat Treatment
This method is a bit unconventional, but it can work on stubborn rubber scuff marks. The heat helps to soften the rubber, making it easier to remove.
Caution: Use this method with extreme care, as excessive heat can damage some surfaces.
1. Apply heat: Hold a hair dryer a few inches away from the scuff mark and apply heat for a few seconds.
2. Wipe with a clean cloth: Immediately wipe the softened rubber with a clean, soft cloth.
3. Repeat if necessary: Repeat the process if necessary, but be careful not to overheat the surface.
4. Clean the area: Clean the area with soap and water to remove any residue.
5. Dry the surface: Dry the surface with a clean, dry cloth.
Specific Surface Considerations
Different surfaces require different approaches. Here’s a breakdown of how to tackle scuff marks on various materials:
* Painted Walls: Start with the mildest method (soap and water). If that doesn’t work, try a Magic Eraser, but use it very gently. Avoid abrasive cleaners like baking soda.
* Hardwood Floors: Soap and water or a Magic Eraser are usually effective. Be careful not to use too much water, as it can damage the wood. Always dry the surface thoroughly.
* Vinyl Floors: Most of the methods described above should work on vinyl floors. Test in an inconspicuous area first.
* Car Interiors: Soap and water or rubbing alcohol (diluted) are good options for car interiors. Be careful not to damage the upholstery or dashboard.
* Shoes: A Magic Eraser or toothpaste can work wonders on shoe scuff marks.
Preventing Future Scuff Marks
Prevention is always better than cure! Here are a few tips to help prevent future tennis ball scuff marks:
* Use tennis ball containers: Store tennis balls in
Conclusion
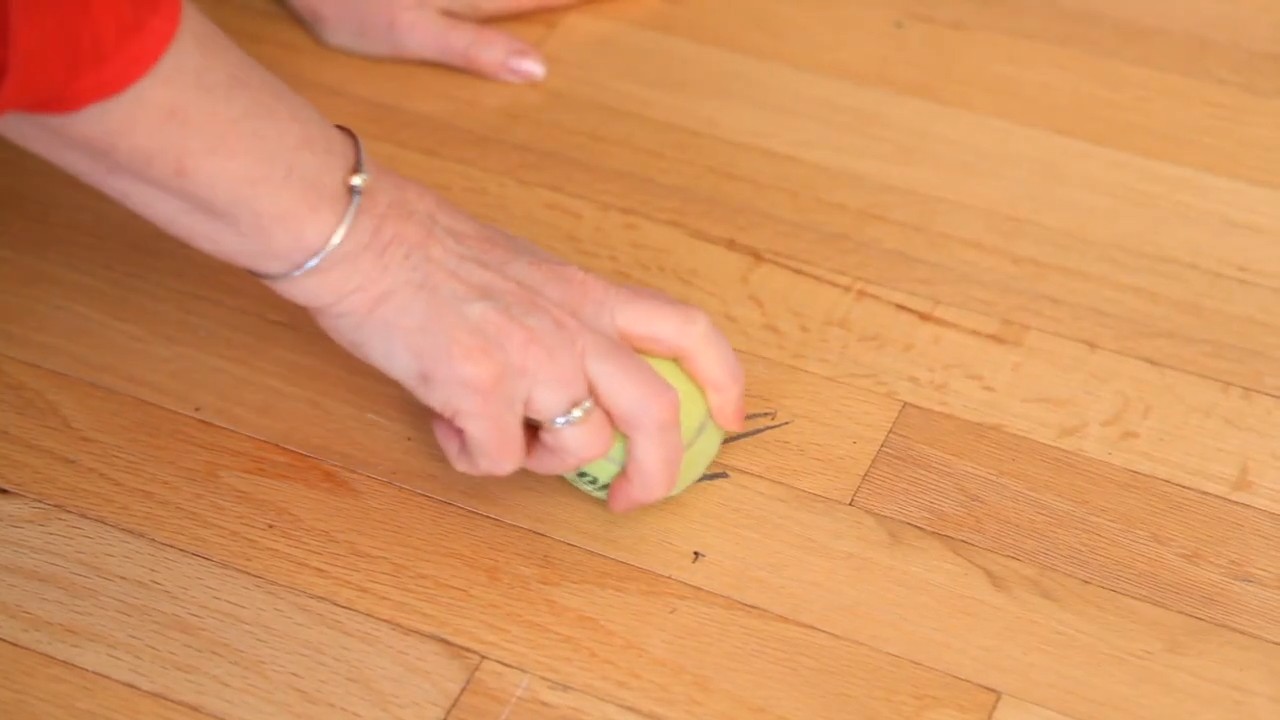
So, there you have it! No need to live with those unsightly tennis ball scuff marks marring your walls and floors. This simple, DIY trick is a game-changer for anyone looking to maintain a clean and fresh home without resorting to harsh chemicals or expensive cleaning services. It’s quick, effective, and uses readily available materials, making it a truly accessible solution for everyone.
Why is this a must-try? Because it saves you time, money, and effort. Instead of spending hours scrubbing with ineffective cleaners or shelling out cash for professional help, you can eliminate those stubborn marks in a matter of minutes with minimal fuss. Plus, it’s a much gentler approach, preserving the integrity of your paint and flooring.
But don’t stop there! Feel free to experiment with variations to suit your specific needs. For instance, if you’re dealing with particularly stubborn marks on a textured surface, try using a slightly damp microfiber cloth in conjunction with the tennis ball. The added moisture can help loosen the scuff marks, while the microfiber cloth provides a bit of extra scrubbing power without being abrasive. You could also try using a magic eraser gently after the tennis ball trick to remove any lingering residue. Remember to always test in an inconspicuous area first to ensure compatibility with your surface.
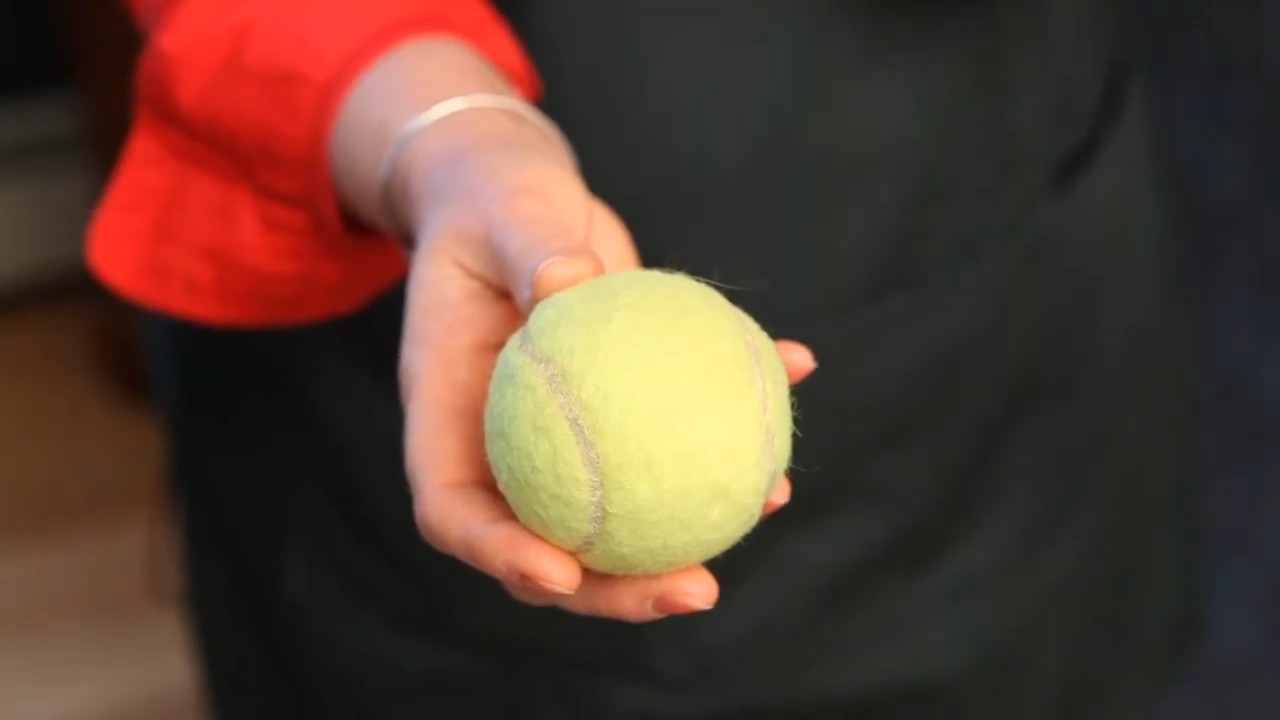
Another variation involves the type of tennis ball you use. While a standard tennis ball works wonders, you might find that a slightly newer ball with a firmer texture is more effective on certain surfaces. Conversely, an older, softer ball might be gentler on delicate finishes.
Ultimately, the key is to find what works best for you and your home. This DIY tennis ball scuff mark removal method is a fantastic starting point, offering a safe, effective, and affordable way to tackle those pesky marks.
We wholeheartedly encourage you to give this trick a try. You’ll be amazed at how easily you can restore your walls and floors to their former glory. And once you’ve experienced the magic of the tennis ball, we’d love to hear about your results! Share your experiences, tips, and variations in the comments below. Let’s create a community of clean-home enthusiasts who are armed with this simple yet powerful cleaning secret. Your insights could help others discover the joy of a scuff-free home! Don’t forget to share this article with your friends and family who might also benefit from this amazing DIY solution. Let’s spread the word and banish those tennis ball scuff marks for good!
Frequently Asked Questions (FAQs)
1. What types of surfaces can I use this tennis ball trick on?
This trick is generally safe and effective on a wide range of surfaces, including painted walls, baseboards, hardwood floors, tile, and even some types of vinyl flooring. However, it’s always crucial to test the tennis ball on an inconspicuous area first, especially if you’re dealing with a delicate or unusual finish. This will help you ensure that the tennis ball doesn’t damage or discolor the surface. Avoid using it on very porous or unfinished surfaces, as the rubber could potentially leave a mark.
2. Will this trick remove all types of scuff marks?
While this method is highly effective for removing tennis ball scuff marks, its effectiveness on other types of scuff marks may vary. It works best on marks caused by rubber or similar materials. For scuff marks caused by other substances, such as dirt or grease, you may need to use a different cleaning solution or technique. However, it’s always worth trying the tennis ball first, as it’s a gentle and non-abrasive option.
3. How much pressure should I apply when rubbing the tennis ball on the scuff mark?
Start with light pressure and gradually increase it as needed. The goal is to remove the scuff mark without damaging the underlying surface. Avoid applying excessive pressure, as this could potentially scratch or dull the finish. If the scuff mark is particularly stubborn, try using a slightly damp microfiber cloth in conjunction with the tennis ball.
4. What if the tennis ball leaves a slight residue on the surface?
In some cases, the tennis ball may leave a slight residue, especially on lighter-colored surfaces. If this happens, simply wipe the area with a clean, damp cloth. You can also use a mild soap solution if necessary. Be sure to dry the area thoroughly after cleaning.
5. Can I use any type of tennis ball for this trick?
While a standard tennis ball works well, you may find that different types of tennis balls are more effective on certain surfaces. A newer, firmer ball may be better for stubborn marks, while an older, softer ball may be gentler on delicate finishes. Avoid using tennis balls that are excessively dirty or worn, as they could potentially transfer dirt or damage the surface.
6. How often can I use this trick without damaging my walls or floors?
This trick is generally safe to use as often as needed, as long as you’re using light pressure and testing in an inconspicuous area first. However, excessive rubbing could potentially dull the finish over time. To minimize the risk of damage, try to address scuff marks as soon as you notice them, rather than waiting for them to build up.
7. Are there any surfaces I should absolutely avoid using this trick on?
Avoid using this trick on very porous or unfinished surfaces, as the rubber could potentially leave a mark. Also, be cautious when using it on delicate or antique finishes, as they may be more susceptible to damage. Always test in an inconspicuous area first to ensure compatibility.
8. Can I use this trick to remove scuff marks from shoes?
While this trick is primarily intended for removing scuff marks from walls and floors, it may also be effective on some types of shoes. However, be sure to test it on an inconspicuous area of the shoe first, as some materials may be more susceptible to damage. Avoid using it on delicate or expensive shoes.
9. Is this method environmentally friendly?
This method is generally considered to be more environmentally friendly than using harsh chemicals or cleaning solutions. Tennis balls are relatively inexpensive and readily available, and they can be reused multiple times. However, it’s important to dispose of used tennis balls responsibly. Consider donating them to a local tennis club or recycling them if possible.
10. Where can I find more information about removing scuff marks from different surfaces?
There are many online resources available that provide information about removing scuff marks from different surfaces. You can search for articles, videos, and forums that offer tips and advice on this topic. Be sure to consult multiple sources and test any new methods in an inconspicuous area first. You can also consult with a professional cleaning service for more specialized advice. Remember that **tennis ball scuff mark removal** is just one tool in your cleaning arsenal!
Leave a Comment