

Strawberry Keychain DIY: Who doesn’t love a little burst of summery sweetness hanging from their keys or bag? I know I do! And what’s even better than buying a cute strawberry keychain? Making your own, of course! This isn’t just about crafting; it’s about adding a personal touch to your everyday essentials and unleashing your inner artist.
Keychains, in their simplest form, have been around for centuries, evolving from practical tools for carrying keys to decorative accessories that reflect our personalities. Think about it – a keychain can be a tiny window into someone’s hobbies, passions, or even their favorite foods! And strawberries? Well, they’ve been symbols of love, purity, and good fortune in various cultures throughout history. Combining these two elements into a Strawberry Keychain DIY project is a delightful way to carry a little bit of joy with you wherever you go.
Let’s face it, store-bought keychains can be generic and, frankly, a little boring. But with this easy and fun Strawberry Keychain DIY, you can create a unique accessory that perfectly matches your style. Plus, it’s a fantastic way to unwind, get creative, and maybe even make a few as gifts for friends and family. Ready to learn some simple tricks and hacks to create your own adorable strawberry charm? Let’s get crafting!

DIY Adorable Strawberry Keychain: A Step-by-Step Guide
Hey there, fellow crafters! Today, I’m super excited to share a fun and easy DIY project with you: creating your very own adorable strawberry keychain! This little charm is perfect for adding a touch of sweetness to your keys, backpack, or even as a cute gift for a friend. I promise, even if you’re a beginner, you can totally nail this!
Materials You’ll Need
Before we dive in, let’s gather all the necessary materials. Trust me, having everything ready beforehand will make the process so much smoother.
* Felt: You’ll need red, green, and white felt. The amount will depend on the size of your strawberry, but a small sheet of each color should be plenty. I usually get the craft felt sheets from my local craft store.
* Embroidery Floss: Matching embroidery floss in red, green, and white. This will be used for stitching and adding details.
* Stuffing: Polyester fiberfill is perfect for stuffing your strawberry and giving it that plump, adorable look.
* Keychain Ring: A standard keychain ring to attach your strawberry to.
* Jump Ring: A small jump ring to connect the strawberry to the keychain ring.
* Scissors: A good pair of sharp scissors for cutting the felt.
* Needle: An embroidery needle with a large enough eye to thread the embroidery floss.
* Pencil or Fabric Marker: For tracing the patterns onto the felt.
* Pins: To hold the felt pieces together while you sew.
* Strawberry Pattern: You can either draw your own strawberry pattern or find a free template online. I’ll provide some tips on creating your own pattern below!
* Optional: Beads or sequins for extra embellishment (if you’re feeling fancy!).
Creating Your Strawberry Pattern
If you’re feeling creative, you can design your own strawberry pattern! Here’s how I usually do it:
1. Sketch the Basic Shape: Start by sketching a simple strawberry shape on a piece of paper. Don’t worry about making it perfect; you can always adjust it later.
2. Add the Leaf Top: Draw a separate pattern for the green leaf top. I usually make it look like a little crown with 5-7 points.
3. Refine the Pattern: Once you’re happy with the basic shapes, refine the lines and make sure everything looks balanced.
4. Cut Out the Patterns: Cut out the paper patterns. These will be your templates for cutting the felt.
Alternatively, you can easily find free strawberry patterns online by searching for “strawberry felt pattern” on Google or Pinterest.
Cutting the Felt Pieces
Now that we have our patterns, it’s time to cut out the felt pieces.
1. Trace the Strawberry Body: Place the strawberry body pattern onto the red felt and trace around it with a pencil or fabric marker. You’ll need two identical pieces for the front and back of the strawberry.
2. Trace the Leaf Top: Place the leaf top pattern onto the green felt and trace around it. You’ll need one piece for the leaf top.
3. Cut Out the Felt Pieces: Carefully cut out all the felt pieces along the traced lines. Make sure to cut accurately for a clean and professional look.
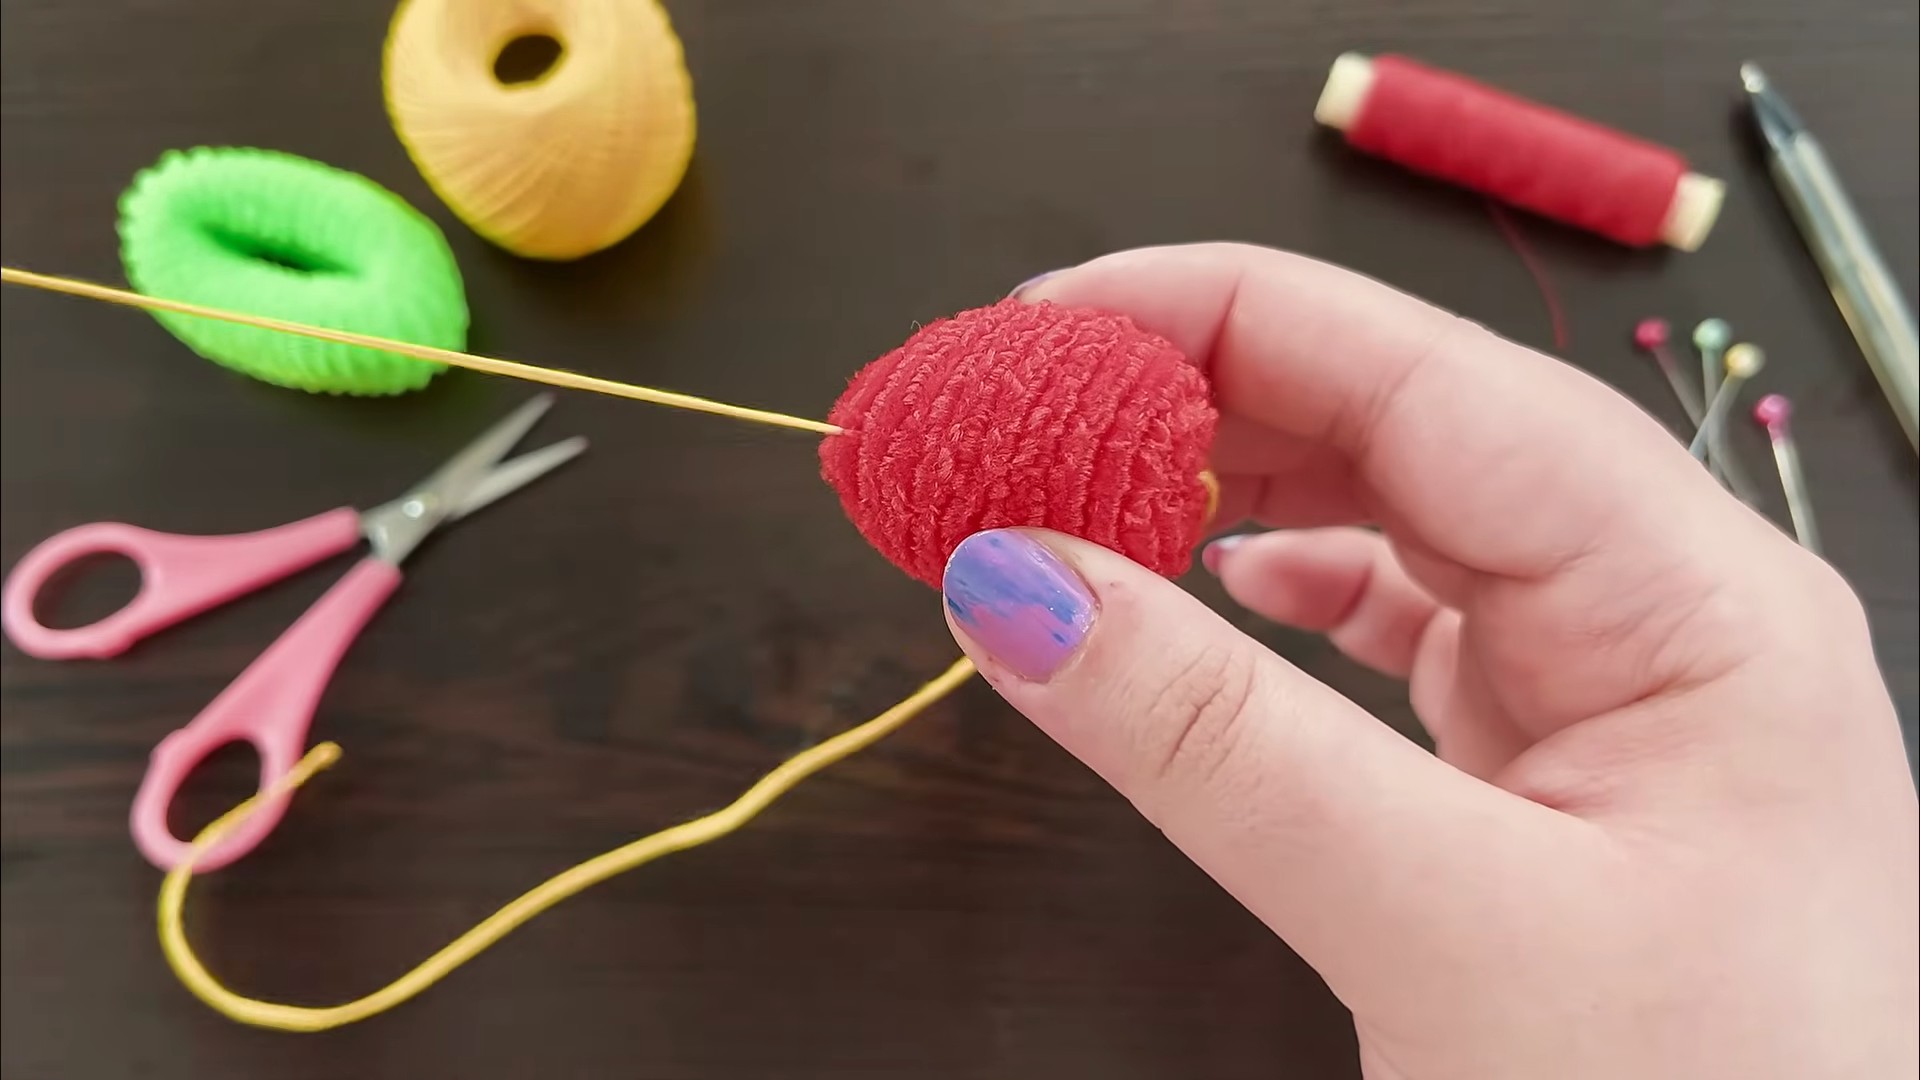
Sewing the Strawberry Body
This is where the magic happens! We’ll start by sewing the two red felt pieces together to create the strawberry body.
1. Pin the Pieces Together: Place the two red felt pieces together, aligning the edges. Use pins to hold them in place. This will prevent the felt from shifting while you sew.
2. Thread the Needle: Thread your needle with red embroidery floss and tie a knot at the end.
3. Start Sewing: Begin sewing around the edge of the strawberry using a blanket stitch or a running stitch. I personally prefer the blanket stitch because it creates a nice, decorative edge.
* Blanket Stitch: To do a blanket stitch, bring the needle up through the back piece of felt, near the edge. Then, insert the needle back down through the front piece of felt, a short distance away. Before pulling the thread tight, bring the needle up through the loop of thread you just created. Pull the thread tight to form a neat stitch. Repeat this process all the way around the edge of the strawberry.
* Running Stitch: For a running stitch, simply weave the needle in and out of the felt, creating a series of small, even stitches.
4. Leave an Opening: As you sew around the strawberry, leave a small opening (about 1-2 inches) for stuffing.
5. Stuff the Strawberry: Carefully stuff the strawberry with polyester fiberfill. Use a small tool, like the end of a pencil or a chopstick, to push the stuffing into the corners and make sure the strawberry is evenly filled. Don’t overstuff it, or it will look lumpy.
6. Close the Opening: Once the strawberry is stuffed to your liking, sew the opening closed using the same stitch you used earlier.
Adding the Seeds
Now, let’s add those iconic strawberry seeds! This is where you can get creative and personalize your keychain.
1. Thread the Needle: Thread your needle with white embroidery floss and tie a knot at the end.
2. Sew the Seeds: Sew small, scattered stitches onto the red felt to represent the seeds. You can use a simple straight stitch or a French knot for a more textured look.
* Straight Stitch: Simply bring the needle up through the felt and then back down, creating a small line.
* French Knot: Bring the needle up through the felt. Wrap the thread around the needle two or three times. Insert the needle back down into the felt very close to where it came up. Hold the thread taut as you pull the needle through. This will create a small knot on the surface of the felt.
3. Distribute the Seeds Evenly: Make sure to distribute the seeds evenly across the strawberry. I like to vary the size and spacing of the seeds for a more natural look.
Attaching the Leaf Top
Next, we’ll attach the green leaf top to the strawberry.
1. Position the Leaf Top: Place the green leaf top onto the top of the strawberry, aligning the edges.
2. Pin the Leaf Top: Use pins to hold the leaf top in place.
3. Sew the Leaf Top: Thread your needle with green embroidery floss and tie a knot at the end. Sew the leaf top to the strawberry using a blanket stitch or a running stitch. Make sure to secure it tightly.
Adding the Keychain Ring
Almost there! Now, let’s add the keychain ring so you can actually use your adorable strawberry.
1. Attach the Jump Ring: Use pliers to open the jump ring. Attach the jump ring to the top of the strawberry, near the leaf top.
2. Attach the Keychain Ring: Attach the keychain ring to the jump ring.
3. Close the Jump Ring: Use pliers to close the jump ring securely.
Optional Embellishments
If you want to add some extra sparkle to your strawberry keychain, here are a few ideas:
* Beads: Sew small beads onto the strawberry for added texture and shine.
* Sequins: Attach sequins to the strawberry for a glamorous look.
* Embroidery Details: Add more intricate embroidery details, such as vines or flowers.
Final Touches
Give your strawberry keychain a final inspection to make sure everything is secure and looks just the way you want it. Trim any loose threads and admire your handiwork!
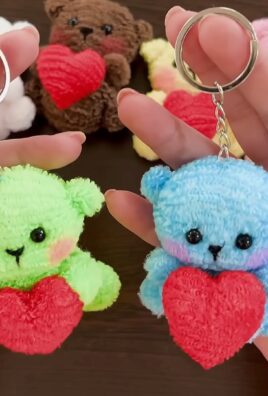
And there you have it! Your very own adorable strawberry keychain. I hope you had as much fun making it as I did sharing the process with you. Now go ahead and create a whole bunch of these little cuties for yourself and your friends! Happy crafting!
Conclusion
So, there you have it! Crafting your own adorable strawberry keychain is not just a fun afternoon activity; it’s a gateway to personalized style and a fantastic way to express your creativity. This simple DIY project offers a delightful escape from the ordinary, allowing you to create something truly unique and charming. Forget mass-produced accessories – with a few basic supplies and a little bit of your own flair, you can whip up a strawberry keychain that perfectly reflects your personality.
Why is this DIY trick a must-try? Because it’s incredibly versatile! Whether you’re a seasoned crafter or a complete beginner, the steps are easy to follow and the results are undeniably cute. Plus, it’s a budget-friendly way to add a touch of sweetness to your keys, backpack, or even use as a decorative charm for your purse. Imagine the compliments you’ll receive when people ask where you got such an adorable accessory!
But the real magic lies in the possibilities for customization. Feel free to experiment with different shades of red and green to create a variety of strawberry hues. Consider adding tiny seed beads for a more realistic look, or use embroidery floss to stitch on intricate details. You could even try using different types of yarn or felt for a unique texture. For a more durable keychain, consider using leather or faux leather scraps.
Variations to Explore:
* Felt Strawberry Keychain: Use felt in various shades of red and green for a soft and cuddly keychain. Add embroidered details for extra charm.
* Crochet Strawberry Keychain: If you’re familiar with crochet, create a 3D strawberry using your favorite yarn. This adds a lovely textural element.
* Beaded Strawberry Keychain: Incorporate small red and green beads to create a shimmering and eye-catching strawberry.
* Leather Strawberry Keychain: For a more durable and sophisticated look, use leather scraps. You can even add metal accents for a touch of edginess.
* Strawberry Keychain with a Scent: Add a drop of strawberry essential oil to the stuffing for a delightful aroma every time you reach for your keys.
Don’t be afraid to get creative and personalize your strawberry keychain to your heart’s content. The beauty of DIY is that there are no rules! Let your imagination run wild and create a keychain that is truly one-of-a-kind.
We wholeheartedly encourage you to try this delightful DIY trick. It’s a fantastic way to unwind, unleash your creativity, and create something beautiful and functional. And most importantly, we want to hear about your experience! Share your creations with us on social media using #StrawberryKeychainDIY. We can’t wait to see what you come up with! Let’s spread the strawberry love and inspire others to embrace the joy of crafting. This **strawberry keychain DIY** is sure to bring a smile to your face every time you see it.
Frequently Asked Questions (FAQ)
What materials do I need to make a strawberry keychain?
The basic materials you’ll need include red and green felt (or your preferred crafting material), stuffing (cotton balls, fiberfill, or even fabric scraps), embroidery floss or yarn in matching colors, a needle, scissors, a keychain ring or clip, and optionally, beads or other embellishments for decoration. The specific materials will vary depending on the variation you choose. For example, a crochet version will require yarn and a crochet hook.
How long does it take to make a strawberry keychain?
The time it takes to make a strawberry keychain depends on your skill level and the complexity of the design. A simple felt keychain can be completed in as little as 30 minutes to an hour. More intricate designs, such as those involving embroidery or beadwork, may take longer. Crochet versions might also require more time, especially if you’re new to crocheting.
Can I use a sewing machine instead of hand-sewing?
Yes, you can definitely use a sewing machine if you prefer! It will speed up the process, especially for the basic construction of the strawberry shape. However, hand-sewing is often preferred for smaller details and embellishments, as it allows for greater precision and control. If using a sewing machine, be sure to use a needle appropriate for the material you’re working with.
What kind of stuffing should I use?
Fiberfill is a popular choice for stuffing because it’s lightweight, washable, and readily available. Cotton balls are a good alternative if you’re looking for a more natural option. You can also use fabric scraps, but be sure to cut them into small pieces to avoid lumps. The key is to use a stuffing material that is soft and pliable, allowing you to shape the strawberry nicely.
How do I attach the keychain ring securely?
The best way to attach the keychain ring securely is to create a loop at the top of the strawberry using a sturdy piece of felt or fabric. Sew this loop securely to the top of the strawberry, reinforcing the stitches multiple times. You can also use a metal eyelet or grommet for added durability. Ensure the loop is large enough to accommodate the keychain ring or clip.
Can I make these strawberry keychains with kids?
Absolutely! This is a great craft project to do with kids. However, adult supervision is recommended, especially when using sharp objects like scissors and needles. You can simplify the design for younger children by using pre-cut felt shapes or by having them decorate the strawberry with markers or paint instead of sewing.
How do I clean my strawberry keychain?
If your strawberry keychain gets dirty, you can gently spot clean it with a damp cloth and mild soap. Avoid soaking the keychain in water, as this can damage the stuffing and cause the colors to bleed. For felt keychains, it’s best to air dry them to prevent shrinkage. If you’ve used beads or other embellishments, be extra careful when cleaning to avoid dislodging them.
What if I don’t have felt? What other materials can I use?
If you don’t have felt, you can use a variety of other materials, such as fleece, cotton fabric, denim, or even repurposed clothing. The key is to choose a material that is relatively easy to work with and that won’t fray easily. You can also use leather or faux leather for a more durable and sophisticated look.
How can I make my strawberry keychain more durable?
To make your strawberry keychain more durable, use high-quality materials and reinforce the seams with multiple rows of stitching. Consider using a thicker fabric, such as denim or leather, for the outer layer. You can also add a layer of interfacing to the felt to give it more structure and prevent it from stretching. Finally, be sure to attach the keychain ring securely using a strong loop and reinforced stitching.
Where can I find inspiration for different strawberry keychain designs?
You can find inspiration for different strawberry keychain designs on websites like Pinterest, Etsy, and Instagram. Search for “strawberry keychain DIY” or “felt strawberry keychain” to find a wealth of ideas and tutorials. You can also browse craft blogs and YouTube channels for step-by-step instructions and creative inspiration. Don’t be afraid to experiment and put your own spin on the designs you find!

Leave a Comment