

Remove Water Rings Wood – those dreaded white circles that seem to appear on our beloved wooden furniture like uninvited guests! Have you ever set a cold glass down, only to discover later that it’s left behind a ghostly reminder of its presence? I know I have, and the frustration is real. But don’t despair! This isn’t a sign of irreversible damage; it’s simply moisture trapped beneath the finish.
For generations, wood has been a cherished material, gracing our homes with its warmth and beauty. From antique tables passed down through families to modern, minimalist designs, wood furniture holds a special place in our lives. But with that beauty comes the responsibility of care, and water rings are a common woe. These rings aren’t just unsightly; they can detract from the overall value and appeal of your furniture.
That’s why I’m so excited to share these simple, effective DIY tricks to remove water rings wood and restore your furniture to its former glory. Forget expensive furniture restorers or harsh chemicals! These methods use common household items you probably already have on hand. I’ll walk you through each step, ensuring you can confidently tackle those pesky rings and keep your wood furniture looking its best for years to come. Let’s get started and say goodbye to those water rings forever!
DIY Water Ring Removal from Wood Furniture: A Comprehensive Guide
Hey there, fellow DIY enthusiasts! Water rings on wood furniture – the bane of our existence, right? I’ve battled these pesky circles for years, and after much trial and error, I’ve compiled a list of tried-and-true methods that actually work. Forget expensive furniture restorers; let’s tackle this ourselves!
Understanding the Enemy: What Causes Water Rings?
Before we dive into the solutions, let’s understand what we’re dealing with. Water rings, those ghostly white circles, are usually caused by moisture trapped *under* the finish of your wood furniture. The heat from a mug or glass forces the moisture to condense, creating that cloudy appearance. The good news is, because the damage is often superficial, we can usually fix it without stripping and refinishing the entire piece.
Method 1: The Hair Dryer Heat Treatment
This is my go-to method for fresh, relatively light water rings. It’s gentle and often surprisingly effective.
What You’ll Need:
* A hair dryer
* A soft, clean cloth (microfiber is ideal)
Step-by-Step Instructions:
1. Prepare the Area: Make sure the surface of your furniture is clean and dry. Wipe away any spills or debris with a clean, dry cloth. You don’t want to trap any extra moisture under the heat.
2. Heat Application: Set your hair dryer to its lowest heat setting. Hold it a few inches away from the water ring.
3. Gentle Heating: Move the hair dryer back and forth over the ring in a slow, even motion. Don’t concentrate the heat in one spot, as this could damage the finish.
4. Observe and Repeat: Keep an eye on the water ring. You should start to see it fade as the heat evaporates the trapped moisture. This might take a few minutes, so be patient.
5. Wipe Away Moisture: As the ring fades, gently wipe the area with your clean, soft cloth. This helps to absorb any remaining moisture.
6. Repeat if Necessary: If the ring doesn’t disappear completely after the first try, repeat the process a few more times. Allow the wood to cool down completely between each attempt.
7. Buff to Shine: Once the ring is gone, buff the area with a clean, dry cloth to restore the shine.
Important Note: Be extremely careful not to overheat the wood. If you notice any discoloration or the finish starts to bubble, stop immediately!
Method 2: The Iron and Cloth Trick
This method uses gentle heat and pressure to draw out the moisture. It’s a bit more aggressive than the hair dryer, so proceed with caution.
What You’ll Need:
* An iron (dry, no steam!)
* A clean, cotton cloth (an old t-shirt works great)
* Water (optional, for stubborn rings)
Step-by-Step Instructions:
1. Prepare the Cloth: Fold the cotton cloth into several layers to create a thick pad. This will protect the wood from direct heat.
2. Position the Cloth: Place the folded cloth directly over the water ring.
3. Heat the Iron: Set your iron to its lowest heat setting. Make sure the steam function is turned OFF. We want dry heat only!
4. Iron the Cloth: Gently press the iron onto the cloth over the water ring. Use a circular motion and avoid holding the iron in one spot for too long.
5. Check Progress: Lift the cloth periodically to check if the ring is fading.
6. Repeat as Needed: Repeat the ironing process for short intervals, checking the progress each time.
7. For Stubborn Rings (Optional): If the ring is particularly stubborn, you can *very lightly* dampen the cloth with water. Make sure the cloth is only slightly damp, not soaking wet. The moisture will help to draw out the trapped water.
8. Buff to Shine: Once the ring is gone, buff the area with a clean, dry cloth to restore the shine.
Important Note: Always use a low heat setting and avoid direct contact between the iron and the wood. Too much heat can damage the finish.
Method 3: The Mayonnaise Miracle
Yes, you read that right! Mayonnaise contains oils that can help to displace the trapped moisture and restore the finish. This method sounds crazy, but I’ve seen it work wonders!
What You’ll Need:
* Mayonnaise (full-fat is best)
* A soft, clean cloth
* A plastic scraper or spoon (optional)
Step-by-Step Instructions:
1. Apply the Mayonnaise: Generously apply a thick layer of mayonnaise directly onto the water ring.
2. Let it Sit: Allow the mayonnaise to sit on the ring for at least an hour, or even overnight for stubborn rings. The longer it sits, the better chance it has of working.
3. Remove the Mayonnaise: Use a soft cloth or a plastic scraper to gently remove the mayonnaise.
4. Wipe Clean: Wipe the area clean with a damp cloth to remove any remaining mayonnaise residue.
5. Buff to Shine: Buff the area with a clean, dry cloth to restore the shine.
Important Note: Don’t use mayonnaise on delicate or antique furniture without testing it in an inconspicuous area first.
Method 4: The Toothpaste Technique
This method uses a mild abrasive to gently buff away the water ring. It’s best suited for light rings on durable finishes.
What You’ll Need:
* Non-gel toothpaste (plain white toothpaste)
* A soft, clean cloth
Step-by-Step Instructions:
1. Apply the Toothpaste: Apply a small amount of toothpaste to a soft, clean cloth.
2. Gently Rub: Gently rub the toothpaste onto the water ring in a circular motion. Use light pressure and avoid scrubbing too hard.
3. Wipe Clean: Wipe away the toothpaste with a damp cloth.
4. Buff to Shine: Buff the area with a clean, dry cloth to restore the shine.
Important Note: Test the toothpaste in an inconspicuous area first to make sure it doesn’t scratch the finish. Avoid using gel toothpaste or toothpaste with whitening agents, as these can be too abrasive.
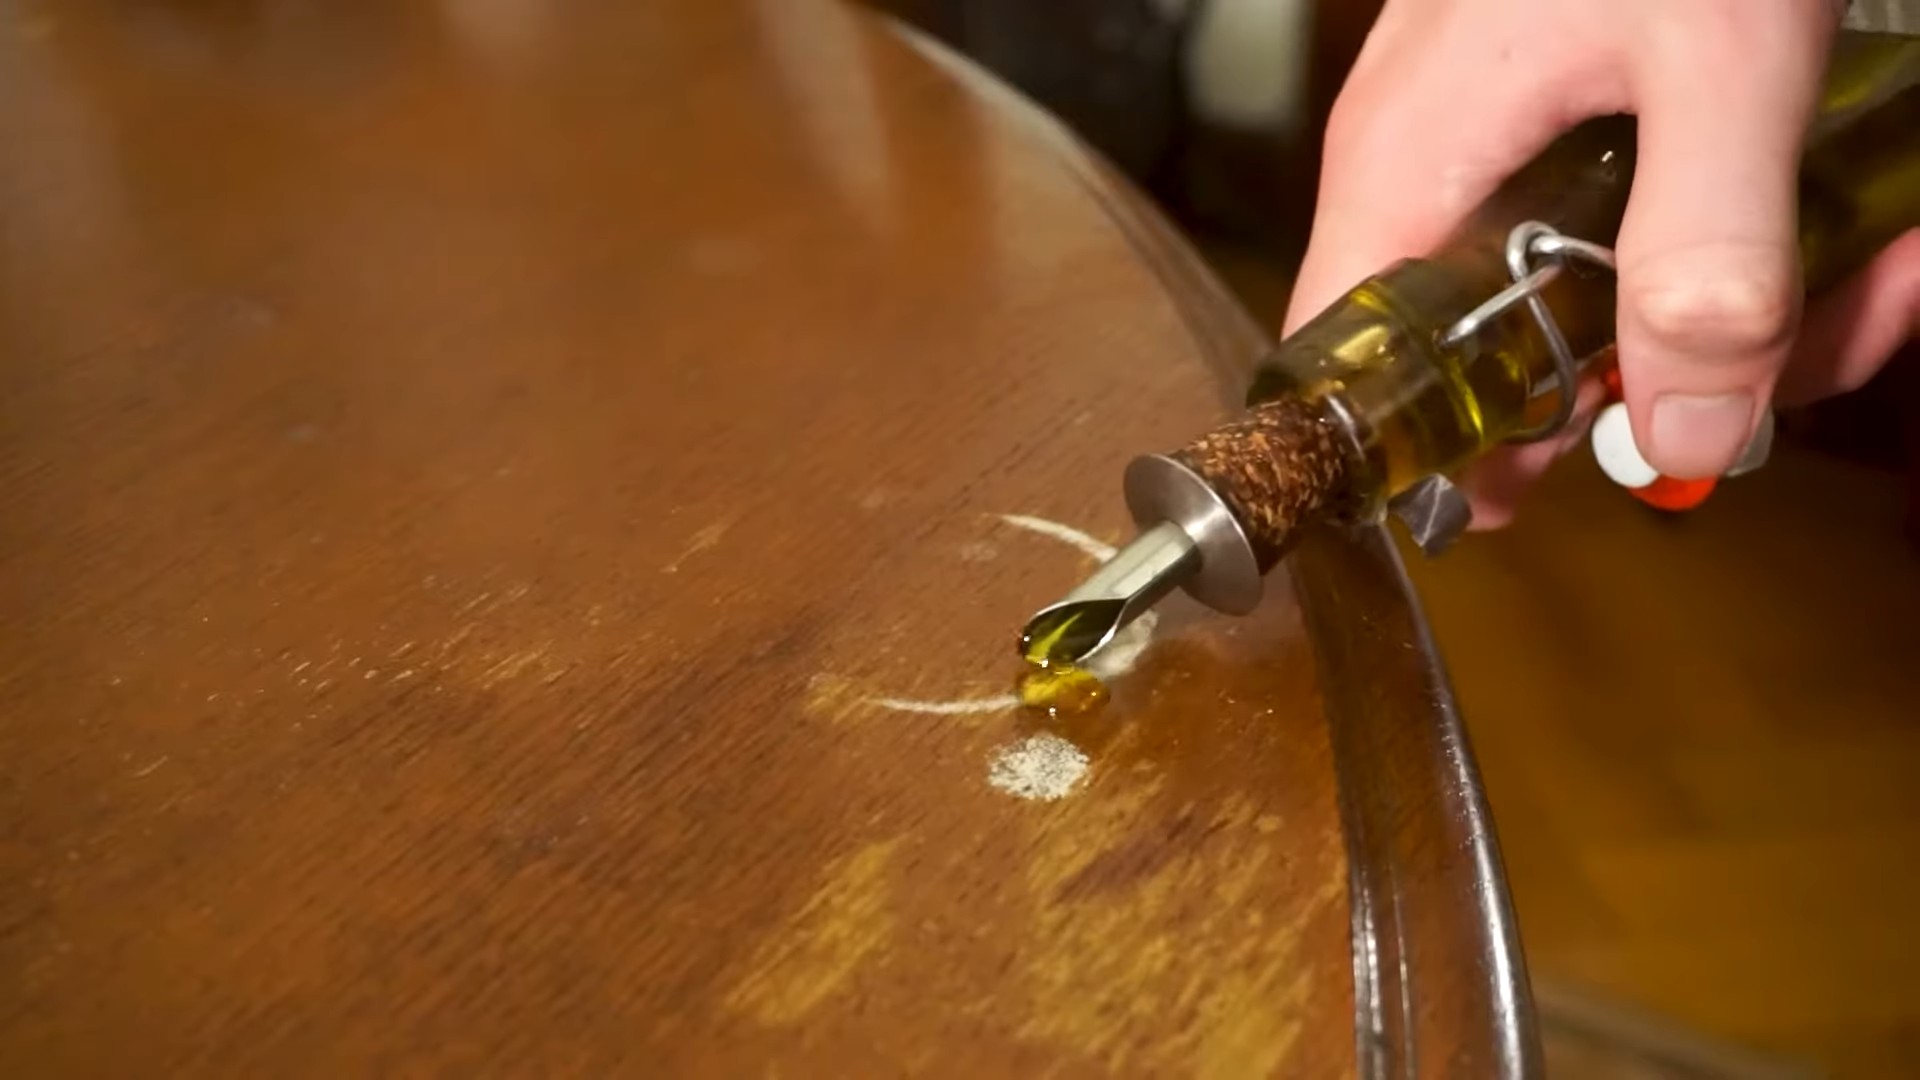
Method 5: The Olive Oil and Salt Paste
This is another abrasive method, but the olive oil helps to lubricate the surface and prevent scratching.
What You’ll Need:
* Olive oil
* Salt (fine table salt)
* A soft, clean cloth
Step-by-Step Instructions:
1. Make a Paste: Mix equal parts olive oil and salt to create a thick paste.
2. Apply the Paste: Apply the paste to the water ring.
3. Gently Rub: Gently rub the paste onto the water ring in a circular motion. Use light pressure.
4. Wipe Clean: Wipe away the paste with a damp cloth.
5. Buff to Shine: Buff the area with a clean, dry cloth to restore the shine.
Important Note: As with the toothpaste method, test this in an inconspicuous area first.
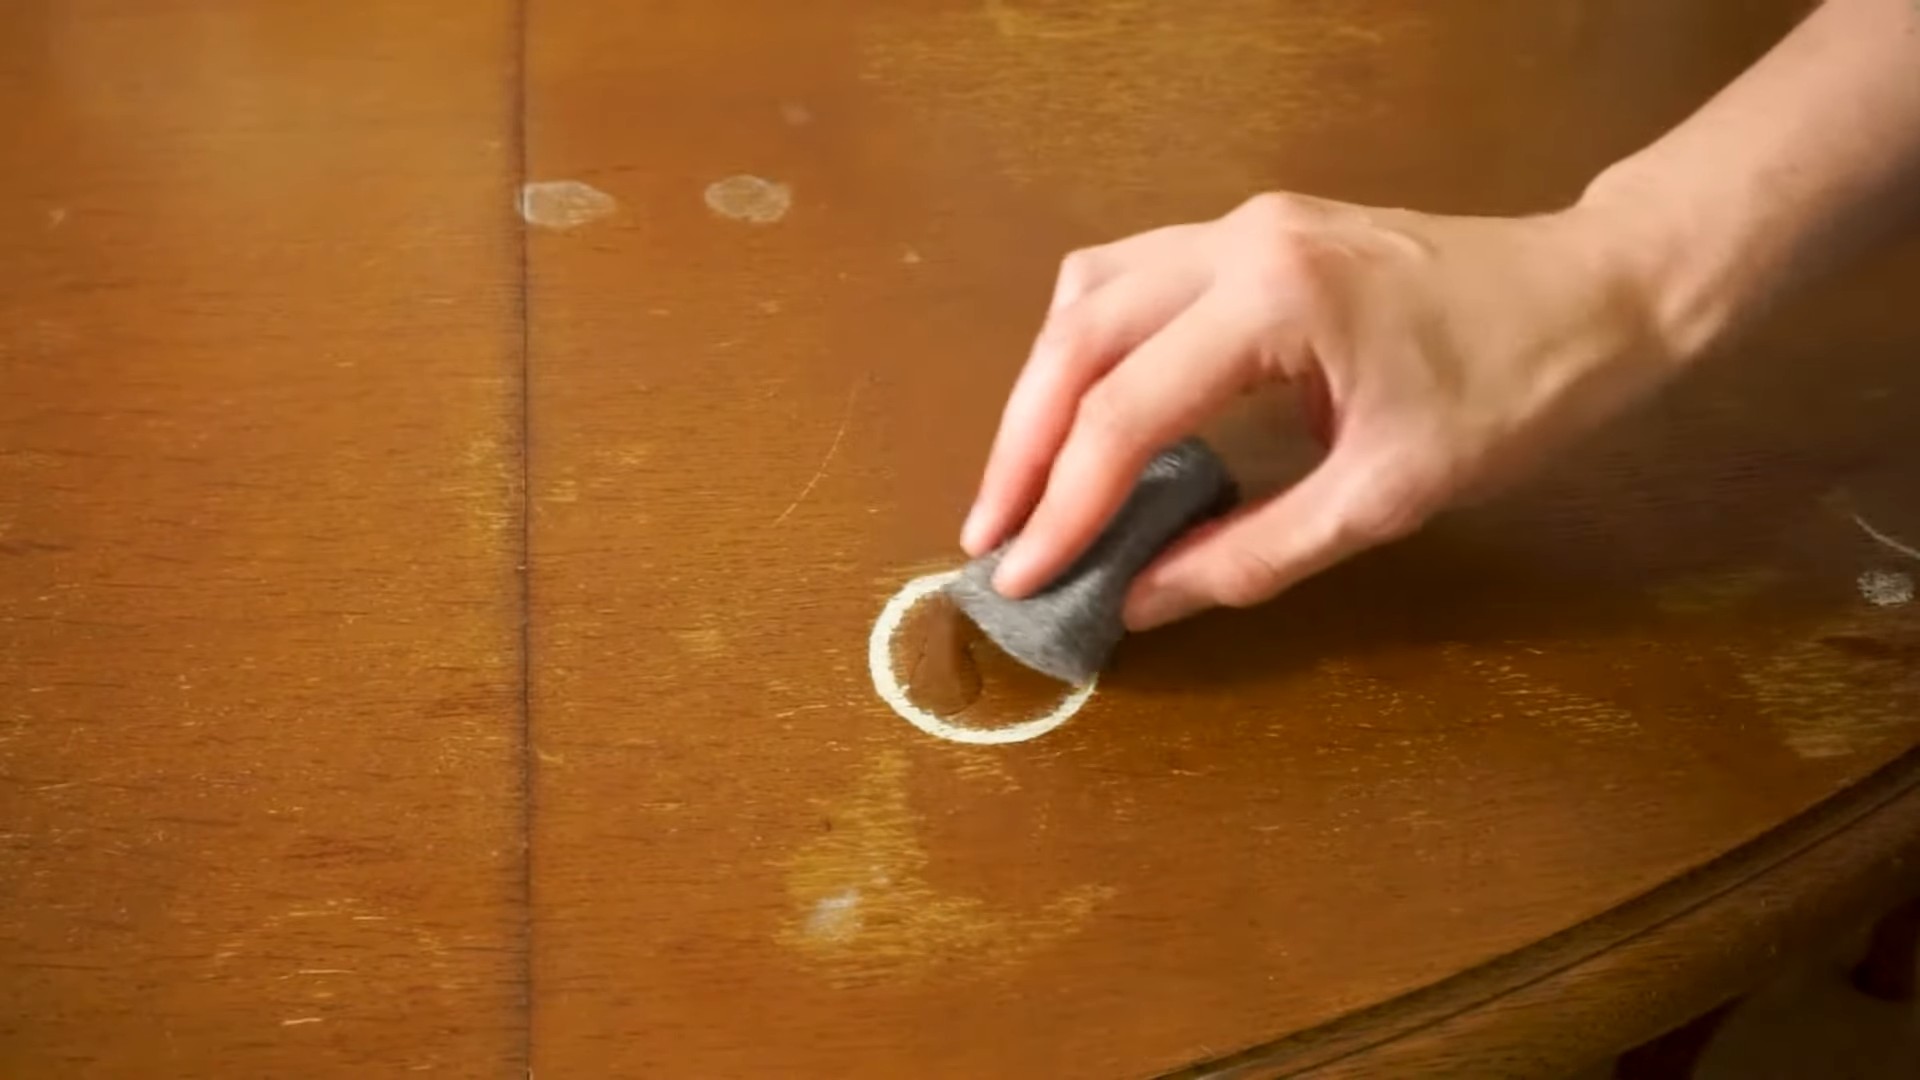
Method 6: Steel Wool (For Lacquered Finishes ONLY!)
WARNING: This method is only for furniture with a lacquered finish. Using steel wool on other types of finishes can cause irreparable damage. If you’re unsure what type of finish your furniture has, DO NOT use this method.
This method uses very fine steel wool to gently buff away the water ring. It’s a last resort for stubborn rings on lacquered finishes.
What You’ll Need:
* 0000-grade steel wool (the finest grade available)
* Furniture polish or wax
Step-by-Step Instructions:
1. Apply Polish/Wax: Apply a small amount of furniture polish or wax to the water ring. This will lubricate the surface and prevent scratching.
2. Gently Buff: Gently buff the water ring with the steel wool in a circular motion. Use very light pressure.
3. Wipe Clean: Wipe away any residue with a clean, soft cloth.
4. Apply More Polish/Wax: Apply another coat of furniture polish or wax to protect the finish.
5. Buff to Shine: Buff the area with a clean, dry cloth to restore the shine.
Important Note: This method is risky and should only be used as a last resort. Test it in an inconspicuous area first.
Prevention is Key: Protecting Your Furniture
Of course, the best way to deal with water rings is to prevent them in the first place! Here are a few tips:
* Use Coasters: Always use coasters under drinks, hot dishes, and anything that could
Conclusion
So, there you have it! Removing water rings from wood furniture doesn’t have to involve expensive products or professional help. This simple, effective DIY trick, using items you likely already have in your home, offers a fantastic solution to those unsightly blemishes that can detract from the beauty of your cherished wooden pieces.
Why is this a must-try? Because it’s gentle, affordable, and, most importantly, it works! Unlike harsh chemicals that can strip the finish or damage the wood, this method relies on the power of heat and a soft cloth to draw out the trapped moisture causing the ring. It’s a low-risk, high-reward approach that can save you time, money, and the potential heartache of damaging your furniture further.
But the beauty of this DIY solution lies not only in its simplicity but also in its adaptability. While the iron and cloth method is a great starting point, feel free to experiment with variations to suit your specific needs and the type of wood you’re working with. For instance, if you’re dealing with a particularly stubborn ring, you might try adding a thin layer of petroleum jelly under the cloth before applying heat. The petroleum jelly can help to further draw out the moisture and protect the wood’s finish. Another option, especially for delicate antique furniture, is to use a hairdryer on a low setting instead of an iron. This provides a gentler heat source and reduces the risk of scorching. Remember to always test any variation on an inconspicuous area of the furniture first to ensure compatibility.
Don’t let those water rings continue to mar the beauty of your wooden furniture. Take a few minutes, gather your supplies, and give this DIY trick a try. You’ll be amazed at how easily you can restore your furniture to its former glory. We’re confident that you’ll find this method incredibly effective in removing water rings from wood.
And now, we want to hear from you! Have you tried this method? Did you discover any helpful variations? Share your experiences, tips, and before-and-after photos in the comments below. Your insights can help other readers achieve even better results and keep their wooden furniture looking its best. Let’s build a community of DIY enthusiasts who are passionate about preserving the beauty of wood!
Frequently Asked Questions (FAQs)
What causes water rings on wood furniture?
Water rings are caused by moisture becoming trapped beneath the finish of the wood. When a cold or damp object is placed on a wooden surface, condensation forms. This moisture can seep through the finish and become trapped in the wood’s pores, creating a cloudy or white ring. The heat from the iron helps to draw this trapped moisture back out of the wood.
What types of wood is this DIY trick suitable for?
This method is generally safe for most types of finished wood, including hardwoods like oak, maple, and cherry, as well as softer woods like pine. However, it’s always crucial to test the method on an inconspicuous area first, especially if you’re dealing with antique or delicate furniture. Different finishes react differently to heat, so a test spot will help you determine if the method is suitable for your specific piece. Avoid using this method on unfinished wood, as it may cause further damage.
What if the water ring is very old or stubborn?
Older, more stubborn water rings may require multiple applications of the heat and cloth method. Be patient and persistent. You can also try the petroleum jelly variation mentioned earlier. If the ring persists after several attempts, you might consider consulting a professional furniture restorer. They have specialized tools and techniques for dealing with more severe water damage.
Can I use a steamer instead of an iron?
While a steamer might seem like a good alternative, it’s generally not recommended for removing water rings from wood. Steamers produce a lot of moisture, which could potentially worsen the problem. The goal is to draw out the existing moisture, not add more. The dry heat from an iron is much more effective and less risky.
What kind of cloth should I use?
A clean, soft cotton cloth is ideal. An old t-shirt or a lint-free cleaning cloth works well. Avoid using abrasive cloths or paper towels, as they can scratch the finish of the wood. The cloth should be thick enough to protect the wood from direct contact with the iron but thin enough to allow the heat to penetrate.
How hot should the iron be?
Use a low to medium heat setting on your iron. You don’t want to scorch the wood or damage the finish. Start with the lowest setting and gradually increase the heat if necessary. Always keep the iron moving and avoid leaving it in one spot for too long.
How long should I apply the heat?
Apply the heat in short bursts, typically 10-15 seconds at a time. Check the progress frequently. You should see the water ring gradually fading. If you don’t see any improvement after a few attempts, try increasing the heat slightly or adding a thin layer of petroleum jelly under the cloth.
What if the water ring comes back after a few days?
If the water ring reappears, it means that some moisture is still trapped in the wood. Repeat the heat and cloth method until the ring is completely gone. You may also want to consider using a dehumidifier in the room to reduce the overall humidity level.
Can I use this method on other types of stains?
While this method is primarily designed for removing water rings, it may also be effective on other types of moisture-related stains, such as those caused by spills or condensation. However, it’s not likely to work on oil-based stains or stains caused by dyes or pigments.
How can I prevent water rings from forming in the future?
The best way to prevent water rings is to use coasters or placemats under all drinks and other items that could potentially leave moisture on the wood. You can also apply a protective furniture polish or wax to create a barrier against moisture. Regular cleaning and maintenance can also help to keep your wooden furniture looking its best.
What if I accidentally damage the finish while trying this method?
If you accidentally damage the finish, don’t panic. Minor scratches or blemishes can often be repaired with furniture polish or touch-up markers. For more serious damage, you may need to consult a professional furniture restorer.
Is there a specific type of petroleum jelly that works best?
Plain, unscented petroleum jelly is the best option. Avoid using petroleum jelly with added fragrances or dyes, as these could potentially stain the wood. A thin layer is all you need to help draw out the moisture.
What are some other DIY methods for removing water rings?
Besides the iron and cloth method, some other DIY methods include using mayonnaise, toothpaste, or baking soda paste. However, these methods can be more abrasive and may not be suitable for all types of wood. Always test any method on an inconspicuous area first. The iron and cloth method is generally considered the safest and most effective DIY option for removing water rings from wood.
Leave a Comment