

Living Room Deep Cleaning Guide: Is your living room feeling less like a sanctuary and more like a stress zone? I get it! Life gets busy, and the living room, the heart of our homes, often bears the brunt of it all. From rogue crumbs hiding in the sofa crevices to dust bunnies staging a takeover under the coffee table, it’s easy for this space to lose its sparkle. But don’t despair! You don’t need to spend a fortune on professional cleaners to reclaim your living room’s pristine glory.
Historically, the concept of a “living room” as a dedicated space for relaxation and socializing is relatively modern, evolving from more formal parlors and drawing rooms. Today, it’s where we unwind, entertain, and connect with loved ones. That’s why keeping it clean and inviting is so important for our overall well-being.
This Living Room Deep Cleaning Guide is packed with easy-to-follow DIY tricks and hacks that will transform your space from drab to fab. I’ll show you how to tackle even the most stubborn stains, banish dust for good, and create a living room that’s not only clean but also a joy to be in. Ready to roll up your sleeves and rediscover the joy of a sparkling clean living room? Let’s get started!

Living Room Deep Cleaning: My Ultimate DIY Guide to a Sparkling Space
Okay, friends, let’s face it: our living rooms are the heart of our homes. They’re where we relax, entertain, and spend quality time with loved ones. But all that living can lead to some serious grime! Don’t worry, I’m here to guide you through a deep clean that will leave your living room feeling fresh, inviting, and oh-so-sparkling. Grab your cleaning supplies, put on some music, and let’s get started!
Phase 1: Preparation is Key!
Before we dive into the nitty-gritty, let’s get organized. This will save you time and frustration in the long run.
- Gather Your Supplies: I like to have everything within reach before I start. Here’s my go-to list:
- Microfiber cloths (lots of them!)
- All-purpose cleaner
- Glass cleaner
- Wood cleaner (if you have wood furniture)
- Upholstery cleaner (appropriate for your furniture type)
- Vacuum cleaner with attachments
- Baking soda
- White vinegar
- Dish soap
- Bucket
- Spray bottles
- Duster (extendable is great for high places)
- Cleaning gloves
- Old toothbrush (for those hard-to-reach spots)
- Magic Eraser (for scuff marks)
- Declutter, Declutter, Declutter: Seriously, this is the most important step! Remove anything that doesn’t belong in the living room. Put away toys, books, magazines, and anything else that’s cluttering up the space. This will make the actual cleaning process much easier.
- Open the Windows: Fresh air is your friend! Opening the windows will help ventilate the room and get rid of any lingering odors.
- Protect Your Floors: If you’re using any harsh chemicals, consider protecting your floors with a drop cloth or old towels.
Phase 2: High to Low – Dusting and Cobweb Removal
We always start from the top down to avoid re-dusting areas we’ve already cleaned.
- Ceiling Fans and Light Fixtures: Use an extendable duster to reach ceiling fans and light fixtures. Make sure the fan is turned off before you start! For light fixtures, you might need to remove the shades and wash them with warm, soapy water. Let them dry completely before putting them back on.
- Crown Molding and Trim: Dust along the crown molding and trim using a microfiber cloth or duster. You can also use a vacuum cleaner with a brush attachment.
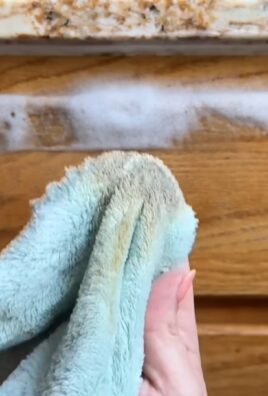
- Walls: Dust the walls with a microfiber cloth or duster. If you have any scuff marks, try using a Magic Eraser. Be gentle, as Magic Erasers can be abrasive. For greasy spots, you can use a damp cloth with a little dish soap.
- Shelves and Bookcases: Remove everything from the shelves and bookcases. Dust the shelves and items individually. This is a great opportunity to declutter and get rid of anything you don’t need or want.
- Window Treatments: Dust curtains or blinds. For curtains, you can use a vacuum cleaner with a brush attachment or take them down and wash them according to the care instructions. For blinds, you can use a damp cloth or a blind cleaner.
Phase 3: Furniture Facelift
Now, let’s tackle the furniture. This is where things can get a little more involved, but the results are so worth it!
- Vacuum Upholstery: Use the upholstery attachment on your vacuum cleaner to vacuum all surfaces of your sofas, chairs, and ottomans. Pay special attention to crevices and seams where dust and crumbs tend to accumulate.
- Spot Clean Stains: Address any stains on your upholstery. Use an upholstery cleaner that’s appropriate for your furniture type. Always test the cleaner in an inconspicuous area first to make sure it doesn’t damage the fabric. Follow the instructions on the cleaner carefully. For general stains, a mixture of mild dish soap and water can often do the trick.
- Deodorize Upholstery: Sprinkle baking soda liberally over your upholstery and let it sit for at least 30 minutes (or even overnight for stubborn odors). Then, vacuum up the baking soda. This will help absorb odors and leave your furniture smelling fresh.
- Clean Wood Furniture: Use a wood cleaner to clean any wood furniture, such as coffee tables, end tables, and entertainment centers. Follow the instructions on the cleaner carefully. You can also use a mixture of olive oil and lemon juice to polish wood furniture.
- Leather Furniture Care: If you have leather furniture, use a leather cleaner and conditioner to keep it looking its best. Follow the instructions on the cleaner and conditioner carefully.
Phase 4: Window Wonders
Sparkling windows can make a huge difference in the overall look and feel of your living room.
- Clean the Inside of the Windows: Spray the inside of your windows with glass cleaner and wipe them clean with a microfiber cloth. Use a clean, dry cloth to buff the windows for a streak-free shine.
- Clean the Outside of the Windows: If possible, clean the outside of your windows as well. You can use a garden hose to rinse off any dirt and debris. Then, spray the windows with glass cleaner and wipe them clean with a microfiber cloth.
- Clean Window Sills and Frames: Wipe down the window sills and frames with a damp cloth. You can use a little dish soap to remove any stubborn dirt or grime.
Phase 5: Floor Focus
Finally, let’s give those floors some love!
- Vacuum or Sweep: Vacuum or sweep the entire floor to remove any loose dirt, dust, and debris. Pay special attention to corners and edges.
- Mop Hard Floors: Mop hard floors with a floor cleaner that’s appropriate for your floor type. Follow the instructions on the cleaner carefully. For wood floors, use a wood floor cleaner to avoid damaging the finish. I like to use a microfiber mop for a streak-free clean.
- Clean Carpets and Rugs: If you have carpets or rugs, consider steam cleaning them to remove deep-down dirt and stains. You can rent a steam cleaner from a local hardware store or hire a professional carpet cleaner. If you’re spot cleaning, always test the cleaner in an inconspicuous area first.
Phase 6: The Finishing Touches
Almost there! These final steps will really bring your living room to life.
- Arrange Furniture: Once everything is clean, arrange your furniture in a way that’s both functional and aesthetically pleasing. Experiment with different layouts to find what works best for you.
- Fluff Pillows and Throws: Fluff your pillows and throws to make your living room feel cozy and inviting.
- Add Accessories: Add accessories, such as lamps, candles, and plants, to personalize your space.
- Empty Trash Cans: Don’t forget to empty the trash cans!
- Enjoy Your Sparkling Living Room! Take a step back and admire your hard work. You deserve it!
Bonus Tip: Maintaining the Sparkle
The key to keeping your living room clean is to maintain it regularly. Here are a few tips:
- Daily: Quickly tidy up any clutter and wipe down surfaces.
- Weekly: Vacuum or sweep the floors and dust the furniture.
- Monthly: Deep clean one area of the living room, such as the windows or the upholstery.
By following these tips, you can keep your living room looking its best all year round! Happy cleaning!

Conclusion
So, there you have it! Transforming your living room from a haven of dust bunnies and lingering odors to a sparkling sanctuary is entirely within your reach. This deep cleaning guide isn’t just about tidying up; it’s about reclaiming your space and creating an environment that promotes relaxation, productivity, and overall well-being. We’ve covered everything from decluttering strategies to tackling those often-overlooked areas like light fixtures and upholstery.
The beauty of this comprehensive approach is its adaptability. Feel free to tailor the steps to suit your specific needs and preferences. Perhaps you’re a minimalist who thrives on simplicity – focus on decluttering and surface cleaning. Or maybe you’re a detail-oriented individual who enjoys the satisfaction of a truly deep clean – embrace the more intensive tasks like carpet shampooing and window washing.
Don’t be afraid to experiment with variations on the suggested cleaning solutions. If you’re sensitive to strong scents, opt for natural alternatives like vinegar and baking soda. For stubborn stains, consider using a specialized stain remover or consulting a professional cleaning service. The key is to find what works best for you and your living room.
Remember, a deep clean isn’t a one-time event; it’s an ongoing process. By incorporating these techniques into your regular cleaning routine, you can maintain a consistently clean and inviting living room. Aim for a mini-deep clean every few months to prevent dirt and grime from accumulating.
This Living Room Deep Cleaning Guide is your roadmap to a fresher, healthier, and more enjoyable living space. It’s an investment in your home and your well-being. The feeling of stepping into a meticulously cleaned living room is truly unparalleled.
We wholeheartedly encourage you to put this guide into action. Don’t be intimidated by the prospect of a deep clean; break it down into manageable tasks and tackle one area at a time. The results will be well worth the effort.
And most importantly, we want to hear about your experience! Share your before-and-after photos, your favorite cleaning tips, and any challenges you encountered along the way. Your feedback will not only inspire others but also help us refine this guide to make it even more effective. Let’s create a community of clean living enthusiasts! So, grab your cleaning supplies, put on some music, and get ready to transform your living room into the sanctuary you deserve. Happy cleaning!
Frequently Asked Questions (FAQs)
Q: How often should I deep clean my living room?
A: The frequency of deep cleaning your living room depends on several factors, including the amount of foot traffic, the presence of pets or children, and your personal preferences. As a general guideline, aim for a deep clean every 3-6 months. However, if your living room experiences heavy use or is prone to dirt and grime, you may want to deep clean it more frequently, perhaps every 2-3 months. Regular maintenance cleaning, such as vacuuming, dusting, and spot cleaning, should be performed weekly to prevent dirt from accumulating and to maintain a clean and healthy environment.
Q: What’s the best way to declutter my living room before deep cleaning?
A: Decluttering is a crucial first step in any deep cleaning process. Start by removing any items that don’t belong in the living room, such as toys, books, or clothing. Next, sort through your belongings and identify items that you no longer need or use. Consider donating, selling, or discarding these items. Organize the remaining items into categories and find appropriate storage solutions for them. Use baskets, shelves, and cabinets to keep clutter out of sight. Finally, establish a habit of regularly decluttering your living room to prevent clutter from accumulating in the future. A good rule of thumb is the “one in, one out” rule: for every new item you bring into the living room, remove one old item.
Q: What are some eco-friendly cleaning solutions I can use in my living room?
A: There are many eco-friendly cleaning solutions that you can use to deep clean your living room without harming the environment or your health. Vinegar is a versatile cleaner that can be used to clean windows, floors, and countertops. Baking soda is a natural deodorizer and abrasive cleaner that can be used to remove stains and odors. Lemon juice is a natural disinfectant and degreaser. Essential oils, such as tea tree oil and lavender oil, can be added to cleaning solutions for their antibacterial and antifungal properties. When purchasing cleaning products, look for those that are labeled as “eco-friendly,” “biodegradable,” or “non-toxic.” Avoid products that contain harsh chemicals, such as bleach, ammonia, and phosphates.
Q: How do I clean upholstery without damaging it?
A: Cleaning upholstery requires caution to avoid damaging the fabric. Before cleaning, check the manufacturer’s instructions for specific cleaning recommendations. Vacuum the upholstery thoroughly to remove loose dirt and debris. Spot clean any stains with a mild detergent and water. Test the cleaning solution on an inconspicuous area of the upholstery first to ensure that it doesn’t cause discoloration or damage. For more thorough cleaning, consider using a steam cleaner or hiring a professional upholstery cleaner. Avoid using harsh chemicals or abrasive cleaners, as these can damage the fabric.
Q: How can I remove pet odors from my living room?
A: Pet odors can be a challenge to remove from a living room, but there are several effective methods you can try. Start by vacuuming the carpets and upholstery thoroughly to remove pet hair and dander. Sprinkle baking soda on the carpets and upholstery, let it sit for several hours, and then vacuum it up. Use an enzymatic cleaner to neutralize pet odors. These cleaners contain enzymes that break down the odor-causing molecules. Wash pet bedding regularly. Open windows and doors to ventilate the living room and allow fresh air to circulate. Consider using an air purifier with a HEPA filter to remove pet odors and allergens from the air.
Q: What’s the best way to clean hardwood floors in my living room?
A: Cleaning hardwood floors requires a gentle approach to avoid scratching or damaging the finish. Vacuum or sweep the floors regularly to remove loose dirt and debris. Use a damp mop with a mild hardwood floor cleaner to clean the floors. Avoid using excessive water, as this can damage the wood. Dry the floors thoroughly after mopping. Avoid using abrasive cleaners, wax-based cleaners, or steam cleaners, as these can damage the finish. Place mats or rugs in high-traffic areas to protect the floors from scratches and wear.
Q: How do I clean windows and mirrors without streaks?
A: Achieving streak-free windows and mirrors requires the right technique and cleaning solution. Use a microfiber cloth to clean the glass. Avoid using paper towels, as they can leave lint behind. Use a mixture of equal parts water and white vinegar as a cleaning solution. Alternatively, you can use a commercial glass cleaner. Spray the cleaning solution onto the glass and wipe it down with the microfiber cloth. Use a second dry microfiber cloth to buff the glass and remove any streaks. Clean windows and mirrors on a cloudy day to prevent the cleaning solution from drying too quickly and leaving streaks.
Q: What are some often-overlooked areas in the living room that need deep cleaning?
A: Many areas in the living room are often overlooked during regular cleaning, but they can accumulate dirt and grime over time. These include:
* **Light fixtures:** Dust and clean light fixtures regularly to improve their brightness and efficiency.
* **Baseboards:** Wipe down baseboards to remove dust and dirt.
* **Window treatments:** Wash or dry clean curtains and blinds to remove dust and allergens.
* **Electronics:** Dust and clean electronic devices, such as televisions, stereos, and gaming consoles.
* **Remote controls:** Disinfect remote controls to kill germs and bacteria.
* **Plants:** Dust and water houseplants regularly.
* **Door handles and light switches:** Disinfect door handles and light switches to kill germs and bacteria.
Q: How can I maintain a clean living room after deep cleaning?
A: Maintaining a clean living room after deep cleaning requires establishing a regular cleaning routine. Vacuum or sweep the floors weekly. Dust surfaces regularly. Spot clean any spills or stains immediately. Declutter the living room regularly to prevent clutter from accumulating. Encourage family members to help keep the living room clean. By incorporating these habits into your daily routine, you can maintain a consistently clean and inviting living room.

Leave a Comment