

Indoor Succulents Home Decor: Ready to transform your living space into a vibrant, green oasis? I’m thrilled to share some amazing DIY tricks and hacks that will help you create stunning succulent arrangements and displays, even if you don’t have a green thumb! For centuries, succulents have been cherished for their unique beauty and resilience, adorning homes and gardens across various cultures. From the ancient Egyptians who used aloe vera for its medicinal properties to the modern-day enthusiasts who appreciate their low-maintenance charm, succulents have always held a special place in our hearts.
But let’s face it, sometimes keeping these little beauties thriving indoors can be a bit tricky. That’s where these DIY tricks come in! I’ll show you how to choose the right containers, create the perfect soil mix, and even propagate new succulents from cuttings. Imagine having a beautiful, thriving collection of indoor succulents home decor that not only adds a touch of nature to your space but also purifies the air and boosts your mood. Whether you’re a seasoned plant parent or just starting your succulent journey, these tips will empower you to create stunning displays that will impress your friends and family. Let’s get started and unlock the secrets to successful indoor succulent gardening!

DIY Indoor Succulent Garden: A Beginner’s Guide to Green Bliss
Hey there, fellow plant enthusiasts! Are you looking to add a touch of green to your home without the fuss of high-maintenance plants? Well, you’ve come to the right place! Today, I’m going to walk you through creating your very own indoor succulent garden. Succulents are fantastic because they’re incredibly resilient, come in a dazzling array of shapes and colors, and require minimal watering. Trust me, even if you think you have a black thumb, you can totally rock this!
What You’ll Need: Gathering Your Supplies
Before we dive in, let’s make sure we have everything we need. This will save you from running back and forth to the store mid-project (been there, done that!).
* A Container: This is where your succulents will call home. You can use almost anything – a terracotta pot, a ceramic bowl, a wooden box, even an old teacup! Just make sure it has drainage holes, or be prepared to add a drainage layer (more on that later). I personally love using repurposed items for a rustic, unique look.
* Succulent Soil: This is crucial! Regular potting soil retains too much moisture and can lead to root rot, which is a succulent’s worst enemy. You can buy pre-mixed succulent and cactus soil at most garden centers. Alternatively, you can make your own by mixing equal parts potting soil, coarse sand (like builder’s sand, not play sand), and perlite or pumice.
* Succulents: The stars of the show! Choose a variety of succulents with different shapes, colors, and textures to create visual interest. Some of my favorites include Echeverias, Sedums, Haworthias, and Aloes. Local nurseries and even some big box stores have a great selection.
* Drainage Material (Optional): If your container doesn’t have drainage holes, you’ll need a layer of gravel, pebbles, or broken pottery shards to create drainage at the bottom.
* Top Dressing (Optional): This is a layer of decorative material that goes on top of the soil. It can be gravel, pebbles, sand, or even glass beads. It adds a polished look and helps prevent soil from splashing when you water.
* Gardening Gloves: Protect your hands from prickly succulents and soil.
* Trowel or Spoon: For scooping and moving soil.
* Watering Can or Spray Bottle: For watering your succulents.
* Small Brush (Optional): For cleaning soil off the succulents.
Step-by-Step Guide: Planting Your Succulent Garden
Alright, let’s get our hands dirty! Follow these steps to create a beautiful and thriving succulent garden.
1. Prepare Your Container: If your container doesn’t have drainage holes, add a 1-2 inch layer of drainage material (gravel, pebbles, etc.) to the bottom. This will help prevent water from pooling around the roots.
2. Add Soil: Fill the container with succulent soil, leaving about an inch of space at the top. Don’t pack the soil down too tightly.
3. Plan Your Layout: Before you start planting, arrange your succulents on top of the soil to get an idea of how you want them to look. Consider the height, color, and texture of each plant. Taller succulents usually look best in the back or center, while smaller ones can be placed around the edges.
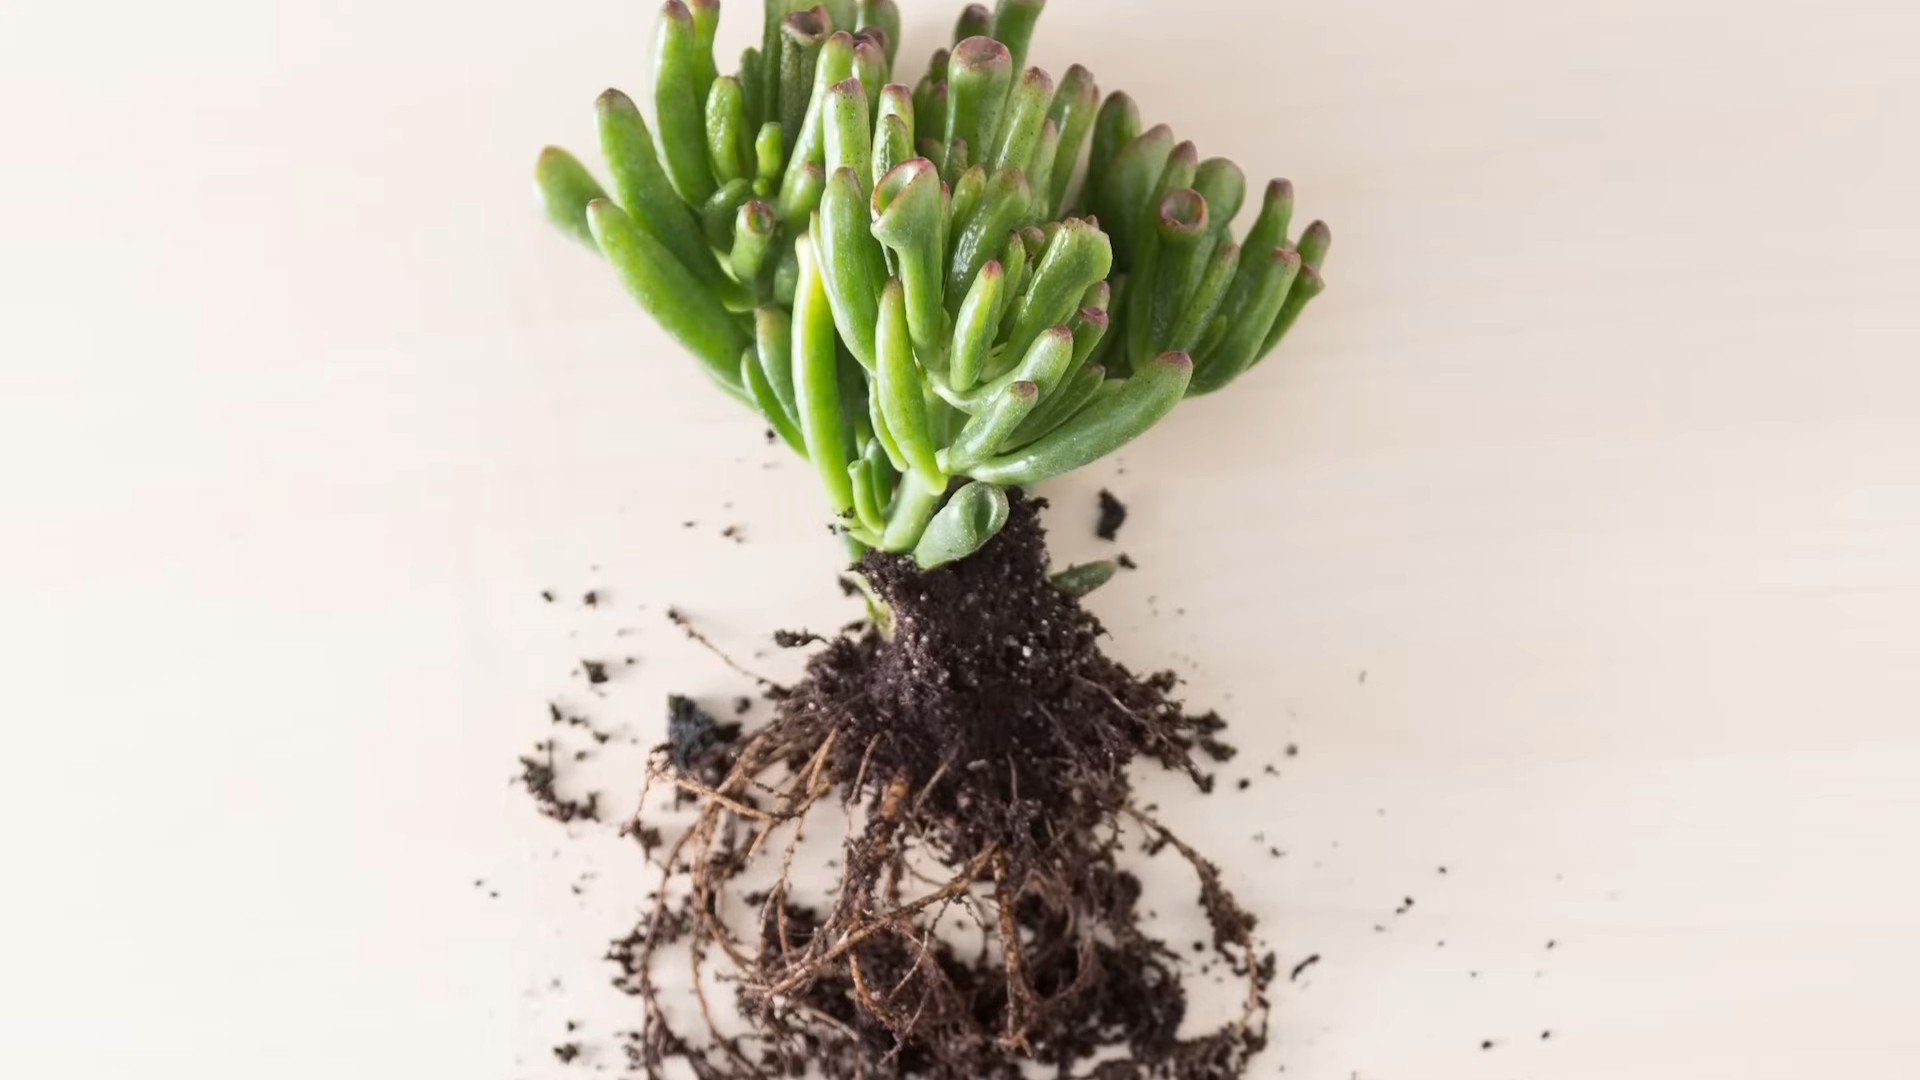
4. Plant Your Succulents: Gently remove each succulent from its nursery pot. Loosen the roots a bit with your fingers. Dig a small hole in the soil and place the succulent in the hole. Make sure the top of the root ball is level with the surrounding soil. Fill in the hole with soil and gently pat it down.
5. Arrange and Repeat: Continue planting your succulents, leaving enough space between them for growth. Don’t overcrowd them!
6. Add Top Dressing (Optional): Once all the succulents are planted, add a layer of top dressing to cover the soil. This will give your garden a finished look and help prevent soil erosion.
7. Water Sparingly: After planting, water your succulents lightly. Avoid overwatering! Succulents prefer to dry out completely between waterings.
8. Clean Up: Use a small brush to remove any soil from the leaves of your succulents.
Caring for Your Succulent Garden: Keeping Them Happy
Now that you’ve created your beautiful succulent garden, it’s important to know how to care for it so it can thrive.
* Light: Succulents need plenty of bright, indirect light. Place your garden near a sunny window, but avoid direct sunlight, which can scorch the leaves. If you don’t have enough natural light, you can supplement with a grow light.
* Watering: This is the most important aspect of succulent care. Overwatering is the most common cause of succulent death. Water your succulents only when the soil is completely dry. When you do water, water thoroughly until water drains out of the drainage holes. Then, let the soil dry out completely before watering again. In general, you’ll need to water more frequently in the summer and less frequently in the winter.
* Soil: Always use well-draining succulent soil.
* Temperature: Succulents prefer temperatures between 60°F and 80°F. Avoid exposing them to freezing temperatures.
* Fertilizing: Succulents don’t need a lot of fertilizer. You can fertilize them once or twice a year with a diluted succulent fertilizer.
* Repotting: As your succulents grow, they may need to be repotted into a larger container. Repot them in the spring or summer.
* Pests: Succulents are generally pest-resistant, but they can occasionally be affected by mealybugs or aphids. If you notice any pests, treat them with insecticidal soap.
Troubleshooting: Common Succulent Problems
Even with the best care, you might encounter some problems with your succulents. Here are some common issues and how to fix them:
* Root Rot: This is caused by overwatering. The roots will turn brown and mushy. To fix it, remove the affected succulent from the container, trim away any rotten roots, and replant it in fresh, dry succulent soil. Be sure to water less frequently.
* Leggy Growth: This is caused by insufficient light. The succulents will stretch out and become elongated. To fix it, move your garden to a brighter location or supplement with a grow light.
* Sunburn: This is caused by too much direct sunlight. The leaves will turn brown or white. To fix it, move your garden to a location with indirect light.
* Wrinkled Leaves: This can be a sign of underwatering. Water your succulents more frequently. However, wrinkled leaves can also be a sign of root rot, so be sure to check the soil before watering.
* Dropping Leaves: This can be caused by a variety of factors, including overwatering, underwatering, and temperature stress. Check the soil and adjust your watering accordingly. Make sure your succulents are not exposed to extreme temperatures.
Creative Ideas: Taking Your Succulent Garden to the Next Level
Want to make your succulent garden even more special? Here are a few creative ideas:
* Add Decorative Elements: Incorporate small figurines, rocks, shells, or other decorative elements into your garden.
* Create a Terrarium: Plant your succulents in a glass terrarium for a unique and eye-catching display. Just be sure to choose a terrarium with good ventilation to prevent moisture buildup.
* Use Different Containers: Experiment with different types of containers, such as teacups, mugs, or even old shoes!
* Vertical Garden: Create a vertical succulent garden using a pallet or a hanging planter.
* Propagate Your Succulents: Once your succulents are established, you can propagate them by taking cuttings or leaf propagations. This is a great way to expand your collection and share your succulents with friends.
Choosing the Right Succulents: A Mini Guide
With so many succulents to choose from, it can be overwhelming! Here’s a quick guide to some popular and easy-to-care-for varieties:
* Echeveria: These rosette-shaped succulents come in a variety of colors and textures. They’re relatively easy to care for and make a great focal point in any succulent garden.
* Sedum: Sedums are known for their trailing growth habit and come in a variety of colors and textures. They’re perfect for adding a cascading effect to your garden.
* Haworthia: These small, slow-growing succulents are native to South Africa. They’re known for their unique patterns and textures.
* Aloe: Aloes are known for their medicinal properties and their striking architectural shapes. They’re relatively easy to care for and can tolerate a wide range of conditions.
* Crassula: This genus includes the popular Jade Plant.
Conclusion
So, there you have it! Transforming your living space with vibrant, thriving succulents is easier and more affordable than you ever imagined. This DIY trick for creating the perfect succulent potting mix is a game-changer, ensuring your beloved plants receive the optimal nutrients and drainage they need to flourish indoors. Forget expensive, pre-packaged mixes that often fall short; with just a few readily available ingredients, you can craft a custom blend tailored to the specific needs of your **indoor succulents home decor**.
Why is this a must-try? Because healthy succulents translate to a more beautiful and inviting home. A vibrant collection of succulents adds a touch of nature, purifies the air, and brings a sense of calm to any room. But more than just aesthetics, this DIY approach empowers you to take control of your plants’ well-being. You’ll understand exactly what’s going into their soil, allowing you to adjust the recipe based on your specific succulent varieties and environmental conditions.
Consider these variations to further personalize your succulent potting mix:
* **For desert cacti and succulents:** Increase the proportion of coarse sand or perlite to enhance drainage even further.
* **For succulents in humid environments:** Add a small amount of horticultural charcoal to the mix to help absorb excess moisture and prevent root rot.
* **For succulents that prefer slightly acidic soil:** Incorporate a small amount of peat moss or coconut coir into the mix. Remember to research the specific needs of your succulents to tailor the mix accordingly.
This DIY succulent potting mix isn’t just about saving money; it’s about fostering a deeper connection with your plants and creating a thriving indoor oasis. It’s about understanding their needs and providing them with the best possible environment to flourish. It’s about transforming your home into a green sanctuary, one succulent at a time.
We wholeheartedly encourage you to try this DIY trick and witness the difference it makes in the health and vitality of your indoor succulents. Don’t be afraid to experiment with the ratios of ingredients to find the perfect blend for your specific plants and environment. The key is to observe your succulents closely and adjust the mix as needed.
Once you’ve created your own custom succulent potting mix, we’d love to hear about your experience! Share your tips, tricks, and photos in the comments below. Let’s build a community of succulent enthusiasts who are passionate about creating thriving indoor gardens. Your insights could help other readers achieve succulent success and transform their homes into vibrant, green spaces. Let’s cultivate a community of thriving **indoor succulents home decor** enthusiasts!
Frequently Asked Questions (FAQ)
What exactly is succulent potting mix, and why is it different from regular potting soil?
Succulent potting mix is a specially formulated soil blend designed to meet the unique needs of succulents and cacti. Unlike regular potting soil, which tends to retain too much moisture, succulent mix is formulated to provide excellent drainage and aeration. This is crucial because succulents are prone to root rot if their roots sit in soggy soil for extended periods. The mix typically consists of ingredients like coarse sand, perlite, or pumice, which promote drainage and prevent compaction. Regular potting soil often contains a higher proportion of organic matter, which can retain too much moisture for succulents. Using the correct potting mix is essential for the health and longevity of your **indoor succulents home decor**.
What are the essential ingredients for a good DIY succulent potting mix?
The basic ingredients for a good DIY succulent potting mix typically include:
* **Potting Soil:** Provides essential nutrients and a base for the mix. Choose a high-quality potting soil that is not too heavy or dense.
* **Coarse Sand:** Improves drainage and aeration. Avoid using fine beach sand, as it can compact and hinder drainage. Horticultural sand or builder’s sand is ideal.
* **Perlite or Pumice:** These volcanic rocks further enhance drainage and aeration. Perlite is lightweight and readily available, while pumice is slightly heavier and provides better stability.
The ratio of these ingredients can be adjusted depending on the specific needs of your succulents and your local climate. A common starting point is a 1:1:1 ratio of potting soil, coarse sand, and perlite or pumice.
How do I know if my succulent potting mix is draining properly?
A well-draining succulent potting mix should allow water to flow freely through the pot and out the drainage holes. After watering, the soil should be moist but not soggy. If the soil remains wet for several days, it indicates that the mix is not draining properly. You can test the drainage by watering the pot thoroughly and observing how quickly the water drains out. If the water pools on the surface or takes a long time to drain, you may need to add more coarse sand, perlite, or pumice to improve drainage. Proper drainage is critical for preventing root rot and ensuring the health of your **indoor succulents home decor**.
Can I use regular garden soil for my succulents?
No, it is generally not recommended to use regular garden soil for succulents. Garden soil is often too heavy, dense, and poorly draining for succulents. It can also contain pests, diseases, and weed seeds that can harm your plants. Succulents require a well-draining and aerated potting mix to thrive, which garden soil typically does not provide. Using regular garden soil can lead to root rot and other problems that can ultimately kill your succulents. Always use a specially formulated succulent potting mix or create your own DIY blend using the recommended ingredients.
How often should I water my succulents after repotting them in the DIY mix?
After repotting your succulents in the DIY mix, it’s best to wait a few days before watering them. This allows any damaged roots to heal and reduces the risk of root rot. When you do water, water thoroughly until water drains out of the drainage holes. Then, allow the soil to dry out completely before watering again. The frequency of watering will depend on factors such as the type of succulent, the size of the pot, the climate, and the time of year. In general, succulents need less water during the dormant season (winter) than during the growing season (spring and summer). Always check the soil moisture before watering to avoid overwatering. Overwatering is a common cause of succulent death, so it’s better to err on the side of underwatering.
What are some signs that my succulents are not happy with their potting mix?
There are several signs that your succulents may not be happy with their potting mix:
* **Yellowing or browning leaves:** This can indicate overwatering or poor drainage.
* **Soft or mushy leaves:** This is a sign of root rot, which is often caused by overly wet soil.
* **Stunted growth:** If your succulents are not growing or are growing very slowly, it could be due to poor soil conditions.
* **Drooping or wilting leaves:** This can indicate underwatering or root damage.
* **White, powdery substance on the soil surface:** This could be a sign of mineral buildup due to hard water or over-fertilizing.
If you notice any of these signs, it’s important to take action to address the problem. This may involve repotting your succulents in a fresh batch of DIY mix, adjusting your watering habits, or providing better drainage. Regularly inspecting your succulents and paying attention to their needs will help you keep them healthy and thriving in your **indoor succulents home decor**.
Can I add fertilizer to my DIY succulent potting mix?
While the DIY mix provides a good foundation, succulents benefit from occasional fertilization, especially during their growing season. You can add a slow-release fertilizer to the mix when you’re initially creating it, or you can fertilize your succulents with a liquid fertilizer diluted to half strength every few weeks during the spring and summer. Look for a fertilizer specifically formulated for succulents and cacti, as these typically have a lower nitrogen content. Avoid over-fertilizing, as this can burn the roots and damage your plants.
Where can I find the ingredients for the DIY succulent potting mix?
Most of the ingredients for the DIY succulent potting mix can be found at your local garden center, hardware store, or online retailer. Potting soil is widely available, and you can usually find coarse sand, perlite, and pumice in the gardening section. Horticultural charcoal can also be found at garden centers or online. If you’re having trouble finding coarse sand, you can try using builder’s sand, but make sure it’s thoroughly rinsed to remove any fine particles.
Is this DIY mix suitable for all types of succulents?
While this DIY mix is a good general-purpose blend for most succulents, some succulents may have specific soil requirements. For example, some succulents prefer slightly acidic soil, while others prefer a more alkaline soil. It’s always a good idea to research the specific needs of your succulents and adjust the mix accordingly. You can add a small amount of peat moss or coconut coir to the mix to increase acidity, or you can add a small amount of lime to increase alkalinity.
How long will the DIY succulent potting mix last?
The DIY succulent potting mix should last for several years if stored properly. Store the mix in a cool, dry place in an airtight container to prevent it from drying out or becoming contaminated. If the mix becomes compacted or contaminated, it’s best to discard it and make a fresh batch.


Leave a Comment