

Hem jeans without cutting? Yes, you read that right! Are you tired of ill-fitting jeans pooling around your ankles? Or maybe you’ve found the perfect pair, but they’re just a tad too long? Before you reach for the scissors and risk a denim disaster, let me tell you about a game-changing DIY trick that will save your jeans and your sanity.
The art of altering clothing has been around for centuries, passed down through generations as a way to make garments fit perfectly and last longer. In a world of fast fashion, where clothes are often disposable, learning to mend and modify our own items is not only economical but also a sustainable practice. This particular technique, hemming jeans without cutting, is especially valuable because it preserves the original hem – a detail that often gives jeans their unique character and style.
I know what you’re thinking: “Is it really possible to shorten jeans without chopping off the excess fabric?” Absolutely! This method is perfect for those who want to maintain the integrity of their jeans, avoid the hassle of sewing a new hem, or simply want a quick and easy solution. Plus, it’s a fantastic way to avoid that dreaded raw edge that can fray and unravel over time. So, if you’re ready to learn how to hem jeans without cutting and achieve a professional-looking result in minutes, keep reading! I’m going to show you exactly how to do it, step-by-step.

DIY: Hem Your Jeans Without Cutting – A No-Sew Solution!
Hey there, fellow DIY enthusiasts! Are you tired of jeans that are just a tad too long? Do you dread the thought of cutting into your favorite pair, fearing a sewing machine mishap or a permanent length alteration you might regret? Well, fear no more! I’m going to show you a super easy, no-sew method to hem your jeans without cutting them. This is perfect for those who aren’t confident with a sewing machine, want to preserve the original hem, or simply need a quick and temporary fix. Let’s get started!
What You’ll Need:
Before we dive in, let’s gather our supplies. The beauty of this method is that you probably already have everything you need!
* Your jeans (obviously!)
* Measuring tape or ruler
* Pins (ballpoint pins are best for denim)
* Iron and ironing board
* Fabric glue (specifically designed for denim or heavy fabrics – I recommend a washable one if you think you might want to undo the hem later)
* Scissors (for trimming excess fabric glue strings, not the jeans!)
* A damp cloth (for cleaning up any glue mishaps)
Preparing Your Jeans:
This step is crucial for a clean and professional-looking hem.
1. Try on your jeans with the shoes you’ll typically wear with them. This is super important! You want to make sure you’re hemming them to the correct length. Have a friend help you if needed to get an accurate measurement.
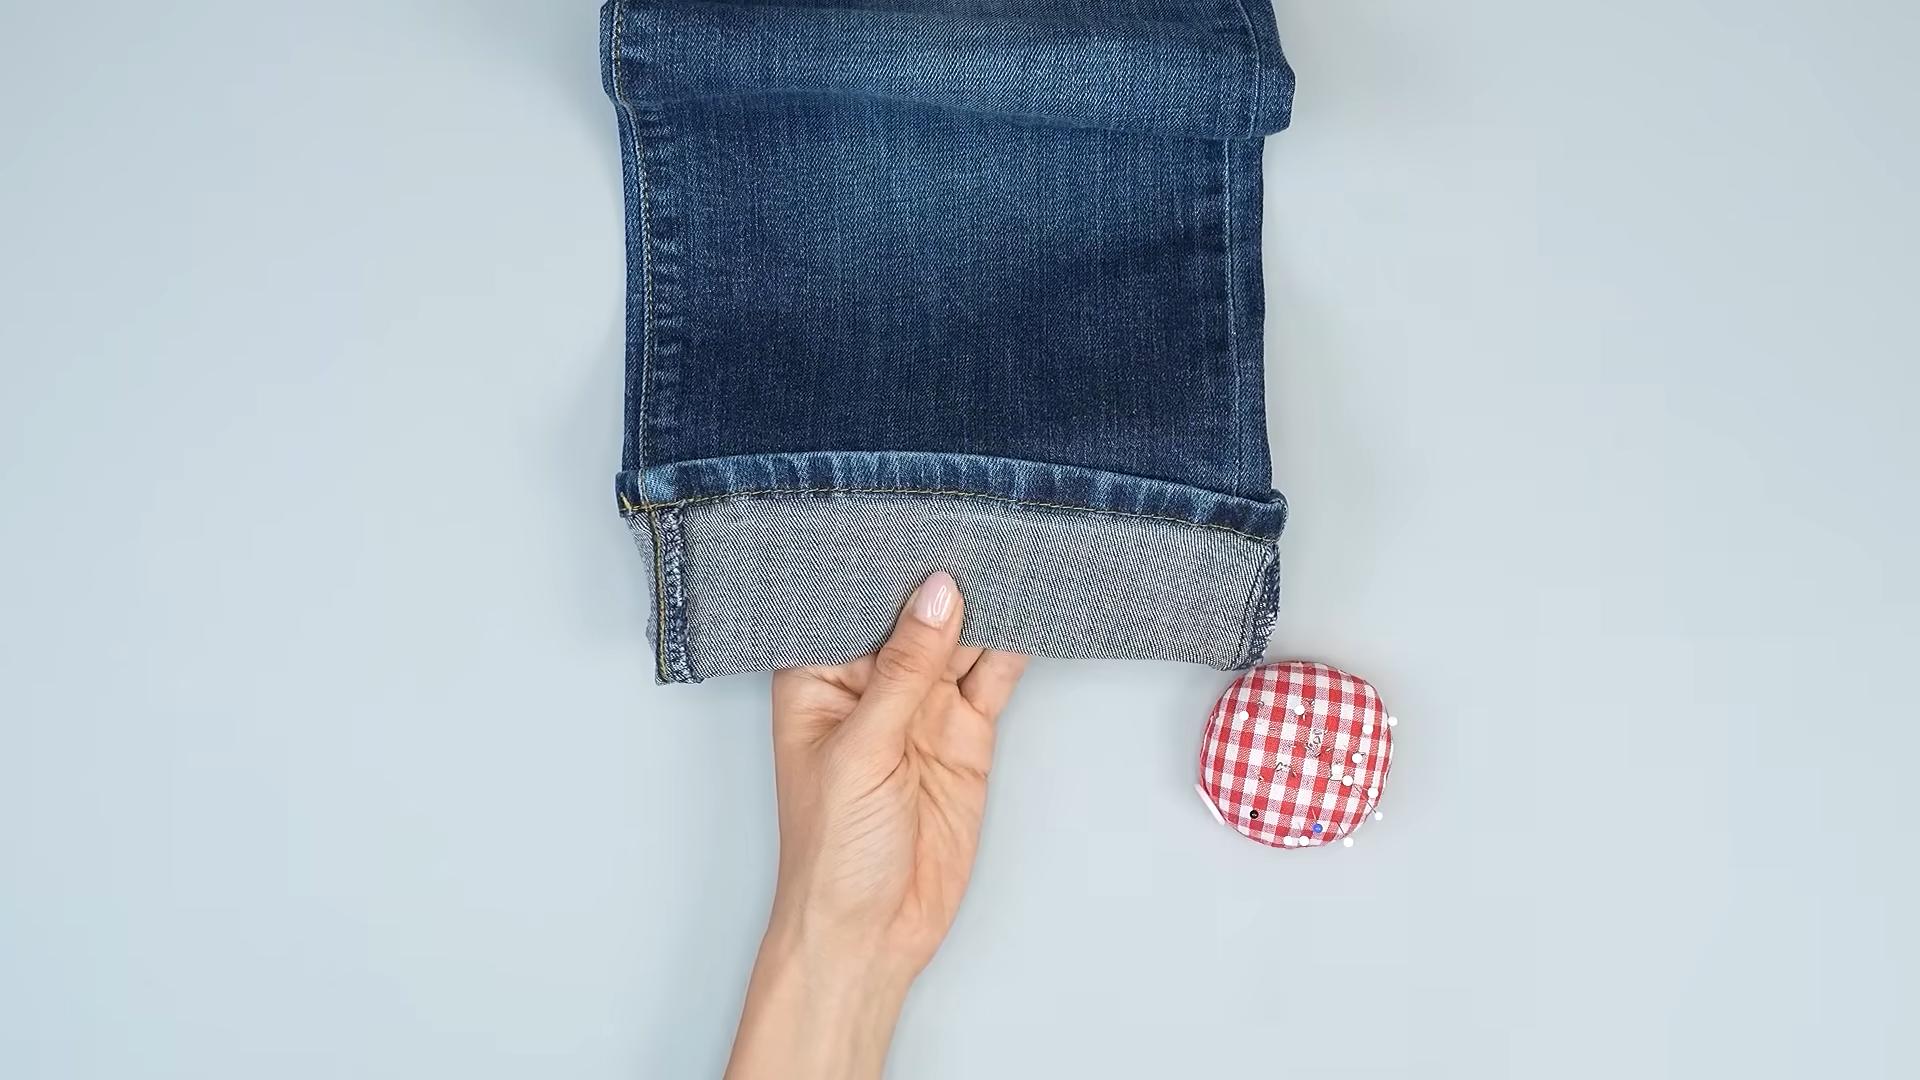
2. Determine your desired hem length. Once you’re wearing the jeans with your shoes, decide how much shorter you want them to be. Mark this point with a pin on both legs. Make sure the pin is placed on the inside seam of the jeans.
3. Remove your jeans and lay them flat on a clean surface. A table or ironing board works great.
4. Measure the distance from the original hem to the pin you placed. This is the amount you’ll be folding up. Write this measurement down – you’ll need it for the next step. For example, let’s say the distance is 1.5 inches.
5. Repeat the measurement on the other leg. Jeans aren’t always perfectly symmetrical, so it’s important to measure both legs individually.
Creating the Fold:
Now we’re going to create the fold that will form the new hem.
1. Fold the bottom of one leg up towards the inside of the jeans, using the measurement you took earlier. In our example, we’d fold up 1.5 inches. The original hem should be facing upwards, towards the inside of the jean leg.
2. Pin the fold in place. Use plenty of pins to secure the fold all the way around the leg. Make sure the pins are perpendicular to the fold to hold it securely. I usually place pins every inch or two.
3. Repeat the folding and pinning process on the other leg. Make sure you’re using the correct measurement for that leg.
4. Double-check the length. Try the jeans on again (carefully!) to make sure the hem is at the desired length. Adjust the fold and pins as needed. This is your last chance to make adjustments before we start gluing!
Ironing the Fold:
Ironing helps to create a crisp, clean fold and will make the gluing process much easier.
1. Set your iron to the appropriate setting for denim. Usually, this is a high heat setting.
2. Iron the folded hem. Press firmly and evenly, working your way around the entire leg. The heat will help to set the fold and create a sharp crease.
3. Remove the pins as you iron. Be careful not to burn yourself!
4. Repeat the ironing process on the other leg.
Applying the Fabric Glue:
This is where the magic happens! We’ll be using fabric glue to secure the folded hem in place.
1. Turn the jeans inside out. This will expose the raw edge of the folded fabric.
2. Apply a thin, even line of fabric glue along the raw edge of the folded fabric. Be careful not to use too much glue, as it can seep through the fabric and create a stiff or visible line. I like to work in small sections, applying the glue and then pressing the fabric together immediately.
3. Press the glued edge firmly against the inside of the jean leg. Make sure the fabric is smooth and wrinkle-free.
4. Use your fingers or a damp cloth to wipe away any excess glue that seeps out.
5. Pin the glued area in place. This will help to hold the fabric together while the glue dries.
6. Repeat the gluing and pinning process around the entire leg.
7. Repeat the entire process on the other leg.
Drying and Finishing:
Now we just need to let the glue dry completely.
1. Allow the glue to dry completely according to the manufacturer’s instructions. This usually takes several hours, or even overnight. Be patient! Don’t try to wear the jeans before the glue is fully dry.
2. Remove the pins.
3. Turn the jeans right side out.
4. Inspect your new hem. Make sure everything is secure and that there are no visible glue spots.
5. If necessary, trim any stray threads or glue strings with scissors. Be very careful not to cut the jeans themselves!
Tips and Tricks for a Perfect Hem:
Here are a few extra tips to help you achieve the best possible results:
* Choose the right fabric glue. Look for a glue that is specifically designed for denim or heavy fabrics. A washable glue is a good option if you think you might want to undo the hem later.
* Don’t use too much glue. A thin, even layer is all you need. Too much glue can make the fabric stiff and create visible lines.
* Work in small sections. This will help to prevent the glue from drying out before you can press the fabric together.
* Use plenty of pins. Pins will help to hold the fabric in place while the glue dries.
* Be patient. Allow the glue to dry completely before wearing the jeans.
* For a more permanent hem, consider using a fusible bonding web in addition to the fabric glue. This will create a stronger bond between the fabric layers. You would iron the bonding web between the layers before applying the glue.
* If you’re unsure about the color of the glue, test it on a scrap of fabric first.
* If you accidentally get glue on the outside of the jeans, wipe it off immediately with a damp cloth.
* Consider adding a decorative stitch along the hem for a more finished look. Even without sewing, you can use fabric markers to mimic a stitch pattern.
Troubleshooting:
Even with the best instructions, things can sometimes go wrong. Here are a few common problems and how to fix them:
* The hem is uneven. If you notice that the hem is uneven after you’ve glued it, you can try to carefully peel back the fabric and re-glue it. However, this can be difficult and may damage the fabric. It’s best to double-check the length before you start gluing.
* The glue is visible. If you used too much glue, or if the glue seeped through the fabric, you may see a visible line of glue. Try to wipe away any excess glue with a damp cloth before it dries. If the glue is already dry, you may be able to remove it with a solvent, but be careful not to damage the fabric.
* The hem is coming undone. If the hem starts to come undone, you can simply re-glue it. Make sure to clean the area first and apply a fresh layer of glue.
Conclusion:
And there you have it! A simple, no-sew way to hem your jeans without cutting them. This method is perfect for anyone who wants to preserve the original hem, needs a quick fix, or isn’t comfortable with a sewing machine. With a little patience and attention to detail, you can easily achieve a professional-looking hem that will make your jeans fit perfectly. Happy hemming!
Conclusion
So, there you have it! Mastering the art of how to hem jeans without cutting is not just a clever trick; it’s a game-changer for your wardrobe and your wallet. Forget expensive tailoring or the heartbreak of permanently altering your favorite denim. This method offers a flexible, reversible solution that preserves the original hem, maintaining the integrity and style of your jeans.
Why is this a must-try? Because it empowers you to customize your jeans to the perfect length without sacrificing their unique character. Think about it: no more awkward stacking at the ankles, no more dragging hems getting frayed and dirty, and no more settling for jeans that just don’t quite fit right. You gain complete control over your denim destiny!
But the benefits extend beyond just aesthetics. This technique is incredibly practical. Maybe you’re between sizes, or perhaps your weight fluctuates. This no-cut hem allows you to adjust the length as needed, ensuring your jeans always fit perfectly. It’s also a fantastic option for growing children or teenagers who are constantly outgrowing their clothes. Instead of buying new jeans every few months, you can simply adjust the hem to accommodate their growth spurts.
Ready to take it a step further? Consider these variations:
* Decorative Stitching: Instead of a simple straight stitch, experiment with decorative stitches on your sewing machine to add a unique touch to the new hemline. Think contrasting colors or intricate patterns to personalize your jeans.
* Iron-On Hemming Tape: For a no-sew option, use iron-on hemming tape to secure the folded hem. This is a great choice for those who don’t have a sewing machine or prefer a quicker solution. Just be sure to use a high-quality tape that will withstand washing and wear.
* Adding a Cuff: If you want a more casual look, create a wider fold and tack it in place to create a permanent cuff. This is a stylish way to shorten your jeans while adding a touch of personality.
* Using a Blind Hem Stitch: For a nearly invisible hem, use a blind hem stitch on your sewing machine. This will create a clean, professional finish that looks like it was done by a tailor.
The possibilities are endless! The key is to experiment and find what works best for you and your jeans.
We wholeheartedly encourage you to try this DIY trick. It’s easier than you think, and the results are well worth the effort. Not only will you save money and time, but you’ll also gain a valuable skill that will serve you well for years to come.
Once you’ve mastered the art of how to hem jeans without cutting, we’d love to hear about your experience! Share your tips, tricks, and variations in the comments below. Let’s create a community of denim-loving DIYers who are passionate about making their jeans fit perfectly. Don’t forget to share photos of your finished projects – we can’t wait to see what you create! So grab your jeans, your sewing machine (or iron-on tape), and get ready to transform your denim wardrobe. Happy hemming!
Frequently Asked Questions (FAQ)
What if I don’t have a sewing machine? Can I still hem jeans without cutting?
Absolutely! While a sewing machine makes the process faster and more durable, you can definitely hem jeans without cutting using alternative methods. The most common is using iron-on hemming tape. This double-sided adhesive tape bonds the fabric together when heated with an iron. Simply fold the hem to your desired length, insert the tape between the layers, and iron according to the tape’s instructions. Another option is hand-sewing. While it takes more time and patience, hand-sewing can create a secure and invisible hem. Use a blind stitch for the best results.
Will this method work on all types of jeans?
This method is generally suitable for most types of jeans, including those made from denim, stretch denim, and even some thicker fabrics. However, extremely thick or rigid denim might be more challenging to work with, especially if you’re using a sewing machine. In such cases, you may need a heavy-duty needle and thread. Also, be mindful of jeans with heavily embellished hems, as folding and securing them might be tricky.
How do I ensure the hem is even all the way around?
Accuracy is key to a professional-looking hem. Before you start sewing or ironing, carefully measure and mark the desired hem length all the way around the leg. Use a fabric ruler or measuring tape and tailor’s chalk or a fabric marker to create a clear and consistent guideline. It’s helpful to use a hem gauge, a small tool that helps you create uniform hems. Double-check your measurements before you start securing the hem to avoid unevenness.
How do I prevent the hem from unraveling after washing?
To prevent unraveling, especially if you’re using a sewing machine, consider using a serger or overlock stitch along the raw edge of the folded hem before securing it. This will create a clean and durable finish that will withstand repeated washing. If you don’t have a serger, you can use a zigzag stitch on your sewing machine. For hand-sewn hems, use a strong thread and reinforce the stitches at the beginning and end of each seam. If you’re using iron-on hemming tape, choose a high-quality tape that is specifically designed for fabric and follow the manufacturer’s instructions carefully.
Can I adjust the hem again later if I need to?
One of the biggest advantages of this no-cut hemming method is its reversibility. If you need to adjust the hem later, simply remove the stitches or iron-on tape and re-hem the jeans to the desired length. This makes it a perfect solution for growing children or for those who experience fluctuations in weight. However, keep in mind that repeated adjustments might weaken the fabric over time, so try to avoid making too many changes.
What kind of thread should I use?
For best results, use a thread that matches the color of your jeans as closely as possible. This will help to make the hem less noticeable. Choose a strong and durable thread, such as a polyester or cotton-polyester blend, to ensure that the hem will hold up well to wear and washing. Denim thread is also a good option, as it is specifically designed for sewing denim fabrics.
How do I care for jeans that have been hemmed using this method?
Care for jeans hemmed without cutting is generally the same as caring for regular jeans. Wash them inside out in cold water to prevent fading and shrinkage. Avoid using harsh detergents or bleach, as these can damage the fabric and weaken the hem. Tumble dry on low heat or hang them to dry. If you’ve used iron-on hemming tape, avoid ironing directly over the hem, as this can melt the adhesive.
Is this method suitable for dress pants or other types of trousers?
While this method is primarily designed for jeans, it can also be adapted for other types of trousers, such as chinos or corduroys. However, the results may vary depending on the fabric and the style of the trousers. For dress pants or more delicate fabrics, it’s generally best to consult a professional tailor to ensure a clean and professional finish.

Leave a Comment