

Growing Chives Indoors has never been easier, and I’m so excited to share my favorite DIY tricks with you! Forget those sad, wilted chives from the grocery store – imagine snipping fresh, flavorful chives right from your kitchen windowsill whenever you need them.
For centuries, chives have been a staple in gardens and kitchens worldwide. Originating in Asia, these versatile herbs were prized not only for their culinary uses but also for their medicinal properties. From flavoring soups and salads to adding a delicate oniony zest to omelets, chives have earned their place as a beloved herb.
But let’s face it, not everyone has a sprawling outdoor garden. That’s where the magic of indoor gardening comes in! Growing Chives Indoors is the perfect solution for apartment dwellers, busy individuals, or anyone who simply wants fresh herbs readily available year-round. This DIY guide will walk you through everything you need to know, from choosing the right container and soil to providing the perfect amount of light and water. I’ll even share some secret hacks to ensure your chives thrive and provide you with a continuous harvest. So, ditch the store-bought herbs and get ready to enjoy the delightful flavor of homegrown chives – it’s easier than you think!
Growing Chives Indoors: A Beginner’s Guide
Hey there, fellow plant enthusiasts! Ever dreamt of snipping fresh chives right from your kitchen windowsill? Well, dream no more! Growing chives indoors is surprisingly easy, even if you don’t have a green thumb. I’m going to walk you through everything you need to know to have a thriving chive garden right inside your home. Let’s get started!
What You’ll Need
Before we dive in, let’s gather our supplies. Here’s a checklist of everything you’ll need to successfully grow chives indoors:
* **Chive Seeds or a Chive Plant:** You can start from seeds, which is more budget-friendly, or purchase a small chive plant from a garden center for faster results.
* **Pot with Drainage Holes:** Choose a pot that’s at least 6 inches in diameter and has drainage holes to prevent waterlogging.
* **Well-Draining Potting Mix:** Regular garden soil is too heavy for indoor containers. Opt for a good quality potting mix specifically designed for containers.
* **Watering Can or Spray Bottle:** For gentle watering.
* **Sunny Windowsill or Grow Light:** Chives need plenty of light to thrive.
* **Optional: Fertilizer:** A balanced liquid fertilizer can help boost growth.
* **Scissors or Kitchen Shears:** For harvesting your chives.
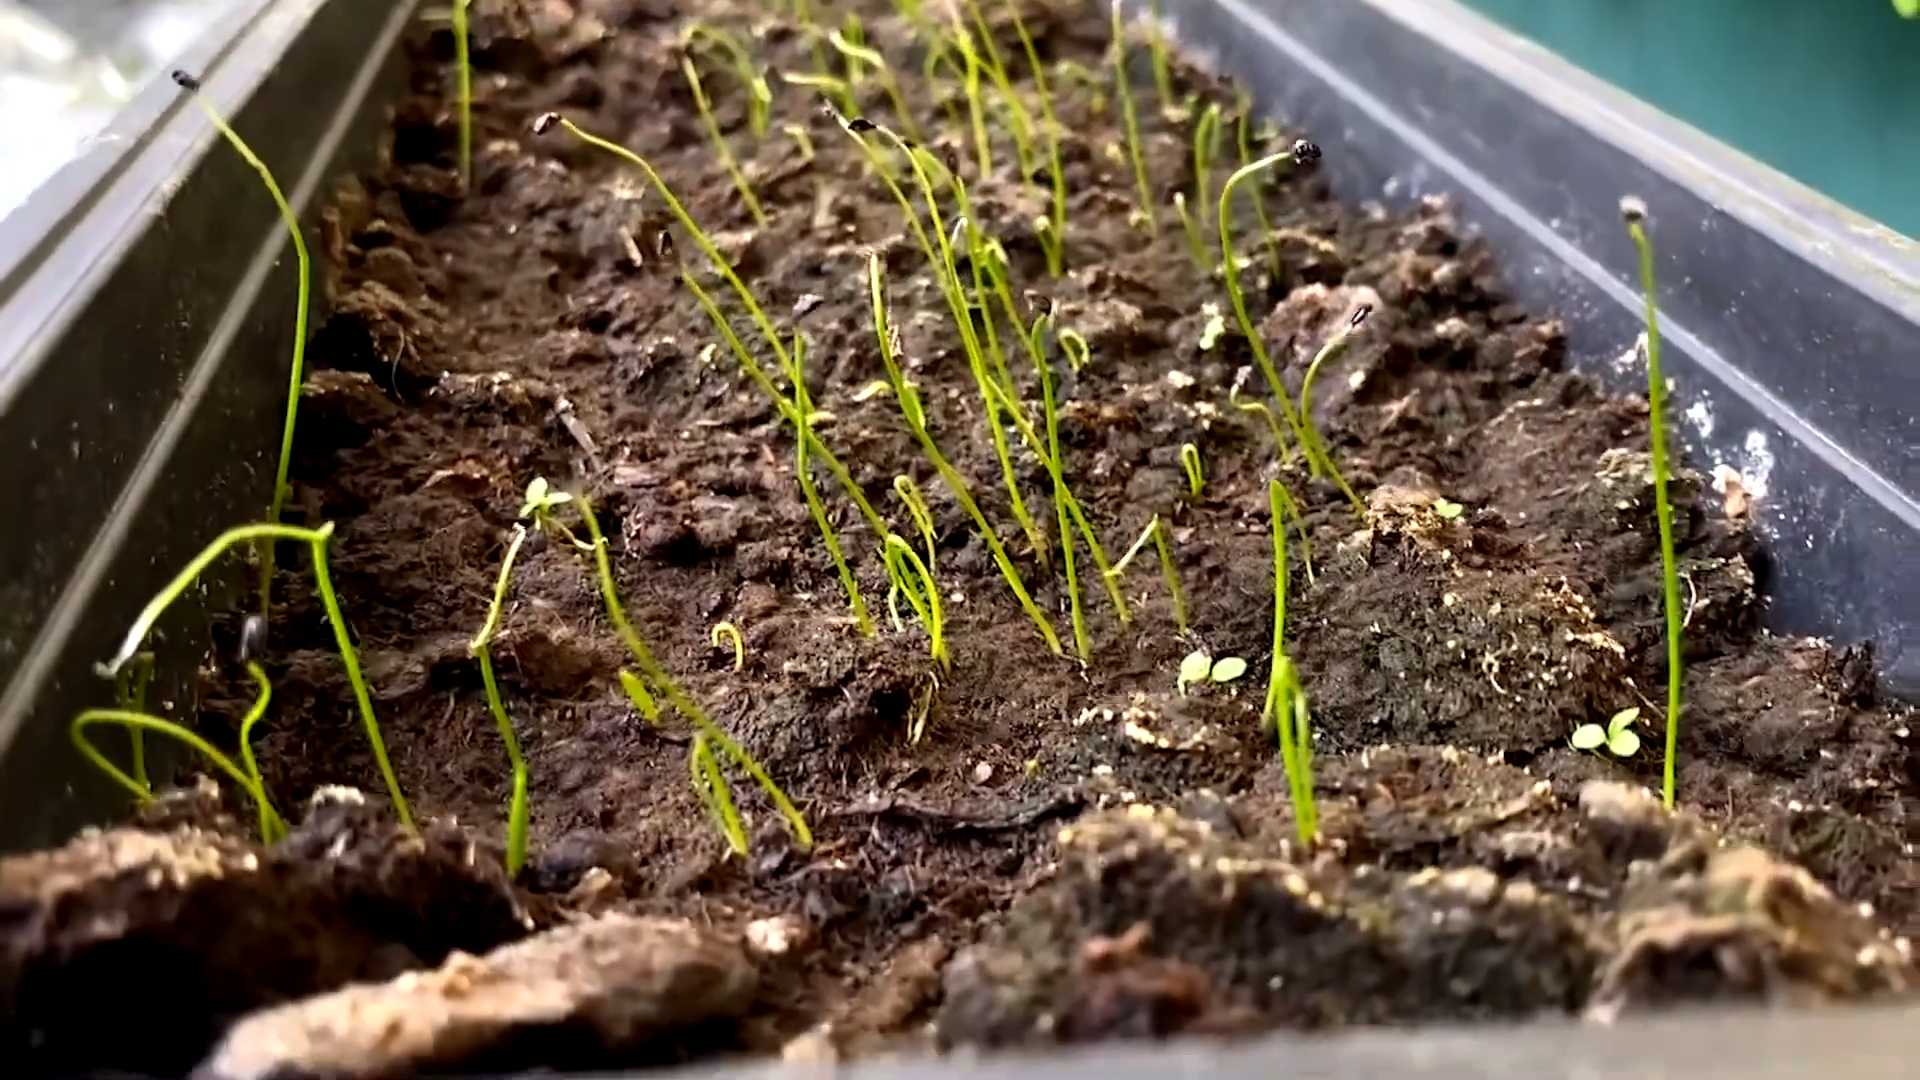
Starting from Seeds: A Step-by-Step Guide
If you’re starting from seeds, here’s how to do it:
1. **Prepare the Pot:** Fill your pot with the well-draining potting mix, leaving about an inch of space at the top. Gently pat down the soil.
2. **Sow the Seeds:** Sprinkle the chive seeds evenly over the surface of the soil. You don’t need to bury them too deep; about ¼ inch is perfect.
3. **Cover the Seeds:** Lightly cover the seeds with a thin layer of potting mix.
4. **Water Gently:** Use a spray bottle or watering can to gently moisten the soil. Be careful not to dislodge the seeds.
5. **Create a Humid Environment:** Cover the pot with plastic wrap or a plastic bag to create a humid environment. This will help the seeds germinate.
6. **Place in a Warm Location:** Place the pot in a warm location, ideally around 70-75°F (21-24°C).
7. **Monitor Germination:** Check the pot daily and mist the soil if it starts to dry out. The seeds should germinate in about 7-14 days.
8. **Remove the Plastic Wrap:** Once the seedlings emerge, remove the plastic wrap.
9. **Provide Light:** Place the pot on a sunny windowsill that receives at least 6 hours of direct sunlight per day. If you don’t have enough natural light, use a grow light.
10. **Thin the Seedlings (Optional):** Once the seedlings are a few inches tall, you can thin them out if they are too crowded. This will give the remaining plants more room to grow.
Transplanting a Chive Plant
If you’ve opted to buy a chive plant, the process is even simpler:
1. **Prepare the Pot:** Fill your pot with well-draining potting mix, leaving about an inch of space at the top.
2. **Remove the Plant from its Container:** Gently remove the chive plant from its original container. If the roots are tightly bound, gently loosen them with your fingers.
3. **Plant the Chives:** Place the chive plant in the center of the pot and fill in the surrounding space with potting mix. Make sure the top of the root ball is level with the soil surface.
4. **Water Thoroughly:** Water the plant thoroughly until water drains out of the drainage holes.
5. **Place in a Sunny Location:** Place the pot on a sunny windowsill or under a grow light.
Caring for Your Indoor Chives
Now that your chives are planted, here’s how to keep them happy and healthy:
* **Watering:** Water your chives when the top inch of soil feels dry to the touch. Avoid overwatering, as this can lead to root rot. Make sure the pot has good drainage.
* **Light:** Chives need at least 6 hours of direct sunlight per day. If you don’t have enough natural light, supplement with a grow light.
* **Fertilizing:** Feed your chives with a balanced liquid fertilizer every 2-4 weeks during the growing season (spring and summer). Follow the instructions on the fertilizer label.
* **Temperature:** Chives prefer temperatures between 60-70°F (15-21°C).
* **Humidity:** Chives don’t require high humidity, but they will appreciate occasional misting, especially in dry indoor environments.
* **Pruning:** Regularly prune your chives to encourage new growth. Simply snip off the tips of the leaves with scissors or kitchen shears.
* **Repotting:** If your chives become root-bound (the roots are circling the inside of the pot), you may need to repot them into a larger container.
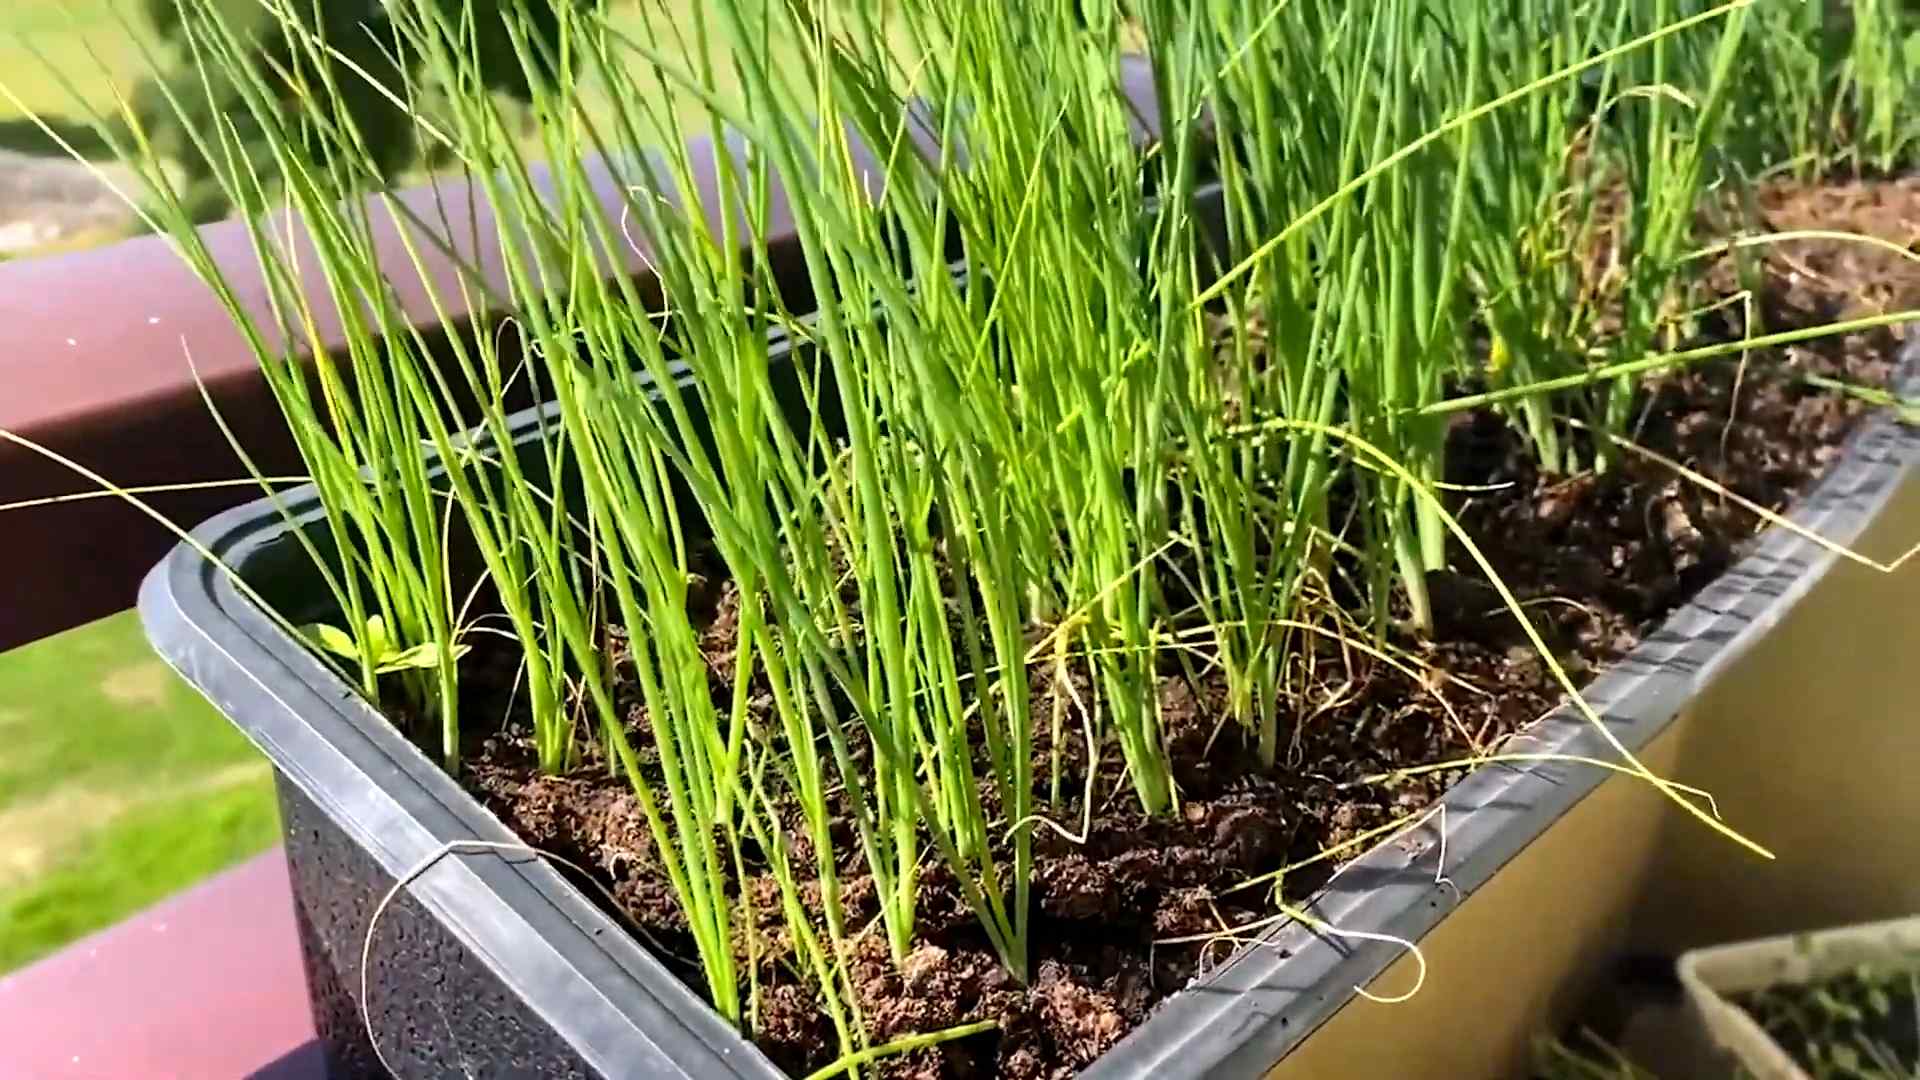
Harvesting Your Chives
The best part of growing chives is, of course, harvesting them! Here’s how to do it:
1. **Wait Until Mature:** Wait until your chives are at least 6 inches tall before harvesting.
2. **Snip the Leaves:** Use scissors or kitchen shears to snip off the leaves about an inch above the soil.
3. **Harvest Regularly:** Harvest your chives regularly to encourage new growth.
4. **Use Fresh or Dried:** Use your fresh chives immediately or dry them for later use. To dry chives, spread them out on a baking sheet and dry them in a low oven (around 170°F or 77°C) until they are brittle. You can also air dry them by hanging them upside down in a cool, dry place.
Troubleshooting Common Problems
Even with the best care, you might encounter some problems while growing chives indoors. Here are some common issues and how to fix them:
* **Yellowing Leaves:** Yellowing leaves can be caused by overwatering, underwatering, or nutrient deficiencies. Check the soil moisture and adjust your watering schedule accordingly. If the soil is consistently moist, you may be overwatering. If the soil is dry, you may be underwatering. You can also try fertilizing your chives with a balanced liquid fertilizer.
* **Leggy Growth:** Leggy growth (long, thin stems) is usually caused by insufficient light. Move your chives to a sunnier location or supplement with a grow light.
* **Pests:** Chives are generally pest-resistant, but they can occasionally be affected by aphids or spider mites. If you notice pests, try spraying your chives with insecticidal soap.
* **Slow Growth:** Slow growth can be caused by a variety of factors, including insufficient light, poor soil, or nutrient deficiencies. Make sure your chives are getting enough light, are planted in well-draining potting mix, and are being fertilized regularly.
Tips for Success
Here are a few extra tips to help you succeed with your indoor chive garden:
* **Choose the Right Variety:** Common chives (Allium schoenoprasum) are the most popular variety for indoor growing. Garlic chives (Allium tuberosum) are another option, but they have a stronger flavor.
* **Rotate Your Plants:** Rotate your chives regularly to ensure that all sides of the plant receive equal amounts of light.
* **Clean Your Tools:** Clean your scissors or kitchen shears before harvesting to prevent the spread of disease.
* **Don’t Over-Harvest:** Avoid harvesting more than one-third of the plant at a time, as this can weaken it.
* **Enjoy Your Harvest!** Use your fresh chives to add flavor to soups, salads, dips, and other dishes.
Propagating Chives
Want more chives? You can easily propagate them! The easiest way is by division:
1. **Carefully Remove the Plant:** Gently remove the chive plant from its pot.
2. **Divide the Clump:** Using your hands or a sharp knife, carefully divide the clump of chives into smaller sections. Each section should have its own roots.
3. **Repot the Divisions:** Plant each division in its own pot filled with well-draining potting mix.
4. **Water Thoroughly:** Water the newly potted divisions thoroughly.
5. **Place in a Sunny Location:** Place the pots on a sunny windowsill or under a grow light.
Using Your Homegrown Chives
Now that you have a bountiful supply of fresh chives, let’s talk about how to use them! Chives are incredibly versatile and can add a delicate oniony flavor to a wide variety of dishes.
* **Garnish:** Sprinkle chopped chives over soups, salads, baked potatoes, scrambled eggs, and omelets for a pop of color and flavor.
* **D
Conclusion
So, there you have it! Growing chives indoors is not only achievable, but it’s also surprisingly simple and incredibly rewarding. Forget those sad, wilted bunches from the grocery store – imagine snipping fresh, vibrant chives right from your windowsill whenever you need them. The difference in flavor is truly remarkable, adding a burst of oniony freshness to your dishes that store-bought chives simply can’t match.
This DIY trick is a must-try for several reasons. First, it provides a constant supply of fresh herbs, regardless of the season. No more last-minute trips to the store or settling for dried herbs when you crave that fresh chive flavor. Second, it’s a budget-friendly alternative to constantly buying chives. A single pot of chives can provide you with months, even years, of fresh herbs with minimal upkeep. Third, it’s a fantastic way to add a touch of green to your indoor space, bringing a bit of the garden inside.
But the benefits don’t stop there. Growing your own chives allows you to control the growing environment, ensuring that your herbs are free from pesticides and other harmful chemicals. You know exactly what’s going into your food, giving you peace of mind.
Looking for variations? Consider planting different varieties of chives, such as garlic chives, for a slightly different flavor profile. You can also experiment with different containers, from simple terracotta pots to more decorative planters that complement your home décor. For a truly unique touch, try growing chives in a repurposed container, like an old teacup or a vintage tin can. Just be sure to provide adequate drainage.
Another fun variation is to create a small indoor herb garden, combining chives with other easy-to-grow herbs like parsley, basil, and mint. This allows you to have a variety of fresh herbs at your fingertips, ready to enhance your culinary creations.
We wholeheartedly encourage you to try this DIY trick and experience the joy of growing chives indoors for yourself. It’s a simple, satisfying, and delicious way to elevate your cooking and bring a touch of nature into your home. Don’t be intimidated – even if you don’t have a green thumb, you can successfully grow chives indoors with just a little bit of care and attention.
Once you’ve given it a try, we’d love to hear about your experience! Share your tips, tricks, and photos in the comments below. Let us know what dishes you’ve been using your fresh chives in and any challenges you may have encountered. Your feedback will not only help other readers but also inspire us to create more helpful and informative content. So, grab a pot, some soil, and some chive seeds or seedlings, and get ready to enjoy the fresh, flavorful goodness of homegrown chives! Happy growing!
Frequently Asked Questions (FAQ)
Q: What kind of soil is best for growing chives indoors?
A: Chives thrive in well-draining soil that is rich in organic matter. A good quality potting mix specifically formulated for herbs or vegetables is ideal. You can also amend a general-purpose potting mix with compost or other organic materials to improve its drainage and nutrient content. Avoid using garden soil, as it can be too heavy and may contain pests or diseases.
Q: How much sunlight do indoor chives need?
A: Chives need at least 6-8 hours of sunlight per day to thrive. A south-facing window is usually the best option, but an east- or west-facing window can also work if it provides sufficient light. If you don’t have a sunny window, you can supplement with a grow light. Position the grow light a few inches above the chives and keep it on for 12-14 hours per day. Insufficient light can lead to leggy, weak growth.
Q: How often should I water my indoor chives?
A: Water your chives when the top inch of soil feels dry to the touch. Avoid overwatering, as this can lead to root rot. Water thoroughly until the water drains out of the bottom of the pot. Be sure to empty the saucer underneath the pot to prevent the chives from sitting in water. The frequency of watering will depend on factors such as the size of the pot, the type of soil, and the temperature and humidity of your home.
Q: How do I harvest chives?
A: You can start harvesting chives once they are about 6 inches tall. Use sharp scissors or kitchen shears to snip the chives about an inch above the soil level. Avoid cutting off more than one-third of the plant at a time, as this can stress the plant. Harvesting regularly will encourage new growth and keep your chives producing.
Q: Do I need to fertilize my indoor chives?
A: Chives benefit from occasional fertilization, especially during the growing season (spring and summer). Use a balanced liquid fertilizer diluted to half strength every 2-4 weeks. Avoid over-fertilizing, as this can burn the roots. You can also amend the soil with compost or other organic materials to provide a slow-release source of nutrients.
Q: My chives are turning yellow. What’s wrong?
A: Yellowing chives can be caused by several factors, including overwatering, underwatering, nutrient deficiencies, or pests. Check the soil moisture to ensure that you are not overwatering or underwatering. If the soil is consistently dry, water more frequently. If the soil is consistently wet, allow it to dry out before watering again. If you suspect a nutrient deficiency, try fertilizing with a balanced liquid fertilizer. Inspect the plants for pests, such as aphids or spider mites, and treat accordingly.
Q: Can I grow chives from seed indoors?
A: Yes, you can grow chives from seed indoors. Start the seeds indoors 6-8 weeks before the last expected frost. Sow the seeds about ¼ inch deep in a seed-starting mix. Keep the soil moist and warm (around 70-75°F). The seeds should germinate in 7-14 days. Once the seedlings have a few sets of true leaves, you can transplant them into individual pots.
Q: How do I prevent pests and diseases on my indoor chives?
A: To prevent pests and diseases, start with healthy plants and use a clean potting mix. Inspect your chives regularly for signs of pests or diseases. If you find any pests, such as aphids or spider mites, you can try washing them off with a strong stream of water or using insecticidal soap. Avoid overwatering, as this can create a favorable environment for fungal diseases. Ensure good air circulation around the plants to prevent moisture buildup.
Q: Can I move my indoor chives outdoors in the summer?
A: Yes, you can move your indoor chives outdoors in the summer, but be sure to acclimate them gradually to the outdoor conditions. Start by placing them in a shady spot for a few hours each day, gradually increasing the amount of sunlight they receive over a week or two. Protect them from strong winds and extreme temperatures. Bring them back indoors before the first frost.
Q: My chives are flowering. Should I cut off the flowers?
A: Chives produce attractive purple flowers that are also edible. However, flowering can sometimes reduce the flavor of the leaves. If you prefer to prioritize leaf production, you can cut off the flower stalks as they appear. Alternatively, you can allow the chives to flower and enjoy the beautiful blooms. The flowers can be used in salads or as a garnish.
Leave a Comment