

Grow Yellow Watermelon at Home: Imagine biting into a juicy, refreshingly sweet watermelon, but instead of the familiar red, it’s a vibrant, sunny yellow! Sounds intriguing, right? For centuries, watermelons have been a symbol of summer, abundance, and good times, enjoyed in cultures around the globe. From ancient Egypt, where they were depicted in hieroglyphics and placed in tombs of pharaohs, to modern-day picnics, watermelons have always held a special place in our hearts (and stomachs!).
But what if I told you that you could cultivate this delightful treat, specifically the unique yellow variety, right in your own backyard? Forget relying on grocery stores – this DIY guide will empower you to grow yellow watermelon at home, even if you’re a beginner gardener. Many people are intimidated by the thought of growing watermelons, believing they require vast amounts of space and expert knowledge. However, with the right techniques and a little patience, you can successfully harvest your own sweet, yellow-fleshed watermelons. This article will provide you with easy-to-follow steps, insider tips, and troubleshooting advice to ensure a bountiful harvest. Get ready to impress your friends and family with this unusual and delicious fruit – let’s get growing!
Grow Your Own Yellow Watermelon: A Step-by-Step Guide
Hey there, fellow gardening enthusiasts! Ever dreamt of biting into a juicy, sweet, yellow watermelon you grew yourself? Well, dream no more! It’s totally achievable, even if you’re not a seasoned pro. I’m going to walk you through everything you need to know to cultivate these sunny delights right in your own backyard (or even in containers!).
Choosing the Right Variety
First things first, you need to pick the right watermelon variety. Not all watermelons are created equal, and you definitely need to choose one specifically bred to have yellow flesh. Here are a few popular and reliable choices:
* ‘Yellow Doll’: This is a classic choice, known for its small size (perfect for smaller gardens) and incredibly sweet, crisp flesh. It matures relatively quickly, too!
* ‘Buttercup Yellow’: This variety produces slightly larger melons than ‘Yellow Doll’ and boasts a rich, buttery flavor.
* ‘Honey Cream’: If you’re looking for something truly unique, ‘Honey Cream’ offers a pale yellow flesh with a distinct honey-like sweetness.
* ‘Mountain Sweet Yellow’: A heirloom variety that is known for its disease resistance and large size.
Once you’ve chosen your variety, make sure you source your seeds from a reputable supplier to ensure good germination rates and healthy plants.
Getting Started: Seed Starting or Direct Sowing
You have two main options for starting your watermelon plants: starting seeds indoors or direct sowing them into the garden. Each has its pros and cons.
* Starting Seeds Indoors: This gives you a head start, especially if you live in a region with a shorter growing season. You can start seeds indoors about 4-6 weeks before the last expected frost.
* Direct Sowing: This is simpler, but it requires warmer soil temperatures and a longer growing season. Wait until the soil temperature consistently reaches at least 70°F (21°C) before direct sowing.
I personally prefer starting seeds indoors because it gives me more control over the early stages of growth and protects the seedlings from pests and diseases.
Starting Seeds Indoors: A Detailed Guide
Here’s how I start my watermelon seeds indoors:
1. Gather Your Supplies: You’ll need:
* Watermelon seeds
* Seed starting trays or small pots (I prefer biodegradable pots to minimize root disturbance when transplanting)
* Seed starting mix (a light, well-draining mix is crucial)
* A heat mat (optional, but it speeds up germination)
* A grow light (optional, but it prevents leggy seedlings)
* A spray bottle filled with water
2. Prepare the Seed Starting Trays: Fill your seed starting trays or pots with the seed starting mix. Gently tap the trays to settle the mix.
3. Sow the Seeds: Make a small indentation (about 1/2 inch deep) in the center of each cell or pot. Place one or two watermelon seeds in each indentation. Cover the seeds with seed starting mix and gently pat down.
4. Water Thoroughly: Use a spray bottle to thoroughly moisten the seed starting mix. Avoid overwatering, as this can lead to fungal diseases.
5. Provide Warmth and Light: Place the seed starting trays on a heat mat (if using) and under a grow light (if using). If you don’t have a heat mat, find a warm spot in your house. If you don’t have a grow light, place the trays near a sunny window, rotating them regularly to prevent the seedlings from leaning towards the light.
6. Maintain Moisture: Keep the seed starting mix consistently moist, but not soggy. Check the moisture level daily and water as needed.
7. Germination: Watermelon seeds typically germinate within 7-10 days. Once the seedlings emerge, remove the heat mat (if using) and continue to provide plenty of light.
8. Thinning (If Necessary): If you planted two seeds per cell or pot and both germinate, thin out the weaker seedling by snipping it off at the soil line with scissors. This will prevent overcrowding and ensure that the remaining seedling has enough space and nutrients to thrive.
Direct Sowing: A Simpler Approach
If you’re opting for direct sowing, here’s what you need to do:
1. Prepare the Soil: Choose a sunny location with well-drained soil. Amend the soil with compost or well-rotted manure to improve its fertility and drainage. Watermelons are heavy feeders, so rich soil is essential.
2. Create Mounds: Watermelons thrive in mounds, which provide better drainage and warmer soil temperatures. Create mounds that are about 1-2 feet in diameter and 6-12 inches high. Space the mounds about 3-4 feet apart.
3. Sow the Seeds: Sow 3-4 watermelon seeds per mound, about 1 inch deep. Cover the seeds with soil and gently pat down.
4. Water Thoroughly: Water the mounds thoroughly after sowing.
5. Thinning: Once the seedlings emerge and have a few true leaves, thin them out to the strongest seedling per mound.
Transplanting Seedlings (If Starting Indoors)
Once your seedlings have developed a few sets of true leaves and the weather has warmed up (soil temperature consistently above 70°F), it’s time to transplant them into the garden.
1. Harden Off the Seedlings: Before transplanting, you need to “harden off” the seedlings. This means gradually exposing them to outdoor conditions over a period of 7-10 days. Start by placing the seedlings in a sheltered location outdoors for a few hours each day, gradually increasing the amount of time they spend outside. This will help them acclimate to the sun, wind, and temperature fluctuations.
2. Prepare the Planting Site: Choose a sunny location with well-drained soil. Amend the soil with compost or well-rotted manure to improve its fertility and drainage. Watermelons need plenty of space to spread out, so make sure you have enough room.
3. Dig Holes: Dig holes that are slightly larger than the root balls of the seedlings. Space the holes about 3-4 feet apart.
4. Transplant the Seedlings: Gently remove the seedlings from their pots or trays. If you used biodegradable pots, you can plant the entire pot directly into the ground. Otherwise, carefully loosen the roots and place the seedlings in the holes.
5. Backfill and Water: Backfill the holes with soil and gently pat down. Water the seedlings thoroughly after transplanting.
Caring for Your Watermelon Plants
Now that your watermelon plants are in the ground, it’s time to provide them with the care they need to thrive.
* Watering: Watermelons need consistent moisture, especially during fruit development. Water deeply and regularly, especially during dry spells. Avoid overhead watering, as this can lead to fungal diseases. Drip irrigation is an excellent option for watermelons.
* Fertilizing: Watermelons are heavy feeders and benefit from regular fertilization. Use a balanced fertilizer (e.g., 10-10-10) every 2-3 weeks. You can also side-dress the plants with compost or well-rotted manure.
* Weeding: Keep the area around your watermelon plants free of weeds. Weeds compete with the watermelons for water and nutrients.
* Mulching: Mulch around the plants with straw or hay to help retain moisture, suppress weeds, and regulate soil temperature.
* Pest and Disease Control: Keep an eye out for common watermelon pests and diseases, such as aphids, squash bugs, and powdery mildew. Take action promptly if you notice any problems. Organic pest control methods, such as insecticidal soap and neem oil, can be effective.
* Pollination: Watermelons require pollination to produce fruit. If you’re not seeing any fruit set, you may need to hand-pollinate the flowers. To hand-pollinate, use a small paintbrush to transfer pollen from the male flowers to the female flowers. Female flowers have a small, immature watermelon at the base of the flower.
Supporting the Fruit (Optional)
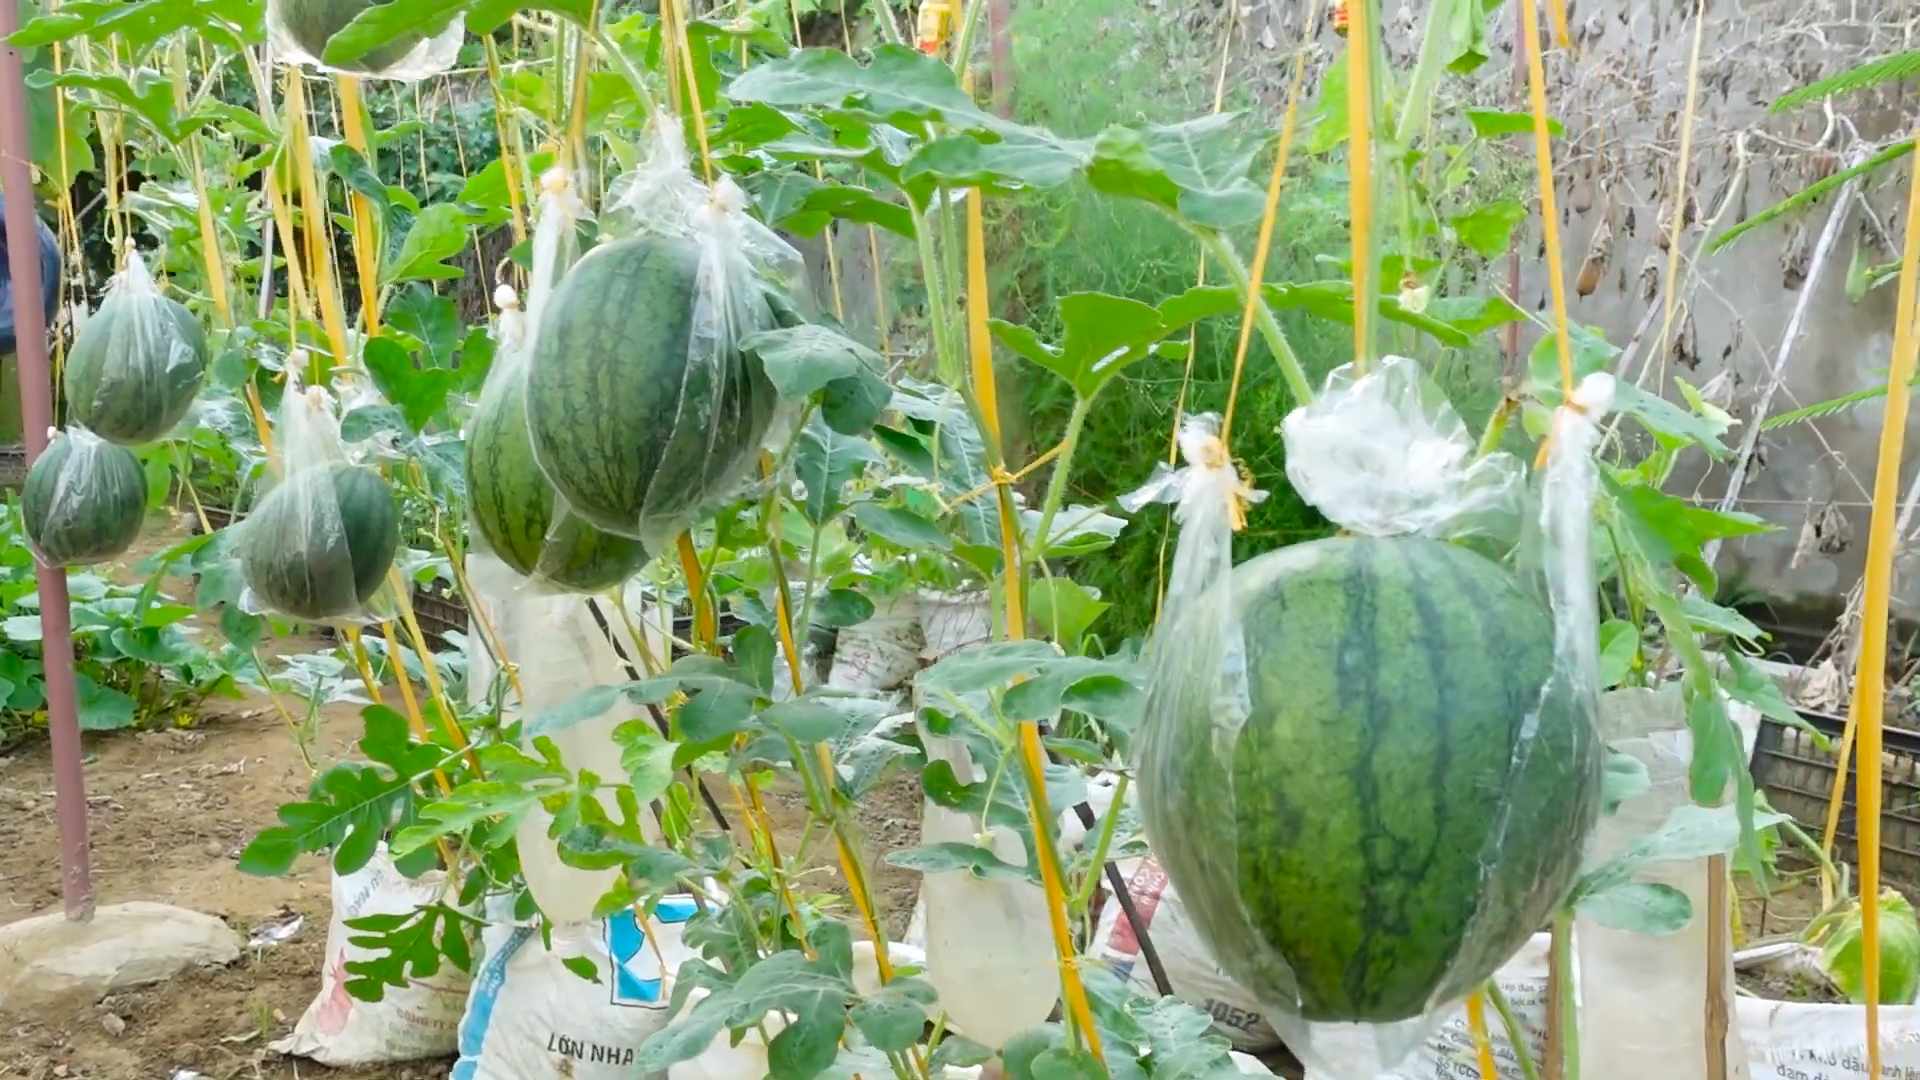
As your watermelons grow larger, you may want to provide them with some support to prevent them from rotting on the ground. You can use straw, wood, or even old tires to elevate the fruits.
Harvesting Your Yellow Watermelon
Knowing when to harvest your yellow watermelon is key to enjoying its sweet, juicy flavor. Here are a few signs to look for:
* The Tendril: The tendril closest to the fruit stem should be brown and dry.
* The Ground Spot: The spot where the watermelon rests on the ground (the “ground spot”) should be yellow or creamy yellow.
* The Thump Test: When you thump the watermelon, it should sound dull and hollow.
*

Conclusion
So, there you have it! Growing your own yellow watermelon at home isn’t just a fun gardening project; it’s a gateway to experiencing a unique and incredibly delicious fruit that you won’t easily find in your local grocery store. The vibrant color and sweeter, honey-like flavor of yellow watermelon offer a refreshing twist on the classic summer treat. Forget the bland, mass-produced watermelons – imagine biting into a juicy, homegrown yellow watermelon, knowing you nurtured it from seed to table.
This DIY trick, while requiring a bit of patience and care, is ultimately rewarding. It allows you to control the growing environment, ensuring your watermelon is free from harmful pesticides and packed with natural goodness. Plus, there’s an undeniable satisfaction in harvesting something you’ve grown yourself. It’s a connection to nature and a celebration of the simple pleasures in life.
But the fun doesn’t stop there! Feel free to experiment with different varieties of yellow watermelon. Some are sweeter than others, and some have a slightly different texture. You could also try companion planting to enhance the growth and flavor of your watermelon. Marigolds, for example, are known to deter pests, while basil can improve the overall health of your plants. Consider using different types of soil amendments to see how they affect the size and sweetness of your harvest. Perhaps you’ll discover the perfect combination for growing the ultimate yellow watermelon!
Don’t be afraid to get creative with your yellow watermelon once you’ve harvested it. Beyond simply slicing and enjoying it fresh, try incorporating it into refreshing summer salads, blending it into smoothies, or even grilling it for a unique caramelized flavor. The possibilities are endless!
We truly believe that this DIY trick for growing yellow watermelon at home is a must-try for any gardening enthusiast or anyone who simply appreciates fresh, delicious food. It’s a rewarding experience that connects you to nature, allows you to control the quality of your food, and provides you with a unique and flavorful treat.
So, grab your seeds, prepare your garden, and get ready to embark on this exciting journey. We’re confident that you’ll be amazed by the results. And most importantly, we want to hear about your experience! Share your tips, tricks, and photos with us in the comments below. Let’s build a community of yellow watermelon growers and inspire others to try this amazing DIY project. Happy gardening!
Frequently Asked Questions (FAQ)
What exactly *is* yellow watermelon, and is it genetically modified?
Yellow watermelon is *not* genetically modified. It’s a naturally occurring variety of watermelon that gets its yellow flesh from a lack of lycopene, the antioxidant that gives red watermelons their color. Think of it like different varieties of apples – some are red, some are green, and some are yellow. Yellow watermelons have been around for a long time and are simply a different cultivar. They often have a sweeter, honey-like flavor compared to red watermelons.
How long does it take to grow yellow watermelon from seed?
Generally, it takes about 70-90 days from planting the seeds to harvesting a ripe yellow watermelon. This timeframe can vary depending on your climate, the specific variety of yellow watermelon you’re growing, and the growing conditions. Warmer temperatures and plenty of sunlight will help speed up the process. Be patient and monitor your plants regularly for signs of maturity.
What are the best growing conditions for yellow watermelon?
Yellow watermelons thrive in warm, sunny conditions. They need at least 6-8 hours of direct sunlight per day. The ideal soil temperature for germination is between 70-90°F (21-32°C). The soil should be well-draining and rich in organic matter. Watermelons are heavy feeders, so amending the soil with compost or aged manure before planting is highly recommended. Consistent watering is crucial, especially during fruit development.
How do I know when my yellow watermelon is ripe?
Determining ripeness can be tricky, but here are a few indicators:
* **The tendril closest to the fruit should be brown and dry.** This is a reliable sign that the watermelon is nearing maturity.
* **The underside of the watermelon (where it rests on the ground) should be yellow or cream-colored.** If it’s still white, it’s not ripe yet.
* **The watermelon should sound hollow when you thump it.** A dull thud indicates it’s not ripe, while a resonant, hollow sound suggests it’s ready to be harvested.
* **The skin should be slightly dull and waxy.** A shiny, bright green skin often means it’s not fully ripe.
Can I grow yellow watermelon in a container?
Yes, you can grow yellow watermelon in a container, but it requires a large container (at least 20 gallons) to accommodate the plant’s extensive root system. Choose a container with good drainage and use a high-quality potting mix. You’ll also need to provide a trellis or support system for the vines to climb. Container-grown watermelons may require more frequent watering and fertilization than those grown in the ground. Consider a dwarf or bush variety of yellow watermelon for container growing, as they are more compact.
What are some common pests and diseases that affect yellow watermelon, and how can I prevent them?
Common pests include aphids, squash bugs, and vine borers. Diseases include powdery mildew, fusarium wilt, and anthracnose. To prevent these problems:
* **Practice crop rotation.** Don’t plant watermelons in the same spot year after year.
* **Choose disease-resistant varieties.**
* **Provide good air circulation.** Space plants adequately to prevent overcrowding.
* **Water at the base of the plants.** Avoid wetting the foliage, which can promote fungal diseases.
* **Inspect plants regularly for pests and diseases.** Treat infestations promptly with insecticidal soap or neem oil.
* **Remove and destroy any infected plant material.**
How often should I water my yellow watermelon plants?
Water deeply and regularly, especially during hot, dry weather. Aim for about 1-2 inches of water per week. Watermelons need consistent moisture, especially during fruit development. Avoid overwatering, which can lead to root rot. Check the soil moisture regularly and adjust your watering schedule accordingly. Mulching around the plants can help retain moisture and suppress weeds.
Do I need to fertilize my yellow watermelon plants?
Yes, watermelons are heavy feeders and benefit from regular fertilization. Use a balanced fertilizer (e.g., 10-10-10) at planting time. Once the plants start to flower, switch to a fertilizer higher in phosphorus and potassium to promote fruit development. Follow the instructions on the fertilizer label carefully. You can also supplement with compost tea or other organic fertilizers.
Can I save seeds from my yellow watermelon to plant next year?
Yes, you can save seeds from your yellow watermelon, but keep in mind that if you grew it near other watermelon varieties, there’s a chance of cross-pollination, which could result in a different type of watermelon next year. To save seeds, scoop them out of a ripe watermelon, rinse them thoroughly, and spread them out on a paper towel to dry completely. Store the dried seeds in an airtight container in a cool, dark place.
Is growing yellow watermelon at home worth the effort?
Absolutely! While it requires some effort and attention, the reward of harvesting your own sweet, juicy yellow watermelon is well worth it. It’s a fun and educational gardening project that connects you to nature and provides you with a unique and delicious treat. Plus, you’ll have the satisfaction of knowing exactly where your food came from and how it was grown. The taste of a homegrown yellow watermelon is simply unmatched!
Leave a Comment