

Grow Yardlong Beans, and prepare to be amazed! Imagine stepping into your garden and harvesting beans that are literally, well, a yard long! It sounds like something out of a fairytale, doesn’t it? But trust me, it’s totally achievable, and I’m here to show you how with some simple DIY tricks and hacks.
Yardlong beans, also known as asparagus beans or Chinese long beans, have a rich history, particularly in Asian cuisine. They’ve been cultivated for centuries and are a staple in many dishes, prized for their unique texture and slightly sweet flavor. But you don’t need to travel to Asia to enjoy these culinary delights; you can grow yardlong beans right in your own backyard!
Why should you bother with this DIY project? Because fresh, homegrown produce is simply the best! Store-bought beans often lack the vibrant flavor and crispness of freshly picked ones. Plus, growing your own food is incredibly rewarding and a fantastic way to connect with nature. I’ve found that it’s also a great way to reduce your carbon footprint and save money on groceries. So, let’s dive in and discover the secrets to successfully growing these impressive legumes!
Growing Yardlong Beans: A DIY Guide to a Bountiful Harvest
Hey there, fellow gardening enthusiasts! I’m so excited to share my experience growing yardlong beans (also known as asparagus beans or Chinese long beans). These fascinating veggies are not only delicious but also a real conversation starter in the garden. Get ready to impress your friends and family with these incredibly long and flavorful beans! I’ll walk you through every step, from preparing the soil to harvesting your impressive crop.
Choosing the Right Variety and Location
Before we dive into the nitty-gritty, let’s talk about variety and location. There are several yardlong bean varieties available, each with slightly different characteristics. I personally prefer the ‘Red Noodle’ variety for its vibrant color and excellent flavor, but ‘Chinese Red Noodle’ and ‘Orient Wonder’ are also popular choices.
* Variety Selection: Consider factors like disease resistance, pod length, and color when choosing your variety. Read reviews and see what grows well in your local climate.
* Sunlight: Yardlong beans need at least 6-8 hours of direct sunlight per day. A sunny spot is crucial for healthy growth and abundant bean production.
* Soil: Well-drained soil is essential. Yardlong beans don’t like soggy roots. Amend heavy clay soil with compost and other organic matter to improve drainage.
* Support System: These beans are climbers! You’ll need a sturdy trellis, fence, or teepee for them to grow on. I’ve found that a trellis made of cattle panels works wonders.
Preparing the Soil: The Foundation for Success
The secret to a thriving yardlong bean crop lies in well-prepared soil. I always spend extra time on this step, and it pays off big time!
1. Soil Testing: Before you start, it’s a good idea to test your soil’s pH. Yardlong beans prefer a slightly acidic to neutral pH (around 6.0-7.0). You can purchase a soil testing kit at most garden centers.
2. Amending the Soil: Based on your soil test results, amend the soil accordingly. If your soil is too acidic, add lime. If it’s too alkaline, add sulfur.
3. Adding Organic Matter: This is the most important step! Incorporate plenty of compost, well-rotted manure, or other organic matter into the soil. This will improve drainage, fertility, and water retention. I usually add a 2-3 inch layer of compost and work it into the top 6-8 inches of soil.
4. Fertilizing: Yardlong beans are heavy feeders. Before planting, I like to add a slow-release fertilizer that’s rich in phosphorus and potassium. Avoid fertilizers that are too high in nitrogen, as this can promote excessive foliage growth at the expense of bean production. Bone meal is a great source of phosphorus.
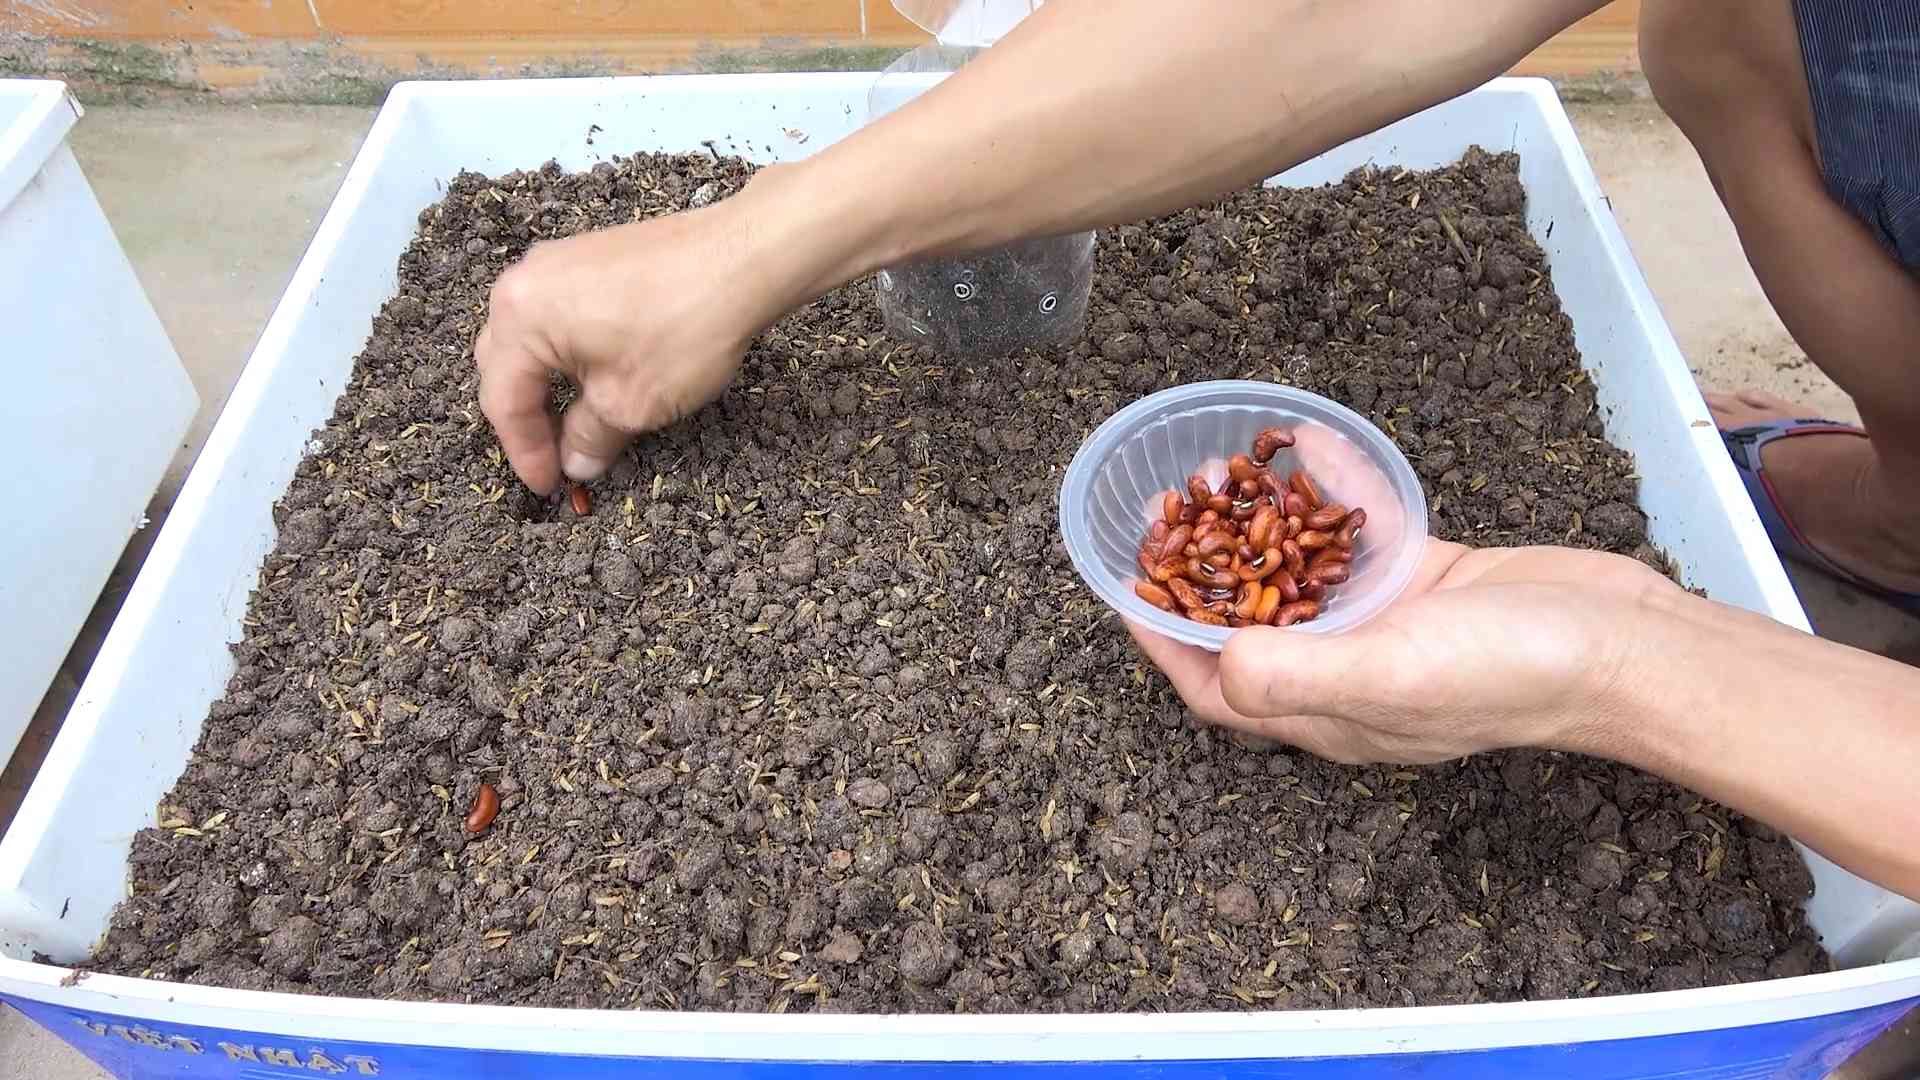
Planting Your Yardlong Beans: Getting Started
Now for the fun part – planting! You can either start your yardlong beans indoors or direct sow them in the garden. I prefer direct sowing, as it avoids transplant shock.
1. Timing: Wait until the soil has warmed up to at least 65°F (18°C) before planting. This is usually a few weeks after the last frost.
2. Sowing Seeds: Sow seeds 1 inch deep and 2-3 inches apart. I usually plant two seeds per hole and thin them out later if both germinate.
3. Spacing: Space rows 2-3 feet apart. This will give the plants plenty of room to grow and allow for good air circulation.
4. Watering: Water the seeds thoroughly after planting. Keep the soil consistently moist until the seedlings emerge.
5. Germination: Yardlong bean seeds typically germinate in 7-14 days. Be patient!
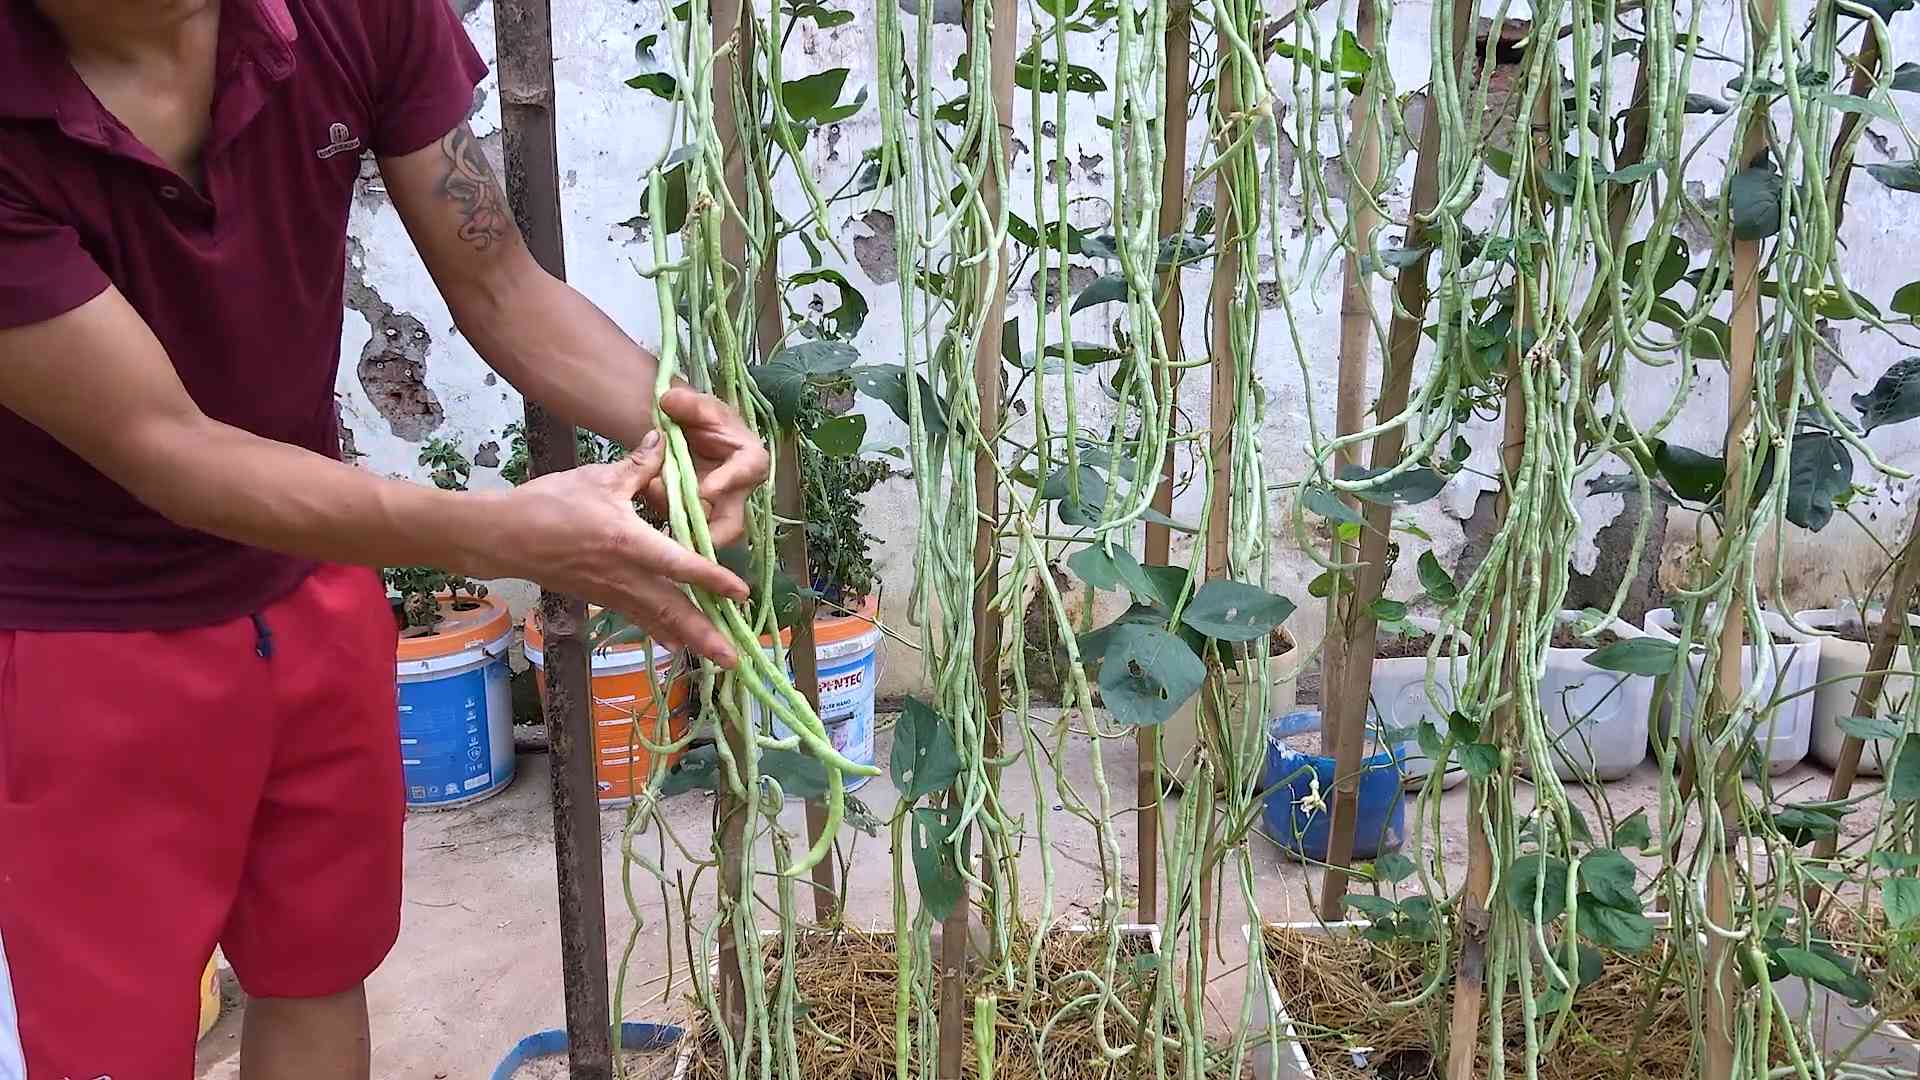
Providing Support: Trellising Your Beans
Yardlong beans are vigorous climbers, so providing a sturdy support system is crucial. I’ve experimented with different trellising methods, and here’s what I’ve learned:
1. Trellis Options: Choose a trellis that is at least 6-8 feet tall. Cattle panels, bamboo stakes, and sturdy fences all work well.
2. Installing the Trellis: Install the trellis before or shortly after planting. This will give the plants something to climb onto as soon as they start growing.
3. Guiding the Vines: As the vines grow, gently guide them onto the trellis. You may need to tie them to the trellis with twine or plant clips.
4. Maintenance: Check the trellis regularly to make sure it’s sturdy and that the vines are properly supported.
Caring for Your Yardlong Beans: Watering, Fertilizing, and Pest Control
Once your yardlong beans are established, it’s important to provide them with proper care.
1. Watering: Water deeply and regularly, especially during hot, dry weather. Aim for about 1 inch of water per week. Avoid overhead watering, as this can promote fungal diseases. Soaker hoses or drip irrigation are ideal.
2. Fertilizing: Side-dress the plants with a balanced fertilizer every 4-6 weeks. You can also use a liquid fertilizer, such as fish emulsion or seaweed extract.
3. Weeding: Keep the area around the plants free of weeds. Weeds compete with the beans for nutrients and water. Mulching can help suppress weeds.
4. Pest Control: Yardlong beans can be susceptible to pests such as aphids, bean beetles, and spider mites. Inspect your plants regularly for signs of infestation.
* Aphids: Spray aphids with a strong stream of water or use insecticidal soap.
* Bean Beetles: Handpick bean beetles or use neem oil.
* Spider Mites: Increase humidity around the plants and use insecticidal soap.
5. Disease Control: Fungal diseases, such as powdery mildew and bean rust, can also affect yardlong beans.
* Powdery Mildew: Improve air circulation around the plants and use a fungicide if necessary.
* Bean Rust: Remove infected leaves and use a fungicide.
Harvesting Your Yardlong Beans: The Moment of Truth
The most rewarding part of growing yardlong beans is, of course, harvesting them!
1. Timing: Harvest the beans when they are young and tender, usually about 12-18 inches long. They should be firm and snap easily.
2. Harvesting Technique: Use scissors or pruning shears to cut the beans from the vine. Be careful not to damage the plant.
3. Frequency: Harvest the beans regularly to encourage continued production. The more you harvest, the more beans the plant will produce.
4. Storage: Yardlong beans are best eaten fresh. However, they can be stored in the refrigerator for a few days. You can also freeze them for longer storage. Blanch the beans for 2-3 minutes before freezing to preserve their color and flavor.
Troubleshooting Common Problems
Even with the best care, you may encounter some problems while growing yardlong beans. Here are some common issues and how to address them:
* Poor Germination: If your seeds aren’t germinating, make sure the soil is warm enough and that you’re not overwatering. You can also try scarifying the seeds by gently nicking them with a knife before planting.
* Yellowing Leaves: Yellowing leaves can be a sign of nutrient deficiency, overwatering, or disease. Check the soil drainage and fertilize the plants if necessary.
* Lack of Bean Production: If your plants are growing well but not producing beans, it could be due to a lack of pollination. Yardlong beans are self-pollinating, but bees and other pollinators can help. You can also try hand-pollinating the flowers by gently transferring pollen from one flower to another with a small brush.
* Pest Infestations: As mentioned earlier, yardlong beans can be susceptible to various pests. Inspect your plants regularly and take action promptly if you notice any signs of infestation.
Enjoying Your Harvest: Culinary Delights
Now that you’ve harvested your yardlong beans, it’s time to enjoy them! These versatile beans can be used in a variety of dishes.
* Stir-fries: Yardlong beans are a popular ingredient in stir-fries. They add a delicious crunch and a slightly sweet flavor.
* Salads: You can add raw or blanched yardlong beans to salads for a refreshing and nutritious boost.
* Soups and Stews: Yardlong beans can also be added to soups and stews for extra flavor and texture.
* Grilled: Grilling yardlong beans is a simple and delicious way to enjoy them. Toss them with olive oil, salt, and pepper before grilling.
* Pickled: Pickled yardlong beans are a tangy and flavorful treat.
I hope this guide has inspired you to
Conclusion
So, there you have it! Growing your own yardlong beans isn’t just a gardening project; it’s an adventure in flavor, a testament to self-sufficiency, and a rewarding experience that connects you directly to the food you eat. We’ve walked through the process, from selecting the perfect seeds to harvesting those impressively long, delicious beans. But why is this DIY trick a must-try?
Firstly, the taste. Freshly picked yardlong beans offer a crispness and sweetness that you simply can’t find in store-bought varieties. The difference is remarkable, a testament to the power of homegrown produce. Secondly, the satisfaction. There’s an undeniable sense of accomplishment that comes with nurturing a plant from seed to harvest, especially when that harvest yields something as unique and visually stunning as yardlong beans. Imagine the conversations sparked by serving a dish featuring beans you grew yourself!
Beyond the taste and satisfaction, growing yardlong beans offers practical benefits. You’ll have a readily available source of fresh vegetables, reducing your reliance on grocery stores and potentially saving money. Plus, these beans are incredibly versatile in the kitchen. Stir-fries are a classic, but don’t stop there! Try them in salads, curries, or even grilled as a unique side dish.
Speaking of variations, feel free to experiment with different growing techniques. Some gardeners prefer to train their yardlong beans up trellises, while others opt for teepees or even sprawling them along fences. The choice is yours, depending on your space and aesthetic preferences. You can also explore different varieties of yardlong beans, each with its own subtle nuances in flavor and appearance. Consider trying the ‘Red Noodle’ variety for a vibrant splash of color in your garden and on your plate, or the ‘Chinese Red’ for a slightly sweeter taste.
Don’t be afraid to get creative with your companion planting too. Marigolds can help deter pests, while basil can enhance the flavor of your beans. Experiment and see what works best in your garden.
Ultimately, the best way to discover the joys of growing yardlong beans is to simply dive in and try it yourself. Don’t be intimidated if you’re a beginner gardener. Yardlong beans are relatively easy to grow, and the rewards are well worth the effort.
We encourage you to embark on this gardening journey and share your experiences with us! Post photos of your yardlong bean plants, share your favorite recipes, and let us know what challenges you encountered and how you overcame them. Your insights can help other gardeners discover the magic of growing their own food. So, grab some seeds, get your hands dirty, and prepare to be amazed by the bounty of your own backyard. This **yardlong bean** adventure awaits!
Frequently Asked Questions (FAQ)
What is the best time of year to plant yardlong beans?
Yardlong beans are warm-weather crops, so the best time to plant them is after the last frost, when the soil has warmed to at least 65°F (18°C). This typically falls in late spring or early summer, depending on your climate. In warmer regions with longer growing seasons, you may even be able to plant a second crop in late summer for a fall harvest. Check your local frost dates to determine the optimal planting time for your area.
How much space do yardlong beans need?
Yardlong beans are vigorous climbers and require ample vertical space. When planting, space seeds about 4-6 inches apart at the base of a trellis or other support structure. The trellis should be at least 6-8 feet tall to accommodate the beans’ growth. If you’re planting in rows, space the rows about 2-3 feet apart. Proper spacing ensures adequate airflow and sunlight penetration, which helps prevent disease and promotes healthy growth.
What kind of soil is best for yardlong beans?
Yardlong beans thrive in well-drained, fertile soil that is rich in organic matter. Before planting, amend your soil with compost or well-rotted manure to improve its structure and nutrient content. The ideal soil pH for yardlong beans is between 6.0 and 7.0. If your soil is heavy clay or sandy, consider adding amendments to improve its drainage and water-holding capacity.
How often should I water yardlong beans?
Yardlong beans need consistent moisture, especially during hot, dry weather. Water deeply and regularly, aiming to keep the soil consistently moist but not waterlogged. A good rule of thumb is to water when the top inch of soil feels dry to the touch. Mulching around the base of the plants can help retain moisture and suppress weeds. Avoid overhead watering, as this can increase the risk of fungal diseases.
Do yardlong beans need fertilizer?
While yardlong beans are not heavy feeders, they benefit from regular fertilization, especially during their active growing period. Apply a balanced fertilizer (e.g., 10-10-10) according to the package instructions. You can also side-dress the plants with compost tea or liquid seaweed extract every few weeks to provide them with essential nutrients. Avoid over-fertilizing, as this can lead to excessive foliage growth at the expense of bean production.
What are some common pests and diseases that affect yardlong beans?
Yardlong beans can be susceptible to various pests and diseases, including aphids, bean beetles, spider mites, and fungal diseases like powdery mildew and bean rust. Regularly inspect your plants for signs of infestation or disease. To prevent problems, practice good garden hygiene, such as removing weeds and debris, and ensuring adequate airflow around the plants. If you encounter pests, try using organic pest control methods, such as insecticidal soap or neem oil. For fungal diseases, consider using a copper-based fungicide.
How do I know when yardlong beans are ready to harvest?
Yardlong beans are typically ready to harvest about 60-80 days after planting. The beans should be long and slender, but still tender and pliable. Avoid letting them become too thick or tough, as this will affect their flavor and texture. Harvest the beans regularly to encourage continued production. Use scissors or pruning shears to cut the beans from the vine, being careful not to damage the plant.
Can I save seeds from my yardlong beans?
Yes, you can save seeds from your yardlong beans, but it’s important to choose healthy, disease-free plants. Allow some of the beans to mature fully on the vine, until they are dry and brown. Remove the seeds from the pods and allow them to dry completely before storing them in an airtight container in a cool, dark place. Be aware that if you grew multiple varieties of yardlong beans, there is a chance of cross-pollination, which may result in variations in the offspring.
Are yardlong beans the same as green beans?
No, yardlong beans are not the same as green beans, although they are both legumes. Yardlong beans, as the name suggests, are significantly longer than green beans, typically growing to lengths of 1-3 feet. They also have a slightly different flavor and texture. Yardlong beans tend to be more tender and slightly sweeter than green beans.
What are some good companion plants for yardlong beans?
Good companion plants for yardlong beans include:
* **Marigolds:** Deter pests like nematodes and bean beetles.
* **Basil:** Enhances the flavor of the beans and repels some insects.
* **Nasturtiums:** Attract aphids away from the beans.
* **Carrots:** Improve soil drainage and aeration.
* **Cucumbers:** Provide shade and support for the beans.
Avoid planting yardlong beans near onions or garlic, as these can inhibit their growth.

Leave a Comment