

Grow Shallots at Home – and unlock a world of culinary possibilities right in your backyard! Have you ever dreamt of snipping fresh, flavorful shallots just moments before adding them to your favorite dish? Well, dream no more! This DIY guide is your key to cultivating these gourmet gems with ease, regardless of your gardening experience.
Shallots, with their delicate onion-garlic flavor, have been prized for centuries. Originating in Central or Southwest Asia, they’ve journeyed across continents, becoming a staple in cuisines worldwide, from French sauces to Asian stir-fries. Their subtle complexity elevates any recipe, and now, you can have a constant supply, fresher than anything you’ll find at the grocery store.
But why should you grow shallots at home? Beyond the incredible flavor, it’s about control. You know exactly what goes into your food – no pesticides, no hidden chemicals, just pure, natural goodness. Plus, it’s incredibly rewarding! There’s something truly special about nurturing a plant from a tiny bulb to a thriving source of deliciousness. In this article, I’ll share my favorite DIY tricks and hacks to ensure your shallot-growing journey is a resounding success. Get ready to impress your friends and family with your homegrown culinary creations!
Grow Shallots at Home: A Beginner’s Guide
Hey there, fellow gardening enthusiasts! Ever dreamt of having a constant supply of fresh, flavorful shallots right at your fingertips? Well, dream no more! Growing shallots at home is surprisingly easy, even if you’re a complete newbie. I’m going to walk you through every step, from choosing the right shallots to harvesting your delicious bounty. Let’s get started!
Choosing Your Shallots
Before we dive into the planting process, let’s talk about selecting the right shallots. You have a couple of options here:
* Shallot Sets: These are small, immature shallots specifically grown for planting. They’re readily available at garden centers and online retailers. This is the easiest and most reliable method for beginners.
* Shallots from the Grocery Store: Yes, you can actually grow shallots from the ones you buy at the grocery store! However, success isn’t always guaranteed. Look for organic shallots that are firm, plump, and show no signs of sprouting. Avoid any that are soft, mushy, or have started to rot.
Important Note: If you’re using grocery store shallots, there’s a chance they might have been treated to prevent sprouting. Organic shallots are less likely to have undergone this treatment.
Preparing for Planting
Okay, you’ve got your shallots. Now, let’s get the planting area ready. Shallots need a sunny spot and well-draining soil.
* Sunlight: Shallots need at least 6-8 hours of direct sunlight per day. Choose a location in your garden that gets plenty of sunshine.
* Soil: Well-draining soil is crucial. Shallots don’t like to sit in soggy soil, as this can lead to rot. If your soil is heavy clay, amend it with compost, well-rotted manure, or other organic matter to improve drainage.
* Soil pH: Shallots prefer a soil pH between 6.0 and 7.0. You can test your soil pH with a soil testing kit, available at most garden centers. If your soil is too acidic, you can add lime to raise the pH. If it’s too alkaline, you can add sulfur to lower the pH.
* Fertilizing: Before planting, work a balanced fertilizer into the soil. A 10-10-10 fertilizer is a good option. Follow the instructions on the fertilizer package for application rates.
Planting Your Shallots
Now for the fun part! Let’s get those shallots in the ground.
1. Timing is Key: The best time to plant shallots is in the fall (September-October) in warmer climates or early spring (February-March) in colder climates. Planting in the fall allows the shallots to establish roots before winter, resulting in a larger harvest the following summer.
2. Preparing the Planting Bed: Rake the soil smooth and remove any rocks or debris.
3. Spacing: Plant shallots 6-8 inches apart in rows that are 12-18 inches apart. This gives them enough room to grow and prevents overcrowding.
4. Planting Depth: Plant the shallots with the pointed end facing up, about 1-2 inches deep. You want the top of the shallot to be just barely covered with soil.
5. Watering: After planting, water the shallots thoroughly. This will help settle the soil and encourage root growth.
Caring for Your Shallots
Once your shallots are planted, they’ll need regular care to thrive.
* Watering: Water regularly, especially during dry periods. Shallots need consistent moisture, but avoid overwatering, which can lead to rot. Aim for about 1 inch of water per week.
* Weeding: Keep the area around your shallots free of weeds. Weeds compete with shallots for nutrients and water. Hand-pull weeds carefully to avoid disturbing the shallot roots.
* Fertilizing: Side-dress your shallots with a nitrogen-rich fertilizer about a month after planting. This will help promote leafy growth. Use a fertilizer like ammonium nitrate or urea, following the instructions on the package.
* Mulching: Apply a layer of mulch around your shallots to help retain moisture, suppress weeds, and regulate soil temperature. Straw, hay, or shredded leaves are good options for mulch.
* Pest and Disease Control: Shallots are generally pest-resistant, but they can be susceptible to onion maggots and thrips. Onion maggots are small, white larvae that feed on the roots of shallots. Thrips are tiny, slender insects that suck sap from the leaves. You can control these pests with insecticidal soap or neem oil. Shallots can also be susceptible to fungal diseases like downy mildew and botrytis blight. These diseases are more common in humid conditions. To prevent fungal diseases, ensure good air circulation around your shallots and avoid overhead watering. If you notice signs of fungal disease, treat with a fungicide.
Harvesting Your Shallots
The moment you’ve been waiting for! Harvesting your shallots is the reward for all your hard work.
1. Timing: Shallots are typically ready to harvest in the summer, about 90-120 days after planting. The leaves will start to turn yellow and brown, and the bulbs will be plump and firm.
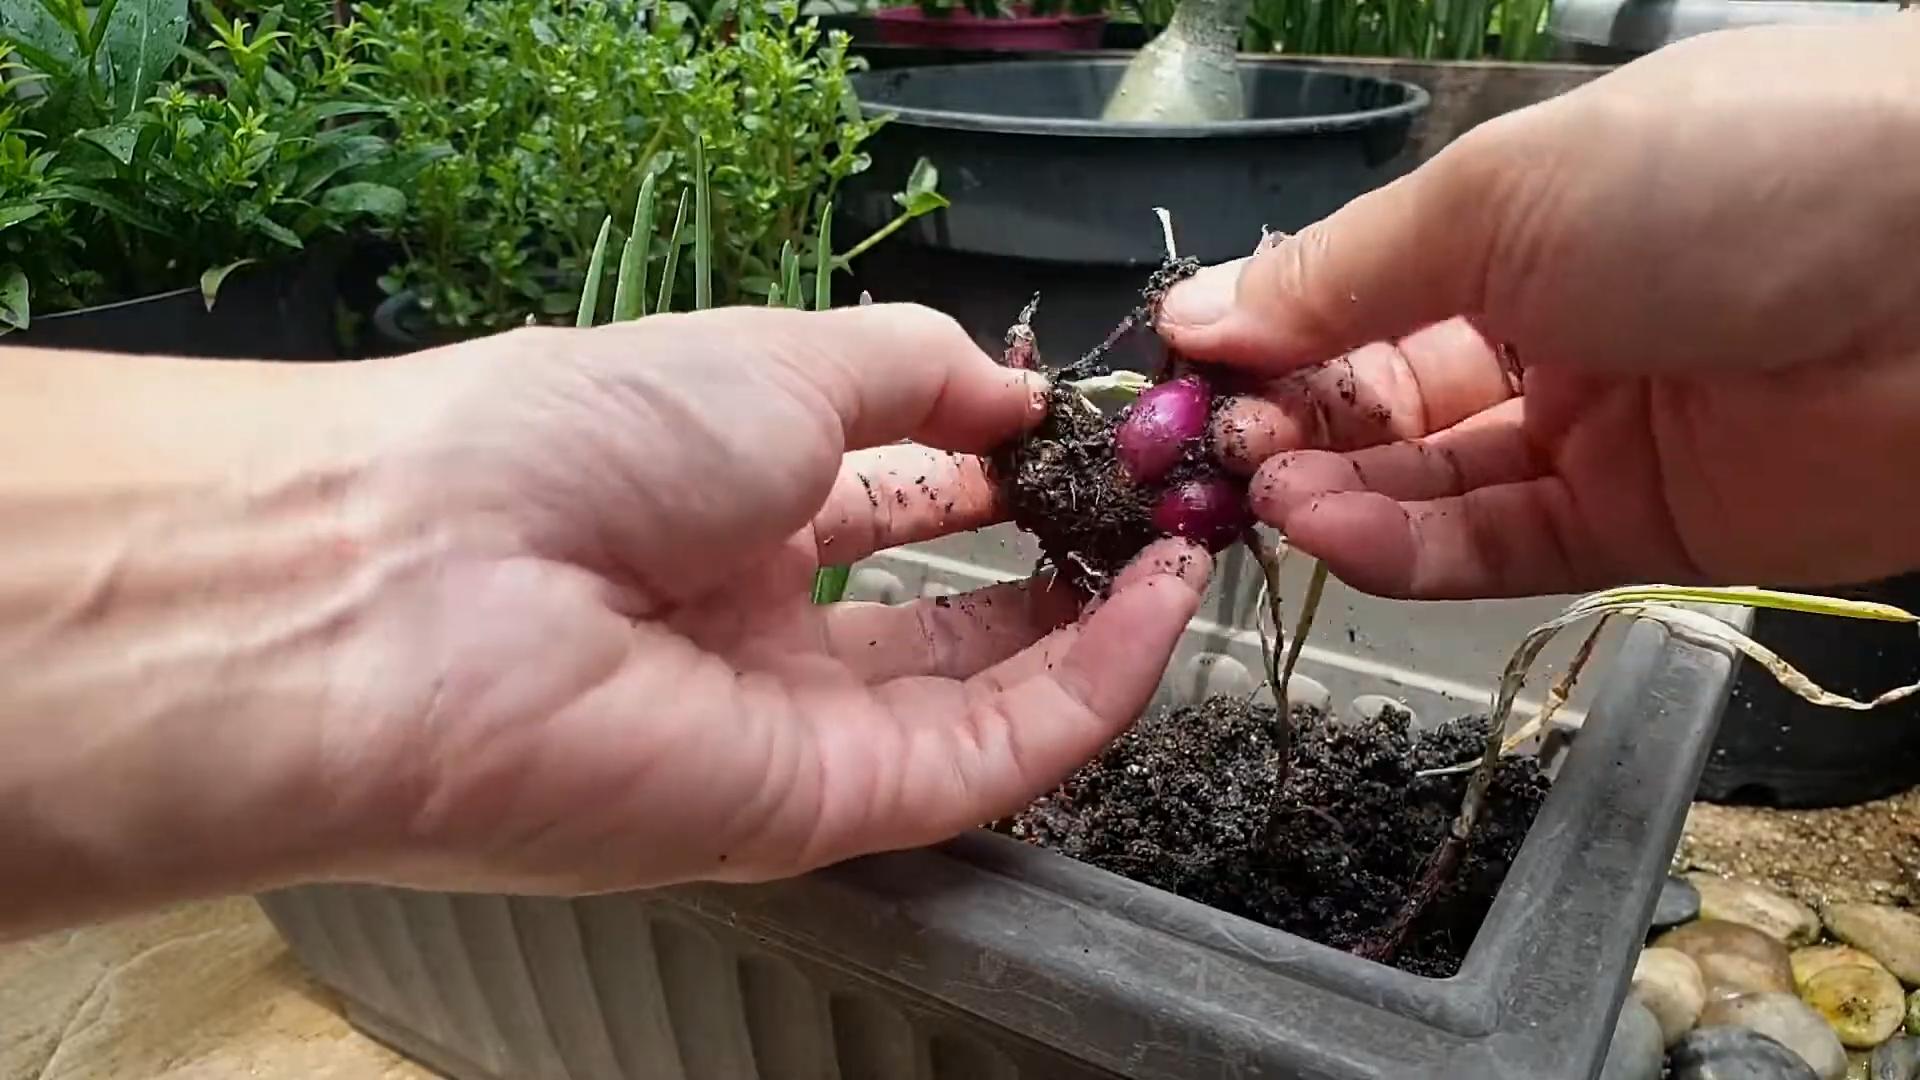
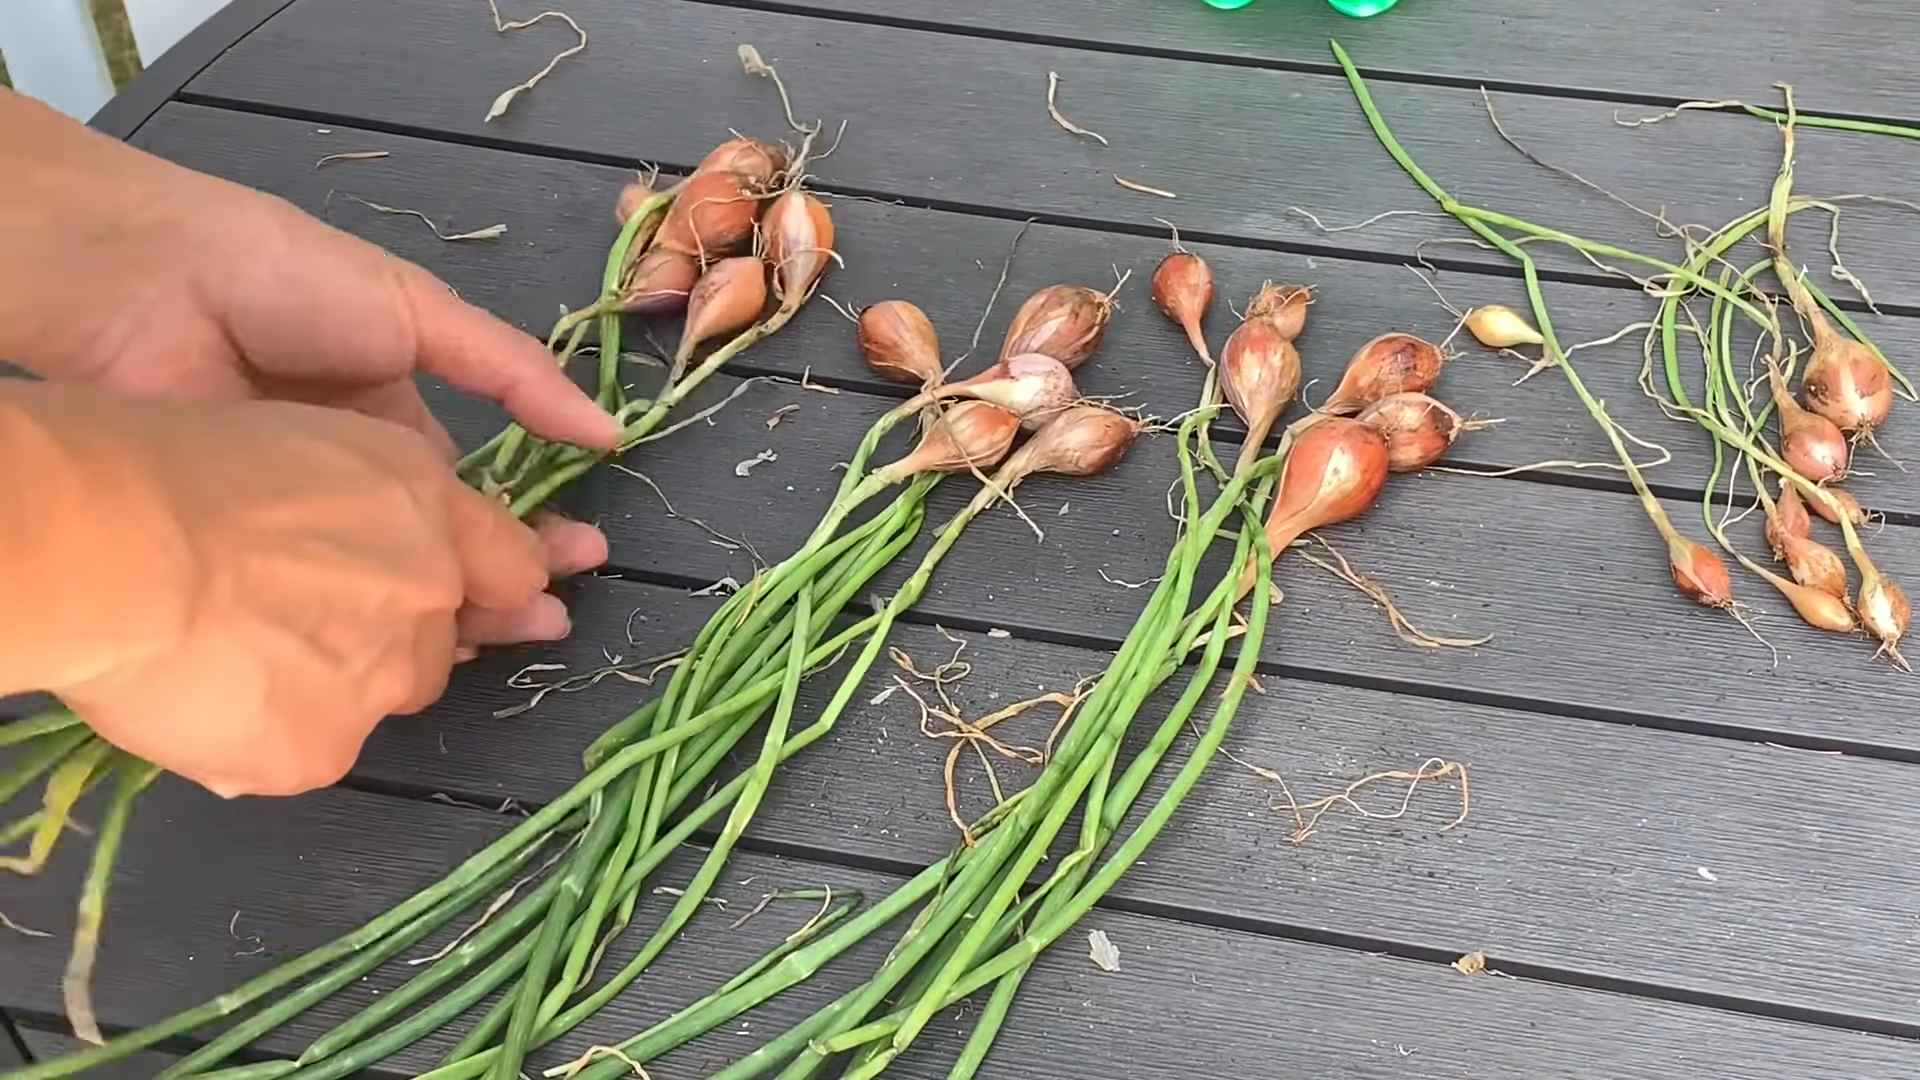
2. Harvesting Technique: Gently loosen the soil around the shallots with a garden fork or trowel. Carefully lift the shallots from the ground, being careful not to damage the bulbs.
3. Curing: After harvesting, cure the shallots in a warm, dry, well-ventilated place for 2-3 weeks. This allows the outer layers of the bulbs to dry and harden, which helps prevent rot during storage. You can cure shallots by spreading them out on a screen or hanging them in mesh bags.
4. Storing: Once the shallots are cured, store them in a cool, dry, dark place. A temperature of 32-40°F (0-4°C) is ideal. Shallots can be stored for several months if properly cured and stored.
Troubleshooting
Even with the best care, you might encounter some challenges along the way. Here are a few common problems and how to address them:
* Shallots Not Bulbing: This can be caused by several factors, including insufficient sunlight, poor soil, or overwatering. Make sure your shallots are getting enough sunlight, amend the soil with compost, and avoid overwatering.
* Shallots Rotting: This is usually caused by overwatering or poor drainage. Ensure your soil is well-draining and avoid overwatering. You can also add a layer of mulch around your shallots to help prevent soil from splashing onto the bulbs.
* Pest Infestations: As mentioned earlier, shallots can be susceptible to onion maggots and thrips. Control these pests with insecticidal soap or neem oil.
* Disease Problems: Fungal diseases like downy mildew and botrytis blight can affect shallots. Prevent these diseases by ensuring good air circulation and avoiding overhead watering. Treat with a fungicide if necessary.
Growing Shallots in Containers
Don’t have a garden? No problem! You can also grow shallots in containers.
* Container Size: Choose a container that is at least 8 inches deep and 12 inches wide. This will give the shallots enough room to grow.
* Potting Mix: Use a well-draining potting mix. Avoid using garden soil, as it can become compacted in containers.
* Planting: Plant the shallots as described above, spacing them about 4-6 inches apart in the container.
* Care: Water regularly and fertilize every few weeks with a balanced fertilizer. Place the container in a sunny location.
Propagating Shallots
Shallots are propagated by dividing the bulbs. After harvesting, you can save some of the bulbs to plant the following year. Choose healthy, plump bulbs that are free of disease. Store them in a cool, dry, dark place until planting time.
Enjoying Your Harvest
Now that you’ve harvested your shallots, it’s time to enjoy the fruits (or rather, bulbs) of your labor! Shallots can be used in a variety of dishes, from soups and stews to sauces and salads. They have a milder flavor than onions, making them a versatile ingredient in the kitchen.
I hope this guide has inspired you to grow your own shallots at home. It’s a rewarding experience that will provide you with fresh, flavorful shallots for months to come. Happy gardening!
Conclusion
So, there you have it! Growing shallots at home is not only surprisingly simple, but it’s also incredibly rewarding. Imagine the satisfaction of snipping fresh, flavorful shallots from your own garden, knowing exactly where they came from and how they were grown. Forget those bland, store-bought shallots that have been sitting on shelves for who knows how long. With this easy DIY trick, you can have a constant supply of vibrant, aromatic shallots right at your fingertips.
This isn’t just about saving a few dollars; it’s about connecting with your food, embracing a more sustainable lifestyle, and adding a touch of culinary magic to your everyday meals. The difference in taste between homegrown shallots and commercially produced ones is truly remarkable. The homegrown variety boasts a more intense, nuanced flavor that will elevate your sauces, soups, stir-fries, and countless other dishes.
But the benefits don’t stop there. Growing your own shallots allows you to control the entire process, ensuring that they are free from harmful pesticides and herbicides. You can choose organic methods and nurture your plants with natural fertilizers, resulting in healthier, more nutritious shallots for you and your family.
Ready to take your shallot game to the next level? Consider experimenting with different varieties. There are French shallots, known for their delicate flavor, and Dutch shallots, prized for their large size and robust taste. You can also try growing shallots from seed, although starting from sets (small bulbs) is generally easier for beginners.
Another fun variation is to grow shallots in containers. This is a great option if you have limited space or live in an apartment. Simply choose a pot that is at least 6 inches deep and fill it with well-draining potting mix. Plant your shallot sets a few inches apart and water regularly. You can even grow shallots indoors if you have a sunny windowsill or a grow light.
Don’t be afraid to get creative with your shallot cultivation. Try companion planting them with other herbs and vegetables, such as carrots, beets, or chamomile. Companion planting can help to deter pests, attract beneficial insects, and improve the overall health of your garden.
Growing shallots at home is a must-try for any home cook or gardening enthusiast. It’s a simple, affordable, and rewarding way to add fresh, flavorful ingredients to your meals. So, grab some shallot sets, find a sunny spot in your garden (or a pot on your windowsill), and get ready to experience the joy of homegrown shallots.
We’re confident that you’ll be amazed by the results. Once you’ve tasted the difference between homegrown and store-bought shallots, you’ll never go back.
We encourage you to try this DIY trick and share your experience with us! Let us know in the comments below how your shallots are growing, what varieties you’re trying, and any tips or tricks you’ve discovered along the way. We can’t wait to hear from you! Share your photos on social media using #HomegrownShallots and inspire others to join the shallot-growing revolution! Happy gardening!
Frequently Asked Questions (FAQ)
What are shallots and how are they different from onions?
Shallots are members of the Allium family, which also includes onions, garlic, leeks, and chives. While they share some similarities with onions, shallots have a milder, more delicate flavor. They also grow in clusters, similar to garlic, whereas onions typically grow as single bulbs. Shallots are often preferred in recipes where a subtle onion flavor is desired, such as vinaigrettes, sauces, and delicate dishes.
When is the best time to plant shallots?
The best time to plant shallots depends on your climate. In general, you can plant shallots in the fall (September-October) for a spring harvest or in the early spring (February-March) for a summer harvest. If you live in a warmer climate, you may be able to plant shallots year-round. The key is to plant them when the soil is cool and moist.
How do I prepare the soil for planting shallots?
Shallots prefer well-drained soil that is rich in organic matter. Before planting, amend your soil with compost or well-rotted manure. This will improve drainage, add nutrients, and help retain moisture. You can also add a slow-release fertilizer to the soil to provide your shallots with a steady supply of nutrients throughout the growing season. The ideal soil pH for shallots is between 6.0 and 7.0.
How deep and far apart should I plant shallot sets?
Plant shallot sets about 1-2 inches deep, with the pointed end facing up. Space them 6-8 inches apart in rows that are 12-18 inches apart. This will give the shallots enough room to grow and develop properly. If you are planting in containers, you can plant them closer together, but make sure they still have enough space to breathe.
How often should I water shallots?
Shallots need consistent moisture, especially during the early stages of growth. Water them regularly, especially during dry spells. Avoid overwatering, as this can lead to rot. A good rule of thumb is to water when the top inch of soil feels dry to the touch. Mulching around your shallots can help to retain moisture and suppress weeds.
Do shallots need full sun?
Shallots thrive in full sun, which means they need at least 6 hours of direct sunlight per day. However, they can also tolerate partial shade, especially in hotter climates. If you are growing shallots indoors, make sure they are placed in a sunny windowsill or under a grow light.
How long does it take for shallots to mature?
Shallots typically take 90-120 days to mature, depending on the variety and growing conditions. You’ll know they’re ready to harvest when the tops start to turn yellow and fall over.
How do I harvest shallots?
To harvest shallots, gently loosen the soil around the bulbs with a garden fork or trowel. Carefully lift the shallots from the ground, being careful not to damage them. Brush off any excess soil and allow them to cure in a warm, dry place for a few days before storing.
How do I store shallots?
Store shallots in a cool, dry, and well-ventilated place. A mesh bag or basket is ideal for storing shallots. Avoid storing them in the refrigerator, as this can cause them to sprout or rot. Properly stored shallots can last for several months.
Can I grow shallots from store-bought shallots?
Yes, you can grow shallots from store-bought shallots, but it’s not always guaranteed to be successful. Some store-bought shallots may have been treated to prevent sprouting. To increase your chances of success, choose organic shallots that are firm and healthy. Plant them as you would shallot sets, and be patient.
What are some common pests and diseases that affect shallots?
Some common pests that affect shallots include onion thrips, onion maggots, and aphids. Diseases that can affect shallots include downy mildew, white rot, and botrytis leaf blight. To prevent pests and diseases, practice good garden hygiene, such as removing weeds and debris, and rotate your crops regularly. You can also use organic pest control methods, such as insecticidal soap or neem oil.
Can I eat the green tops of shallots?
Yes, the green tops of shallots are edible and have a mild, oniony flavor. You can use them in salads, soups, and other dishes. They are best used fresh, as they don’t store well.
What are some creative ways to use homegrown shallots?
The possibilities are endless! Use them in vinaigrettes, sauces, soups, stir-fries, omelets, and countless other dishes. Caramelize them for a sweet and savory topping for pizzas or tarts. Pickle them for a tangy condiment. Or simply sauté them in butter or olive oil for a delicious side dish. The flavor of homegrown shallots will elevate any dish.

Leave a Comment