

Grow Shallots at Home, even if you think you don’t have a green thumb! Have you ever dreamt of snipping fresh, flavorful shallots right from your own backyard, adding that gourmet touch to your dishes without a trip to the grocery store? Well, dream no more! This DIY guide is your passport to shallot-growing success, transforming even the smallest space into a thriving edible garden.
Shallots, with their delicate onion-garlic flavor, have been cultivated for centuries, gracing cuisines from the Mediterranean to Southeast Asia. Their subtle complexity has made them a culinary staple, and now, you can easily bring that magic to your own kitchen. But beyond their deliciousness, growing your own shallots offers a sense of accomplishment and connection to nature that’s hard to beat.
In today’s world, where convenience often trumps quality, knowing exactly where your food comes from is more important than ever. Plus, let’s be honest, store-bought shallots can be pricey! This DIY trick not only saves you money but also ensures you have access to the freshest, most flavorful shallots imaginable. I’m going to show you simple, effective methods to grow shallots at home, regardless of your experience level. Get ready to unleash your inner gardener and enjoy the rewards of homegrown goodness!
Growing Shallots at Home: A Beginner’s Guide
Hey there, fellow gardening enthusiasts! I’m so excited to share my experience with growing shallots at home. It’s surprisingly easy, and the flavor you get from homegrown shallots is just unbeatable. Trust me, once you try it, you’ll be hooked! This guide will walk you through everything you need to know, from choosing the right shallots to harvesting your delicious crop.
Choosing Your Shallots
Before we dive into the planting process, let’s talk about selecting the right shallots. You have a couple of options here:
* Shallot Sets: These are small, immature shallots that are specifically grown for planting. They’re readily available at garden centers and online. This is the easiest and most reliable way to start.
* Shallots from the Grocery Store: Yes, you can actually use shallots you bought for cooking! Just make sure they are organic. Non-organic shallots are often treated to prevent sprouting. Look for firm, healthy shallots with no signs of rot or mold.
Important Note: If you’re using grocery store shallots, it’s best to choose ones that are already starting to sprout a little. This indicates that they’re ready to grow.
Preparing for Planting
Okay, now that we have our shallots, let’s get ready to plant! Here’s what you’ll need:
* Shallot Sets or Grocery Store Shallots
* Well-draining soil: Shallots don’t like soggy feet! A mix of compost, potting soil, and a little sand works great.
* A sunny spot: Shallots need at least 6 hours of sunlight per day.
* Gardening gloves: To keep your hands clean and protected.
* A trowel or small shovel: For digging holes.
* Optional: Organic fertilizer or compost tea.
Planting Your Shallots
This is where the magic happens! Follow these steps carefully, and you’ll be well on your way to a bountiful shallot harvest.
1. Choose Your Planting Time: The best time to plant shallots is in the fall (September-November) or early spring (February-April). Fall planting allows the shallots to establish roots over the winter, resulting in a larger harvest the following summer. Spring planting will give you a harvest in the late summer or early fall. I personally prefer fall planting for a bigger yield.
2. Prepare the Soil: Loosen the soil in your chosen planting area with a trowel or shovel. Remove any rocks, weeds, or debris. Amend the soil with compost or well-rotted manure to improve drainage and fertility. Shallots prefer a slightly acidic to neutral soil pH (around 6.0-7.0).
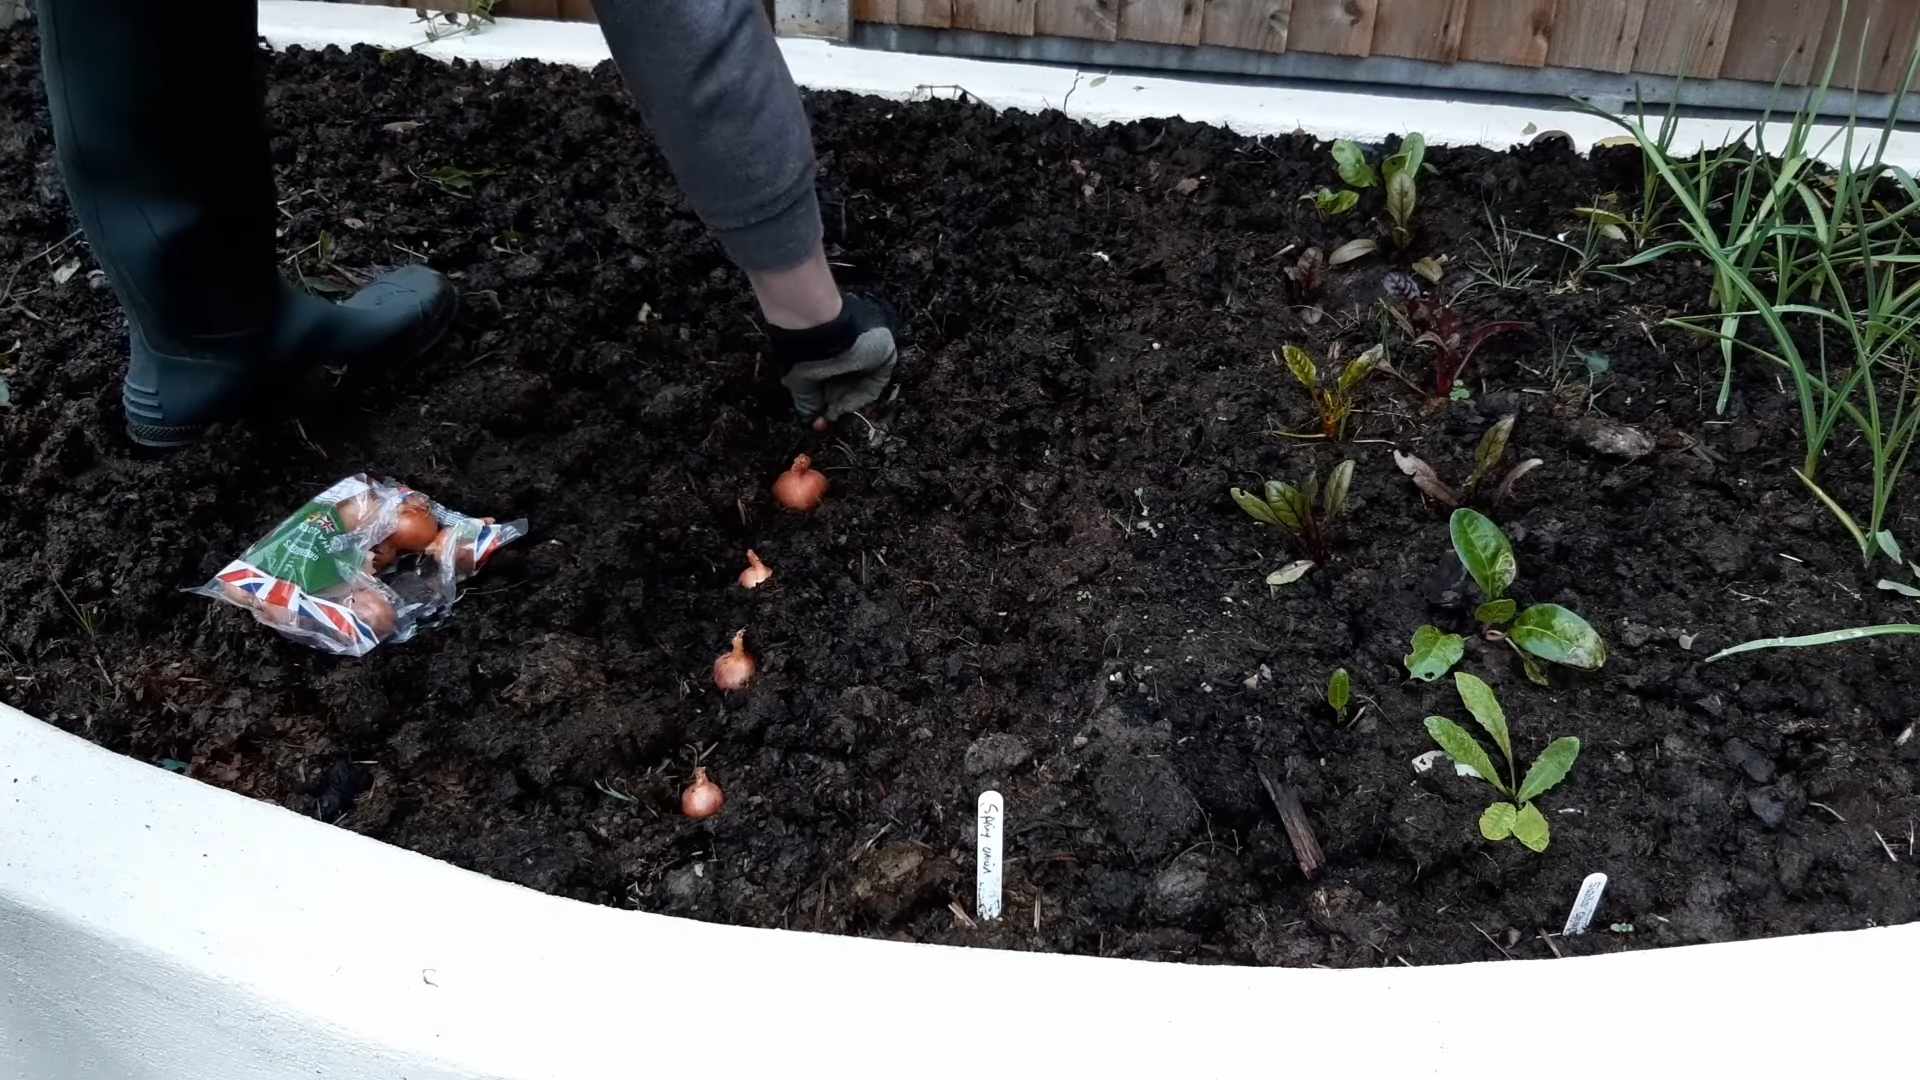
3. Planting Depth and Spacing: This is crucial for proper growth. Plant the shallot sets or bulbs about 1-2 inches deep, with the pointed end facing up. Space them about 6-8 inches apart in rows that are 12-18 inches apart. This gives them enough room to grow and prevents overcrowding.
4. Water Thoroughly: After planting, water the shallots thoroughly to settle the soil and encourage root growth. The soil should be moist but not waterlogged.
5. Mulch (Optional): Applying a layer of mulch around the shallots can help retain moisture, suppress weeds, and regulate soil temperature. Straw, shredded leaves, or wood chips are all good options.
Caring for Your Shallots
Now that your shallots are planted, it’s time to provide them with the care they need to thrive.
1. Watering: Shallots need consistent moisture, especially during dry periods. Water deeply whenever the top inch of soil feels dry to the touch. Avoid overwatering, as this can lead to bulb rot.
2. Weeding: Keep the planting area free of weeds, as they can compete with the shallots for nutrients and water. Hand-pull weeds carefully to avoid disturbing the shallot roots.
3. Fertilizing (Optional): If your soil is poor, you can fertilize your shallots with a balanced organic fertilizer or compost tea every few weeks. Follow the instructions on the fertilizer package. I personally like to use compost tea, as it’s gentle and provides a slow-release of nutrients.
4. Pest and Disease Control: Shallots are generally resistant to pests and diseases, but they can occasionally be affected by onion maggots, thrips, or fungal diseases. Inspect your plants regularly for any signs of problems. If you notice any pests, you can try using insecticidal soap or neem oil. For fungal diseases, ensure good air circulation and avoid overwatering.
5. Scaping (Optional): As your shallots grow, they may produce flower stalks (scapes). While these are edible, removing them will encourage the plant to focus its energy on bulb development, resulting in a larger harvest. Simply snip off the scapes with scissors or pruning shears. You can use the scapes in salads, stir-fries, or as a garnish.
Harvesting Your Shallots
The moment you’ve been waiting for! Harvesting your shallots is the most rewarding part of the process.
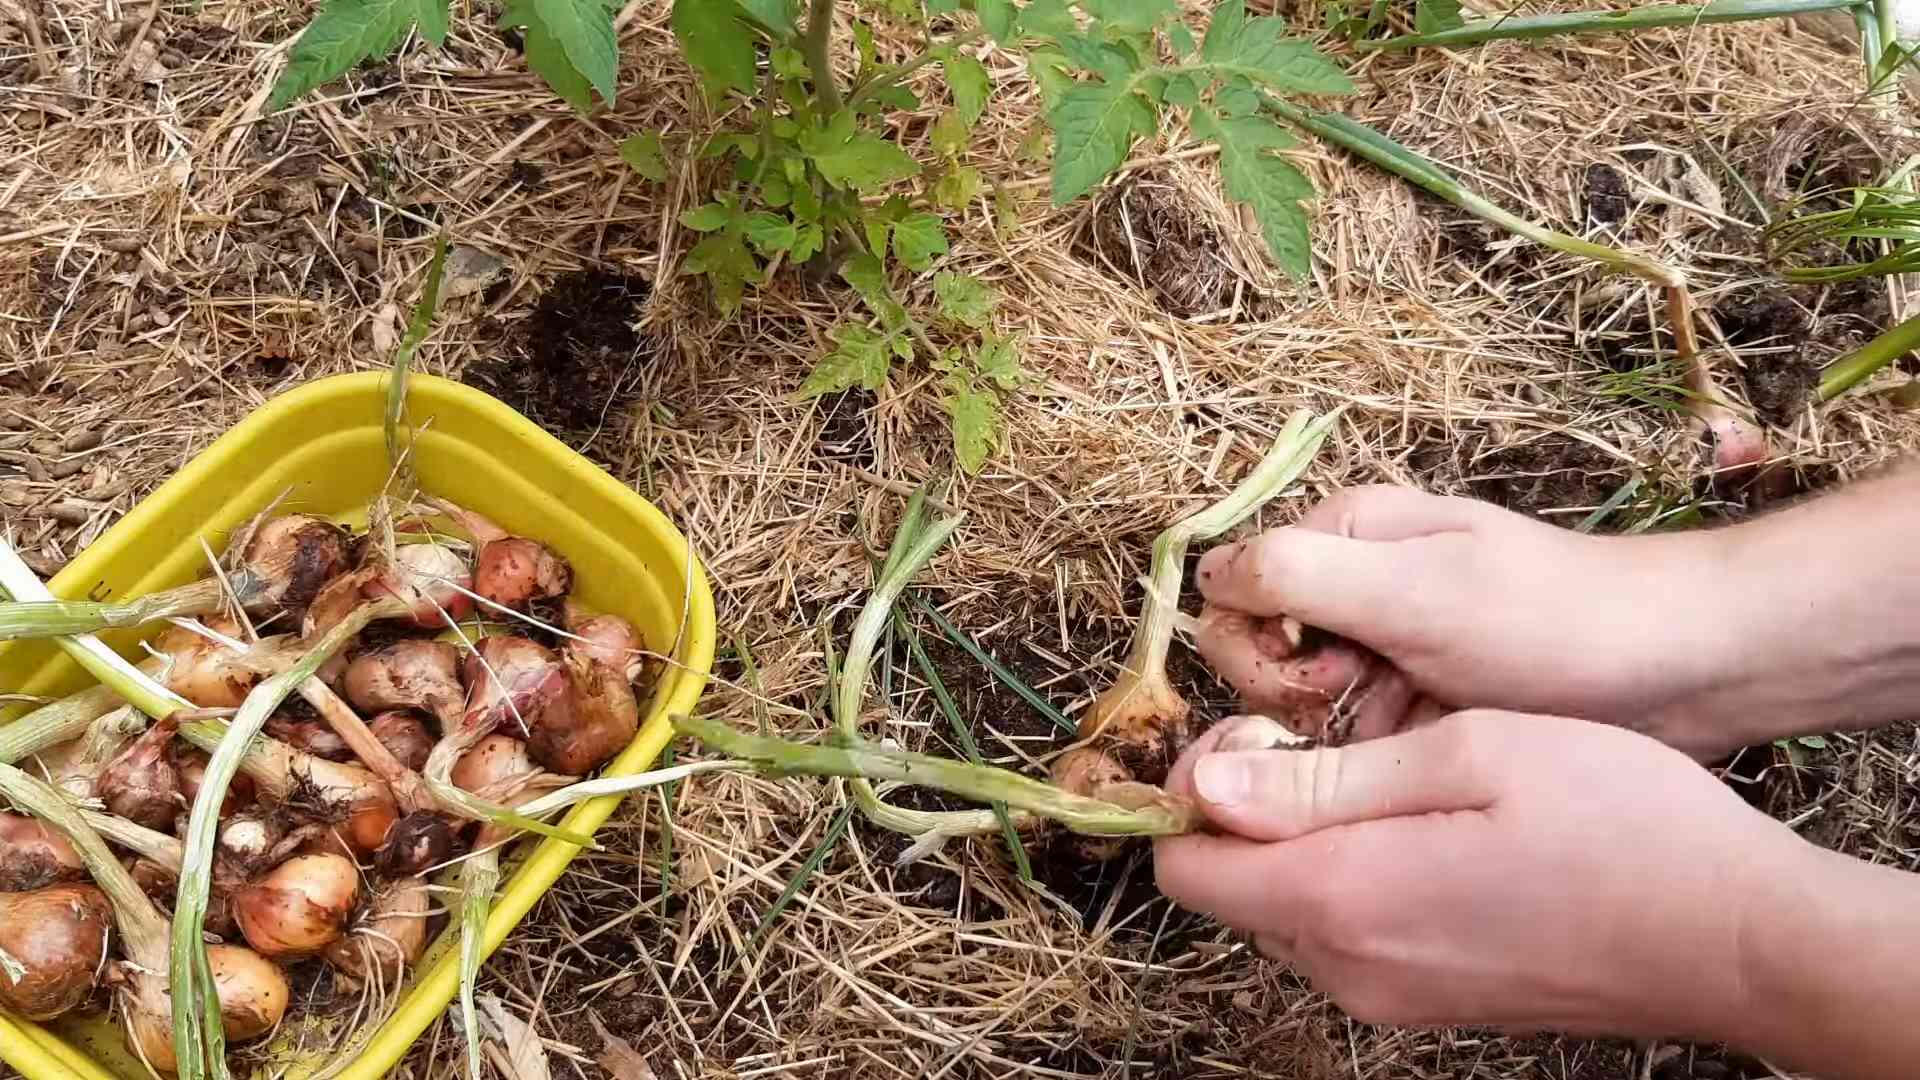
1. When to Harvest: Shallots are typically ready to harvest when the tops start to turn yellow and fall over. This usually happens about 90-120 days after planting.
2. How to Harvest: Gently loosen the soil around the shallots with a trowel or fork. Carefully lift the bulbs from the ground, being careful not to damage them.
3. Curing: After harvesting, cure the shallots by laying them out in a single layer in a warm, dry, and well-ventilated place for 2-3 weeks. This allows the outer skins to dry and toughen, which helps to prevent rot and prolongs their storage life.
4. Storing: Once the shallots are cured, you can store them in a cool, dry, and dark place, such as a pantry or basement. They should last for several months.
Troubleshooting
Even with the best care, you might encounter a few challenges along the way. Here are some common problems and how to address them:
* Yellowing Leaves: This could be a sign of overwatering, underwatering, nutrient deficiency, or disease. Check the soil moisture and adjust your watering accordingly. If the soil is poor, fertilize with a balanced organic fertilizer. Inspect the plants for any signs of disease and treat accordingly.
* Bulb Rot: This is usually caused by overwatering or poor drainage. Ensure that the soil is well-draining and avoid overwatering. Remove any infected bulbs immediately to prevent the spread of the disease.
* Small Bulbs: This could be due to overcrowding, poor soil, or insufficient sunlight. Thin out the plants to provide more space for each bulb to grow. Amend the soil with compost or fertilizer to improve its fertility. Ensure that the plants are getting at least 6 hours of sunlight per day.
* Pests: Keep an eye out for pests like onion maggots and thrips. Use appropriate organic pest control methods like insecticidal soap or neem oil.
Enjoying Your Homegrown Shallots
Congratulations! You’ve successfully grown your own shallots. Now it’s time to enjoy the fruits (or rather, bulbs) of your labor. Homegrown shallots have a delicate, slightly sweet flavor that’s perfect for a variety of dishes.
Here are just a few ideas:
* Sautéed Shallots: Sautéed shallots are a delicious addition to omelets, pasta dishes, and roasted vegetables.
* Shallot Vinaigrette: A shallot vinaigrette is a flavorful dressing for salads and grilled meats.
* French Onion Soup: Shallots add a depth of flavor to classic French onion soup.
* Pickled Shallots: Pickled shallots are a tangy and flavorful condiment that can be used to top tacos, sandwiches, and salads.
Growing shallots at home is a rewarding experience that anyone can enjoy. With a little bit of care and attention, you can have a bountiful harvest of delicious, homegrown shallots to enjoy all season long. Happy gardening!
Conclusion
So, there you have it! Growing shallots at home is not only surprisingly simple, but it’s also incredibly rewarding. Imagine the satisfaction of snipping fresh, flavorful shallots from your own garden, knowing exactly where they came from and how they were grown. Forget those expensive, often lackluster shallots from the grocery store. With this easy DIY trick, you can have a constant supply of these culinary gems right at your fingertips.
This method is a game-changer for anyone who loves to cook. The difference in flavor between store-bought and homegrown shallots is truly remarkable. Homegrown shallots boast a more intense, complex flavor profile, adding a depth and richness to your dishes that you just can’t replicate with commercially grown varieties. Think of the possibilities: shallot confit, shallot vinaigrette, shallot-infused olive oil, the list goes on!
But the benefits extend beyond just flavor. Growing your own shallots is also a sustainable and cost-effective way to add fresh produce to your diet. You’ll reduce your reliance on grocery stores, minimize your carbon footprint, and save money in the long run. Plus, it’s a fantastic way to connect with nature and enjoy the therapeutic benefits of gardening.
Don’t be afraid to experiment! Try different varieties of shallots to find your favorite flavor profile. Some varieties are milder, while others are more pungent. You can also try growing shallots in different types of soil or containers to see what works best in your environment. Consider companion planting with herbs like rosemary or thyme to deter pests and enhance the flavor of your shallots.
For those with limited space, container gardening is an excellent option. A sunny balcony or patio is all you need to get started. Just be sure to choose a pot that’s large enough to accommodate the growing shallots and provide adequate drainage.
This DIY shallot growing trick is a must-try for any home cook or gardening enthusiast. It’s easy, affordable, and incredibly rewarding. You’ll be amazed at how simple it is to grow your own fresh, flavorful shallots.
We encourage you to give it a try and share your experience with us! Let us know how your shallots are growing, what varieties you’re trying, and any tips or tricks you’ve discovered along the way. Share your photos and stories on social media using #HomegrownShallots and inspire others to join the shallot-growing revolution! We can’t wait to see what you create. Happy gardening!
Frequently Asked Questions (FAQ)
Q: What are the best shallot varieties to grow at home?
A: The best shallot variety depends on your personal preference and local climate. Some popular and reliable varieties include ‘French Red’, ‘Gray Griselle’, and ‘Dutch Yellow’. ‘French Red’ is known for its mild, sweet flavor, while ‘Gray Griselle’ has a more intense, pungent taste. ‘Dutch Yellow’ is a versatile variety that’s suitable for a wide range of dishes. Experiment with different varieties to find your favorite! Consider checking with your local garden center or agricultural extension office for recommendations on varieties that thrive in your specific region. They can provide valuable insights based on local growing conditions.
Q: How much sunlight do shallots need?
A: Shallots need at least 6 hours of direct sunlight per day to thrive. Choose a sunny location in your garden or on your balcony or patio. If you’re growing shallots indoors, you may need to supplement with artificial light. Insufficient sunlight can result in leggy growth and reduced bulb size. Observe your shallots closely and adjust their location as needed to ensure they’re receiving adequate sunlight.
Q: What type of soil is best for growing shallots?
A: Shallots prefer well-drained, fertile soil with a pH of 6.0 to 7.0. Amend your soil with compost or other organic matter to improve drainage and fertility. Avoid heavy clay soils, as they can retain too much moisture and lead to bulb rot. If you’re growing shallots in containers, use a high-quality potting mix that’s specifically formulated for vegetables. Regular soil testing can help you determine if your soil is deficient in any essential nutrients.
Q: How often should I water my shallots?
A: Water your shallots regularly, especially during dry periods. Keep the soil consistently moist, but avoid overwatering, as this can lead to bulb rot. Water deeply and less frequently, rather than shallowly and more often. Check the soil moisture regularly by sticking your finger into the soil. If the top inch of soil is dry, it’s time to water. Reduce watering as the shallots mature and the leaves begin to yellow.
Q: How do I know when my shallots are ready to harvest?
A: Shallots are typically ready to harvest when the leaves begin to yellow and fall over. This usually occurs about 90 to 120 days after planting. Gently dig up the bulbs and allow them to dry in a warm, sunny location for a few days before storing them. Curing the shallots helps to prevent rot and prolong their shelf life.
Q: Can I grow shallots from store-bought shallots?
A: Yes, you can grow shallots from store-bought shallots, but it’s important to choose organic shallots that haven’t been treated with chemicals to prevent sprouting. Non-organic shallots may have been treated to inhibit growth, making them unsuitable for planting. Select firm, healthy shallots with no signs of rot or mold. Follow the same planting instructions as you would for shallots purchased from a garden center. Keep in mind that the resulting shallots may not be identical to the parent shallot, as they may have cross-pollinated with other varieties.
Q: How do I store shallots after harvesting?
A: After harvesting and curing your shallots, store them in a cool, dry, and well-ventilated place. A mesh bag or basket is ideal for storing shallots, as it allows for good air circulation. Avoid storing shallots in the refrigerator, as this can cause them to sprout or become soft. Properly stored shallots can last for several months. Check your shallots regularly for signs of rot or mold and discard any that are affected.
Q: Are there any common pests or diseases that affect shallots?
A: Shallots can be susceptible to certain pests and diseases, such as onion thrips, onion maggots, and downy mildew. To prevent pest and disease problems, practice good garden hygiene, such as removing weeds and debris from around your shallots. You can also use organic pest control methods, such as insecticidal soap or neem oil, to control pests. If you notice signs of disease, such as yellowing or spotting on the leaves, treat your shallots with a fungicide. Crop rotation can also help to prevent soilborne diseases from building up in your garden.
Q: Can I grow shallots in containers?
A: Yes, shallots grow very well in containers. Choose a pot that is at least 6 inches deep and wide to allow the bulbs to develop properly. Use a well-draining potting mix and ensure the container has drainage holes. Water regularly and fertilize every few weeks with a balanced fertilizer. Container-grown shallots may need more frequent watering than those grown in the ground, especially during hot weather.
Q: What are some creative ways to use homegrown shallots in cooking?
A: The possibilities are endless! Use them in classic dishes like French onion soup or shallot vinaigrette. Finely chop and sauté them as a base for sauces and stews. Roast them whole with other vegetables for a flavorful side dish. Pickle them for a tangy condiment. Infuse olive oil with shallots for a delicious dipping oil. Add them to omelets, frittatas, and quiches. The intense flavor of homegrown shallots will elevate any dish.

Leave a Comment