

Grow Radishes at Home? Absolutely! And you don’t need acres of land or a green thumb blessed by the gardening gods. I’m here to tell you that cultivating these peppery little gems is surprisingly simple, even if you’re a complete beginner. Forget those bland, store-bought radishes; imagine the crisp, vibrant flavor of freshly harvested radishes, bursting with a zing that only comes from your own backyard (or balcony!).
Radishes have been around for centuries, enjoyed by ancient Egyptians and Greeks, who valued them not only for their taste but also for their medicinal properties. From humble beginnings, they’ve become a staple in cuisines worldwide, adding a delightful crunch and spice to salads, sandwiches, and countless other dishes. But why settle for ordinary when you can easily grow radishes at home and experience the unparalleled satisfaction of nurturing your own food?
In today’s fast-paced world, connecting with nature and knowing where your food comes from is more important than ever. Growing your own radishes is a fantastic way to do just that. Plus, it’s incredibly rewarding to watch those tiny seeds sprout and transform into delicious, edible roots in just a few short weeks. So, are you ready to ditch the grocery store radishes and embark on a fun and fulfilling gardening adventure? Let’s dive into some easy DIY tricks and hacks that will have you harvesting your own crop of peppery perfection in no time!

Grow Radishes at Home: A Beginner’s Guide to Crunchy Success
Hey there, fellow gardening enthusiasts! Ever wanted to add a peppery kick to your salads or a vibrant crunch to your snacks? Radishes are your answer! They’re incredibly easy to grow, even if you’re a complete newbie like I was when I started. Plus, you can harvest them in just a few weeks – talk about instant gratification! This guide will walk you through everything you need to know to grow your own delicious radishes at home.
What You’ll Need
Before we get our hands dirty, let’s gather our supplies. Here’s a checklist of everything you’ll need to grow radishes successfully:
* Radish Seeds: Choose your favorite variety! There are tons of options, from the classic red globe radishes to longer, more slender varieties like French Breakfast. I personally love the Cherry Belle for their quick growth and mild flavor.
* Well-Draining Soil: Radishes need loose, fertile soil to thrive. If your garden soil is heavy clay, amend it with compost or other organic matter to improve drainage. You can also grow them in containers using a good quality potting mix.
* Gardening Gloves: Protect your hands from dirt and potential irritants.
* Hand Trowel or Garden Fork: For preparing the soil and planting the seeds.
* Watering Can or Hose: To keep the soil consistently moist.
* Fertilizer (Optional): A balanced fertilizer can give your radishes a boost, but it’s not always necessary. I usually use a liquid seaweed fertilizer diluted according to the package instructions.
* Row Covers (Optional): To protect your radishes from pests like flea beetles, especially if you’ve had problems with them in the past.
* A Sunny Spot: Radishes need at least 6 hours of sunlight per day.
Choosing the Right Radish Variety
The world of radishes is surprisingly diverse! Here are a few popular varieties to consider:
* Cherry Belle: A classic, round, red radish with a mild flavor. It matures quickly, making it a great choice for beginners.
* French Breakfast: An elongated radish with a red top and white bottom. It has a slightly milder flavor than Cherry Belle.
* Easter Egg: A mix of radishes in different colors, including red, pink, purple, and white. They’re fun to grow and add a splash of color to your garden.
* Black Spanish: A larger, round radish with black skin and white flesh. It has a stronger, more pungent flavor and takes longer to mature.
* Daikon: A long, white radish that’s commonly used in Asian cuisine. It has a mild, slightly sweet flavor.
I recommend starting with Cherry Belle or French Breakfast if you’re new to growing radishes. They’re both easy to grow and have a pleasant flavor.
Preparing the Soil
Radishes need loose, well-draining soil to develop properly. If the soil is compacted, the roots won’t be able to expand, and you’ll end up with small, misshapen radishes. Here’s how to prepare the soil:
1. Clear the Area: Remove any weeds, rocks, or debris from the planting area.
2. Loosen the Soil: Use a hand trowel or garden fork to loosen the soil to a depth of at least 6 inches.
3. Amend the Soil: If your soil is heavy clay or sandy, amend it with compost or other organic matter to improve drainage and fertility. I usually add a generous amount of compost to my radish beds.
4. Rake the Soil: Rake the soil smooth to create a level planting surface.
Planting the Radish Seeds
Now comes the fun part – planting the seeds! Radishes are cool-season crops, so they’re best planted in early spring or late summer.
1. Create Furrows: Use your finger or a trowel to create shallow furrows in the soil, about ½ inch deep and 1 inch apart.
2. Sow the Seeds: Sprinkle the radish seeds evenly in the furrows, about ½ inch apart. Don’t overcrowd them, or they’ll compete for resources.
3. Cover the Seeds: Gently cover the seeds with soil and pat it down lightly.
4. Water Thoroughly: Water the soil gently but thoroughly to moisten the seeds.
Caring for Your Radishes
Radishes are relatively low-maintenance, but they do need consistent moisture and adequate sunlight to thrive.
1. Water Regularly: Keep the soil consistently moist, but not waterlogged. Water deeply whenever the top inch of soil feels dry to the touch. I usually water my radishes every other day, depending on the weather.
2. Thin Seedlings: Once the seedlings emerge (usually in 4-7 days), thin them to about 1-2 inches apart. This will give them enough space to grow and develop properly. I know it’s hard to thin out your precious seedlings, but it’s essential for getting good-sized radishes.
3. Weed Regularly: Keep the planting area free of weeds, which can compete with the radishes for nutrients and water.
4. Fertilize (Optional): If you want to give your radishes a boost, you can fertilize them with a balanced fertilizer diluted according to the package instructions. I usually use a liquid seaweed fertilizer every couple of weeks.
5. Protect from Pests: Flea beetles can be a problem for radishes, especially in the spring. They chew small holes in the leaves, which can weaken the plants. To protect your radishes from flea beetles, you can cover them with row covers.
Harvesting Your Radishes
The best part about growing radishes is that they mature quickly! Most varieties are ready to harvest in just 3-4 weeks.
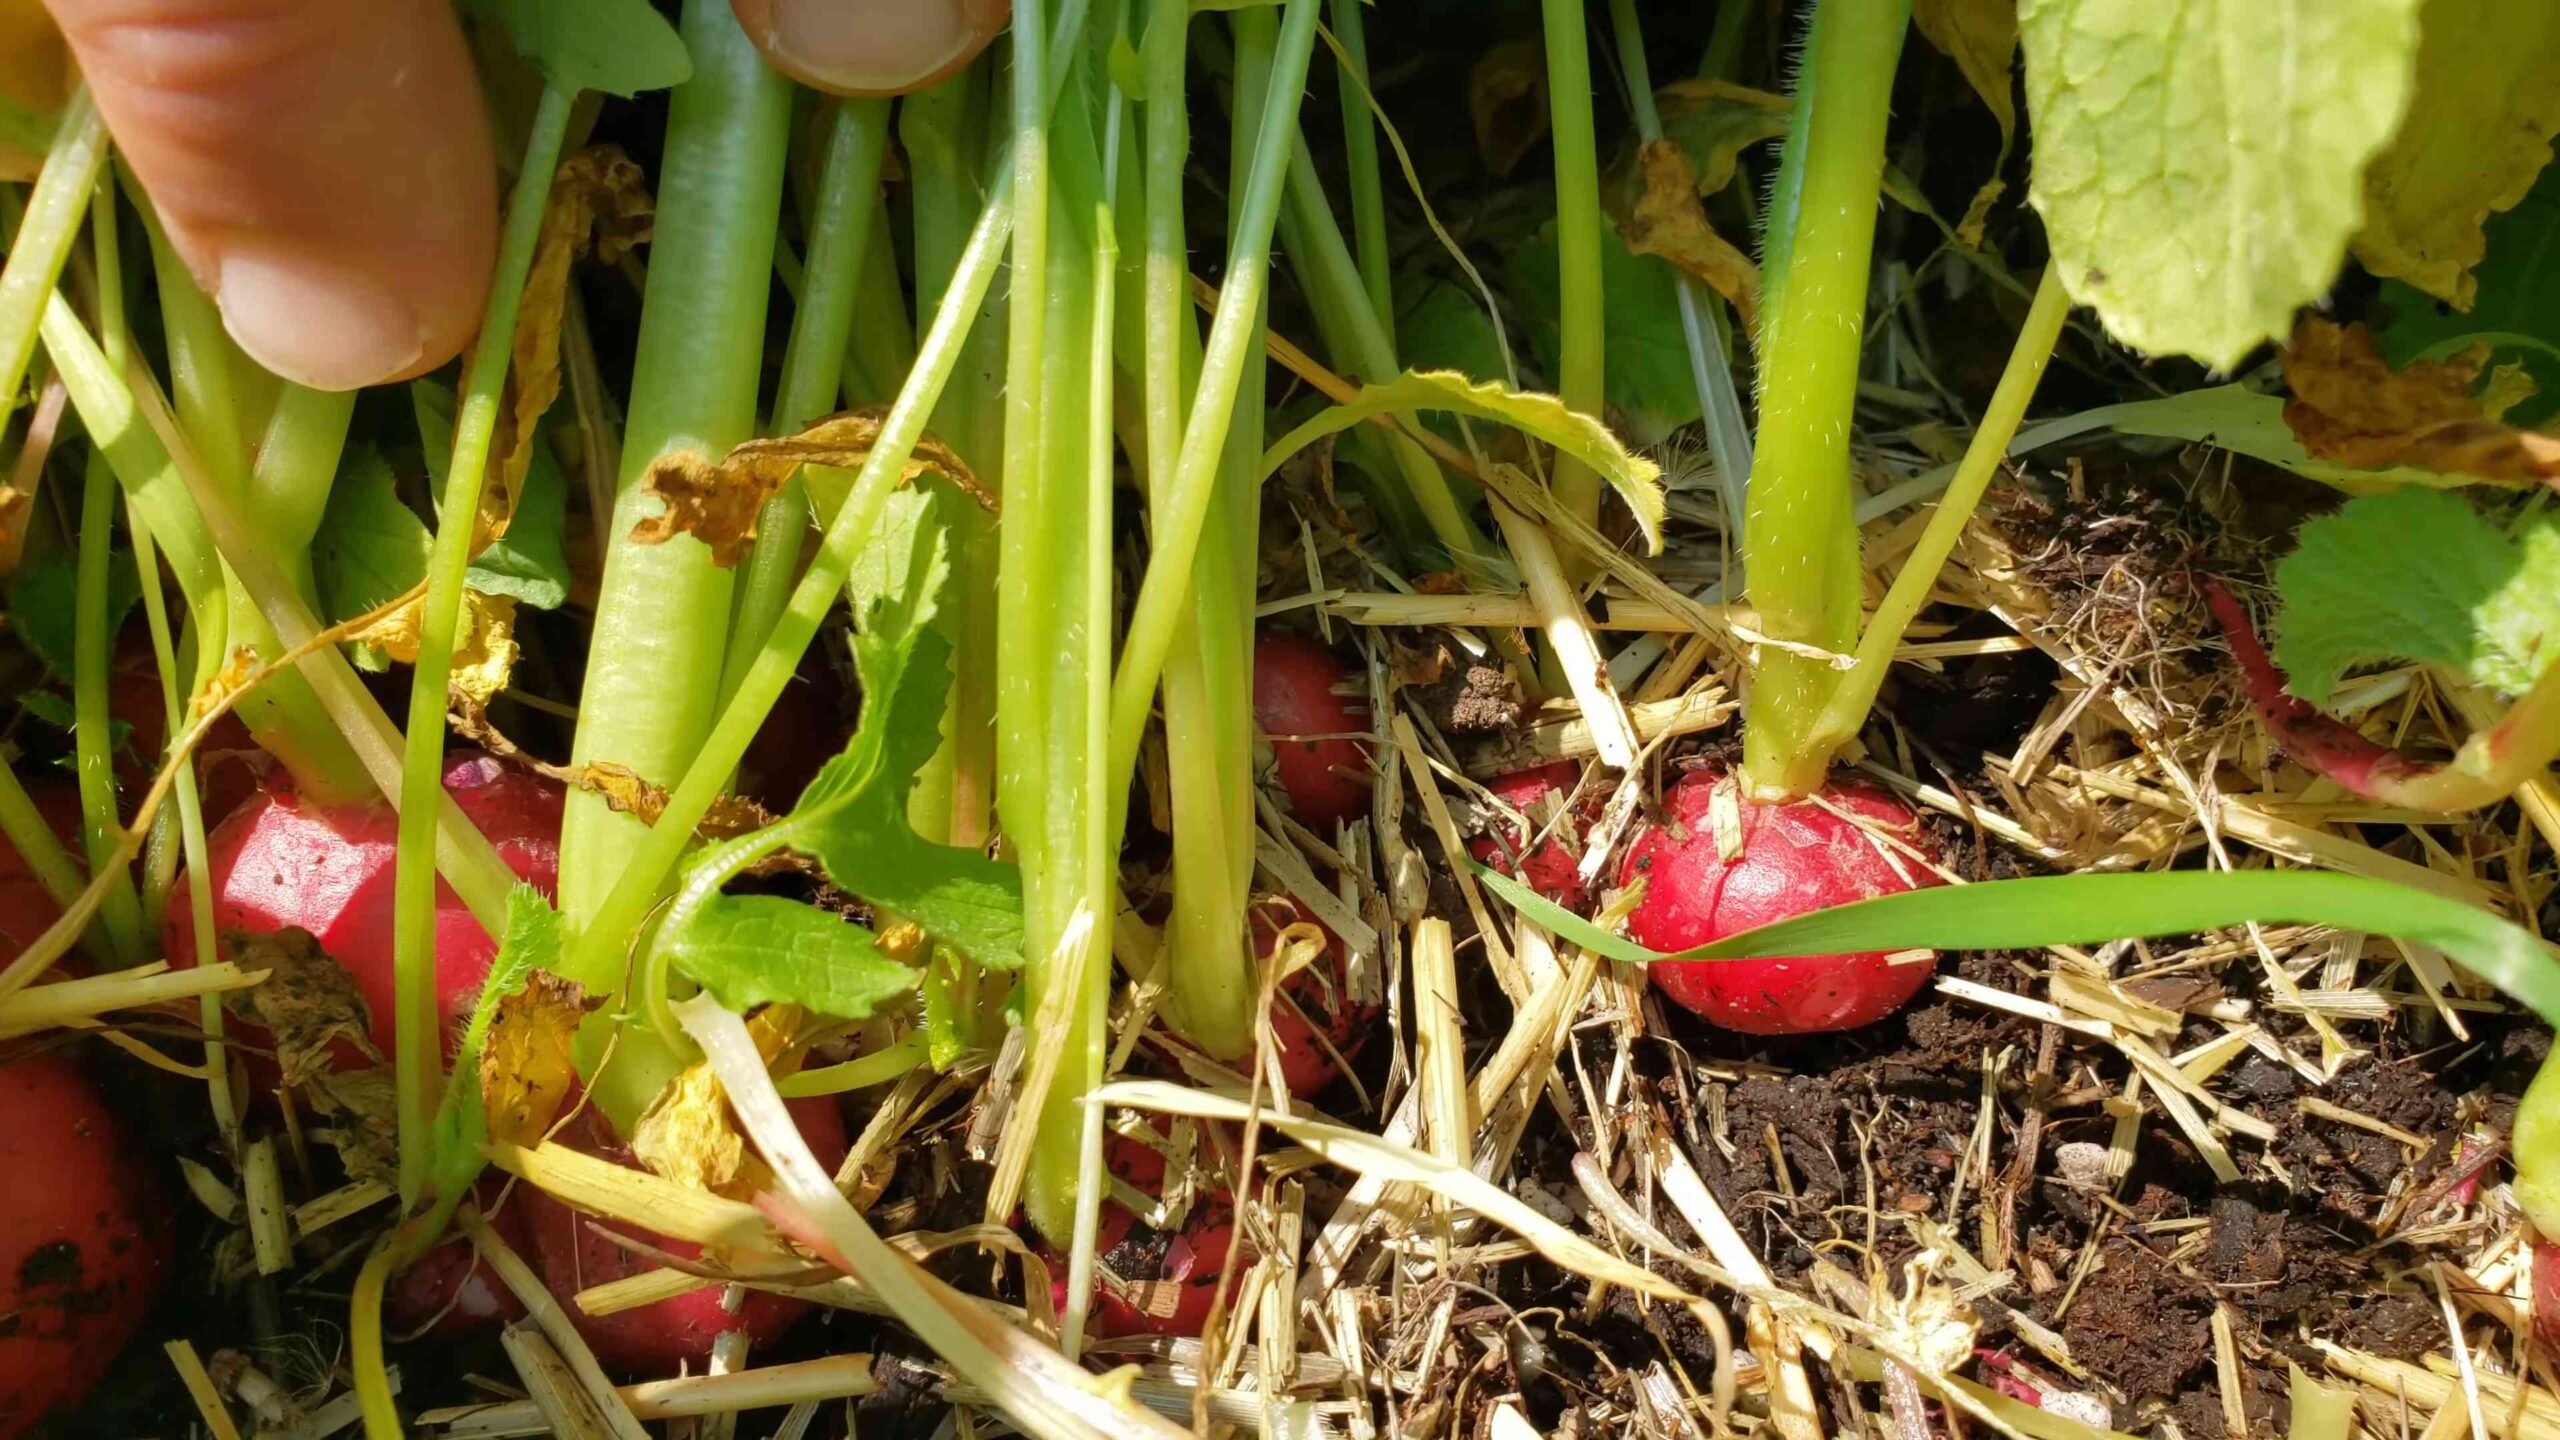
1. Check for Maturity: Gently brush away the soil around the base of the radish to check its size. It should be about 1 inch in diameter for most varieties.
2. Harvest Carefully: Grasp the radish by the leaves and gently pull it out of the soil. If it’s difficult to pull, loosen the soil around it with a trowel.
3. Wash and Store: Wash the radishes thoroughly and remove the leaves. Store them in a plastic bag in the refrigerator for up to a week.
Troubleshooting Common Problems
Even with the best care, you might encounter a few problems when growing radishes. Here are some common issues and how to address them:
* Radishes are too small: This is usually caused by overcrowding, lack of water, or poor soil. Make sure to thin the seedlings properly, water regularly, and amend the soil with compost.
* Radishes are cracked: This is usually caused by inconsistent watering. Keep the soil consistently moist, especially during hot, dry weather.
* Radishes are too spicy: This can be caused by hot weather or letting the radishes mature for too long. Harvest them when they’re the right size, and try growing them in a shadier location during the summer.
* Flea beetles are eating the leaves: Cover the radishes with row covers to protect them from flea beetles. You can also use insecticidal soap to control them.
Succession Planting for a Continuous Harvest
To enjoy a continuous harvest of radishes throughout the growing season, practice succession planting. This means planting a new batch of seeds every 1-2 weeks. This way, you’ll always have fresh radishes to enjoy! I usually plant a new row of radishes every other week from early spring to late summer.
Growing Radishes in Containers
If you don’t have a garden, you can still grow radishes in containers! Choose a container that’s at least 6 inches deep and has drainage holes. Fill it with a good quality potting mix and follow the same planting and care instructions as for growing radishes in the ground. Container-grown radishes may need more frequent watering, especially during hot weather.
Enjoying Your Homegrown Radishes
Now that you’ve harvested your delicious homegrown radishes, it’s time to enjoy them! Here are a few ideas:
* Eat them raw: Radishes are delicious eaten raw in salads, sandwiches, or as a snack.
* Roast them: Roasting radishes mellows their flavor and makes them slightly sweet.
* Pickle them: Pickled radishes are a tangy and flavorful addition to any meal.
* Add them to stir-fries: Radishes add a peppery kick to stir-fries.
* Use the greens: Don’t throw away the radish greens! They’re edible and can be used in salads, soups, or stir-fries.
Growing radishes is a rewarding experience that anyone can enjoy. With a little bit of planning and care, you can have a steady supply of fresh, crunchy radishes right
Conclusion
So, there you have it! Growing radishes at home is not only surprisingly simple, but it’s also incredibly rewarding. Forget those bland, store-bought radishes that lack that peppery punch. With just a few simple steps, you can cultivate your own vibrant, flavorful radishes right in your backyard or even on your windowsill. The satisfaction of harvesting your own produce, knowing exactly where it came from and what went into it, is truly unmatched.
This DIY trick is a must-try for several reasons. First, it’s incredibly cost-effective. A packet of radish seeds is inexpensive, and you’ll likely get multiple harvests from it. Second, it’s fast! Radishes are known for their quick growth, meaning you can enjoy fresh, homegrown radishes in as little as three to four weeks. Third, it’s a fantastic way to introduce children to gardening and teach them about where their food comes from. Finally, and perhaps most importantly, homegrown radishes simply taste better. They’re crisper, more flavorful, and have a delightful peppery bite that you just can’t find in commercially grown varieties.
Looking to spice things up? Consider these variations:
* Succession Planting: Plant a new batch of seeds every week or two for a continuous harvest throughout the growing season. This ensures you always have fresh radishes on hand.
* Container Gardening: If you’re short on space, radishes thrive in containers. Choose a pot that’s at least 6 inches deep and wide, and use a well-draining potting mix.
* Companion Planting: Radishes are excellent companion plants for carrots, lettuce, and cucumbers. They help deter pests and improve soil health.
* Radish Varieties: Experiment with different radish varieties to find your favorites. ‘Cherry Belle’ is a classic choice, while ‘French Breakfast’ radishes are known for their mild flavor. For a spicier kick, try ‘Black Spanish’ radishes.
* Radish Greens: Don’t throw away the radish greens! They’re edible and delicious. Sauté them with garlic and olive oil, add them to salads, or use them in soups and stews.
Growing radishes at home offers a delightful and accessible entry point into the world of gardening. It’s a project that’s both quick and rewarding, providing you with fresh, flavorful produce that you can enjoy in countless ways.
So, what are you waiting for? Grab a packet of seeds, find a sunny spot, and get planting! We’re confident that you’ll be amazed at how easy and enjoyable it is to grow your own radishes. We encourage you to try this DIY trick and experience the joy of homegrown goodness.
Once you’ve harvested your first batch of radishes, we’d love to hear about your experience! Share your tips, tricks, and photos in the comments below. Let’s build a community of radish-growing enthusiasts and inspire others to discover the joys of homegrown produce. Happy gardening!
Frequently Asked Questions (FAQ)
What is the best time of year to plant radishes?
Radishes are a cool-season crop, meaning they thrive in cooler temperatures. The best time to plant radishes is in early spring or late summer/early fall. In the spring, plant them as soon as the soil can be worked. In the fall, plant them about 4-6 weeks before the first expected frost. Avoid planting radishes during the heat of summer, as they tend to bolt (go to seed) in hot weather, resulting in poor-tasting roots.
How much sunlight do radishes need?
Radishes need at least 6 hours of sunlight per day to grow properly. Choose a location that receives full sun for the best results. If you’re growing radishes indoors, place them near a sunny window or use grow lights to supplement natural light. Insufficient sunlight can lead to leggy growth and small, underdeveloped roots.
What kind of soil is best for growing radishes?
Radishes prefer loose, well-draining soil that is rich in organic matter. Amend heavy clay soil with compost or other organic materials to improve drainage and aeration. The ideal soil pH for radishes is between 6.0 and 7.0. Before planting, loosen the soil to a depth of at least 6 inches to allow the roots to grow easily. Avoid rocky or compacted soil, as it can hinder root development.
How often should I water radishes?
Radishes need consistent moisture to grow quickly and develop crisp, flavorful roots. Water them regularly, especially during dry spells. Aim to keep the soil consistently moist but not waterlogged. Overwatering can lead to root rot, while underwatering can cause the roots to become tough and bitter. A good rule of thumb is to water deeply whenever the top inch of soil feels dry to the touch.
How far apart should I plant radish seeds?
Plant radish seeds about ½ inch deep and 1 inch apart in rows that are 6-12 inches apart. Thin the seedlings to 2-3 inches apart once they emerge. Thinning is important to prevent overcrowding and ensure that each radish has enough space to grow. If you’re growing radishes in containers, you can plant them closer together, but make sure they still have enough room to develop.
How long does it take for radishes to mature?
Radishes are one of the fastest-growing vegetables. Most varieties mature in just 3-4 weeks. Check the seed packet for the specific maturity time of the variety you’re growing. Harvest radishes as soon as they reach the desired size, as they can become woody and bitter if left in the ground too long.
How do I know when radishes are ready to harvest?
Radishes are ready to harvest when the roots are about 1 inch in diameter. Gently loosen the soil around the radish and pull it out of the ground. If the roots are too small, leave them in the ground for a few more days. If they’re too large, they may be tough and bitter.
Why are my radishes cracking?
Radish roots can crack if they experience inconsistent watering. This is often caused by periods of drought followed by heavy watering. To prevent cracking, water radishes regularly and consistently, especially during dry spells. Mulching around the plants can also help retain moisture in the soil.
Why are my radishes all tops and no bottoms?
Several factors can contribute to radishes producing lots of leaves but small or no roots. These include:
* Too much nitrogen: Excessive nitrogen in the soil can promote leafy growth at the expense of root development. Avoid using high-nitrogen fertilizers.
* Overcrowding: If the radishes are planted too close together, they may not have enough space to develop properly. Thin the seedlings to the recommended spacing.
* Insufficient sunlight: Radishes need at least 6 hours of sunlight per day to grow properly.
* Hot weather: Radishes tend to bolt in hot weather, which can result in poor root development. Plant them in early spring or late summer/early fall.
Can I eat radish leaves?
Yes, radish leaves are edible and nutritious. They have a peppery flavor similar to the roots. You can add them to salads, sauté them with garlic and olive oil, or use them in soups and stews. Choose young, tender leaves for the best flavor. Avoid eating leaves that are damaged or discolored.
Leave a Comment