

Grow potatoes at home easily? Absolutely! Imagine harvesting your own fresh, earthy potatoes right from your backyard – or even your balcony! It’s a rewarding experience that connects you to nature and provides delicious, homegrown food. For centuries, potatoes have been a staple crop, originating in the Andes Mountains and spreading across the globe to become a culinary cornerstone.
But let’s be honest, the thought of growing potatoes might seem daunting. Visions of sprawling farms and complicated machinery might spring to mind. That’s where these DIY tricks come in! I’m here to show you that you don’t need acres of land or a green thumb to grow potatoes at home easily.
In this article, I’ll share simple, effective DIY hacks that will empower you to cultivate your own potato patch, no matter your space or experience level. From container gardening to innovative planting techniques, we’ll cover everything you need to know to enjoy a bountiful potato harvest. Why buy from the store when you can have fresher, tastier potatoes grown with your own two hands? Let’s get digging!

Grow Your Own Potatoes: A Beginner’s Guide to Spudtastic Success!
Hey there, fellow gardening enthusiasts! Ever dreamt of digging up your own homegrown potatoes, bursting with flavor and freshness? Well, dream no more! Growing potatoes at home is surprisingly easy and incredibly rewarding. I’m going to walk you through a simple method that even a complete beginner can master. Get ready to impress your friends and family with your spud-tacular skills!
Choosing Your Potato Variety
Before we get our hands dirty, let’s talk potatoes! The type of potato you choose will influence the taste, texture, and even the best time to harvest. Here are a few popular options:
* Russet: The classic baking potato, known for its fluffy interior.
* Yukon Gold: A versatile potato with a buttery flavor and smooth texture, great for roasting, mashing, or boiling.
* Red Potatoes: These have thin skins and a waxy texture, making them perfect for potato salads and boiling.
* Fingerling Potatoes: These small, elongated potatoes have a unique flavor and are delicious roasted or steamed.
Consider your climate and what you like to eat when making your choice. I personally love Yukon Golds because they’re so versatile!
Preparing Your Seed Potatoes
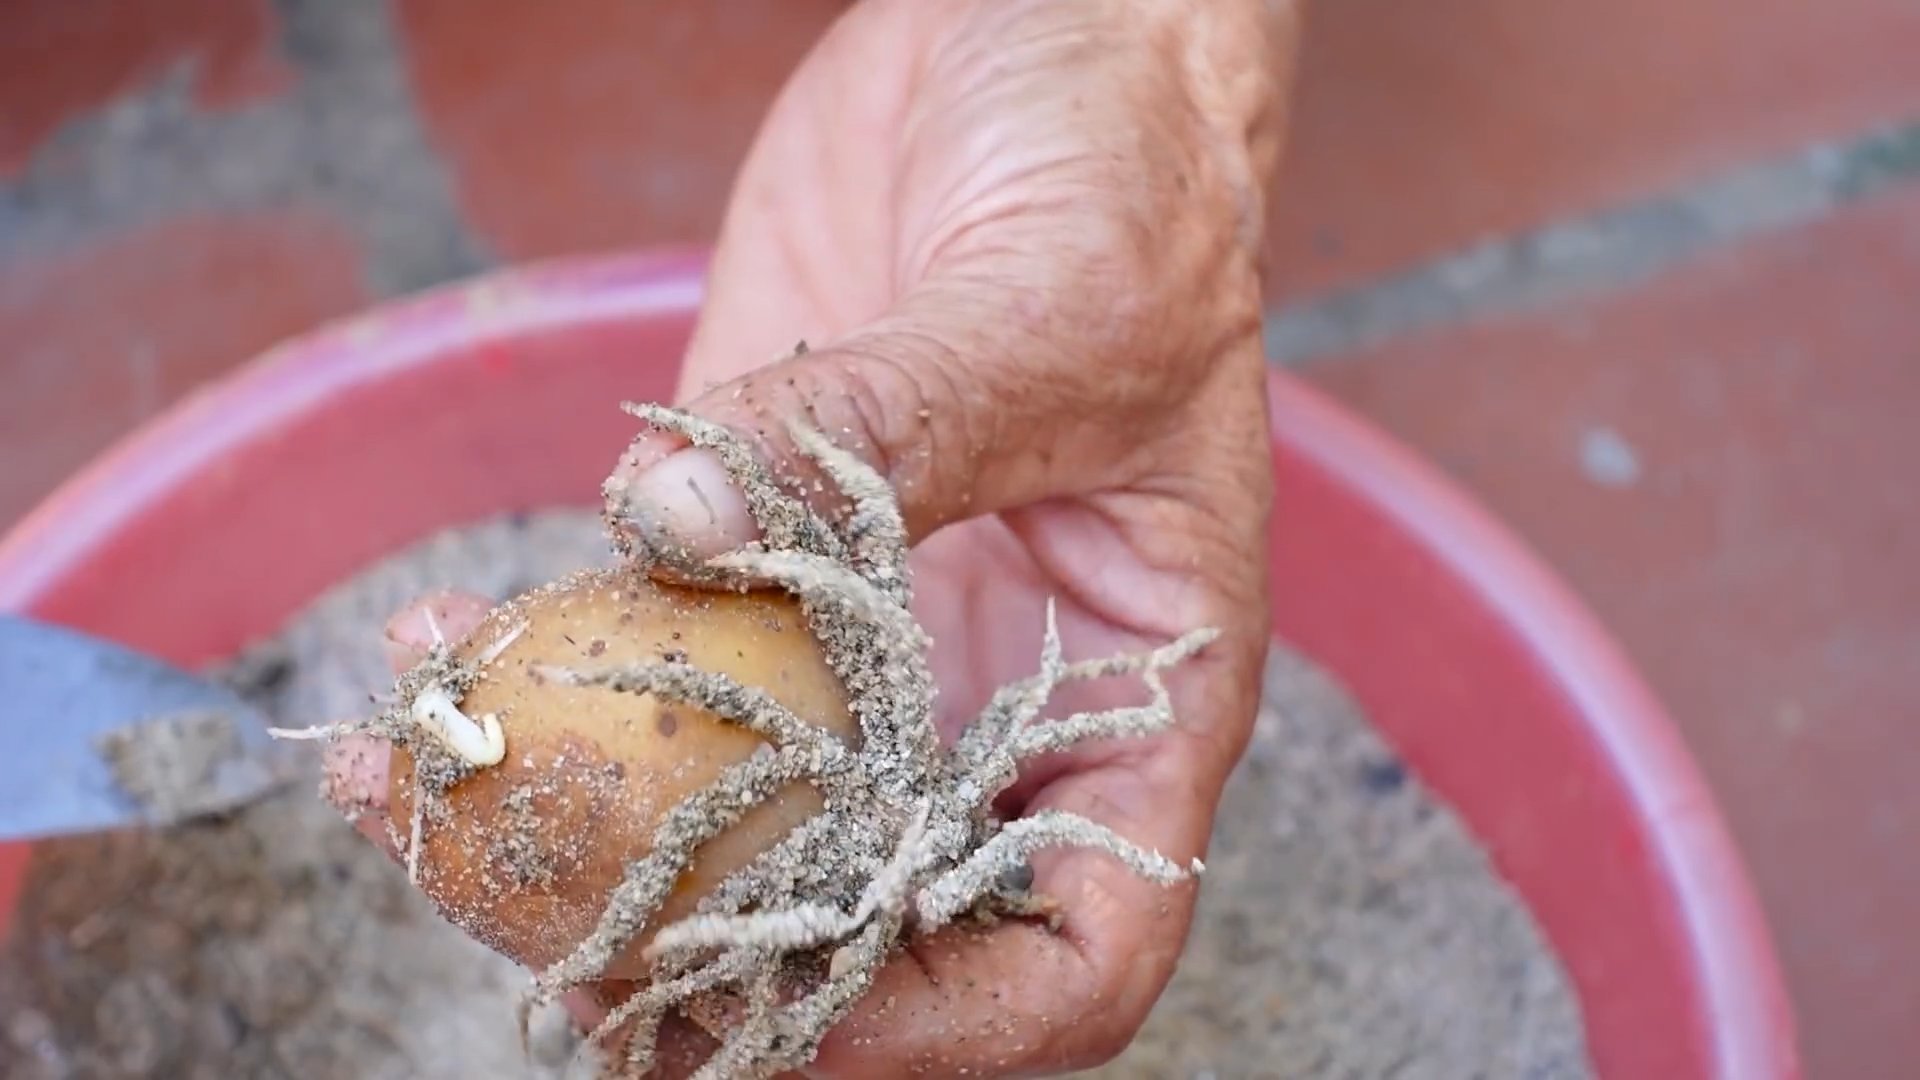
Now, you might be wondering, “What are seed potatoes?” These aren’t seeds in the traditional sense. They’re actually small potatoes or pieces of potatoes that have “eyes” (those little buds) from which new plants will sprout. You can buy certified seed potatoes from a garden center or online.
Important: Don’t use potatoes from the grocery store! They may have been treated to prevent sprouting, and they might carry diseases.
Here’s how to prepare your seed potatoes:
* Chitting (Optional but Recommended): Chitting is the process of encouraging your seed potatoes to sprout before planting. This gives them a head start and can result in an earlier harvest. To chit your potatoes, place them in a cool, bright location (but not direct sunlight) for a few weeks. Egg cartons work great for this! You’ll see small, green sprouts emerging from the eyes.
* Cutting (If Necessary): If your seed potatoes are large (bigger than an egg), you can cut them into pieces. Each piece should have at least one or two eyes. Let the cut pieces dry for a day or two to callous over. This helps prevent rot. I usually cut mine into pieces about the size of a golf ball.
Planting Your Potatoes
Alright, let’s get planting! Potatoes need well-drained soil and plenty of sunlight (at least 6 hours a day).
Here’s what you’ll need:
* Seed potatoes (prepared as described above)
* A sunny spot in your garden or large containers (at least 15 gallons)
* Well-draining soil (amend with compost for extra nutrients)
* A shovel or trowel
* Fertilizer (optional, but can boost growth)
Step-by-Step Planting Instructions:
1. Prepare the Soil: Loosen the soil in your planting area and mix in some compost or well-rotted manure. This will provide your potatoes with the nutrients they need to thrive.
2. Dig Trenches or Holes: Dig trenches about 6-8 inches deep and 2-3 feet apart. If you’re using containers, make sure they have drainage holes.
3. Plant the Seed Potatoes: Place the seed potatoes (or pieces) in the trenches or holes, with the eyes facing up. Space them about 12 inches apart.
4. Cover with Soil: Cover the seed potatoes with about 4 inches of soil.
5. Water Well: Water the planting area thoroughly.
“Hilling” Your Potatoes
This is a crucial step for maximizing your potato harvest! As the potato plants grow, you’ll need to “hill” them, which means adding more soil around the stems. This encourages the plants to produce more potatoes along the buried stems.
Here’s how to hill your potatoes:
1. Wait for Growth: Once the potato plants are about 6-8 inches tall, it’s time to start hilling.
2. Add Soil: Use a shovel or hoe to gently pull soil from the sides of the trench or container and mound it around the base of the plants, leaving only the top few inches of the plant exposed.
3. Repeat: Repeat this process every few weeks as the plants continue to grow, until the mounds are about 12 inches high. I usually hill mine every 2-3 weeks.
Caring for Your Potato Plants
Now that your potatoes are planted and hilled, it’s time to provide them with the care they need to flourish.
* Watering: Potatoes need consistent moisture, especially during flowering and tuber formation. Water deeply whenever the top inch of soil feels dry. Avoid overwatering, as this can lead to rot.
* Fertilizing: If your soil is poor, you can fertilize your potato plants with a balanced fertilizer (e.g., 10-10-10) every few weeks. Follow the instructions on the fertilizer package.
* Weeding: Keep the planting area free of weeds, as they can compete with your potatoes for nutrients and water.
* Pest Control: Keep an eye out for pests like potato beetles and aphids. You can handpick them off the plants or use an organic insecticide if necessary. I prefer to use neem oil for pest control.
Harvesting Your Potatoes
The moment we’ve all been waiting for! Harvesting your own potatoes is incredibly satisfying.
Here’s how to know when your potatoes are ready to harvest:
* Flowering: Potato plants typically flower a few weeks after planting. This is a good indication that tubers are starting to form.
* Foliage Dieback: As the potatoes mature, the foliage (leaves and stems) will start to turn yellow and die back. This is a sign that the potatoes are ready to be harvested.
* Test Dig: You can also do a test dig to check the size of the potatoes. Gently dig around the base of a plant and pull out a few potatoes. If they’re the size you want, it’s time to harvest!
Harvesting Instructions:
1. Dig Carefully: Use a garden fork or shovel to carefully dig around the potato plants, being careful not to damage the tubers.
2. Lift the Plants: Gently lift the plants from the soil, and the potatoes should come with them.
3. Collect the Potatoes: Pick up all the potatoes from the soil.
4. Cure the Potatoes: Cure the potatoes by letting them dry in a cool, dark, and well-ventilated place for a week or two. This will help them develop a thicker skin and prevent rot.
Storing Your Potatoes
Proper storage is essential for keeping your potatoes fresh and delicious for months.
* Choose the Right Potatoes: Select potatoes that are free from bruises, cuts, or blemishes for storage.
* Store in a Cool, Dark, and Dry Place: The ideal storage temperature for potatoes is between 40-50°F (4-10°C). A root cellar or unheated garage is perfect.
* Avoid Sunlight: Exposure to sunlight can cause potatoes to turn green and produce solanine, a toxic compound.
* Don’t Wash Before Storing: Washing potatoes before storing them can promote rot.
* Check Regularly: Check your stored potatoes regularly and remove any that are starting to rot.
Troubleshooting Common Potato Problems
Even with the best care, you might encounter some problems while growing potatoes. Here are a few common issues and how to address them:
* Potato Blight: This fungal disease can cause brown spots on the leaves and tubers. Prevent blight by planting disease-resistant varieties and ensuring good air circulation. If blight occurs, remove infected foliage and spray with a fungicide.
* Scab: This bacterial disease causes rough, scabby patches on the potato skins. Prevent scab by maintaining a slightly acidic soil pH.
* Wireworms: These soil-dwelling pests can tunnel into potatoes, causing damage. Prevent wireworms by rotating your crops and adding organic matter to the soil.
* Potato Beetles: These pests can defoliate potato plants. Handpick them off the plants or use an organic insecticide.
Enjoy Your Homegrown Potatoes!
Congratulations! You’ve successfully grown your own potatoes. Now it’s time to enjoy the fruits (or rather, tubers) of your labor. Roast them, mash them, boil them, fry them – the possibilities are endless! There’s nothing quite like the taste of homegrown potatoes. Happy gardening!
Conclusion
So, there you have it! Growing potatoes at home, especially with this simple DIY trick, is more than just a gardening project; it’s a gateway to fresher, tastier, and more sustainable eating. Forget those bland, store-bought potatoes that have traveled miles to reach your plate. Imagine the satisfaction of harvesting your own crop, knowing exactly where it came from and how it was grown. This method, focusing on ease and accessibility, truly makes homegrown potatoes a reality for anyone, regardless of their gardening experience or available space.
Why is this DIY potato growing trick a must-try? Because it simplifies the process, minimizes the effort, and maximizes the yield. It’s perfect for small gardens, balconies, or even patios. You don’t need acres of land or specialized equipment. All you need is a container, some seed potatoes, soil, and a little bit of patience. The beauty of this method lies in its adaptability. You can use various containers, from old tires stacked on top of each other to large grow bags or even repurposed trash cans. The key is to ensure proper drainage and provide enough space for the potatoes to develop.
Looking for variations? Consider experimenting with different potato varieties. Russets are great for baking and frying, while Yukon Golds are perfect for mashed potatoes and roasting. Red potatoes hold their shape well when boiled, making them ideal for salads. You can also try adding different types of compost or fertilizer to see how they affect the growth and flavor of your potatoes. Some gardeners swear by adding coffee grounds to the soil, while others prefer using bone meal for added phosphorus.
Another exciting variation is companion planting. Marigolds can help deter pests, while basil can improve the flavor of your potatoes. Planting beans or peas nearby can also help fix nitrogen in the soil, benefiting your potato plants. Don’t be afraid to get creative and experiment with different combinations to find what works best for you.
This DIY potato growing method is not just about growing potatoes; it’s about connecting with nature, learning new skills, and enjoying the fruits (or rather, vegetables) of your labor. It’s about reducing your carbon footprint and contributing to a more sustainable food system. And most importantly, it’s about enjoying the delicious taste of homegrown potatoes, knowing that you played a part in bringing them to your table.
So, what are you waiting for? Grab some seed potatoes, find a container, and get started on your potato-growing adventure today! We’re confident that you’ll be amazed by the results. And once you’ve harvested your first crop, be sure to share your experience with us. We’d love to hear about your successes, your challenges, and any tips or tricks you’ve learned along the way. Share your photos and stories on social media using #HomegrownPotatoes and let’s inspire others to join the movement! Let’s all discover the joy of growing potatoes at home easily.
Frequently Asked Questions (FAQ)
What exactly are “seed potatoes,” and where can I get them?
Seed potatoes are potatoes specifically grown to be planted and produce new potato plants. They are different from the potatoes you buy at the grocery store, which are often treated to prevent sprouting. Seed potatoes are certified disease-free and come in various sizes. You can purchase them from local nurseries, garden centers, or online retailers specializing in gardening supplies. Look for reputable suppliers to ensure you’re getting high-quality seed potatoes.
How do I prepare my seed potatoes before planting?
Before planting, it’s beneficial to “chit” your seed potatoes. Chitting involves encouraging them to sprout small, green shoots. To do this, place the seed potatoes in a cool, bright location (but not in direct sunlight) for a few weeks before planting. This gives them a head start and can result in earlier and more abundant harvests. If your seed potatoes are large, you can cut them into smaller pieces, ensuring that each piece has at least one or two “eyes” (the small buds from which the sprouts will grow). Allow the cut pieces to dry for a day or two before planting to prevent rotting.
What kind of soil is best for growing potatoes in containers?
Potatoes prefer well-draining, slightly acidic soil. A good mix would be equal parts of compost, potting soil, and perlite or vermiculite. The compost provides nutrients, the potting soil provides structure, and the perlite or vermiculite improves drainage. Avoid using garden soil, as it can be too heavy and compact, hindering root growth. You can also add some slow-release fertilizer to the soil to provide a steady supply of nutrients throughout the growing season.
How often should I water my potato plants in containers?
Water your potato plants regularly, especially during dry periods. The soil should be consistently moist but not waterlogged. Overwatering can lead to root rot, while underwatering can stunt growth. Check the soil moisture by sticking your finger into the soil. If the top inch feels dry, it’s time to water. Water deeply, allowing the water to drain out of the bottom of the container. During hot weather, you may need to water more frequently.
What does “hilling” mean, and why is it important for growing potatoes?
Hilling is the process of adding more soil to the container as the potato plants grow. This encourages the plants to produce more potatoes along the buried stem. As the potato plants grow taller, add more soil to the container, covering the lower part of the stem. Leave the top few inches of the plant exposed. Repeat this process every few weeks until the container is full. Hilling also helps to protect the developing potatoes from sunlight, which can cause them to turn green and produce a toxic substance called solanine.
How do I know when my potatoes are ready to harvest?
The timing of the harvest depends on the variety of potato you’re growing. Generally, potatoes are ready to harvest when the plants begin to flower or when the foliage starts to turn yellow and die back. You can harvest “new potatoes” (small, immature potatoes) a few weeks after flowering. For larger, mature potatoes, wait until the foliage has completely died back. To harvest, gently dig around the base of the plant and lift the potatoes out of the soil. Be careful not to damage the potatoes during harvesting.
What are some common pests and diseases that affect potato plants, and how can I prevent them?
Common pests that affect potato plants include aphids, potato beetles, and flea beetles. Diseases include blight, scab, and root rot. To prevent pests and diseases, choose disease-resistant potato varieties, practice crop rotation, and maintain good soil drainage. You can also use organic pest control methods, such as insecticidal soap or neem oil, to control pests. Regularly inspect your plants for signs of pests or diseases and take action promptly.
Can I grow potatoes in containers indoors?
While it’s possible to grow potatoes indoors, it can be challenging. Potatoes need a lot of sunlight, so you’ll need to provide them with supplemental lighting if you’re growing them indoors. You’ll also need to ensure that they have adequate ventilation and humidity. Growing potatoes outdoors in containers is generally easier and more successful.
How do I store my harvested potatoes?
Store your harvested potatoes in a cool, dark, and well-ventilated place. A root cellar is ideal, but a basement or garage can also work. Avoid storing potatoes in the refrigerator, as this can cause them to develop a sweet taste. Store them in a burlap sack or a cardboard box with holes for ventilation. Check the potatoes regularly and remove any that are rotting or sprouting. Properly stored potatoes can last for several months.
What if my potato plants don’t flower? Will I still get potatoes?
Yes, even if your potato plants don’t flower, you can still get potatoes. Flowering is not essential for potato production. The potatoes develop underground, regardless of whether the plant flowers or not. Focus on providing your plants with adequate sunlight, water, and nutrients, and you should still have a successful harvest. The absence of flowers might simply be due to the specific variety you’re growing or environmental factors.
Leave a Comment