

Grow Pea Shoots at Home and unlock a world of fresh, flavorful greens right on your windowsill! Have you ever wondered how to bring the vibrant taste of spring into your kitchen, even in the dead of winter? This DIY guide is your answer. Forget those expensive trips to the grocery store for microgreens; I’m going to show you how incredibly easy and rewarding it is to cultivate your own delicious pea shoots.
Pea shoots, also known as pea tendrils, have a rich history, particularly in Asian cuisine, where they’ve been prized for centuries for their delicate sweetness and crisp texture. They’re not just delicious; they’re packed with vitamins and nutrients, making them a healthy addition to any meal. But beyond their nutritional value, growing your own food connects you to a tradition of self-sufficiency and sustainable living.
In today’s fast-paced world, finding moments of calm and connection with nature can be a challenge. That’s where this simple DIY project comes in. Learning how to grow pea shoots at home offers a therapeutic escape, a chance to nurture something from seed to harvest, and a delicious reward for your efforts. Plus, it’s a fantastic way to reduce your carbon footprint and enjoy fresh, organic greens without leaving your house. So, grab your supplies, and let’s get started on this exciting journey of growing your own pea shoots!
Grow Your Own Delicious Pea Shoots: A Beginner’s Guide
Hey there, fellow plant enthusiasts! Ever wanted to add a burst of fresh, vibrant flavor to your salads, sandwiches, or stir-fries? Well, look no further than pea shoots! These tender little greens are packed with nutrients and incredibly easy to grow right in your own kitchen. Forget expensive grocery store prices – I’m going to show you how to cultivate your own supply of these delicious microgreens. Trust me, once you start, you’ll be hooked!
What You’ll Need
Before we dive in, let’s gather our supplies. The beauty of this project is that you probably already have most of what you need lying around.
* Pea Seeds: This is the most important ingredient! Look for “pea seeds for sprouting” or “snow pea seeds.” Avoid treated seeds, as they’re not meant for consumption. I personally love using snow pea seeds because they have a slightly sweeter flavor. You can find these at most garden centers or online.
* Growing Tray or Container: A shallow tray with drainage holes is ideal. You can use a dedicated seed starting tray, a recycled plastic container (like a takeout container), or even a baking dish. Just make sure it’s clean and has a way for excess water to drain.
* Growing Medium: You have a few options here. I’ve had success with both potting soil and coconut coir. Potting soil is readily available and provides nutrients, while coconut coir is a sustainable and lightweight alternative. You can also use a soilless mix specifically designed for seed starting.
* Water: Clean, filtered water is best.
* Spray Bottle: This will help you keep the seeds moist without overwatering them.
* Weight (Optional): A small plate or book can be used to weigh down the seeds during the initial soaking period. This helps with even germination.
* Dark Place: A cupboard, closet, or even a covered box will work.
* Sunny Spot: Once the shoots start to sprout, they’ll need sunlight to thrive. A windowsill or under a grow light is perfect.
Step-by-Step Instructions: From Seed to Sprout
Okay, let’s get our hands dirty! Here’s a detailed guide to growing your own pea shoots:
Phase 1: Soaking the Seeds
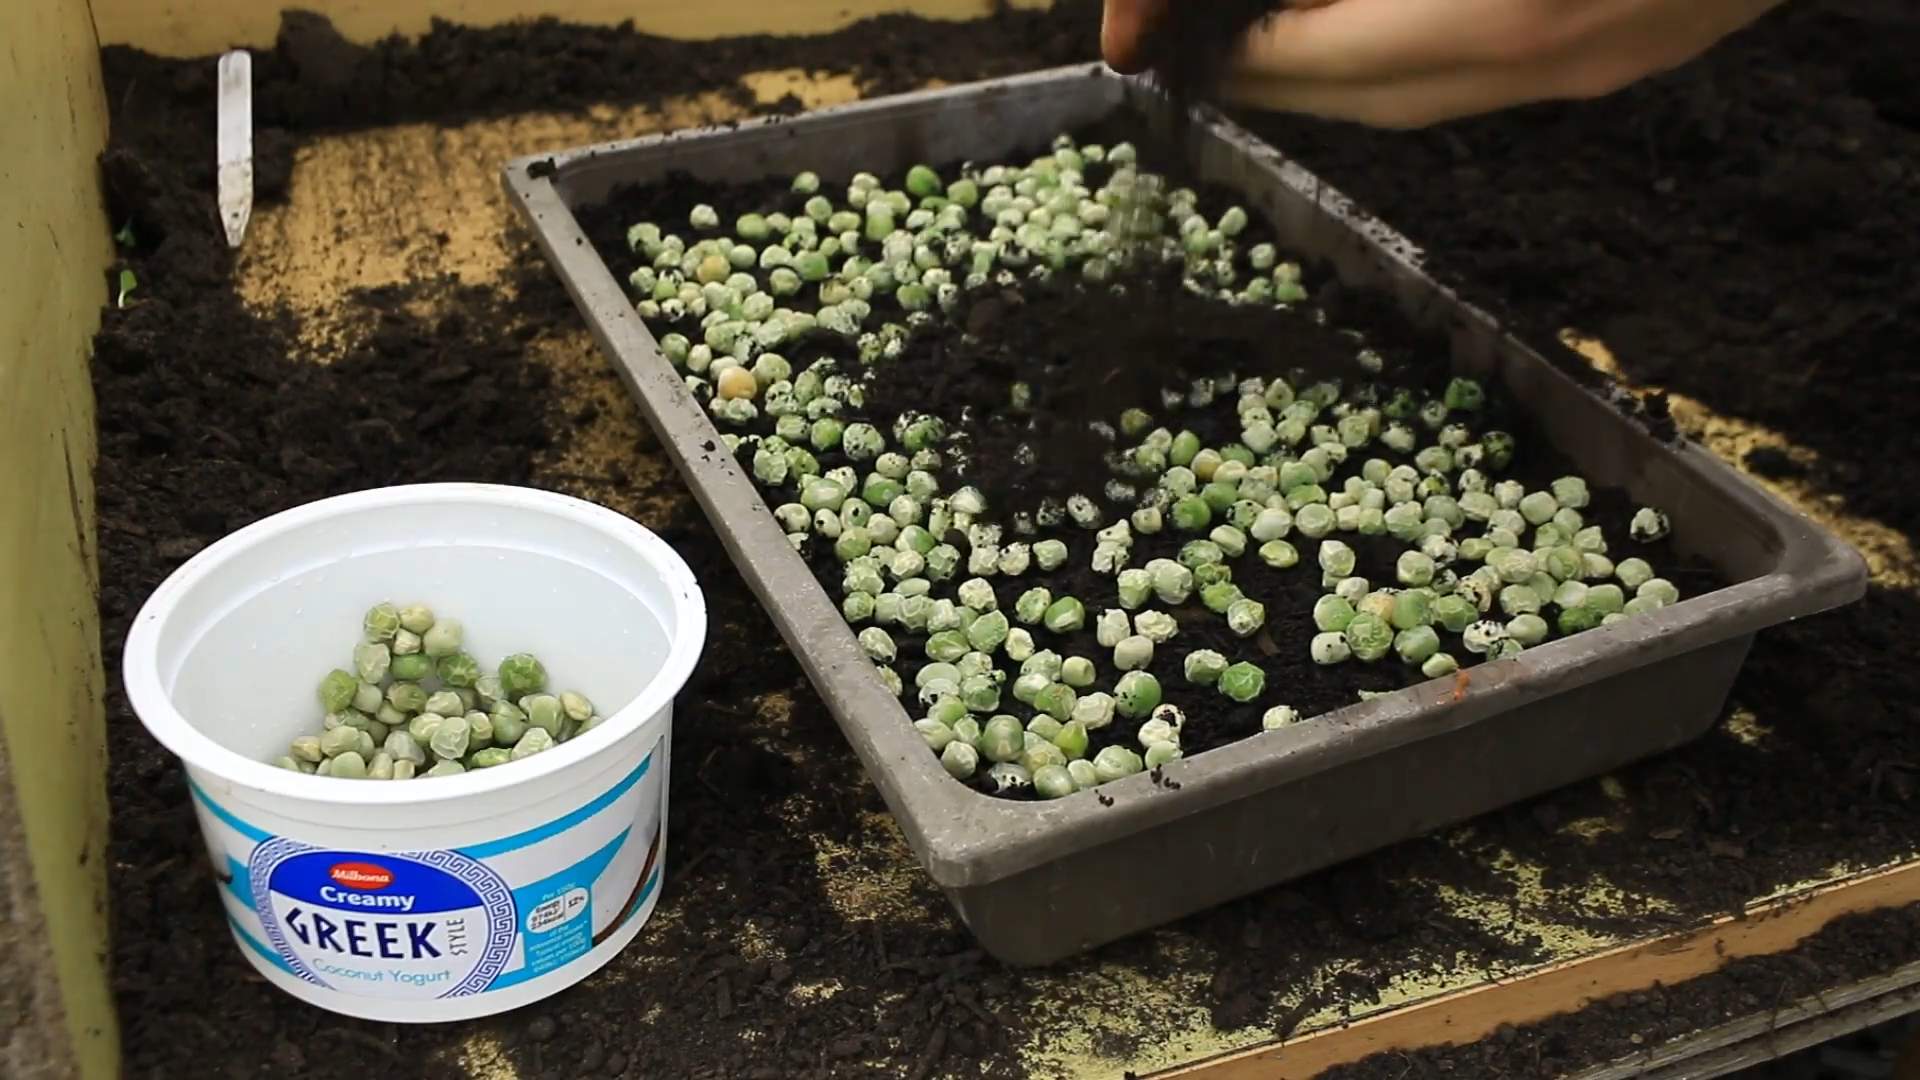
1. Rinse the Seeds: Place your pea seeds in a bowl and rinse them thoroughly with cool water. This helps remove any debris and prepares them for soaking.
2. Soak the Seeds: Cover the rinsed seeds with plenty of fresh water. You want them to be fully submerged.
3. Weight Them Down (Optional): Place a small plate or book on top of the seeds to keep them submerged. This helps ensure even water absorption.
4. Soak Time: Let the seeds soak for 12-24 hours. This is crucial for softening the seed coat and kickstarting the germination process. You’ll notice the seeds will plump up considerably as they absorb water.
Phase 2: Planting the Seeds
1. Prepare Your Container: Fill your growing tray or container with your chosen growing medium (potting soil or coconut coir). Make sure the medium is evenly distributed and slightly compacted. Leave about an inch of space at the top of the container.
2. Moisten the Growing Medium: Water the growing medium thoroughly until it’s evenly moist but not soggy. You want it to feel like a wrung-out sponge.
3. Drain the Seeds: After the soaking period, drain the water from the seeds.
4. Sow the Seeds: Spread the soaked pea seeds evenly over the surface of the moist growing medium. Don’t overcrowd them, but you can plant them fairly densely. They should be touching, but not piled on top of each other.
5. Cover the Seeds (Optional): Lightly cover the seeds with a thin layer of the growing medium. This helps retain moisture and provides a dark environment for germination. I sometimes skip this step and still get great results, but it can help.
6. Water Gently: Gently water the seeds with your spray bottle. You want to keep the surface moist without disturbing the seeds.
Phase 3: Germination and Sprouting
1. Darkness is Key: Place your planted seeds in a dark, cool place. This is essential for germination. A cupboard, closet, or even a covered box will work perfectly.
2. Maintain Moisture: Check the seeds daily and mist them with your spray bottle to keep the growing medium moist. Don’t let it dry out!
3. Patience is a Virtue: Germination typically takes 2-4 days. You’ll start to see tiny white roots emerging from the seeds.
4. Introduce Light: Once the seeds have sprouted and you see the first signs of green shoots, it’s time to introduce them to light. Move your tray to a sunny windowsill or under a grow light.
Phase 4: Growing and Harvesting
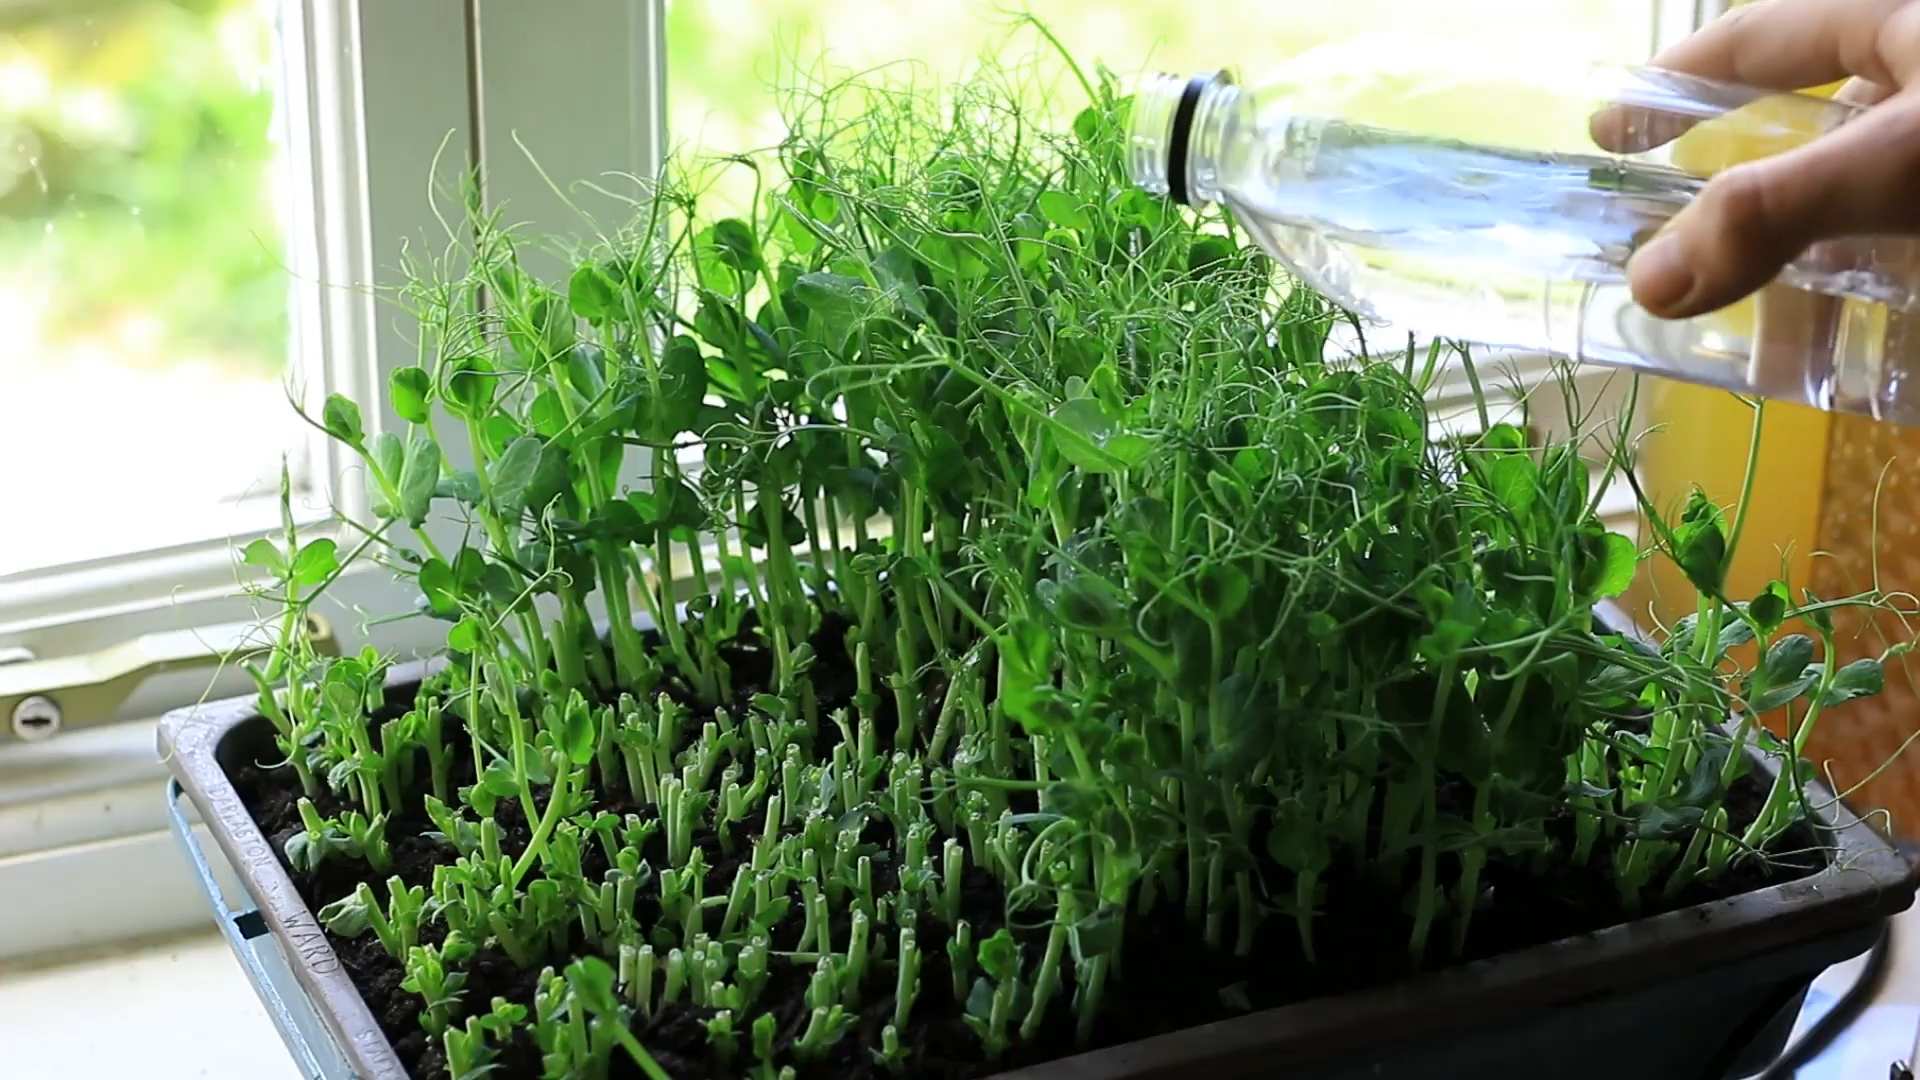
1. Light and Water: Continue to provide your pea shoots with plenty of light and keep the growing medium consistently moist. Water them gently from the bottom if possible, by adding water to the tray and letting the medium absorb it. This helps prevent fungal growth.
2. Rotate the Tray: If you’re growing your pea shoots on a windowsill, rotate the tray regularly to ensure even growth.
3. Harvest Time: Your pea shoots will be ready to harvest in about 1-3 weeks, depending on the variety and growing conditions. They should be about 2-4 inches tall and have several leaves.
4. Harvesting Technique: Use scissors or sharp shears to cut the pea shoots just above the lowest leaves. This allows the plant to potentially regrow for a second harvest, although the second harvest is usually less abundant.
5. Enjoy Your Harvest: Rinse your freshly harvested pea shoots and enjoy them in salads, sandwiches, stir-fries, or as a garnish.
Troubleshooting Tips
Even with the best intentions, things can sometimes go awry. Here are a few common problems and how to fix them:
* Mold: If you notice mold growing on your pea shoots, it’s usually a sign of overwatering or poor air circulation. Remove the affected shoots and improve ventilation by placing a small fan near the tray. You can also try watering less frequently.
* Slow Growth: Slow growth can be caused by insufficient light, lack of nutrients, or cold temperatures. Make sure your pea shoots are getting plenty of light and consider adding a diluted liquid fertilizer to the water.
* Uneven Germination: Uneven germination can be caused by uneven watering or inconsistent temperatures. Make sure the growing medium is evenly moist and that the tray is kept in a consistent temperature.
* Leggy Shoots: Leggy shoots are tall and spindly, and they’re usually a sign of insufficient light. Move your pea shoots to a brighter location or use a grow light.
Extra Tips for Success
* Experiment with Varieties: Try different varieties of pea seeds to find your favorite flavor. Snow peas, sugar snap peas, and garden peas all produce delicious shoots.
* Succession Planting: To ensure a continuous supply of pea shoots, plant a new batch of seeds every week or two.
* Compost the Leftovers: After harvesting, you can compost the leftover roots and growing medium.
* Wash Thoroughly: Always wash your pea shoots thoroughly before eating them to remove any dirt or debris.
* Store Properly: Store your harvested pea shoots in the refrigerator in a sealed container for up to a week.
Growing your own pea shoots is a rewarding and delicious experience. With a little bit of effort, you can enjoy a constant supply of fresh, nutritious greens right from your own kitchen. So, grab some seeds and get growing! You won’t regret it!
Conclusion
So, there you have it! Growing your own pea shoots at home is not just a fun project; it’s a gateway to incredibly fresh, flavorful, and nutritious greens right at your fingertips. Forget those wilted, overpriced bags at the grocery store. With minimal effort and resources, you can cultivate a continuous supply of these delightful microgreens, adding a burst of springtime to your meals year-round.
Why is this DIY trick a must-try? Because it empowers you to control the quality and freshness of your food. You know exactly what’s going into your pea shoots – no pesticides, no hidden additives, just pure, unadulterated goodness. Plus, it’s incredibly satisfying to watch those tiny seeds sprout and transform into a vibrant, edible crop. It’s a miniature garden that fits right on your windowsill!
Beyond the basic method, there’s plenty of room for experimentation. Try different varieties of peas – snow peas, sugar snap peas, or even dried field peas – to discover your favorite flavor profile. You can also experiment with different growing mediums. While soil is the most common, you can also use coco coir, hemp mats, or even just paper towels. Each medium will affect the growth rate and flavor of your pea shoots slightly, so have fun exploring the possibilities.
Consider adding a diluted liquid fertilizer, like seaweed extract, to the water every few days to boost growth and nutrient content. Just be sure to use it sparingly to avoid over-fertilizing. You can also adjust the amount of light your pea shoots receive. More light will result in bushier, greener shoots, while less light will produce taller, more leggy shoots.
Don’t be afraid to get creative with how you use your homegrown pea shoots! They’re delicious in salads, sandwiches, stir-fries, soups, and even as a garnish for your favorite dishes. Their delicate sweetness and crunchy texture add a delightful touch to any meal.
We wholeheartedly encourage you to give this DIY project a try. It’s easy, rewarding, and a fantastic way to connect with nature, even if you don’t have a traditional garden. Once you taste the difference between store-bought and homegrown pea shoots, you’ll never go back!
And most importantly, we want to hear about your experience! Share your photos, tips, and variations on social media using #HomegrownPeaShoots. Let’s build a community of pea shoot enthusiasts and inspire others to embrace the joy of growing their own food. Happy growing!
Frequently Asked Questions (FAQ)
What kind of peas should I use to grow pea shoots?
The best types of peas for growing pea shoots are typically snow peas, sugar snap peas, or dried field peas. Avoid using ornamental peas, as they may be treated with chemicals that are not safe for consumption. You can find pea seeds specifically labeled for sprouting or microgreens, which are usually a good choice. Experimenting with different varieties can lead to discovering your preferred taste and texture.
How long does it take to grow pea shoots?
Generally, it takes about 7-14 days to grow pea shoots from seed to harvest. The exact time will depend on factors such as temperature, light, and humidity. You’ll know they’re ready when they are about 2-4 inches tall and have developed several leaves.
What kind of container should I use?
You can use a variety of containers to grow pea shoots. Shallow trays, plastic containers with drainage holes, or even repurposed takeout containers work well. The key is to ensure that the container is clean and has adequate drainage to prevent waterlogging. A container that is at least 2 inches deep is recommended to provide enough space for the roots to grow.
How much light do pea shoots need?
Pea shoots need adequate light to grow properly. While they don’t require direct sunlight, they thrive in bright, indirect light. A sunny windowsill is often sufficient. If you don’t have enough natural light, you can supplement with a grow light. Insufficient light can result in leggy, pale shoots.
How often should I water my pea shoots?
Keep the growing medium consistently moist, but not waterlogged. Water gently from the bottom by adding water to the tray beneath the container, allowing the medium to absorb the moisture. Alternatively, you can mist the surface of the soil with a spray bottle. Avoid overwatering, as this can lead to mold growth. Check the moisture level daily and adjust watering as needed.
What if my pea shoots start to mold?
Mold growth is usually a sign of overwatering or poor air circulation. If you notice mold, remove the affected areas immediately. Improve air circulation by placing a small fan near the pea shoots. Reduce watering frequency and ensure that the container has adequate drainage. You can also try spraying the shoots with a diluted solution of hydrogen peroxide and water (1 part hydrogen peroxide to 10 parts water).
How do I harvest pea shoots?
Harvest pea shoots when they are about 2-4 inches tall. Use scissors or a sharp knife to cut the shoots just above the lowest set of leaves. This allows the plant to regrow, providing you with multiple harvests. You can usually get 2-3 harvests from a single planting.
Can I regrow pea shoots after harvesting?
Yes, you can regrow pea shoots after harvesting. After cutting the shoots, continue to water and provide light as usual. The plant will typically regrow within a week or two, allowing you to harvest again. However, the subsequent harvests may be less abundant than the first.
Are pea shoots nutritious?
Yes, pea shoots are highly nutritious. They are a good source of vitamins A, C, and K, as well as folate, fiber, and antioxidants. They also contain essential minerals like iron, magnesium, and potassium. Adding pea shoots to your diet can contribute to overall health and well-being.
How should I store harvested pea shoots?
Store harvested pea shoots in the refrigerator in a sealed container or plastic bag. They will stay fresh for about 3-5 days. To prolong their freshness, you can wrap them in a damp paper towel before storing them. Avoid washing them until just before you’re ready to use them.
Can I grow pea shoots outdoors?
Yes, you can grow pea shoots outdoors, especially during the cooler months of spring and fall. Choose a location that receives partial shade, as direct sunlight can scorch the delicate shoots. Ensure that the container has adequate drainage and protect the shoots from pests such as slugs and snails.
Are there any pests or diseases that affect pea shoots?
Pea shoots are generally resistant to pests and diseases, but they can be susceptible to aphids, slugs, and snails. Inspect your plants regularly and remove any pests manually. You can also use organic pest control methods, such as neem oil or insecticidal soap. As mentioned earlier, mold can be a problem if the growing medium is too wet.
Can I use the same soil for multiple plantings?
It’s generally recommended to use fresh soil for each planting of pea shoots. This helps to prevent the buildup of diseases and pests. However, if you choose to reuse soil, make sure to sterilize it first by baking it in the oven at 200°F (93°C) for 30 minutes.
What are some creative ways to use pea shoots in cooking?
Pea shoots are incredibly versatile and can be used in a variety of dishes. Add them to salads for a fresh, crunchy texture. Use them as a topping for sandwiches and wraps. Stir them into soups and stir-fries for added flavor and nutrition. They can also be used as a garnish for grilled meats and vegetables. Get creative and experiment with different ways to incorporate pea shoots into your meals.
Is growing pea shoots at home cost-effective?
Absolutely! Growing pea shoots at home is a very cost-effective way to enjoy fresh, nutritious greens. A packet of pea seeds is relatively inexpensive, and you can get multiple harvests from a single planting. Compared to buying pea shoots at the grocery store, growing your own can save you a significant amount of money over time. Plus, you have the added benefit of knowing exactly where your food is coming from and how it was grown.
Leave a Comment