

Grow Mung Bean Sprouts Easily and unlock a world of fresh, crunchy goodness right in your kitchen! Forget those bland, store-bought sprouts – I’m going to show you how to cultivate your own vibrant sprouts with minimal effort and maximum flavor.
Sprouting, in general, isn’t a new fad. In fact, it boasts a rich history, dating back thousands of years to ancient China, where mung beans were prized for their nutritional value and medicinal properties. These tiny powerhouses were a staple during times of scarcity and remain a vital part of Asian cuisine today. Think about all those delicious stir-fries and salads that get a delightful crunch from mung bean sprouts!
But why should *you* learn to grow mung bean sprouts easily at home? Well, for starters, it’s incredibly cost-effective. A small bag of mung beans can yield a surprising amount of sprouts, saving you money compared to constantly buying them from the grocery store. More importantly, you control the growing environment, ensuring your sprouts are free from harmful chemicals and contaminants. Plus, there’s something incredibly satisfying about nurturing your own food from seed to sprout. It’s a quick and easy way to add a boost of vitamins, minerals, and enzymes to your diet, especially during the colder months when fresh produce might be less readily available. So, let’s dive in and discover the simple secrets to sprouting success!
Grow Your Own Crunchy Mung Bean Sprouts: A Simple DIY Guide
Hey there, fellow sprout enthusiast! I’m so excited to share my foolproof method for growing delicious, crunchy mung bean sprouts right in your own kitchen. Forget buying them at the store – this is cheaper, fresher, and surprisingly satisfying. Trust me, once you taste homemade sprouts, you’ll never go back!
What You’ll Need
Before we dive in, let’s gather our supplies. The beauty of this project is that you probably already have most of these things lying around:
* Mung Beans: Obviously! You can find these at most grocery stores, Asian markets, or online. Start with about 1/4 to 1/2 cup of dried mung beans. They expand a lot!
* A Wide-Mouth Jar: A quart-sized mason jar works perfectly.
* Sprouting Lid or Cheesecloth & Rubber Band: A sprouting lid is ideal because it’s designed for this purpose, but cheesecloth secured with a rubber band works just as well.
* Water: Filtered water is best, but tap water is usually fine.
* A Dark Place: A cupboard, drawer, or even a covered bowl will do the trick. Darkness is key for optimal sprout growth.
* A Bowl or Tray: To angle the jar for drainage.
Step-by-Step Instructions: From Bean to Sprout!
Okay, let’s get sprouting! This process takes about 3-5 days, so patience is key. But I promise, the wait is worth it.
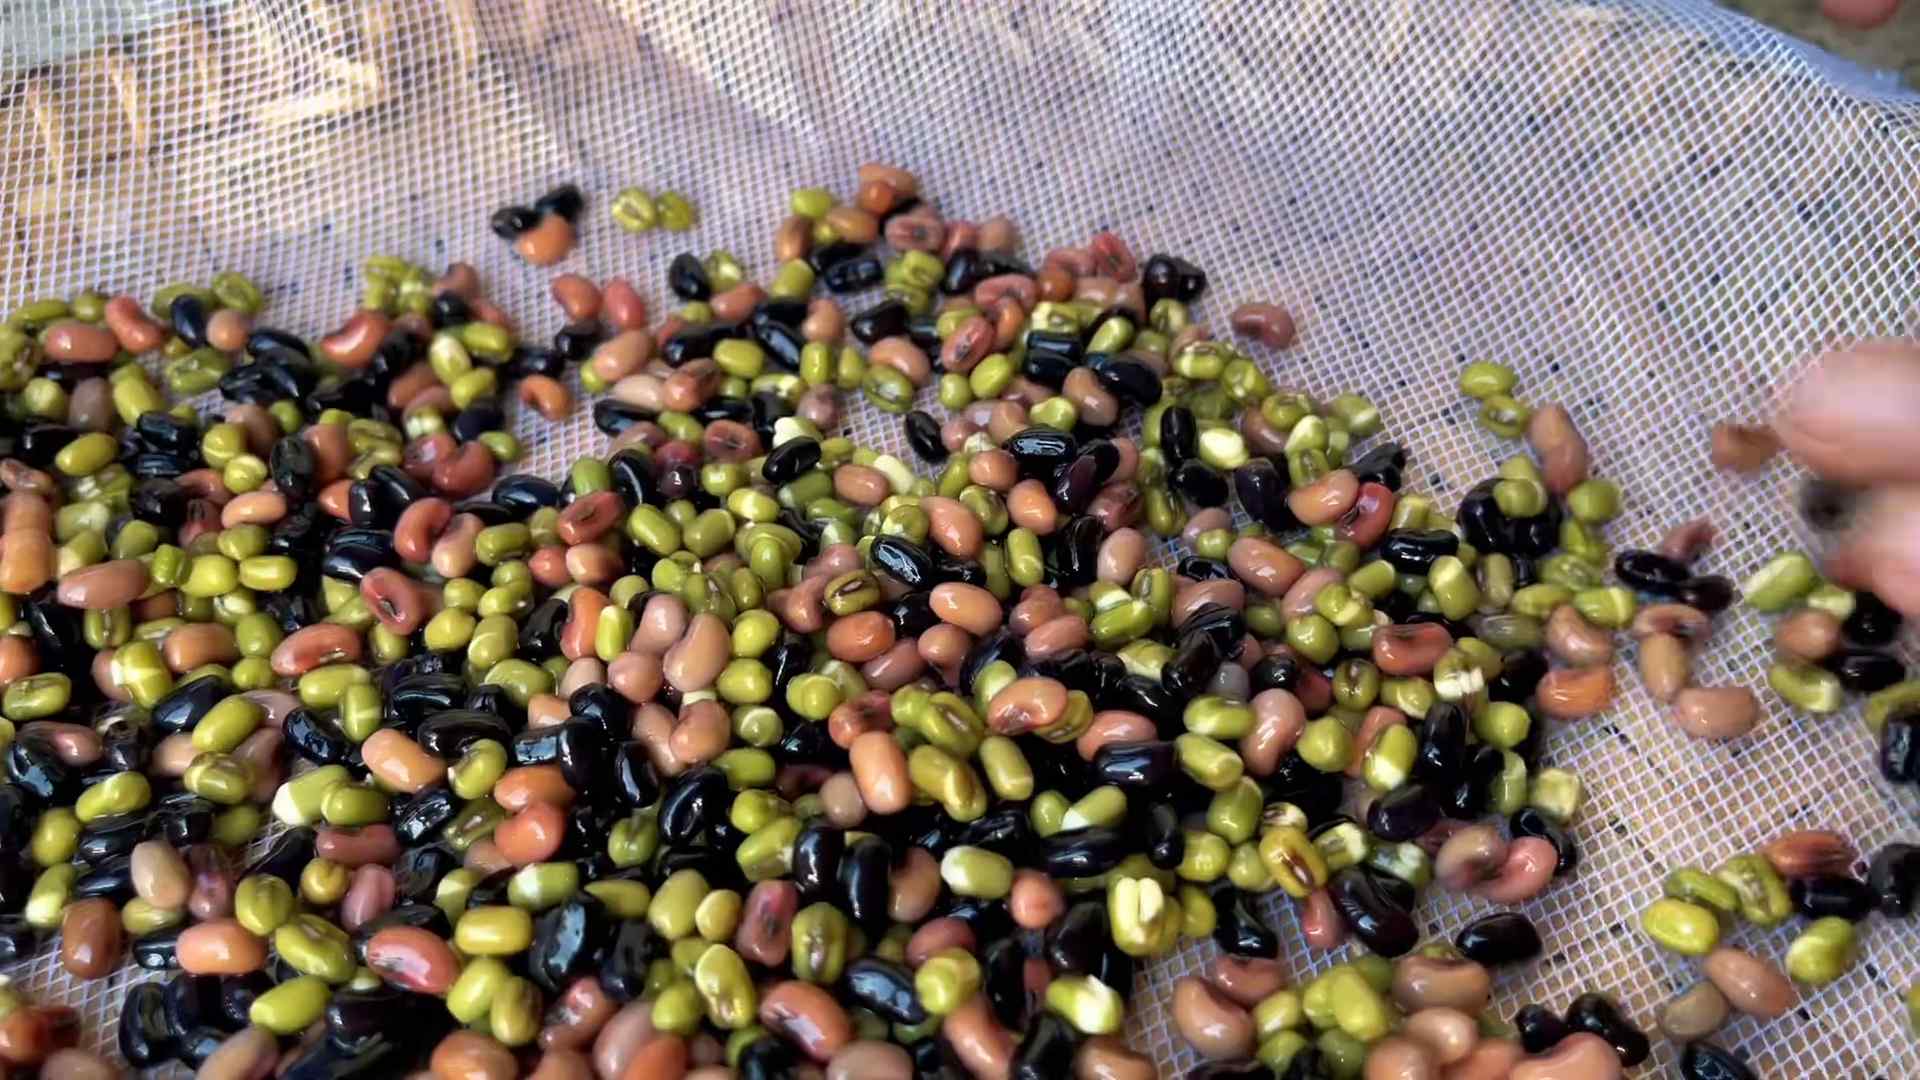
1. Rinse the Beans: Pour your mung beans into the jar and cover them with plenty of cool water. Swirl them around to remove any debris or dust. Drain the water completely. This initial rinse is super important to get rid of any surface nasties.
2. Soak the Beans: Add fresh, cool water to the jar, ensuring the beans are fully submerged. They’ll expand significantly, so don’t overcrowd them. I usually use about 3 times the volume of water to beans. Cover the jar with your sprouting lid or cheesecloth and rubber band. Let the beans soak for 8-12 hours, or even overnight. This soaking process wakes up the beans and gets them ready to sprout.
3. Drain and Rinse (Day 1): After soaking, drain all the water from the jar. Rinse the beans thoroughly with fresh, cool water. Make sure to drain all the water again. This is crucial to prevent mold growth. Place the jar upside down at an angle in a bowl or tray to allow any excess water to drain out. The goal is to keep the beans moist but not sitting in water.
4. Darkness is Your Friend: Now, place the jar in a dark, cool place. A cupboard or drawer works perfectly. This is where the magic happens!
5. Rinse and Drain (Days 2-4): This is the most important part of the process. Rinse and drain the beans 2-3 times a day. I usually do it in the morning, afternoon, and before bed. This keeps them hydrated and prevents mold. Remember to always drain all the water after rinsing. The sprouts need moisture, not a swimming pool!
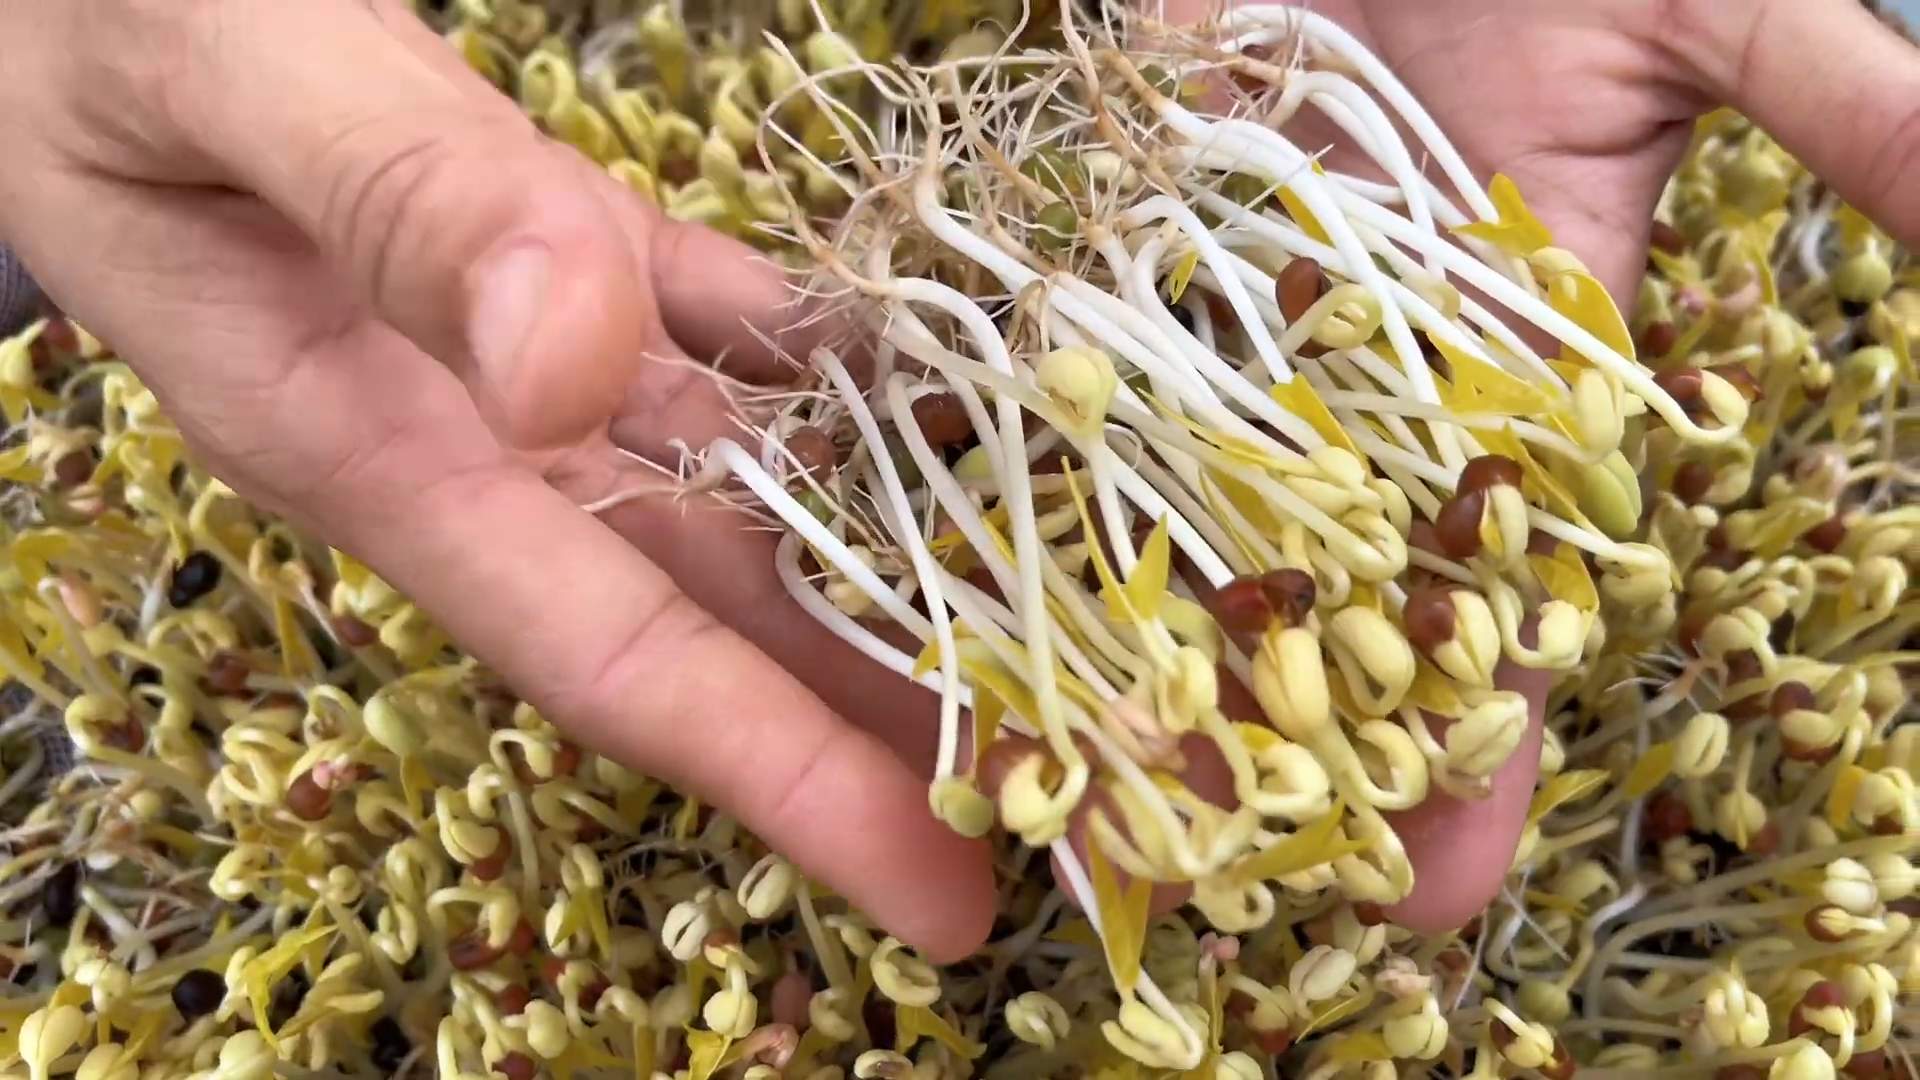
6. Observe the Growth: You should start seeing tiny sprouts emerging within 24 hours. As the days go by, they’ll grow longer and thicker. Keep rinsing and draining regularly.
7. Harvest Time (Day 3-5): Your sprouts are ready to harvest when they’re about 2-3 inches long. I prefer mine a little longer, but it’s all about personal preference. The longer they grow, the more nutrients they develop!
8. Final Rinse and De-Hulling (Optional): Give your sprouts a final, thorough rinse. At this stage, you might notice some loose hulls (the outer skins of the beans). You can remove these by gently agitating the sprouts in a bowl of water. The hulls will float to the top, and you can skim them off. This step is optional, but it makes the sprouts look nicer.
9. Dry Thoroughly: This is a key step to prevent spoilage. Spread the sprouts out on a clean kitchen towel or salad spinner and let them air dry for a few hours. You can also use a salad spinner to remove excess water. The drier they are, the longer they’ll last in the fridge.
10. Store and Enjoy: Store your freshly grown mung bean sprouts in an airtight container in the refrigerator. They should last for about a week. Add them to salads, stir-fries, sandwiches, or enjoy them as a crunchy snack.
Troubleshooting: Common Issues and Solutions
Sometimes, things don’t go exactly as planned. Here are a few common issues you might encounter and how to fix them:
* Mold Growth: This is usually caused by insufficient rinsing or drainage. If you see any mold, discard the entire batch. To prevent mold, make sure you’re rinsing and draining the sprouts thoroughly 2-3 times a day. Also, ensure good air circulation around the jar.
* Slow Growth: This could be due to several factors, including temperature, water quality, or bean quality. Make sure you’re using fresh, good-quality mung beans. The ideal temperature for sprouting is around 70-75°F (21-24°C). If your house is too cold, try placing the jar in a slightly warmer location.
* Sprouts are Slimy: This is usually a sign of bacterial growth. It’s often caused by not rinsing frequently enough or using contaminated water. Discard the batch and start again, making sure to rinse thoroughly and use clean water.
* Bitter Taste: Sometimes, sprouts can develop a slightly bitter taste if they’re grown for too long or exposed to too much light. Try harvesting them a little earlier or keeping them in a darker location.
Tips and Tricks for Sprout-Growing Success
Here are a few extra tips I’ve learned along the way to help you grow the best mung bean sprouts ever:
* Use Good Quality Beans: This makes a huge difference. Look for beans that are whole, unbroken, and free of debris. Organic beans are a great option.
* Don’t Overcrowd the Jar: Mung beans expand a lot when they soak and sprout. Don’t fill the jar more than about 1/4 to 1/3 full with dry beans.
* Ensure Proper Drainage: This is crucial to prevent mold growth. Make sure the jar is angled properly so that all the excess water can drain out.
* Experiment with Light: While darkness is generally preferred, exposing the sprouts to a little bit of indirect sunlight for the last day or two can help them develop chlorophyll and turn a slightly greener color. This can also enhance their flavor.
* Keep it Clean: Wash your jar and sprouting lid thoroughly between batches to prevent the buildup of bacteria.
* Enjoy the Process: Growing your own sprouts is a fun and rewarding experience. Don’t be afraid to experiment and find what works best for you.
Beyond Mung Beans: Exploring Other Sprouting Options
Once you’ve mastered mung bean sprouts, you can try sprouting other types of beans, seeds, and grains. Some popular options include:
* Alfalfa Sprouts: These are delicate and slightly sweet, perfect for salads and sandwiches.
* Radish Sprouts: These have a peppery, spicy flavor that adds a kick to any dish.
* Broccoli Sprouts: These are packed with nutrients and have a mild, slightly bitter flavor.
* Lentil Sprouts: These are hearty and filling, great for adding to soups and stews.
* Quinoa Sprouts: These are a complete protein and have a nutty flavor.
The possibilities are endless! Each type of sprout has its own unique flavor and nutritional profile. So, get creative and experiment with different varieties to find your favorites.
Why Grow Your Own Sprouts? The Benefits are Endless!
Growing your own mung bean sprouts is not only easy and affordable, but it’s also incredibly beneficial for your health. Here are just a few of the reasons why I love sprouting:
* Nutrient Powerhouse: Sprouts are packed with vitamins, minerals, enzymes, and antioxidants. They’re a concentrated source of nutrition.
* Improved Digestion: The sprouting process breaks down complex carbohydrates and proteins, making them easier to digest.
* Increased Bioavailability: Sprouting increases the bioavailability of nutrients, meaning your body can absorb them more easily.
* Fresh and Flavorful: Homemade sprouts taste so much better than store-bought ones. They’re crisp, crunchy, and full of flavor.
* Cost-Effective: Growing your own sprouts is a fraction of the cost of buying them at the store.
* Sustainable: Sprouting is a sustainable way to grow your own food. It requires very little water and energy.
* Fun and
Conclusion
So, there you have it! Growing your own mung bean sprouts at home is not only incredibly easy and cost-effective, but it also provides you with a fresher, more nutritious, and readily available supply of these versatile little powerhouses. Forget those limp, often questionable sprouts from the grocery store. With just a few simple supplies and a little patience, you can cultivate a vibrant batch of crisp, delicious mung bean sprouts right in your own kitchen.
This DIY trick is a must-try for several reasons. First, you have complete control over the growing environment, ensuring optimal hygiene and minimizing the risk of contamination. Second, you can harvest your sprouts at their peak freshness, maximizing their nutritional value and flavor. Third, it’s a fantastic way to reduce food waste and embrace a more sustainable lifestyle. Finally, it’s surprisingly rewarding to watch these tiny seeds transform into a bountiful harvest in just a few days!
Why is this method superior? Because you are in control. You know exactly what goes into your food, and you can tailor the process to your specific preferences.
Looking for variations? Experiment with different types of beans! While this guide focuses on mung beans, you can also try sprouting other legumes like lentils, adzuki beans, or even alfalfa seeds. Just be sure to research the specific sprouting times and requirements for each type of bean. You can also add a touch of flavor by rinsing your sprouts with a diluted lemon juice solution or a sprinkle of sea salt during the final rinse. For a spicier kick, consider adding a pinch of chili flakes to the soaking water.
Don’t be afraid to experiment! The beauty of this DIY project is that it’s incredibly forgiving. Even if your first batch isn’t perfect, you’ll learn something valuable and be one step closer to mastering the art of home sprouting.
We wholeheartedly encourage you to give this DIY trick a try. It’s a simple, satisfying, and incredibly rewarding way to add fresh, nutritious sprouts to your diet. Once you experience the joy of harvesting your own homegrown mung bean sprouts, you’ll never go back to store-bought again!
We’d love to hear about your experiences! Share your photos, tips, and variations in the comments below. Let’s build a community of home sprouting enthusiasts and inspire others to embrace the goodness of homegrown food. Happy sprouting!
Frequently Asked Questions (FAQ)
What exactly are mung bean sprouts and why should I eat them?
Mung bean sprouts are germinated mung beans. They are a popular ingredient in Asian cuisine, known for their crunchy texture and mild, slightly sweet flavor. They are also packed with nutrients, including vitamins C and K, folate, fiber, and protein. Eating mung bean sprouts can contribute to improved digestion, immune function, and overall health. They are low in calories and fat, making them a healthy addition to salads, stir-fries, sandwiches, and more.
How long does it take to grow mung bean sprouts?
Typically, it takes between 3 to 5 days to grow mung bean sprouts at home, depending on the temperature and humidity of your environment. Warmer temperatures generally speed up the sprouting process. Check your sprouts daily and harvest them when they reach your desired length and crispness.
What kind of container should I use to grow mung bean sprouts?
A wide-mouthed jar, a sprouting tray, or even a colander lined with cheesecloth can be used. The key is to ensure good drainage and ventilation to prevent mold growth. A mason jar with a sprouting lid is a popular and convenient option. Make sure the container is clean and sanitized before starting.
How often should I rinse the mung bean sprouts?
Rinse your mung bean sprouts at least twice a day, preferably three times, with cool, clean water. This helps to keep them moist and prevents them from drying out or developing mold. Ensure that all the water drains out after each rinse.
What if my mung bean sprouts start to smell bad?
A foul odor is a sign of bacterial contamination or mold growth. This usually happens due to insufficient rinsing or poor drainage. If you notice a bad smell, discard the entire batch of sprouts immediately. To prevent this, ensure you are rinsing your sprouts thoroughly and frequently, and that your container has adequate drainage.
Can I eat the mung bean sprouts raw?
While many people eat mung bean sprouts raw, it’s generally recommended to cook them lightly before consumption, especially for individuals with weakened immune systems, pregnant women, and young children. Lightly steaming, stir-frying, or blanching the sprouts can help to reduce the risk of foodborne illness.
How do I store mung bean sprouts?
Once harvested, store your mung bean sprouts in an airtight container in the refrigerator. They will typically last for up to a week. To maintain their crispness, you can line the container with a paper towel to absorb excess moisture.
What are some creative ways to use mung bean sprouts in my cooking?
Mung bean sprouts are incredibly versatile! Add them to stir-fries, salads, spring rolls, sandwiches, soups, and noodle dishes. They can also be used as a topping for tacos or as a filling for omelets. Experiment with different flavors and cuisines to discover your favorite ways to enjoy these nutritious sprouts.
Can I grow mung bean sprouts without light?
Yes, mung bean sprouts can be grown in a dark or dimly lit environment. In fact, growing them in the dark can help to produce whiter, more tender sprouts. However, exposing them to a little bit of indirect light during the final day or two of sprouting can help to enhance their chlorophyll content and nutritional value.
What if my mung bean sprouts don’t sprout?
There could be several reasons why your mung bean sprouts aren’t sprouting. First, ensure that your mung beans are fresh and viable. Old beans may have a lower germination rate. Second, make sure you are soaking the beans for the appropriate amount of time (usually 8-12 hours). Third, check the temperature of your environment. Mung beans sprout best in a warm environment (around 70-75°F). Finally, ensure that you are rinsing the beans regularly and providing adequate drainage.
Are there any health concerns associated with eating mung bean sprouts?
While mung bean sprouts are generally safe to eat, there is a small risk of foodborne illness, particularly if they are not grown or stored properly. To minimize this risk, always wash your hands thoroughly before handling sprouts, use clean containers and water, rinse the sprouts frequently, and cook them lightly before consumption. Individuals with weakened immune systems should exercise extra caution.
Can I use any type of mung bean to grow sprouts?
Yes, you can use any type of whole, dried mung bean to grow sprouts. However, avoid using split mung beans or mung beans that have been processed in any way. Look for organic mung beans whenever possible to minimize exposure to pesticides and other chemicals.
How do I know when the mung bean sprouts are ready to harvest?
Mung bean sprouts are ready to harvest when they have reached your desired length and crispness. Typically, they are harvested when the sprouts are about 1-2 inches long and have a firm, crunchy texture. You can harvest them all at once or harvest them gradually over a few days as they continue to grow.
Is growing mung bean sprouts a good activity for kids?
Absolutely! Growing mung bean sprouts is a fun and educational activity for kids. It teaches them about the life cycle of plants, the importance of healthy eating, and the basics of gardening. It’s also a great way to get them involved in the kitchen and encourage them to try new foods. Just be sure to supervise them closely and teach them about food safety.

Leave a Comment