

Grow Lupins From Seed and unlock a world of vibrant color and architectural beauty in your very own garden! Have you ever gazed upon a field of lupins, their spires reaching for the sky, and thought, “I wish I could do that?” Well, guess what? You absolutely can! This isn’t some gardening secret reserved for the green-thumbed elite; it’s a surprisingly simple and rewarding project that anyone can tackle.
Lupins have a rich history, gracing gardens for centuries and even finding their way into folklore and art. Their striking presence has captivated gardeners and artists alike, making them a timeless favorite. But beyond their aesthetic appeal, lupins are also beneficial to your garden’s ecosystem, enriching the soil with nitrogen.
Why should you learn how to grow lupins from seed? Because it’s incredibly cost-effective, allowing you to cultivate a stunning display without breaking the bank. Plus, starting from seed gives you complete control over the varieties you grow, ensuring a personalized and unique garden. In this article, I’ll share my tried-and-true methods for successfully germinating lupin seeds and nurturing them into flourishing plants. Get ready to transform your garden into a lupin paradise!
Growing Lupines From Seed: A Comprehensive DIY Guide
Hey there, fellow gardening enthusiasts! I’m so excited to share my tried-and-true method for growing lupines from seed. These beauties are not only stunning additions to any garden, but they’re also relatively easy to cultivate, even for beginners. I’ve had amazing success with this method, and I’m confident you will too! Let’s dive in!
Understanding Lupines
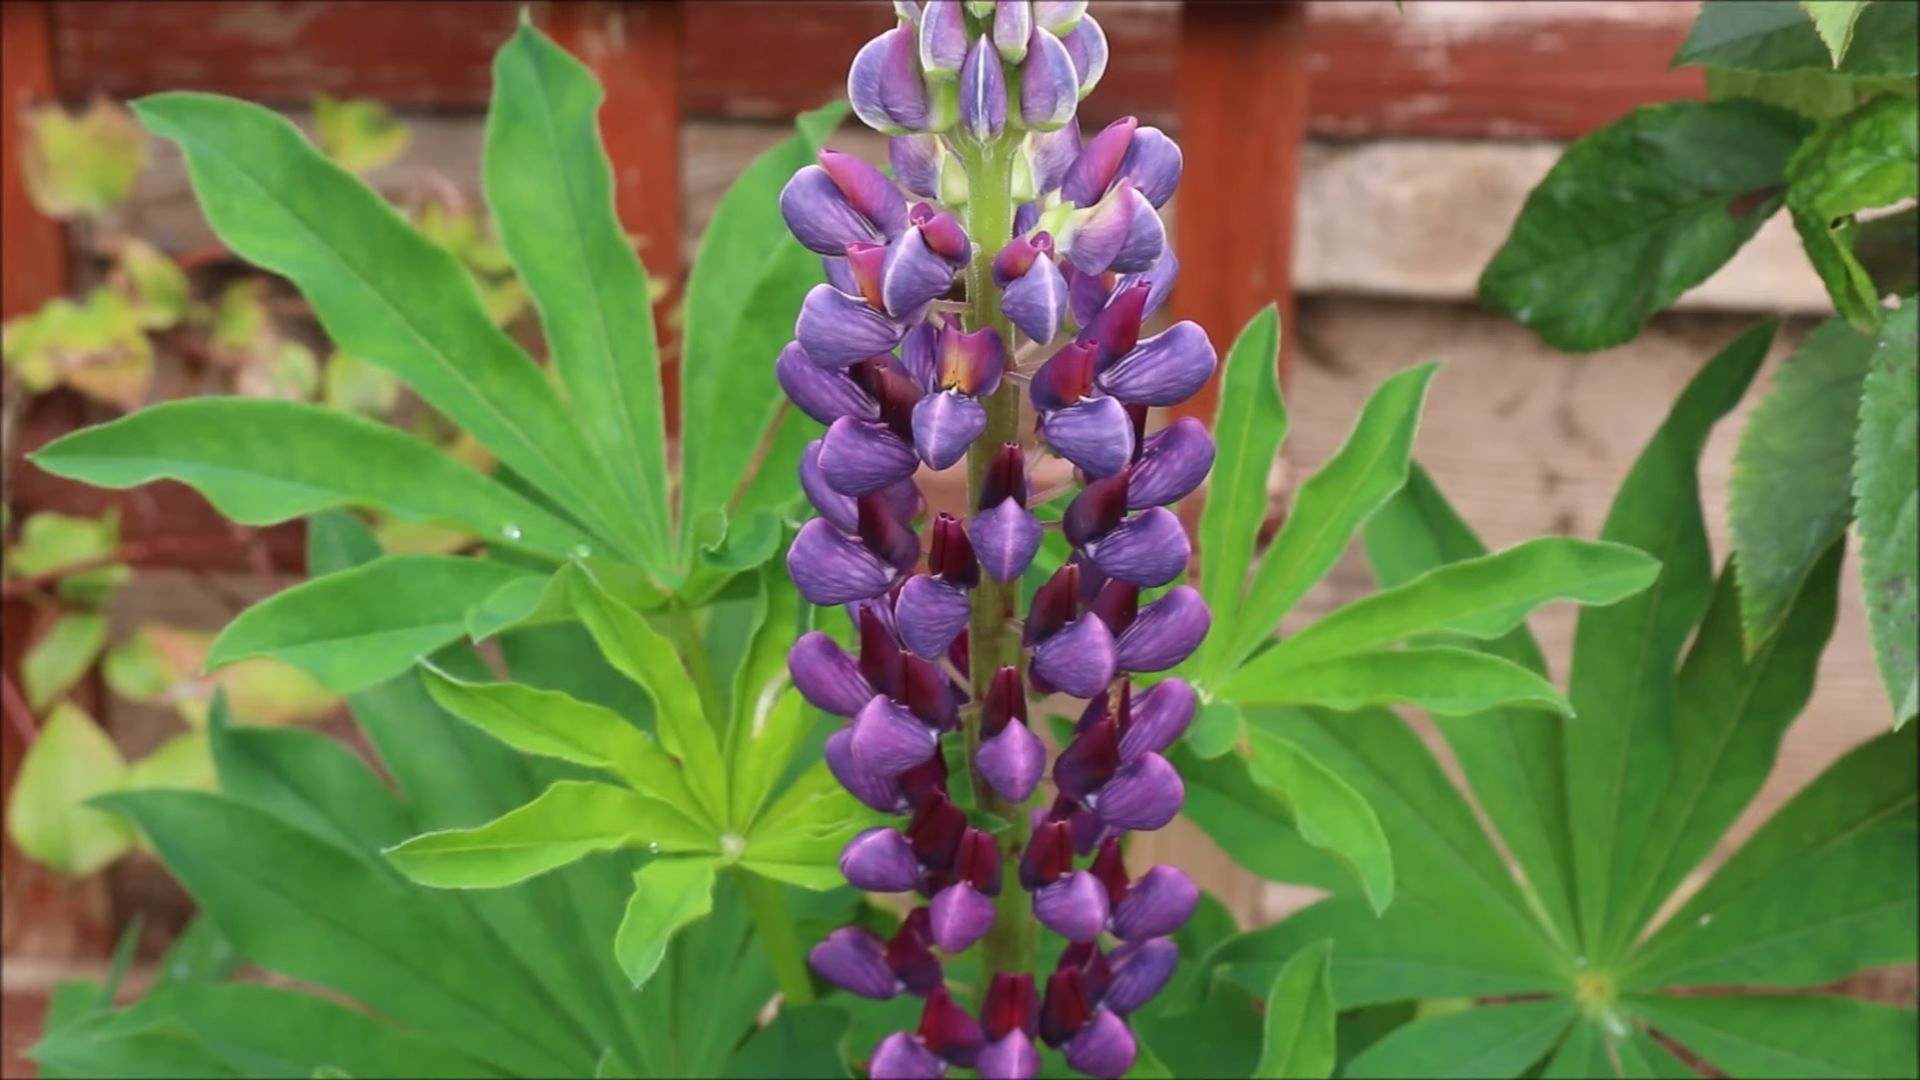
Before we get our hands dirty, let’s talk a little about lupines. They belong to the legume family and are known for their tall, elegant flower spikes that come in a rainbow of colors – blues, purples, pinks, yellows, and even whites. They’re also nitrogen fixers, meaning they help improve the soil quality by converting atmospheric nitrogen into a form plants can use. Pretty cool, right?
Lupines thrive in well-drained soil and prefer full sun to partial shade. They’re generally hardy in zones 3-8, but it’s always a good idea to check the specific variety you’re growing for its hardiness.
Materials You’ll Need
To get started, gather these supplies:
* Lupine seeds (choose your favorite colors!)
* Small pots or seed trays
* Seed starting mix (a well-draining mix is crucial)
* Watering can or spray bottle
* A warm, bright location (a sunny windowsill or grow lights)
* Optional: Sandpaper or a nail file
* Optional: Rooting hormone
Pre-Sowing Seed Preparation: Scarification and Soaking
Lupine seeds have a tough outer coating, which can make it difficult for them to germinate. To overcome this, we need to scarify and soak the seeds. This process helps break down the seed coat and allows water to penetrate, triggering germination.
Scarification
Scarification involves gently damaging the seed coat. There are a few ways to do this:
* Sandpaper Method: Gently rub the seeds between two pieces of fine-grit sandpaper. Be careful not to damage the inside of the seed. I usually rub them for about 30 seconds.
* Nail File Method: Use a nail file to gently nick the seed coat. Again, be very careful not to damage the inside.
* Knife Method: (Use with extreme caution!) Very carefully use a sharp knife to make a tiny nick in the seed coat. This method is riskier, so I usually stick to sandpaper or a nail file.
Soaking
After scarification, soak the seeds in lukewarm water for 12-24 hours. This will further soften the seed coat and encourage germination. I like to use a small bowl or cup for this. You’ll notice the seeds will swell up a bit as they absorb water.
Sowing the Seeds
Now for the fun part – planting!
1. Fill your pots or seed trays with seed starting mix. Make sure the mix is loose and well-draining. I like to gently tap the pots to settle the mix.
2. Make small holes in the soil. The holes should be about 1/4 to 1/2 inch deep. I use my finger or a pencil to make the holes.
3. Place one seed in each hole. Gently cover the seeds with soil.
4. Water gently. Use a watering can or spray bottle to moisten the soil. Avoid overwatering, as this can lead to rot.
5. Place the pots in a warm, bright location. A sunny windowsill or under grow lights is ideal. The ideal temperature for germination is around 65-70°F (18-21°C).
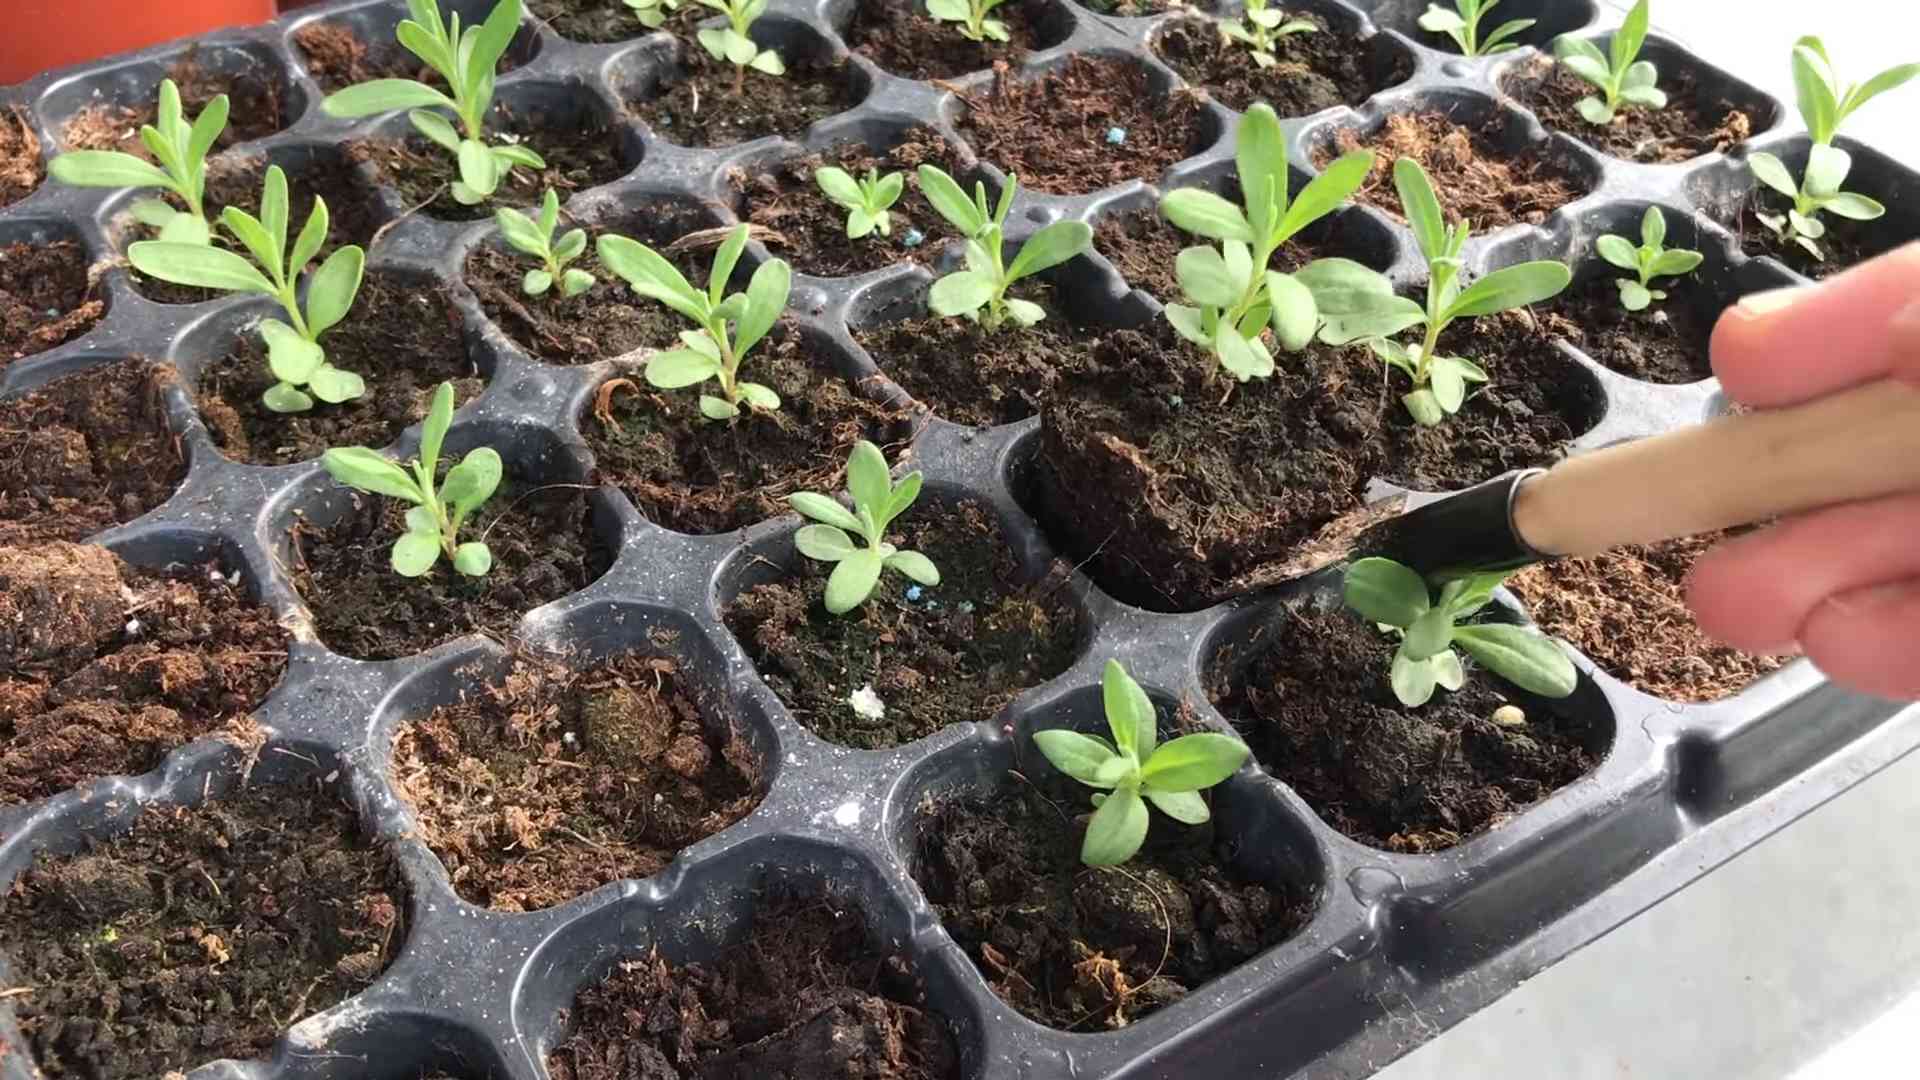
Caring for Seedlings
Once your lupine seeds have germinated (usually within 7-21 days), it’s important to provide them with proper care.
1. Keep the soil consistently moist, but not soggy. Water when the top inch of soil feels dry to the touch.
2. Provide adequate light. If you’re using a windowsill, rotate the pots regularly to ensure even growth. If you’re using grow lights, keep them on for about 14-16 hours per day.
3. Thin the seedlings if necessary. If you planted multiple seeds in one pot, thin them out to the strongest seedling once they have a few sets of true leaves.
4. Fertilize sparingly. Once the seedlings have a few sets of true leaves, you can start fertilizing them with a diluted liquid fertilizer. I use a balanced fertilizer diluted to half strength. Be careful not to over-fertilize, as this can burn the seedlings.
Transplanting Lupines
Once your lupine seedlings have grown large enough (usually when they’re about 4-6 inches tall and have several sets of true leaves), it’s time to transplant them into larger pots or directly into the garden.
Hardening Off
Before transplanting your lupines outdoors, you need to harden them off. This process gradually acclimates the seedlings to outdoor conditions, preventing shock.
1. Start by placing the seedlings outdoors in a sheltered location for a few hours each day. Gradually increase the amount of time they spend outdoors each day.
2. Protect the seedlings from direct sunlight and strong winds.
3. After about a week, the seedlings should be ready to be transplanted into the garden.
Transplanting into the Garden
1. Choose a location with well-drained soil and full sun to partial shade.
2. Dig a hole that is slightly larger than the root ball of the seedling.
3. Gently remove the seedling from its pot and loosen the roots.
4. Place the seedling in the hole and backfill with soil.
5. Water thoroughly.
6. Space the plants about 1-2 feet apart.
Ongoing Care
Once your lupines are established in the garden, they’re relatively low-maintenance.
1. Water regularly, especially during dry periods.
2. Deadhead spent flowers to encourage more blooms. Simply snip off the faded flower spikes.
3. Provide support for tall varieties. Lupines can get quite tall and may need staking to prevent them from flopping over.
4. Watch out for pests and diseases. Lupines can be susceptible to aphids, slugs, and powdery mildew. Treat any problems promptly. I usually use insecticidal soap for aphids and slug bait for slugs. For powdery mildew, I use a fungicide.
5. Mulch around the plants to help retain moisture and suppress weeds. I like to use organic mulch, such as wood chips or straw.
Troubleshooting
Even with the best care, you might encounter some challenges when growing lupines. Here are a few common problems and how to address them:
* Poor germination: This could be due to several factors, including old seeds, improper scarification, or cold soil temperatures. Make sure to use fresh seeds, scarify them properly, and provide adequate warmth.
* Yellowing leaves: This could be a sign of overwatering, nutrient deficiency, or pest infestation. Check the soil moisture, fertilize if necessary, and inspect the plants for pests.
* Powdery mildew: This fungal disease can cause a white, powdery coating on the leaves. Improve air circulation, avoid overhead watering, and treat with a fungicide.
* Aphids: These small, sap-sucking insects can weaken the plants. Spray with insecticidal soap or neem oil.
* Slugs: These pests can damage the leaves and flowers. Use slug bait or handpick them off the plants.
Enjoying Your Lupines
Growing lupines from seed is a rewarding experience. With a little patience and care, you can enjoy these beautiful flowers in your garden for years to come. They’re perfect for adding color and height to borders, cottage gardens, and wildflower meadows. Plus, they attract pollinators like bees and butterflies, making your garden a haven for wildlife.
I hope this guide has been helpful! Happy gardening!
Conclusion
So, there you have it! Growing lupins from seed isn’t just a cost-effective way to fill your garden with these stunning spires of color; it’s a deeply rewarding experience. From the initial anticipation of germination to the eventual burst of vibrant blooms, each stage offers a connection to nature that you simply can’t replicate by buying pre-grown plants.
Why is this DIY trick a must-try? Because it empowers you to control the entire process, from selecting the perfect lupin varieties to nurturing them from tiny seedlings into magnificent specimens. You’re not limited by what’s available at the garden center; you can explore the full spectrum of lupin colors and forms, creating a truly personalized display. Plus, the satisfaction of knowing you grew these beauties from scratch is unparalleled.
But the benefits extend beyond aesthetics. Growing lupins from seed allows you to choose the healthiest, most vigorous plants, ensuring they’re well-adapted to your specific garden conditions. You can also avoid introducing potential pests or diseases that might be lurking in commercially grown plants. And let’s not forget the sheer joy of watching something you nurtured from a tiny seed flourish into a breathtaking display.
Ready to take your lupin game to the next level? Consider these variations and suggestions:
* Succession Planting: Sow seeds every few weeks to extend the blooming season. This way, you’ll have a continuous display of lupin flowers throughout the summer.
* Color Combinations: Experiment with different color combinations to create eye-catching displays. Plant contrasting colors side-by-side for a bold statement, or opt for a more harmonious blend of pastel shades.
* Companion Planting: Lupins are excellent companion plants for other garden vegetables and flowers. They help to fix nitrogen in the soil, enriching it for other plants. Consider planting them near brassicas like broccoli and cabbage, or alongside roses to improve their growth and flowering.
* Seed Saving: Once your lupins have finished flowering, you can save the seeds for next year’s planting. Allow the seed pods to dry on the plant, then collect them and store them in a cool, dry place. This is a great way to propagate your favorite varieties and save money on seeds.
* Soil Enrichment: Lupins thrive in well-drained soil that is slightly acidic. Before planting, amend your soil with compost or other organic matter to improve its drainage and fertility. Avoid adding too much nitrogen, as this can encourage leafy growth at the expense of flowering.
* Dealing with Pests: Keep an eye out for common lupin pests like aphids and slugs. Treat infestations promptly with organic pest control methods, such as insecticidal soap or slug pellets.
Don’t be intimidated if you’re a beginner gardener. Growing lupins from seed is a relatively easy and forgiving process. With a little patience and attention, you’ll be rewarded with a stunning display of color that will brighten up your garden for years to come.
So, what are you waiting for? Grab some lupin seeds, follow our simple guide, and get ready to experience the joy of growing these magnificent flowers from scratch. We’re confident that you’ll be thrilled with the results.
We encourage you to try this DIY trick and share your experience with us! Post photos of your lupin seedlings and blooming plants on social media using #GrowLupinsFromSeed. We can’t wait to see your beautiful creations! Let’s spread the lupin love and inspire others to discover the joy of gardening. Remember, mastering the art of growing lupins from seed is within your reach, and the rewards are well worth the effort. Happy gardening!
FAQ
What is the best time to sow lupin seeds?
The ideal time to sow lupin seeds is either in early spring (March-April) or late summer/early autumn (August-September). Spring sowing allows the plants to establish themselves before the heat of summer, while autumn sowing gives them a head start for the following spring. If you live in a region with mild winters, autumn sowing is often preferred as it results in earlier blooms. However, if you experience harsh winters, spring sowing is a safer bet. Consider your local climate and growing conditions when deciding on the best time to sow your lupin seeds.
Do lupin seeds need any special treatment before sowing?
Yes, lupin seeds benefit from scarification and soaking before sowing. Scarification involves gently nicking or scratching the seed coat to help water penetrate and speed up germination. You can do this by rubbing the seeds lightly with sandpaper or using a sharp knife to make a small nick. After scarification, soak the seeds in lukewarm water for 12-24 hours. This further softens the seed coat and encourages germination. These steps are particularly important for lupin seeds, as they have a hard outer shell that can inhibit germination.
What type of soil is best for growing lupins?
Lupins prefer well-drained soil that is slightly acidic to neutral (pH 6.0-7.0). They don’t thrive in heavy clay soils or soils that are prone to waterlogging. Before planting, amend your soil with compost or other organic matter to improve its drainage and fertility. If your soil is alkaline, you can add sulfur or peat moss to lower the pH. Avoid adding too much nitrogen to the soil, as this can encourage leafy growth at the expense of flowering. A balanced fertilizer or bone meal can be used to provide essential nutrients without over-stimulating vegetative growth.
How deep should I sow lupin seeds?
Sow lupin seeds about 1/2 inch (1.25 cm) deep in the soil. Space the seeds about 2-3 inches (5-7.5 cm) apart if sowing in seed trays or pots. If sowing directly into the garden, space the seeds about 12-18 inches (30-45 cm) apart to allow for adequate growth. Cover the seeds with soil and gently water them in. Keep the soil moist but not waterlogged until the seedlings emerge.
How long does it take for lupin seeds to germinate?
Lupin seeds typically germinate within 7-21 days, depending on the temperature and moisture levels. Keep the soil consistently moist during this period. Once the seedlings emerge, provide them with plenty of sunlight. If you’re growing them indoors, place them under grow lights or near a sunny window.
When should I transplant lupin seedlings into the garden?
Transplant lupin seedlings into the garden when they are about 4-6 inches (10-15 cm) tall and have developed several sets of true leaves. Choose a sunny location with well-drained soil. Harden off the seedlings by gradually exposing them to outdoor conditions for a week or two before transplanting. Dig a hole that is slightly larger than the root ball and gently place the seedling in the hole. Backfill with soil and water thoroughly. Space the plants about 12-18 inches (30-45 cm) apart.
How often should I water lupins?
Water lupins regularly, especially during dry periods. They prefer consistently moist soil but don’t like to be waterlogged. Water deeply and less frequently, rather than shallowly and more often. This encourages the roots to grow deeper and makes the plants more drought-tolerant. Avoid watering the foliage, as this can increase the risk of fungal diseases.
Do lupins need staking?
Taller varieties of lupins may need staking to prevent them from flopping over, especially in windy areas. Use bamboo stakes or other supports to gently tie the stems to. This will help to keep the plants upright and prevent them from being damaged by the wind.
How do I deadhead lupins?
Deadheading lupins involves removing the spent flower spikes to encourage further blooming. Cut the flower spikes back to the base of the plant after they have finished flowering. This will prevent the plants from setting seed and encourage them to produce more flowers.
Are lupins susceptible to any pests or diseases?
Lupins can be susceptible to aphids, slugs, and powdery mildew. Aphids can be controlled with insecticidal soap or by introducing beneficial insects like ladybugs. Slugs can be controlled with slug pellets or by handpicking them off the plants. Powdery mildew can be prevented by providing good air circulation and avoiding overhead watering. If powdery mildew does occur, treat it with a fungicide.
Leave a Comment