

Grow Jicama at Home and unlock a world of fresh, crunchy goodness right in your backyard! Have you ever dreamt of strolling through your garden and harvesting your own exotic vegetables? Well, dream no more! This DIY guide will empower you to cultivate this delicious root vegetable, even if you’re a complete beginner.
Jicama, also known as the Mexican turnip, boasts a rich history deeply rooted in Mesoamerican cultures. For centuries, it has been a staple in their diets, prized for its refreshing taste and nutritional benefits. Imagine bringing that ancient tradition to your own table!
Why should you embark on this jicama-growing adventure? Because store-bought jicama simply can’t compare to the flavor and satisfaction of harvesting your own. Plus, growing your own food is a fantastic way to connect with nature, reduce your carbon footprint, and ensure you’re eating the freshest, healthiest produce possible. This DIY project is not only rewarding but also incredibly practical. I’m going to show you simple tricks and hacks that will make it easier than you think to grow Jicama at Home, regardless of your gardening experience. Let’s get started and transform your garden into a jicama haven!
Growing Jicama at Home: A Beginner’s Guide
Hey there, fellow gardening enthusiasts! Ever wanted to try growing something a little different? Jicama, also known as Mexican turnip or yam bean, is a fantastic and surprisingly easy vegetable to cultivate at home. It’s got a crisp, slightly sweet flavor that’s perfect for salads, snacks, or even stir-fries. Plus, it’s packed with nutrients! I’m going to walk you through everything you need to know to successfully grow jicama in your own backyard (or even in a large container!).
What is Jicama?
Before we dive in, let’s quickly cover what jicama actually *is*. It’s a root vegetable, meaning the part we eat grows underground. The plant itself is a vine, and it produces beautiful, bean-like pods. However, it’s crucial to remember that the pods and leaves of the jicama plant are toxic. We’re only interested in the delicious root!
Getting Started: Planning and Preparation
Okay, so you’re ready to grow some jicama! Here’s what you need to consider before you even get your hands dirty:
* Climate: Jicama thrives in warm climates with a long growing season (at least 150 days). If you live in a cooler region, don’t worry! You can still grow jicama, but you’ll need to start the seeds indoors and choose a variety that matures relatively quickly.
* Sunlight: Jicama needs plenty of sunshine – at least 6-8 hours per day. Choose a location in your garden that gets full sun.
* Soil: Well-draining soil is essential. Jicama doesn’t like to sit in soggy soil, as this can lead to root rot. Amend your soil with compost or other organic matter to improve drainage and fertility. A slightly acidic to neutral pH (around 6.0-7.0) is ideal.
* Support: As I mentioned, jicama is a vine. You’ll need to provide some kind of support for it to climb on, such as a trellis, fence, or even sturdy stakes.
* Seeds or Seedlings: You can start jicama from seeds or purchase seedlings from a nursery. Starting from seeds is more economical, but it requires a bit more time and effort.
Step-by-Step Guide: Growing Jicama from Seed
I personally prefer starting jicama from seed because it gives me more control over the process. Here’s how I do it:
1. Soaking the Seeds: Jicama seeds have a hard outer shell, so soaking them in warm water for 24-48 hours before planting will help them germinate faster. I usually put them in a small bowl with water and leave them on my kitchen counter.
2. Starting Seeds Indoors (Optional): If you live in a cooler climate, start your seeds indoors about 8-10 weeks before the last expected frost. Use seed-starting trays or small pots filled with a seed-starting mix.
* Plant the seeds about ½ inch deep.
* Keep the soil consistently moist but not waterlogged.
* Provide warmth (around 70-80°F) using a heat mat or by placing the trays in a warm location.
* Once the seedlings emerge, provide them with plenty of light using grow lights or by placing them in a sunny window.
3. Direct Sowing (Warmer Climates): If you live in a warm climate with a long growing season, you can direct sow the seeds directly into the garden soil after the last frost.
* Prepare the soil by loosening it and adding compost or other organic matter.
* Sow the seeds about ½ inch deep and 4-6 inches apart.
* Water gently but thoroughly.
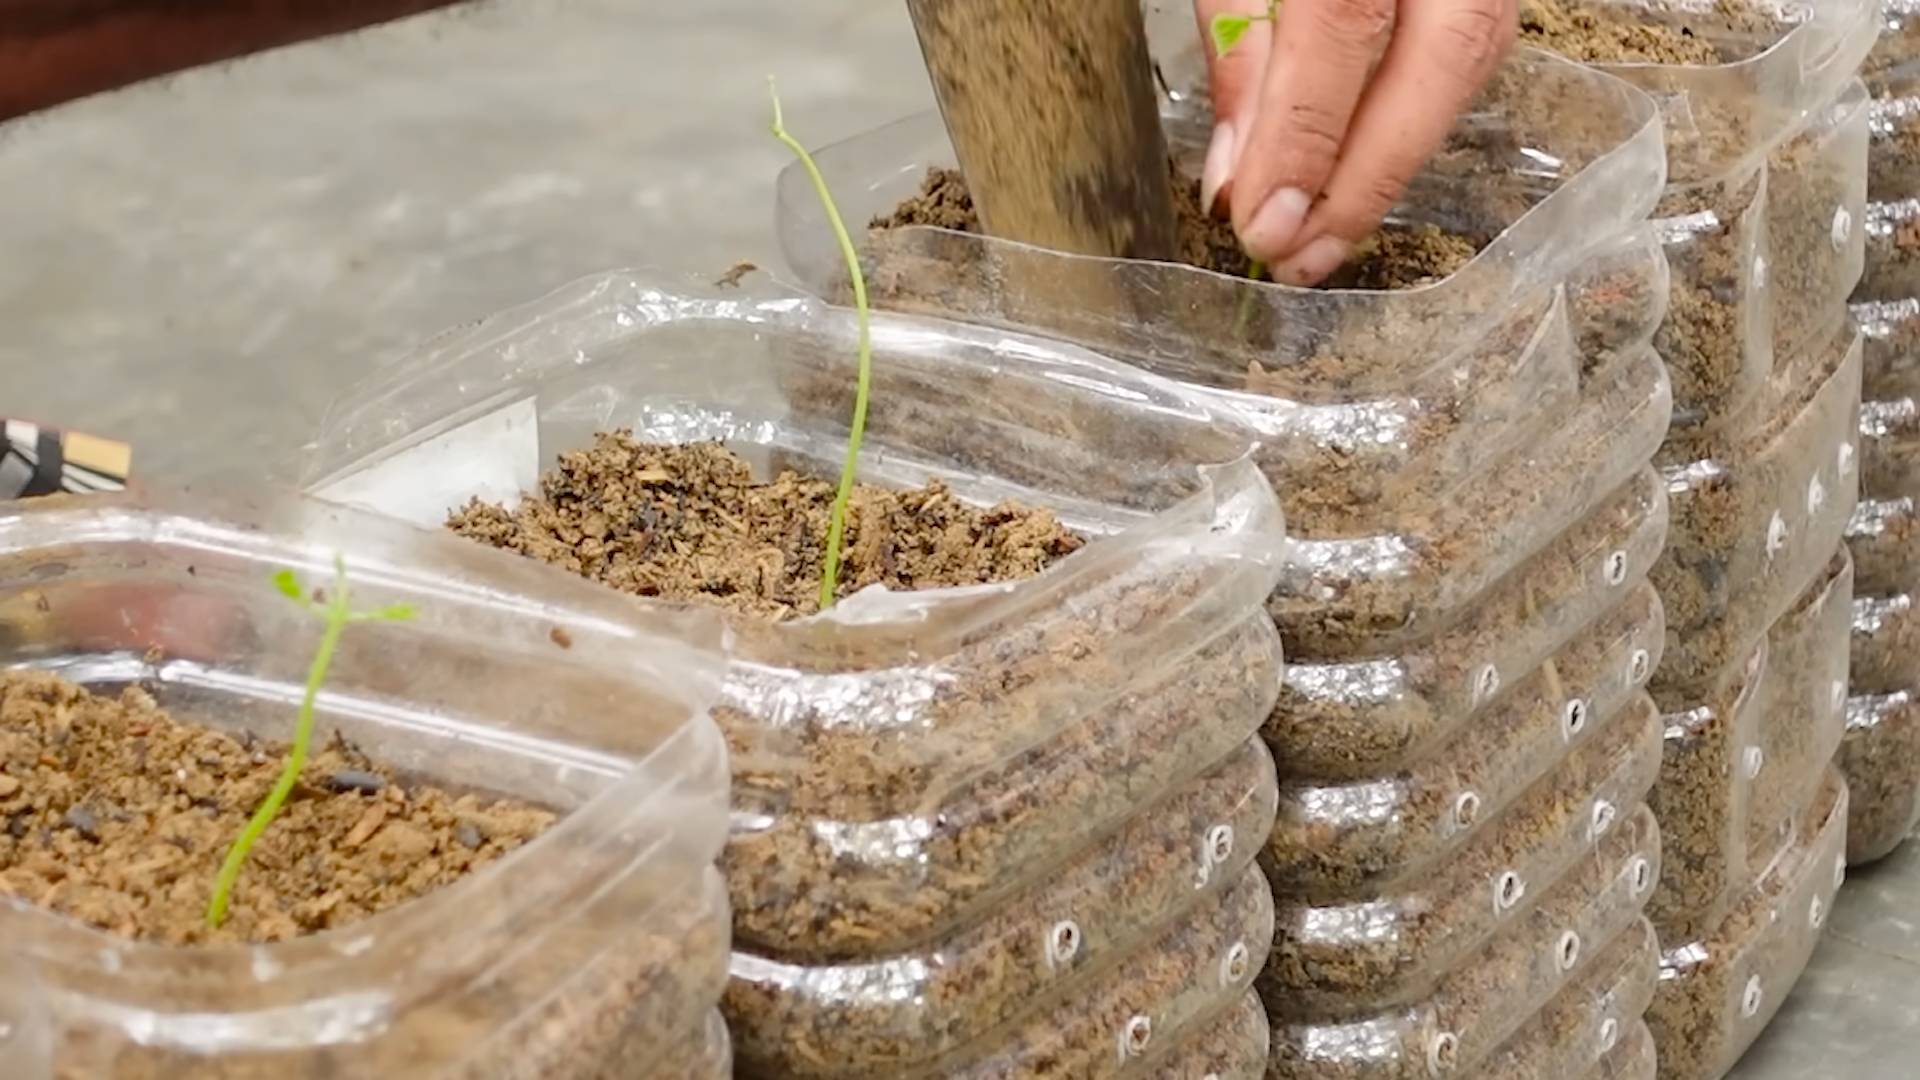
4. Transplanting Seedlings (If Starting Indoors): Once the seedlings have developed a few sets of true leaves and the weather has warmed up, it’s time to transplant them into the garden.
* Harden off the seedlings by gradually exposing them to outdoor conditions for a week or two. Start by placing them in a sheltered location for a few hours each day and gradually increase the amount of time they spend outdoors.
* Choose a sunny location with well-draining soil.
* Dig holes that are slightly larger than the root balls of the seedlings.
* Gently remove the seedlings from their pots and place them in the holes.
* Backfill the holes with soil and water thoroughly.
* Space the plants about 12-18 inches apart.
Caring for Your Jicama Plants
Now that your jicama plants are in the ground, it’s time to provide them with the care they need to thrive.
1. Watering: Jicama needs consistent moisture, especially during hot, dry weather. Water deeply whenever the top inch of soil feels dry. Avoid overwatering, as this can lead to root rot.
2. Fertilizing: Feed your jicama plants with a balanced fertilizer every few weeks. I like to use a liquid fertilizer diluted to half strength. Avoid fertilizers that are high in nitrogen, as this can promote excessive vine growth at the expense of root development.
3. Weeding: Keep the area around your jicama plants free of weeds. Weeds compete with the plants for nutrients and water.
4. Pruning: This is a crucial step for maximizing root development. Jicama plants tend to produce lots of vines and flowers. To encourage the plant to focus its energy on growing the root, you need to prune the vines and remove the flowers and bean pods as they appear. I know it seems counterintuitive, but trust me, it works! I usually prune the vines back to about 2-3 feet in length.
5. Providing Support: As the vines grow, train them to climb on the trellis, fence, or stakes you’ve provided. This will help to keep the plants off the ground and prevent them from rotting.
Dealing with Pests and Diseases
Jicama is generally a relatively pest-resistant plant, but there are a few things to watch out for:
* Aphids: These tiny insects can suck the sap from the leaves and stems of the plants. You can control aphids by spraying them with a strong stream of water or by using insecticidal soap.
* Spider Mites: These tiny pests can also suck the sap from the leaves, causing them to become yellow and stippled. You can control spider mites by spraying them with a strong stream of water or by using miticidal soap.
* Root Rot: This is a fungal disease that can occur in poorly drained soil. To prevent root rot, make sure your soil is well-draining and avoid overwatering.
Harvesting Your Jicama
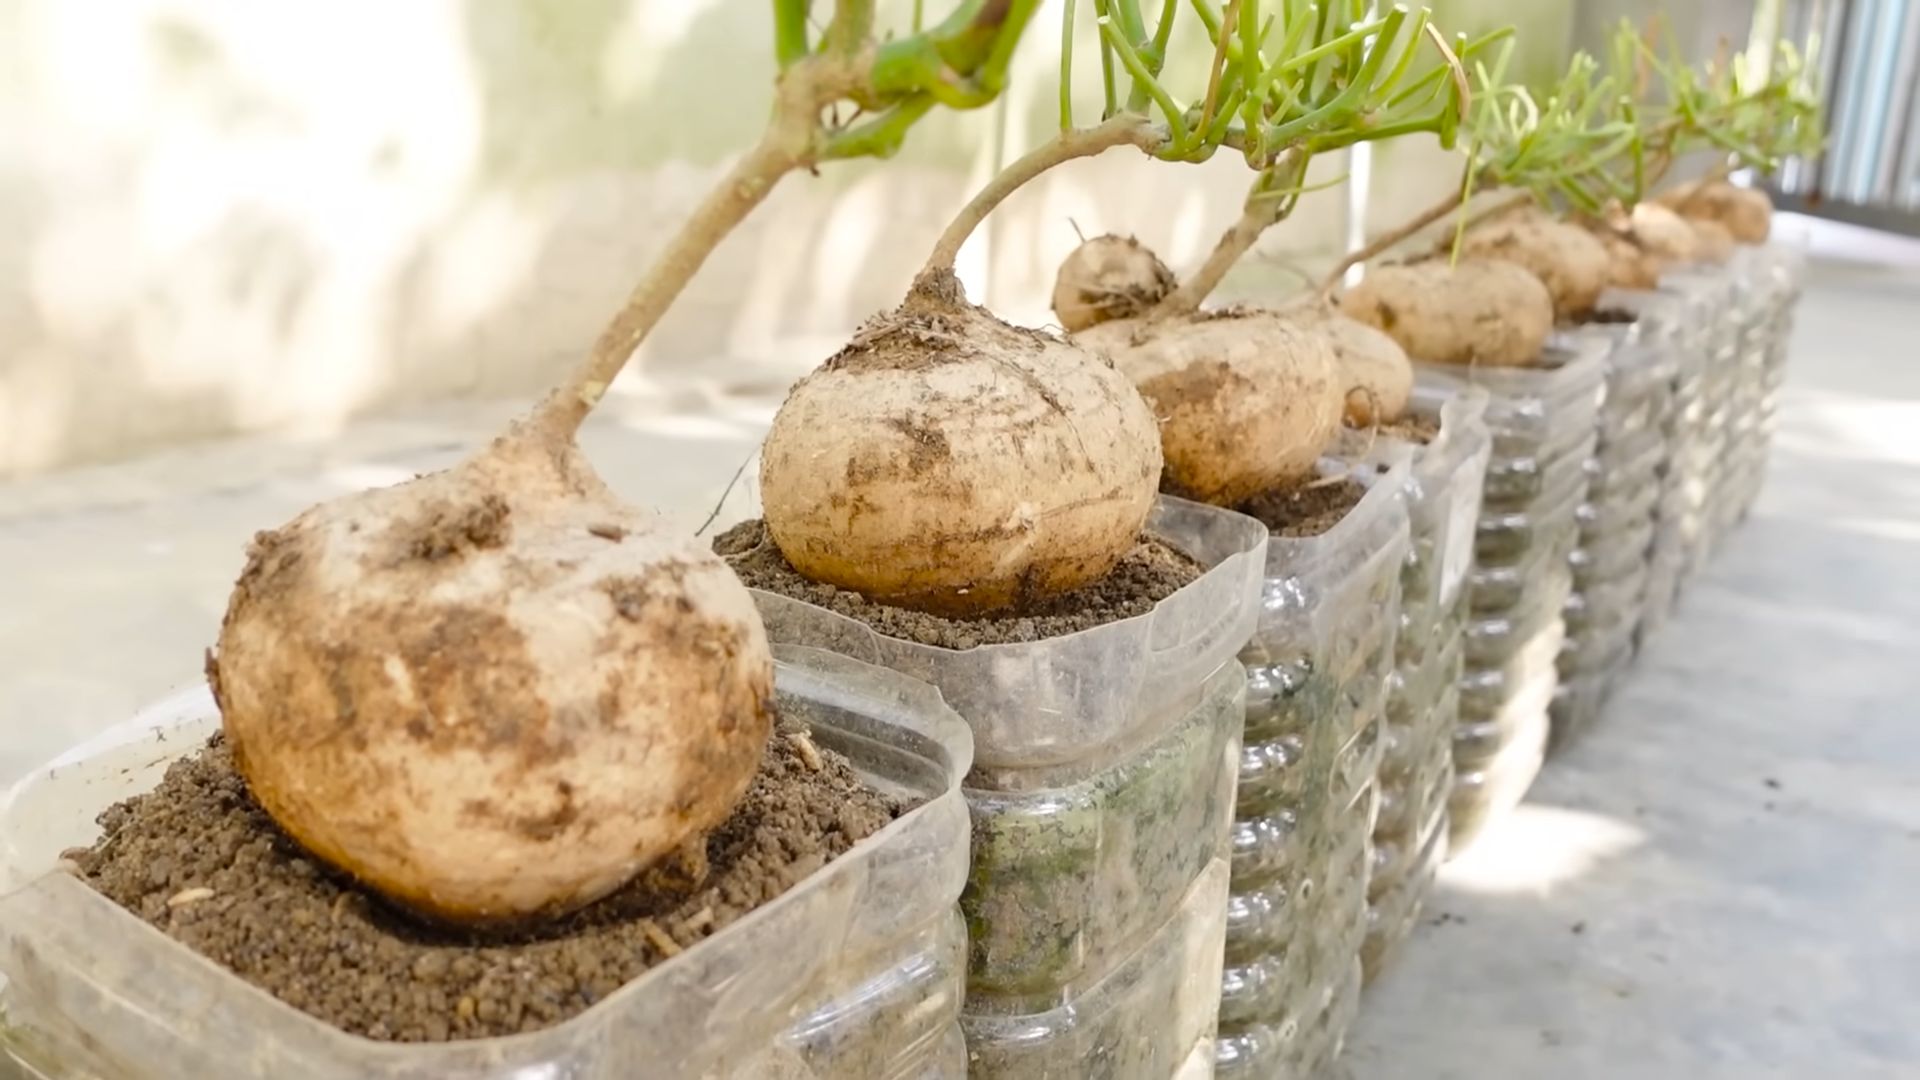
The moment we’ve all been waiting for! Jicama typically takes about 4-6 months to mature, depending on the variety and growing conditions. You’ll know it’s ready to harvest when the root is about 4-6 inches in diameter.
1. Loosening the Soil: Use a garden fork or shovel to carefully loosen the soil around the base of the plant.
2. Pulling the Root: Gently pull the root out of the ground. Be careful not to damage it.
3. Cleaning the Root: Brush off any excess soil from the root.
4. Storing the Jicama: Store your jicama in a cool, dry place. It can last for several weeks or even months if stored properly. I usually wrap mine in paper towels and store them in the refrigerator.
Enjoying Your Homegrown Jicama
Now that you’ve harvested your jicama, it’s time to enjoy it! Jicama can be eaten raw or cooked. It’s delicious in salads, slaws, stir-fries, and even as a snack with a little lime juice and chili powder.
Here are a few of my favorite ways to enjoy jicama:
* Jicama Salad: Combine diced jicama with shredded carrots, chopped cilantro, lime juice, and a pinch of salt.
* Jicama Slaw: Combine shredded jicama with shredded cabbage, mayonnaise, vinegar, and a little sugar.
* Jicama Fries: Cut jicama into fries, toss with olive oil and spices, and bake until crispy.
* Jicama Sticks with Dip: Cut jicama into sticks and serve with your favorite dip, such as hummus or guacamole.
Troubleshooting Tips
Even with the best planning, sometimes things don’t go exactly as expected. Here are a few common problems you might encounter and how to address them:
* Poor Germination: If your seeds aren’t germinating, make sure the soil is warm enough and consistently moist. You can also try scarifying the seeds by gently rubbing them with sandpaper before soaking them.
* Slow Growth: If your plants are growing slowly, make sure they’re getting enough sunlight and nutrients. You can also try adding some compost tea to the soil.
* Small
Conclusion
So, there you have it! Growing jicama at home is not only achievable but also incredibly rewarding. From the satisfaction of nurturing a plant from seed to the unparalleled freshness of a homegrown harvest, the benefits are numerous. We’ve walked you through the entire process, from selecting the right seeds and preparing your soil to providing the necessary support and patiently waiting for those delicious tubers to mature.
Why is this DIY trick a must-try? Because it empowers you to take control of your food source, reduces your reliance on store-bought produce (often shipped from afar), and connects you with the natural world in a tangible way. Plus, the taste of homegrown jicama is simply superior – crisper, sweeter, and bursting with flavor that you just can’t find in the supermarket. Imagine the envy of your friends and neighbors when you serve up a refreshing jicama salad made with ingredients you cultivated yourself!
But the journey doesn’t end here. Feel free to experiment with different varieties of jicama to discover your personal favorite. Some gardeners have had success growing jicama in large containers, making it a viable option even for those with limited garden space. You can also try companion planting, pairing your jicama with beneficial herbs and vegetables that deter pests and enhance growth. Consider interplanting with marigolds to ward off nematodes or basil to repel aphids.
Don’t be afraid to get creative with your jicama harvest, too! While it’s delicious raw in salads and slaws, it can also be cooked in stir-fries, soups, and even baked into chips. The possibilities are endless!
We wholeheartedly encourage you to embark on this exciting gardening adventure and grow jicama at home. It’s a project that’s both educational and fulfilling, and the delicious results are well worth the effort. Once you’ve experienced the joy of harvesting your own jicama, you’ll never look at this versatile vegetable the same way again.
And most importantly, we want to hear about your experiences! Share your tips, tricks, and triumphs in the comments section below. Let us know what worked for you, what challenges you faced, and any creative ways you’ve found to enjoy your homegrown jicama. Together, we can build a community of passionate gardeners and spread the word about the joys of growing your own food. So, grab your seeds, get your hands dirty, and let the jicama-growing adventure begin! We can’t wait to see what you create.
Frequently Asked Questions (FAQ)
What is the best time of year to plant jicama?
Jicama thrives in warm weather and requires a long growing season of at least 150 days. Therefore, the best time to plant jicama is typically in the late spring or early summer, after the last frost has passed. In warmer climates with mild winters, you may be able to plant jicama earlier in the spring or even in the fall for a winter harvest. However, in colder regions, it’s essential to start your jicama seeds indoors 6-8 weeks before the last expected frost to give them a head start. This will ensure that they have enough time to mature and produce a good yield before the first frost of the fall. Check your local frost dates to determine the optimal planting time for your specific region.
How much sunlight does jicama need?
Jicama requires plenty of sunlight to thrive and produce large, healthy tubers. Aim for at least 6-8 hours of direct sunlight per day. If you’re growing jicama indoors, place it near a sunny window or use grow lights to supplement the natural light. Insufficient sunlight can result in stunted growth, smaller tubers, and a less flavorful harvest. If you notice that your jicama plant is not growing vigorously or that the leaves are pale, it may not be getting enough sunlight. Consider moving it to a sunnier location or providing supplemental lighting.
What type of soil is best for growing jicama?
Jicama prefers well-drained, sandy loam soil that is rich in organic matter. The soil should be loose and airy to allow the tubers to expand easily. Avoid heavy clay soils, as they can become waterlogged and hinder tuber development. Before planting, amend your soil with compost, aged manure, or other organic matter to improve its drainage, fertility, and texture. A slightly acidic to neutral soil pH of 6.0 to 7.0 is ideal for jicama growth. You can test your soil pH using a soil testing kit and adjust it accordingly with lime (to raise the pH) or sulfur (to lower the pH).
How often should I water my jicama plant?
Jicama needs consistent moisture, especially during hot and dry periods. Water deeply and regularly, ensuring that the soil remains consistently moist but not waterlogged. Avoid overhead watering, as it can promote fungal diseases. Instead, water at the base of the plant, using a soaker hose or drip irrigation system. The frequency of watering will depend on the weather conditions, soil type, and the size of your plant. Check the soil moisture regularly and water when the top inch of soil feels dry to the touch. During periods of heavy rainfall, you may need to reduce watering to prevent root rot.
How do I know when my jicama is ready to harvest?
Jicama typically takes 4-6 months to mature, depending on the variety and growing conditions. The tubers are ready to harvest when they reach a diameter of 4-6 inches. You can gently dig around the base of the plant to check the size of the tubers. If they are large enough, carefully loosen the soil around the plant and lift the entire plant out of the ground. Be careful not to damage the tubers during harvesting. The leaves of the plant may start to turn yellow and die back as the tubers mature. This is a natural process and a sign that the plant is nearing the end of its growing cycle.
Are there any common pests or diseases that affect jicama?
Jicama is generally a relatively pest-resistant plant, but it can be susceptible to certain pests and diseases, including aphids, spider mites, nematodes, and fungal diseases like powdery mildew. Regularly inspect your plants for signs of infestation or disease. If you notice any problems, take action promptly to prevent them from spreading. You can control aphids and spider mites with insecticidal soap or neem oil. Nematodes can be managed by incorporating organic matter into the soil and using nematode-resistant cover crops. Fungal diseases can be prevented by providing good air circulation, avoiding overhead watering, and applying a fungicide if necessary.
Can I eat the leaves or seeds of the jicama plant?
No, the leaves and seeds of the jicama plant are toxic and should not be consumed. They contain rotenone, a natural insecticide that can be harmful to humans and animals. Only the tubers are edible. Be sure to wash the tubers thoroughly before eating them to remove any dirt or residue.
How do I store jicama after harvesting?
After harvesting, brush off any excess dirt from the tubers and store them in a cool, dry, and dark place. Jicama can be stored for several weeks or even months if stored properly. Avoid storing jicama in the refrigerator, as it can become chilled and develop a mealy texture. A root cellar or unheated garage is an ideal storage location. Check the tubers periodically for signs of spoilage, such as soft spots or mold. Discard any tubers that show signs of decay.
Can I grow jicama in containers?
Yes, jicama can be grown in containers, but you will need a large container with good drainage. Choose a container that is at least 18 inches in diameter and 18 inches deep. Fill the container with a well-draining potting mix that is rich in organic matter. Provide a trellis or other support for the vines to climb on. Water regularly and fertilize every few weeks with a balanced fertilizer. Container-grown jicama may not produce as large of tubers as those grown in the ground, but you can still enjoy a decent harvest.
What are some creative ways to use jicama in cooking?
Jicama is a versatile vegetable that can be used in a variety of dishes. It can be eaten raw in salads, slaws, and crudités. It can also be cooked in stir-fries, soups, and stews. Jicama can be baked into chips or fries, or even used as a substitute for potatoes in certain recipes. Its crisp texture and slightly sweet flavor make it a refreshing addition to any meal. Try adding jicama to your favorite salsa recipe, or use it as a filling for tacos or spring rolls. The possibilities are endless!

Leave a Comment