

Grow cabbage in plastic bottles? Absolutely! I know it sounds a little unconventional, but trust me, this clever DIY trick can revolutionize your home gardening experience, especially if you’re short on space or dealing with less-than-ideal soil conditions. For centuries, resourceful gardeners have been finding innovative ways to maximize their yields, from ancient terracing techniques to modern hydroponics. This method taps into that same spirit of ingenuity, offering a practical and sustainable solution for growing delicious, healthy cabbage right in your own backyard (or even on your balcony!).
Why should you try this? Well, imagine enjoying fresh, homegrown cabbage in your favorite dishes without the hassle of extensive weeding or worrying about pests decimating your crop. This method is perfect for beginners, seasoned gardeners looking for a fun project, and anyone wanting to make the most of limited space. Plus, repurposing plastic bottles is a fantastic way to reduce waste and contribute to a greener lifestyle. So, let’s dive into this easy-to-follow guide and discover how you can grow cabbage in plastic bottles and enjoy a bountiful harvest!
Grow Cabbage in Plastic Bottles: A DIY Guide
Hey there, fellow gardening enthusiasts! Ever thought about growing cabbage in plastic bottles? It’s a fantastic way to recycle, save space, and get a head start on your cabbage crop. I’ve been doing this for a few years now, and I’m excited to share my method with you. It’s surprisingly easy and rewarding!
Why Grow Cabbage in Plastic Bottles?
Before we dive in, let’s talk about why this method is so great:
* Space Saving: Perfect for small gardens, balconies, or even patios. You can arrange the bottles vertically or horizontally, maximizing your growing area.
* Recycling: Gives those empty plastic bottles a new purpose, reducing waste and helping the environment.
* Early Start: You can start your cabbage seedlings indoors in the bottles, giving them a head start before transplanting them into the garden.
* Pest Control: The bottles offer some protection against pests like slugs and snails, especially when the seedlings are young.
* Easy Monitoring: It’s easy to monitor the soil moisture and plant health in the transparent bottles.
* Portability: You can easily move the bottles around to find the best sunlight exposure.
Materials You’ll Need
Okay, let’s gather our supplies. Here’s what you’ll need:
* Plastic Bottles: 2-liter soda bottles or larger water bottles work best. The more, the merrier! Make sure they’re clean and free of any residue.
* Potting Soil: Use a good quality potting mix that’s well-draining. Avoid using garden soil directly, as it can compact in the bottles.
* Cabbage Seeds: Choose your favorite cabbage variety! I personally love growing ‘Early Jersey Wakefield’ and ‘Red Acre’.
* Scissors or Utility Knife: For cutting the plastic bottles. Be careful!
* Drill or Nail: To create drainage holes in the bottles.
* Watering Can or Spray Bottle: For watering your cabbage seedlings.
* Optional:
* Liquid Fertilizer: For feeding your cabbage plants.
* Labels: To label the cabbage varieties you’re growing.
* Gloves: To protect your hands.
Preparing the Plastic Bottles
This is a crucial step, so pay close attention!
1. Clean the Bottles: Thoroughly wash the plastic bottles with soap and water to remove any dirt or residue. Rinse them well and let them dry completely.
2. Cut the Bottles: There are a couple of ways you can cut the bottles, depending on how you want to use them:
* Option 1: Horizontal Planting: Cut a rectangular opening along one side of the bottle, leaving the top and bottom intact. This creates a trough-like container. I usually cut an opening that’s about 4 inches wide and 6 inches long.
* Option 2: Vertical Planting: Cut the bottle in half horizontally. You’ll use the bottom half as the container. You can discard the top half or use it as a mini-greenhouse cover later on.
3. Create Drainage Holes: This is super important! Cabbage plants don’t like sitting in soggy soil. Use a drill or nail to create several drainage holes in the bottom of the bottle. I usually make about 5-6 holes, spaced evenly apart.
4. Optional: Paint the Bottles: If you want to get fancy, you can paint the outside of the bottles with a light-colored paint. This will help reflect sunlight and keep the soil cooler. Make sure to use a paint that’s safe for plants.
Sowing the Cabbage Seeds
Now for the fun part – planting the seeds!
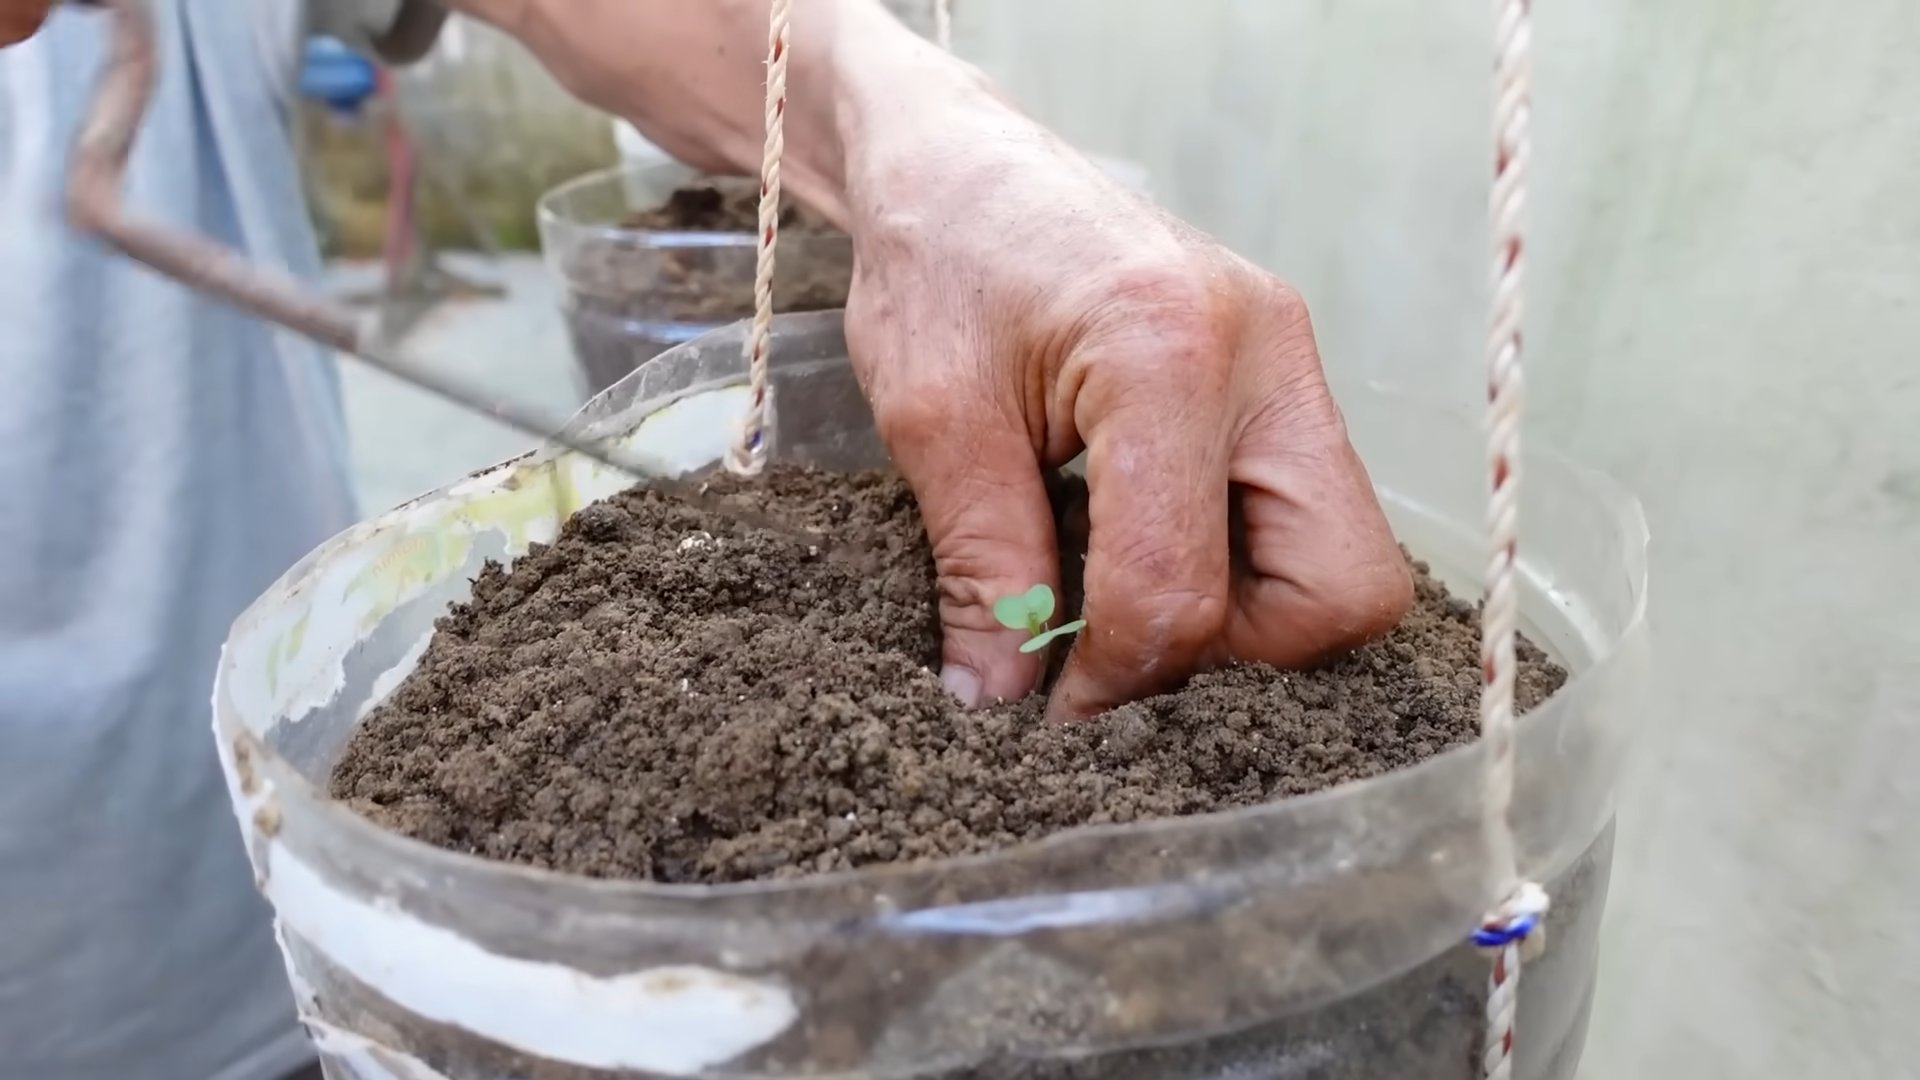
1. Fill the Bottles with Potting Soil: Fill the prepared plastic bottles with potting soil, leaving about an inch of space at the top. Gently press down on the soil to remove any air pockets.
2. Sow the Seeds: Sprinkle the cabbage seeds evenly over the surface of the soil. I usually sow about 3-4 seeds per bottle, just to be on the safe side.
3. Cover the Seeds: Lightly cover the seeds with a thin layer of potting soil. About 1/4 inch is perfect.
4. Water Gently: Use a watering can or spray bottle to gently water the soil. Be careful not to wash away the seeds. The soil should be moist but not soggy.
5. Label the Bottles: If you’re growing multiple cabbage varieties, label each bottle with the name of the variety and the date you planted the seeds. This will help you keep track of everything.
Caring for Your Cabbage Seedlings
This is where the patience comes in!
1. Provide Sunlight: Place the bottles in a sunny location where they’ll receive at least 6 hours of sunlight per day. If you’re starting the seeds indoors, you may need to use a grow light.
2. Keep the Soil Moist: Check the soil moisture regularly and water as needed. The soil should be consistently moist but not waterlogged.
3. Thin the Seedlings: Once the seedlings have emerged and have a few true leaves, thin them out to one strong seedling per bottle. This will give the remaining seedling plenty of room to grow. To thin, simply snip off the weaker seedlings at the soil line with scissors. Don’t pull them out, as this can disturb the roots of the remaining seedling.
4. Fertilize Regularly: Feed your cabbage seedlings with a liquid fertilizer diluted to half strength every 2-3 weeks. This will provide them with the nutrients they need to grow strong and healthy.
5. Harden Off the Seedlings: Before transplanting the seedlings into the garden, you’ll need to harden them off. This means gradually exposing them to outdoor conditions over a period of 1-2 weeks. Start by placing the bottles outdoors in a sheltered location for a few hours each day, gradually increasing the amount of time they spend outdoors. This will help them acclimate to the sun, wind, and temperature changes.
Transplanting the Cabbage Seedlings
Almost there!
1. Choose a Sunny Location: Select a sunny location in your garden with well-drained soil. Cabbage plants need at least 6 hours of sunlight per day.
2. Prepare the Soil: Amend the soil with compost or other organic matter to improve its fertility and drainage.
3. Dig Holes: Dig holes that are slightly larger than the plastic bottles. Space the holes about 12-18 inches apart, depending on the cabbage variety.
4. Remove the Seedlings from the Bottles: Gently remove the cabbage seedlings from the plastic bottles. If you used the horizontal planting method, you can simply slide the seedlings out of the opening. If you used the vertical planting method, you may need to carefully cut the bottle to remove the seedling.
5. Plant the Seedlings: Place the seedlings in the holes and backfill with soil. Gently firm the soil around the base of the plants.
6. Water Thoroughly: Water the newly transplanted seedlings thoroughly.
Caring for Your Cabbage Plants in the Garden
The final stretch!
1. Water Regularly: Water your cabbage plants regularly, especially during dry periods. Cabbage plants need consistent moisture to thrive.
2. Fertilize Regularly: Continue to fertilize your cabbage plants every 2-3 weeks with a liquid fertilizer.
3. Control Pests and Diseases: Keep an eye out for pests and diseases, such as cabbage worms, aphids, and clubroot. Take action promptly to control any problems. You can use organic pest control methods, such as insecticidal soap or Bacillus thuringiensis (Bt).
4. Weed Regularly: Keep the area around your cabbage plants free of weeds. Weeds can compete with the cabbage plants for nutrients and water.
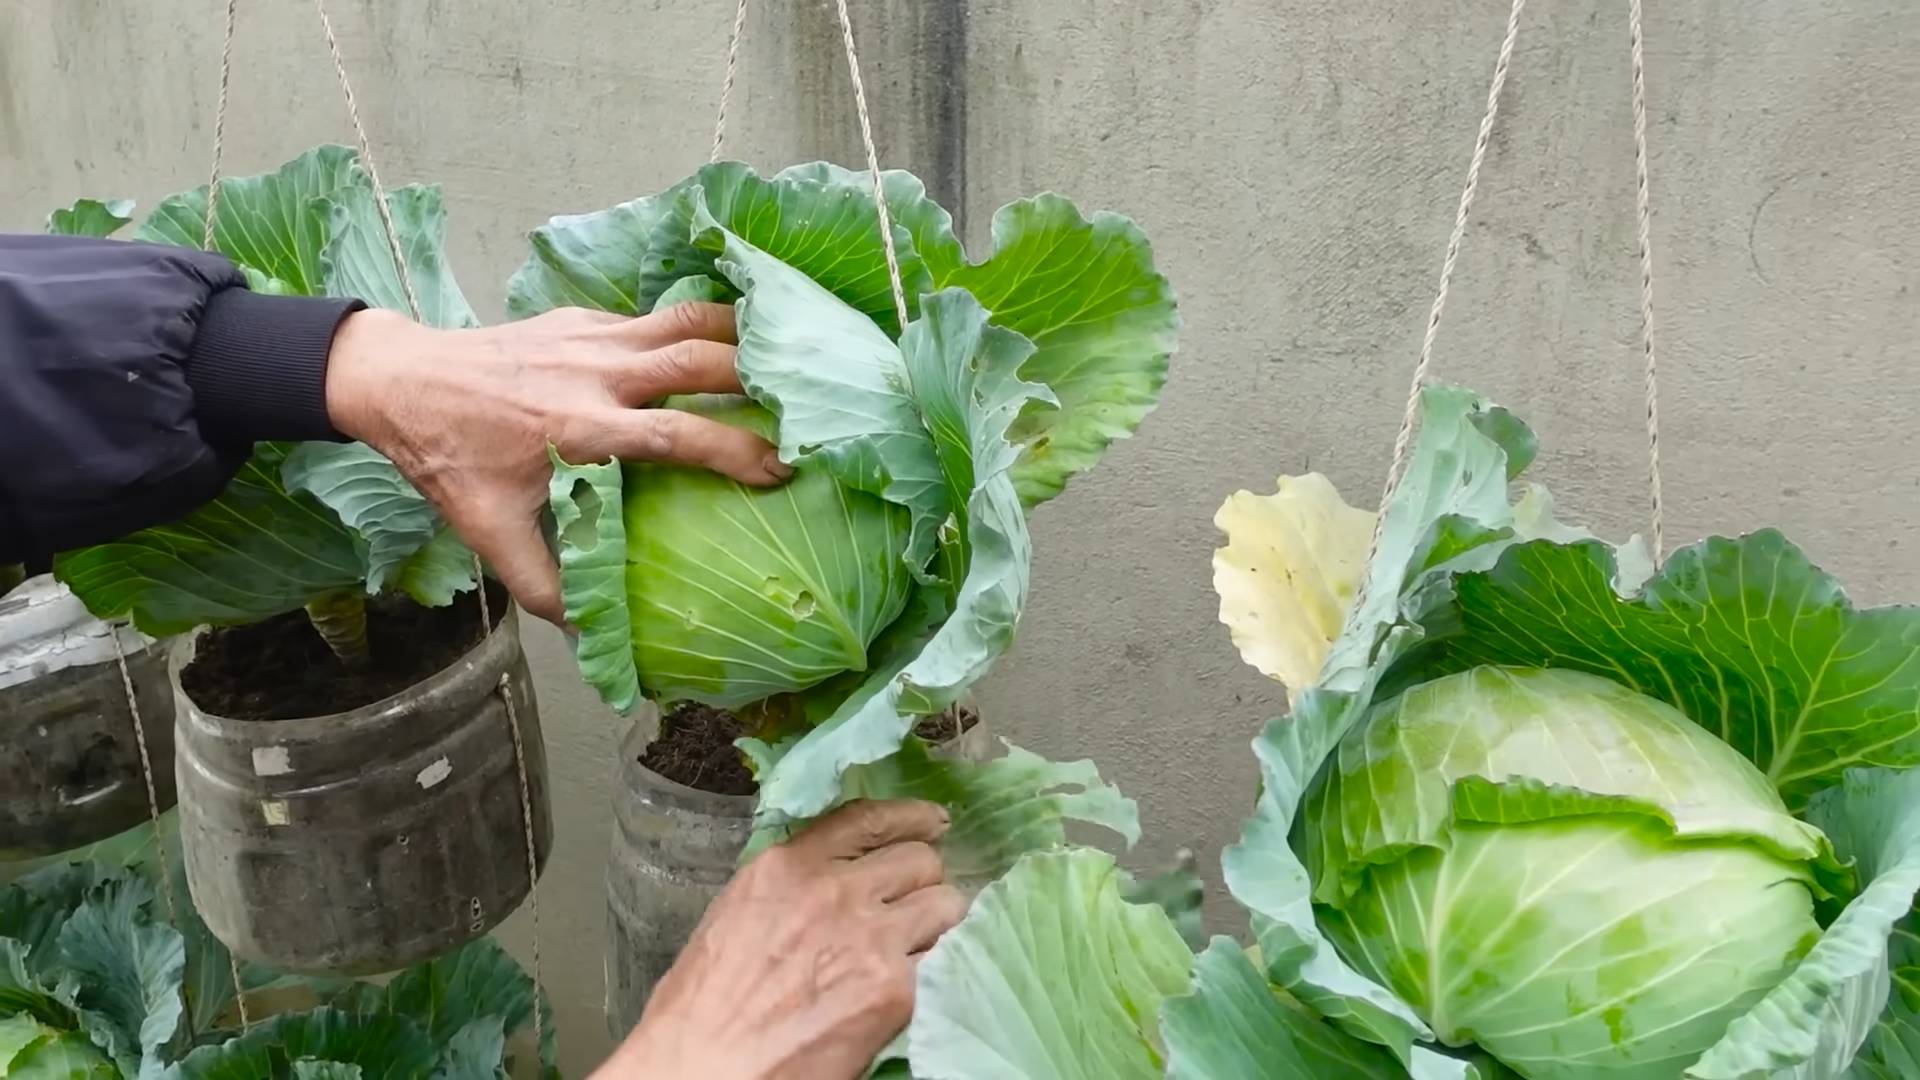
5. Harvest Your Cabbage: Harvest your cabbage when the heads are firm and tightly packed. The exact time to harvest will depend on the cabbage variety.
Tips for Success
Here are a few extra tips to help you succeed with growing cabbage in plastic bottles:
* Choose the Right Cabbage Variety: Some cabbage varieties are better suited for container growing than others. Look for compact varieties that don’t get too large.
* Use a Good Quality Potting Mix: Don’t skimp on the potting mix! A good quality potting mix will provide your cabbage plants with the nutrients and drainage they need to thrive.
* Don’t Overwater: Overwatering can lead to root rot, so be careful not to overwater your cabbage plants.
* Provide Adequate Sunlight: Cabbage plants need at least 6 hours of sunlight per day.
* Protect from Pests: Cabbage plants are susceptible to a variety of pests, so take steps to protect them.
* Rotate Your Crops: Don
Conclusion
So, there you have it! Growing cabbage in plastic bottles isn’t just a quirky gardening experiment; it’s a game-changer for urban gardeners, space-conscious enthusiasts, and anyone looking to maximize their yield while minimizing waste. We’ve explored how this simple DIY trick can transform discarded plastic bottles into miniature cabbage cradles, offering a protected and controlled environment for your seedlings to flourish.
Why is this a must-try? Because it addresses several key challenges faced by gardeners. Firstly, it provides excellent drainage, preventing root rot, a common problem with traditional gardening methods. Secondly, the enclosed environment offers protection from pests and harsh weather conditions, giving your cabbage seedlings a significant head start. Thirdly, it’s incredibly space-efficient, allowing you to grow a substantial amount of cabbage even on a small balcony or patio. And finally, it’s an environmentally friendly way to repurpose plastic bottles, reducing landfill waste and promoting sustainable gardening practices.
But the beauty of this method lies in its adaptability. Feel free to experiment with different sizes of plastic bottles to accommodate various cabbage varieties. Consider using colored bottles to provide additional shade during the hottest parts of the day. You can also add drainage holes at different levels to control the moisture content of the soil. For an extra boost, try incorporating slow-release fertilizer into the soil mix or using a liquid fertilizer solution during watering.
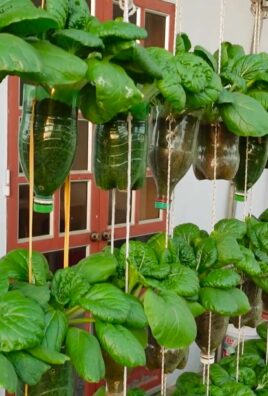
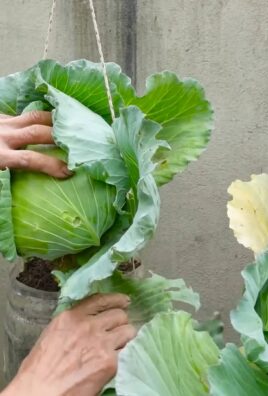
Don’t be afraid to get creative with your setup. You can arrange the bottles in rows, stack them vertically, or even hang them from a trellis to create a stunning vertical garden. The possibilities are endless!
We wholeheartedly encourage you to give this DIY trick a try. It’s a rewarding and cost-effective way to grow your own fresh, delicious cabbage. And remember, gardening is all about experimentation and learning. Don’t be discouraged if you encounter challenges along the way. Embrace the process, learn from your mistakes, and celebrate your successes.
Most importantly, we want to hear about your experience! Share your photos, tips, and stories with us in the comments section below. Let’s build a community of cabbage-growing enthusiasts and inspire others to embrace this innovative and sustainable gardening method. Let us know what cabbage varieties you tried, what challenges you faced, and what tips you discovered along the way. Your feedback will help us refine this guide and make it even more helpful for future gardeners. So, grab those plastic bottles, get your hands dirty, and start growing your own delicious cabbage today! This method of growing cabbage in plastic bottles is not only efficient but also a fun and engaging way to connect with nature and enjoy the fruits (or vegetables!) of your labor. Happy gardening!
FAQ
Frequently Asked Questions About Growing Cabbage in Plastic Bottles
Q: What type of plastic bottles are best for growing cabbage?
A: Ideally, you should use sturdy, food-grade plastic bottles, such as those used for water, juice, or soda. Avoid bottles that have contained harsh chemicals or cleaning products. The size of the bottle will depend on the variety of cabbage you’re growing, but generally, 2-liter bottles or larger are suitable. Clear or translucent bottles are preferable as they allow you to monitor the soil moisture levels. However, in very hot climates, consider using colored bottles (like green or blue) to provide some shade to the roots.
Q: What kind of soil should I use for growing cabbage in plastic bottles?
A: Cabbage thrives in well-draining, nutrient-rich soil. A good mix would be equal parts of potting soil, compost, and perlite or vermiculite. The potting soil provides a base for the plants, the compost adds essential nutrients, and the perlite or vermiculite improves drainage and aeration. You can also add a slow-release fertilizer to the soil mix to provide a steady supply of nutrients throughout the growing season. Avoid using garden soil directly, as it can be too heavy and may contain pests or diseases.
Q: How often should I water my cabbage plants in plastic bottles?
A: The watering frequency will depend on the climate, the size of the bottle, and the stage of growth of the cabbage plant. Generally, you should water when the top inch of soil feels dry to the touch. Avoid overwatering, as this can lead to root rot. Ensure that the bottles have adequate drainage holes to prevent waterlogging. During hot weather, you may need to water more frequently, possibly even daily. Check the soil moisture levels regularly and adjust your watering schedule accordingly.
Q: How much sunlight do cabbage plants need when grown in plastic bottles?
A: Cabbage plants need at least 6 hours of direct sunlight per day to thrive. Choose a location that receives ample sunlight throughout the day. If you live in a very hot climate, consider providing some afternoon shade to prevent the plants from overheating. You can use shade cloth or move the bottles to a shadier location during the hottest part of the day. Insufficient sunlight can result in leggy growth and reduced yields.
Q: How do I protect my cabbage plants from pests and diseases when growing in plastic bottles?
A: Growing cabbage in plastic bottles can actually help reduce pest and disease problems, as the enclosed environment provides some protection. However, it’s still important to take precautions. Regularly inspect your plants for signs of pests or diseases. If you notice any problems, take action immediately. You can use organic pest control methods, such as insecticidal soap or neem oil, to control pests. Ensure good air circulation around the plants to prevent fungal diseases. Remove any dead or decaying leaves promptly. You can also cover the bottles with netting to protect the plants from larger pests, such as cabbage moths.
Q: Can I transplant cabbage seedlings grown in plastic bottles into the garden?
A: Yes, you can transplant cabbage seedlings grown in plastic bottles into the garden once they have developed several sets of true leaves and the weather is suitable. Harden off the seedlings by gradually exposing them to outdoor conditions for a week or two before transplanting. To transplant, carefully remove the seedling from the bottle, being careful not to damage the roots. Dig a hole in the garden that is slightly larger than the root ball and plant the seedling. Water thoroughly after transplanting.
Q: What are some common problems I might encounter when growing cabbage in plastic bottles, and how can I fix them?
A: Some common problems include:
* Root rot: This is caused by overwatering. Ensure that the bottles have adequate drainage and avoid overwatering.
* Pest infestations: Regularly inspect your plants for pests and take action immediately if you notice any problems.
* Nutrient deficiencies: Use a balanced fertilizer to provide the plants with the nutrients they need.
* Sunscald: This can occur in very hot climates. Provide some afternoon shade to protect the plants from overheating.
* Bolting: This occurs when cabbage plants are exposed to prolonged periods of cold weather. Choose bolt-resistant varieties and protect the plants from cold temperatures.
Q: What cabbage varieties are best suited for growing in plastic bottles?
A: Smaller, compact cabbage varieties are generally best suited for growing in plastic bottles. Some good options include:
* ‘Golden Acre’
* ‘Early Jersey Wakefield’
* ‘Dwarf Blue Vates’
* ‘Red Acre’
These varieties tend to mature quickly and don’t require as much space as larger cabbage varieties.
Q: How long does it take to grow cabbage in plastic bottles?
A: The time it takes to grow cabbage in plastic bottles will depend on the variety of cabbage, the climate, and the growing conditions. Generally, it takes about 60-90 days from transplanting to harvest. Check the seed packet or plant label for specific information on the maturity time of the cabbage variety you are growing.
Q: Can I reuse the plastic bottles for growing cabbage again?
A: Yes, you can reuse the plastic bottles for growing cabbage again. However, it’s important to clean them thoroughly before reusing them to prevent the spread of diseases. Wash the bottles with soap and water and then disinfect them with a solution of bleach and water (1 part bleach to 9 parts water). Rinse the bottles thoroughly before using them again.
Leave a Comment