

Grow Birds Eye Chili, and unlock a world of fiery flavor right in your own backyard! Have you ever dreamed of adding a zesty kick to your meals with chilies you’ve nurtured from seed to harvest? Well, get ready to turn that dream into a delicious reality. This isn’t just about growing peppers; it’s about embracing a time-honored tradition. Chili peppers, including the Birds Eye variety, have been cultivated for thousands of years, with roots tracing back to South America. They’ve spiced up cuisines and cultures across the globe, and now it’s your turn to join the legacy.
But why should you bother with the effort? In today’s world, where grocery store produce can lack that vibrant, fresh taste, growing your own Birds Eye Chili offers a fantastic solution. Imagine the satisfaction of plucking perfectly ripe chilies, knowing exactly where they came from and how they were grown. Plus, let’s be honest, store-bought chilies can be surprisingly expensive! With these simple DIY tricks and hacks, I’ll show you how easy and rewarding it can be to grow Birds Eye Chili, even if you’re a complete beginner. Get ready to add some serious heat to your garden and your plate!
Growing Birds Eye Chili: A DIY Guide From Seed to Spice
Okay, chili lovers! So you want to grow your own fiery Birds Eye chilies? Awesome! I’m here to guide you through the whole process, from tiny seed to blazing hot harvest. Trust me, there’s nothing quite like the satisfaction of cooking with chilies you’ve nurtured yourself. Let’s get started!
Getting Started: Seed Germination
First things first, we need to get those seeds sprouting. This is a crucial step, so let’s do it right.
* Choosing Your Seeds: You can buy Birds Eye chili seeds online or from a local garden center. Make sure they’re from a reputable source to ensure good germination rates. I always check reviews before buying!
* Soaking the Seeds (Optional but Recommended): Soaking the seeds in lukewarm water for 24 hours before planting can help speed up germination. I usually put them in a small bowl or cup.
* Choosing a Germination Method: You have a few options here. I’ll cover two popular ones: the paper towel method and direct sowing.
Method 1: The Paper Towel Method
This method allows you to monitor germination closely.
1. Gather Your Supplies: You’ll need Birds Eye chili seeds, paper towels, a zip-lock bag, and a spray bottle filled with water.
2. Moisten the Paper Towel: Dampen a paper towel with water. It should be moist but not dripping wet.
3. Place the Seeds: Spread the chili seeds evenly on one half of the paper towel.
4. Fold and Seal: Fold the other half of the paper towel over the seeds and gently press down. Place the paper towel inside the zip-lock bag.
5. Create a Humid Environment: Seal the zip-lock bag, leaving a small opening for air circulation.
6. Find a Warm Spot: Place the bag in a warm location, ideally between 75-85°F (24-29°C). A heat mat can be helpful if you live in a colder climate. I usually put mine on top of the refrigerator.
7. Monitor and Moisten: Check the paper towel daily to ensure it remains moist. If it starts to dry out, spray it with water.
8. Wait for Germination: Germination usually takes 7-21 days. You’ll see tiny roots emerging from the seeds.
Method 2: Direct Sowing
This method involves planting the seeds directly into a seed starting mix.
1. Gather Your Supplies: You’ll need Birds Eye chili seeds, seed starting mix, seed starting trays or small pots, and a spray bottle filled with water.
2. Fill the Trays/Pots: Fill the seed starting trays or pots with seed starting mix. Gently tap the containers to settle the mix.
3. Sow the Seeds: Make a small indentation (about 1/4 inch deep) in the center of each cell or pot. Place 1-2 seeds in each indentation.
4. Cover the Seeds: Gently cover the seeds with seed starting mix.
5. Water Gently: Water the soil gently using a spray bottle to avoid disturbing the seeds.
6. Create a Humid Environment: Cover the trays or pots with a clear plastic dome or plastic wrap to create a humid environment.
7. Find a Warm Spot: Place the trays or pots in a warm location, ideally between 75-85°F (24-29°C). A heat mat can be helpful.
8. Monitor and Moisten: Check the soil daily to ensure it remains moist. If it starts to dry out, spray it with water. Remove the plastic dome or wrap once the seedlings emerge.
9. Wait for Germination: Germination usually takes 7-21 days.
Transplanting Your Seedlings
Once your seedlings have developed a few sets of true leaves (the leaves that look like miniature versions of the adult plant’s leaves), it’s time to transplant them into larger pots.
* Choosing the Right Pot: Select pots that are at least 4 inches in diameter. Make sure they have drainage holes!
* Preparing the Potting Mix: Use a well-draining potting mix. I like to mix equal parts potting soil, perlite, and compost.
* Gently Remove the Seedlings: Carefully remove the seedlings from their seed starting trays or pots. Be gentle to avoid damaging the roots. I use a small spoon to help lift them out.
* Planting the Seedlings: Make a hole in the center of the pot that is large enough to accommodate the seedling’s root ball. Place the seedling in the hole and gently backfill with potting mix.
* Water Thoroughly: Water the seedlings thoroughly after transplanting.
* Provide Adequate Light: Place the seedlings in a sunny location or under grow lights. They need at least 6-8 hours of sunlight per day.
Caring for Your Chili Plants
Now comes the ongoing care. This is where you really get to nurture your plants and watch them thrive!
* Watering: Water your chili plants regularly, especially during hot weather. The soil should be moist but not waterlogged. I usually water when the top inch of soil feels dry.
* Fertilizing: Fertilize your chili plants every 2-3 weeks with a balanced fertilizer. Look for a fertilizer that is specifically formulated for vegetables or peppers. I like to use a liquid fertilizer diluted to half strength.
* Providing Support: As your chili plants grow, they may need support to prevent them from falling over. You can use stakes or cages to support the plants.
* Pruning (Optional): Pruning can help to encourage bushier growth and increase fruit production. You can prune your chili plants by removing any dead or yellowing leaves, as well as any suckers (small shoots that grow from the base of the plant).
* Pest and Disease Control: Keep an eye out for pests and diseases. Common pests that affect chili plants include aphids, spider mites, and whiteflies. Common diseases include powdery mildew and blossom end rot. If you notice any pests or diseases, treat them promptly with an appropriate insecticide or fungicide. I prefer to use organic methods whenever possible. Neem oil is a great option for controlling many pests.
Moving Outdoors (If Applicable)
If you started your seeds indoors, you’ll need to acclimate your chili plants to outdoor conditions before transplanting them into the garden.
* Hardening Off: This process gradually exposes your plants to outdoor conditions. Start by placing them outdoors in a sheltered location for a few hours each day, gradually increasing the amount of time they spend outdoors over a period of 1-2 weeks.
* Choosing a Location: Select a sunny location with well-draining soil. Birds Eye chilies need at least 6-8 hours of sunlight per day.
* Preparing the Soil: Amend the soil with compost or other organic matter to improve drainage and fertility.
* Transplanting: Dig a hole that is large enough to accommodate the plant’s root ball. Gently remove the plant from its pot and place it in the hole. Backfill with soil and water thoroughly.
* Spacing: Space your chili plants about 18-24 inches apart.
Harvesting Your Chilies
This is the moment you’ve been waiting for!
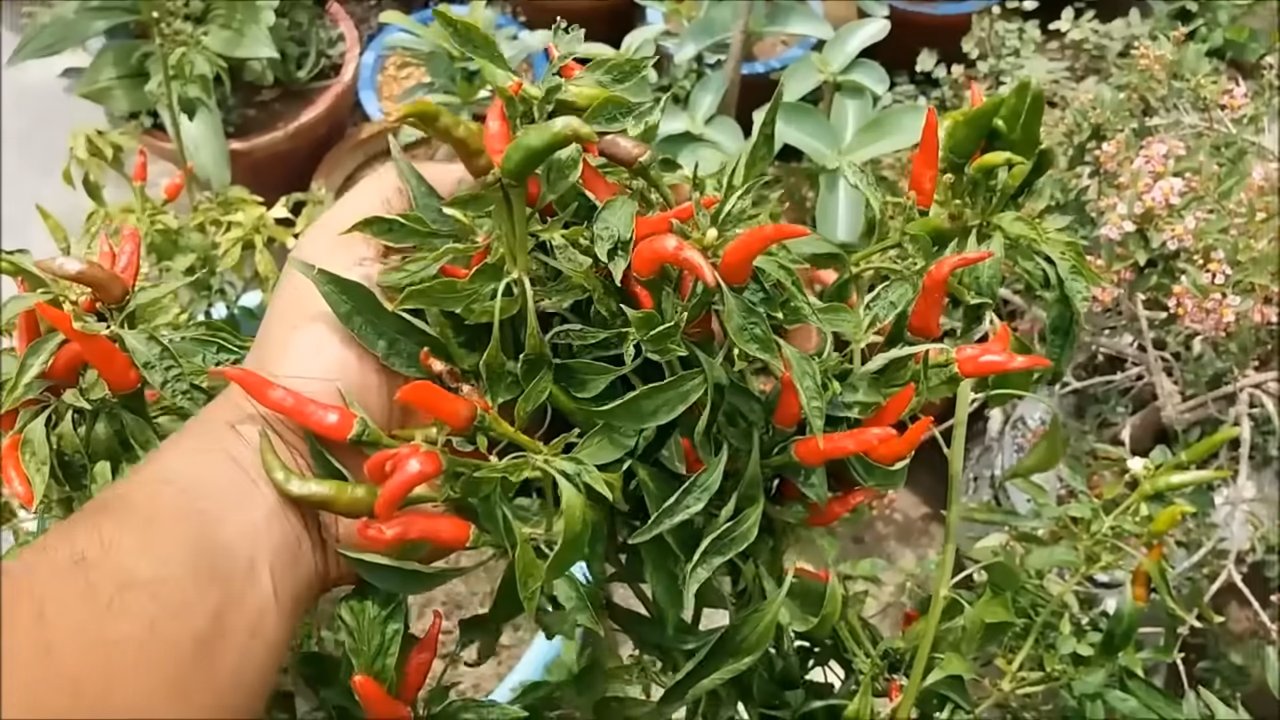
* When to Harvest: Birds Eye chilies are typically ready to harvest when they turn red and are firm to the touch.
* How to Harvest: Use scissors or pruning shears to cut the chilies from the plant. Be careful not to damage the plant.
* Handling with Care: Remember, these are hot chilies! Wear gloves when handling them to avoid skin irritation.
* Drying and Storing: You can dry your chilies by stringing them together and hanging them in a well-ventilated area. You can also dry them in a dehydrator or oven. Once they are completely dry, store them in an airtight container in a cool, dark place. You can also freeze them for longer storage.
Troubleshooting
Even with the best care, you might encounter some problems. Here are a few common issues and how to address them:
* Yellowing Leaves: This can be caused by overwatering, underwatering, nutrient deficiencies, or pests. Check the soil moisture and adjust your watering accordingly. Fertilize your plants with a balanced fertilizer. Inspect the plants for pests and treat them if necessary.
* Blossom End Rot: This is a calcium deficiency that causes the bottom of the fruit to rot. To prevent blossom end rot, ensure that your plants have adequate calcium and water consistently. You can also add calcium to the soil by adding crushed eggshells or bone meal.
* Lack of Fruit: This can be caused by insufficient sunlight, poor pollination, or nutrient deficiencies. Ensure that your plants

Conclusion
So, there you have it! Growing your own Birds Eye Chili plants is not just a rewarding experience; it’s a gateway to unlocking a world of culinary possibilities and fiery flavors right in your own backyard. We’ve walked you through the essential steps, from selecting the right seeds to nurturing your plants to a bountiful harvest. But why is this DIY project a must-try?
Firstly, consider the unparalleled freshness. Store-bought chilies, even the best ones, simply can’t compare to the vibrant, just-picked flavor of homegrown Birds Eye Chilies. The intensity of the heat, the subtle nuances of the aroma – these are all amplified when you’re harvesting chilies that have been nurtured with your own care.
Secondly, think about the cost savings. While the initial investment in seeds, soil, and perhaps a few pots might seem like a small expense, it pales in comparison to the ongoing cost of purchasing chilies regularly. Over time, you’ll find that growing your own Birds Eye Chili is a significantly more economical option.
Thirdly, and perhaps most importantly, is the satisfaction. There’s a unique sense of accomplishment that comes from nurturing a plant from a tiny seed to a thriving, chili-producing powerhouse. It’s a connection to nature, a mindful activity, and a source of fresh ingredients all rolled into one.
But the journey doesn’t end with the basic recipe. Feel free to experiment! Try different soil mixes to see which one yields the best results. Consider using organic fertilizers to enhance the flavor and nutritional value of your chilies. And don’t be afraid to get creative with your growing methods. You could try growing your Birds Eye Chili in raised beds, containers, or even hydroponically.
Here are a few variations to consider:
* **Infused Oils:** Once you have a good harvest, try infusing olive oil with your Birds Eye Chilies for a spicy kick to your cooking. Simply add a few dried chilies to a bottle of olive oil and let it steep for a few weeks.
* **Chili Paste:** Blend your fresh chilies with garlic, ginger, and other spices to create a homemade chili paste that can be used in a variety of dishes.
* **Dried Chili Flakes:** Dry your chilies in a dehydrator or oven and then crush them into flakes for a convenient and versatile spice.
* **Pickled Chilies:** Preserve your harvest by pickling your Birds Eye Chilies in vinegar and spices. These make a great addition to sandwiches, salads, and charcuterie boards.
We are confident that you will find growing your own Birds Eye Chili to be a rewarding and enjoyable experience. So, grab your seeds, get your hands dirty, and prepare to be amazed by the fiery flavors that you can create.
We encourage you to embark on this exciting culinary adventure. Don’t be intimidated if you’re a beginner – growing chilies is surprisingly easy, and the rewards are well worth the effort. And most importantly, we want to hear about your experience! Share your tips, tricks, and successes with us in the comments below. Let’s create a community of chili growers and learn from each other. Happy growing!
Frequently Asked Questions (FAQ)
What is the best time of year to plant Birds Eye Chili seeds?
The best time to plant Birds Eye Chili seeds depends on your climate. In warmer climates with mild winters, you can start seeds indoors in late winter or early spring. In colder climates, it’s best to start seeds indoors 6-8 weeks before the last expected frost. This allows the seedlings to develop a strong root system before being transplanted outdoors. Remember, Birds Eye Chilies thrive in warm weather, so ensure the risk of frost has passed before transplanting.
How much sunlight do Birds Eye Chili plants need?
Birds Eye Chili plants require at least 6-8 hours of direct sunlight per day to thrive. Insufficient sunlight can lead to leggy growth, reduced flowering, and smaller, less potent chilies. Choose a sunny location in your garden or, if growing indoors, place your plants near a south-facing window. If you don’t have access to enough natural light, consider using grow lights to supplement.
What type of soil is best for growing Birds Eye Chilies?
Birds Eye Chilies prefer well-draining, fertile soil with a slightly acidic to neutral pH (around 6.0-7.0). A good potting mix for chilies should contain a blend of peat moss, perlite, and vermiculite. You can also amend your garden soil with compost or well-rotted manure to improve its fertility and drainage. Avoid heavy clay soils, as they can become waterlogged and lead to root rot.
How often should I water my Birds Eye Chili plants?
Water your Birds Eye Chili plants regularly, especially during hot and dry weather. The soil should be kept consistently moist but not waterlogged. Check the soil moisture by sticking your finger about an inch deep into the soil. If it feels dry, it’s time to water. Water deeply, allowing the water to drain out of the bottom of the pot. Avoid overhead watering, as this can increase the risk of fungal diseases.
What are some common pests and diseases that affect Birds Eye Chili plants?
Birds Eye Chili plants can be susceptible to various pests and diseases, including aphids, spider mites, whiteflies, and fungal diseases like powdery mildew and blossom end rot. Regularly inspect your plants for signs of infestation or disease. Treat pests with insecticidal soap or neem oil. Prevent fungal diseases by providing good air circulation, avoiding overhead watering, and using a fungicide if necessary. Blossom end rot is often caused by calcium deficiency, so ensure your soil is rich in calcium or supplement with calcium nitrate.
How do I know when my Birds Eye Chilies are ready to harvest?
Birds Eye Chilies are typically ready to harvest when they turn from green to red. The exact color and size will vary depending on the specific variety. The chilies should be firm and plump. You can harvest them at any stage of ripeness, but the flavor and heat will be more intense when they are fully ripe. Use scissors or pruning shears to cut the chilies from the plant, leaving a small stem attached.
How can I increase the heat of my Birds Eye Chilies?
Several factors can influence the heat of your Birds Eye Chilies, including genetics, growing conditions, and stress. To increase the heat, ensure your plants receive plenty of sunlight and water. Avoid over-fertilizing, as this can reduce the heat. Some growers believe that stressing the plants slightly by withholding water for short periods can also increase the heat. Remember, the heat level is also influenced by the specific variety of Birds Eye Chili you are growing.
Can I grow Birds Eye Chilies indoors?
Yes, you can successfully grow Birds Eye Chilies indoors, provided you meet their basic needs. Ensure they receive at least 6-8 hours of direct sunlight per day or supplement with grow lights. Use a well-draining potting mix and water regularly. Provide good air circulation to prevent fungal diseases. You may also need to hand-pollinate the flowers to ensure fruit set.
How do I store my harvested Birds Eye Chilies?
There are several ways to store your harvested Birds Eye Chilies. You can dry them, freeze them, pickle them, or make them into chili oil or paste. To dry them, simply string them together and hang them in a well-ventilated area until they are completely dry. You can also dry them in a dehydrator or oven. To freeze them, simply place them in a freezer bag and store them in the freezer. Pickled chilies can be stored in the refrigerator for several months.
My Birds Eye Chili plant is not producing any chilies. What could be the problem?
There are several reasons why your Birds Eye Chili plant might not be producing chilies. It could be due to insufficient sunlight, over-fertilizing, lack of pollination, or stress. Ensure your plant is receiving at least 6-8 hours of direct sunlight per day. Avoid over-fertilizing, as this can promote vegetative growth at the expense of fruit production. If you are growing your plant indoors, you may need to hand-pollinate the flowers. Stressful conditions, such as extreme temperatures or drought, can also inhibit fruit production.

Leave a Comment