

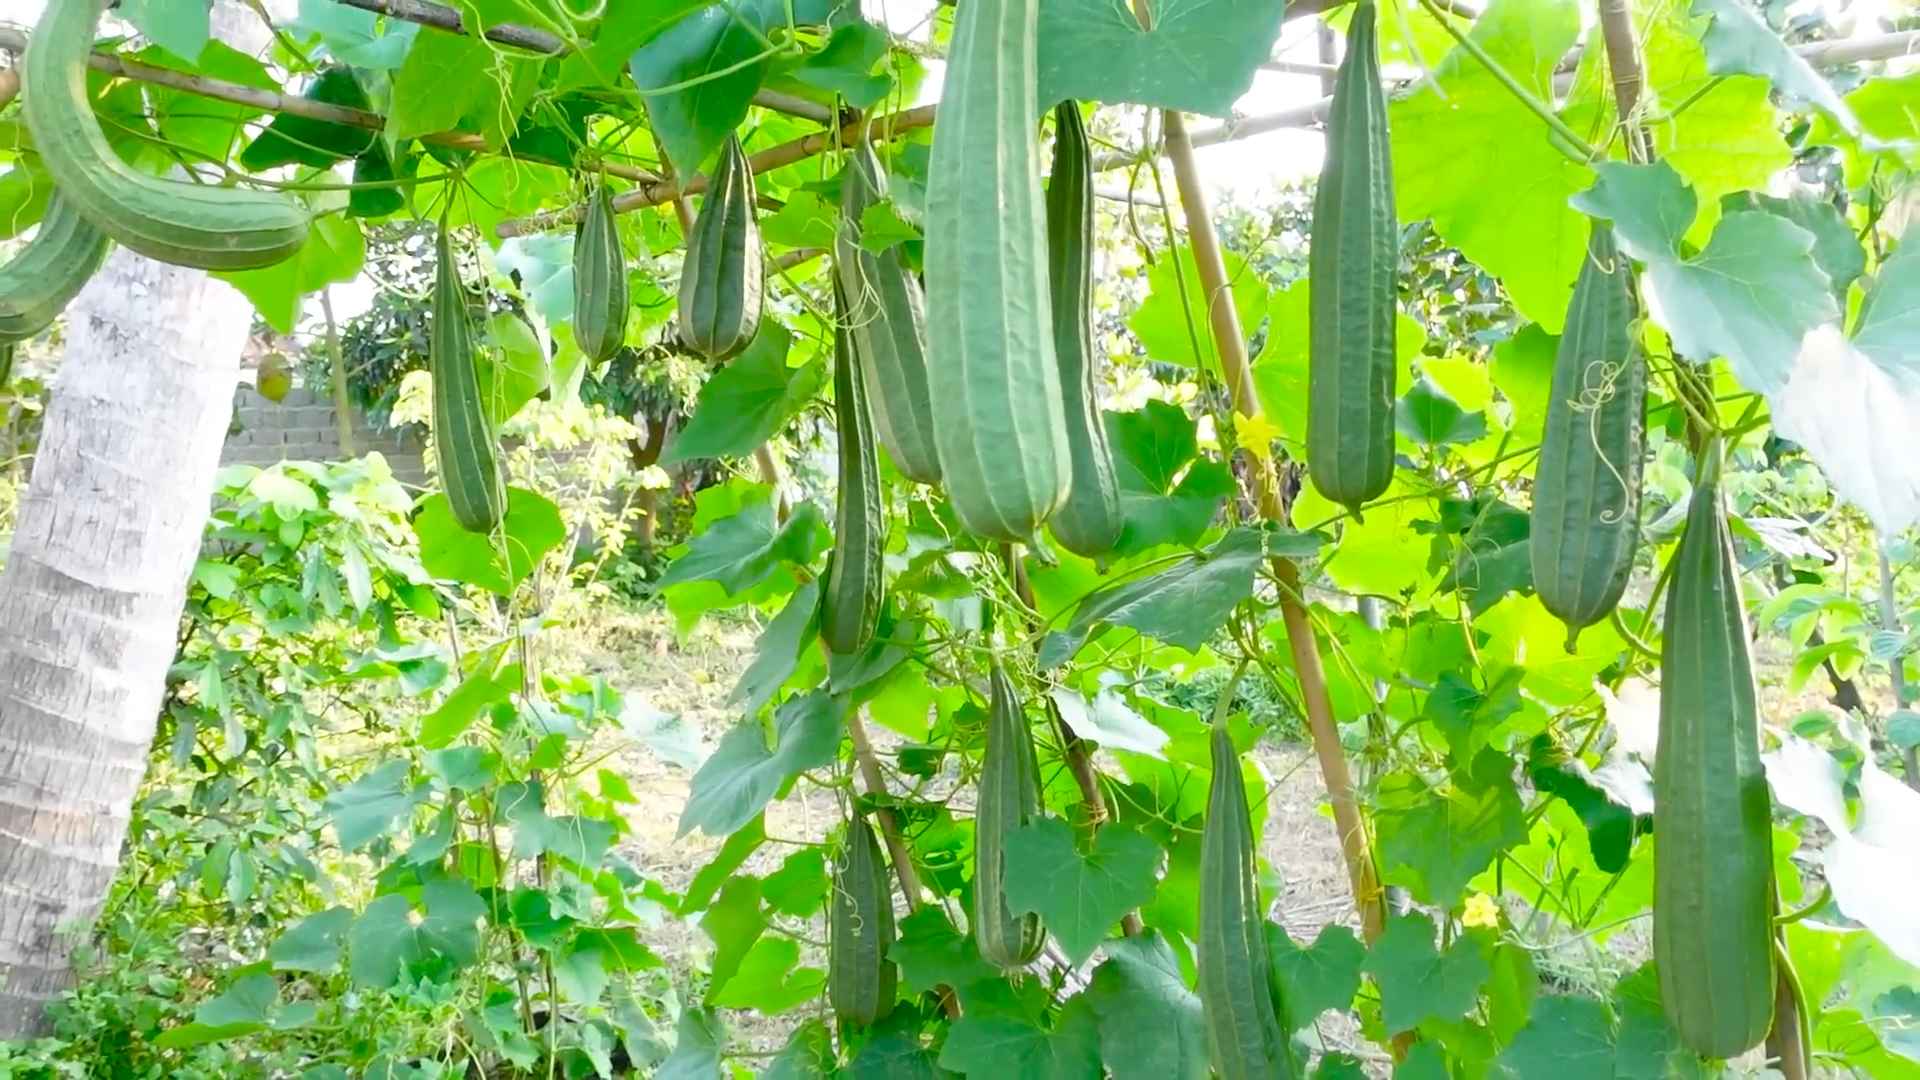
Grow angled luffa at home and unlock a world of natural sponges right in your backyard! Have you ever imagined harvesting your own eco-friendly, exfoliating wonders? It’s not just a dream; it’s a surprisingly achievable DIY project that brings a touch of the exotic to your garden.
The angled luffa, also known as the Chinese okra or ridge gourd, boasts a rich history, deeply rooted in Asian and African cultures where it has been cultivated for centuries, not only for its practical uses but also as a culinary delight. Imagine, generations ago, families relying on this versatile plant for everything from scrubbing dishes to bathing. Now, you can tap into that same resourceful spirit!
In today’s world, where sustainability is more important than ever, ditching synthetic sponges and embracing natural alternatives is a fantastic way to reduce your environmental footprint. Plus, growing your own angled luffa is incredibly rewarding. You’ll not only have a constant supply of natural sponges, but you’ll also enjoy the beauty of the plant as it climbs and produces its unique fruit. I’m excited to share some simple yet effective tricks and DIY hacks that will help you successfully grow angled luffa at home, even if you’re a beginner gardener. Let’s get started!
Grow Angled Luffa at Home: A Comprehensive DIY Guide
Hey there, fellow gardening enthusiasts! Ever dreamt of growing your own natural sponges? Well, angled luffa, also known as Chinese okra or ridged gourd, is your answer! It’s not only a fantastic exfoliating sponge but also a delicious vegetable when harvested young. I’m going to walk you through the entire process, from seed to sponge (or stir-fry!), so you can enjoy the fruits (or rather, gourds) of your labor.
Choosing the Right Variety and Starting Seeds
First things first, let’s talk about choosing the right luffa variety. While there are different types, angled luffa ( *Luffa acutangula* ) is generally easier to grow and produces more manageable sponges than the smooth luffa ( *Luffa aegyptiaca* ).
Here’s how to get those seeds started:
* Seed Selection: Purchase high-quality angled luffa seeds from a reputable source. Look for seeds that are plump and healthy-looking.
* Timing is Key: Luffa needs a long growing season (around 150-200 days), so starting seeds indoors is crucial, especially if you live in a cooler climate. Start them about 6-8 weeks before the last expected frost.
* Scarification (Optional, but Recommended): To improve germination, you can scarify the seeds. Gently rub the seeds with sandpaper or nick them with a knife. Be careful not to damage the inner seed.
* Soaking the Seeds: Soak the seeds in warm water for 24 hours before planting. This helps soften the seed coat and encourages germination.
* Planting the Seeds: Use seed starting trays or small pots filled with a well-draining seed starting mix. Plant the seeds about 1 inch deep.
* Warmth and Moisture: Luffa seeds need warmth to germinate. Maintain a soil temperature of around 70-80°F (21-27°C). Use a heat mat if necessary. Keep the soil consistently moist, but not waterlogged.
* Light: Once the seedlings emerge, provide them with plenty of light. A sunny windowsill or grow lights will work well.
* Hardening Off: Before transplanting the seedlings outdoors, you need to harden them off. This process gradually acclimates them to outdoor conditions. Start by placing the seedlings outdoors for a few hours each day, gradually increasing the time over a week or two.
Preparing the Garden Bed
Luffa vines are vigorous growers and need plenty of space and support. Proper soil preparation is essential for a successful harvest.
* Sunlight: Choose a location that receives at least 6-8 hours of direct sunlight per day.
* Soil: Luffa prefers well-drained, fertile soil with a pH of 6.0-6.8. Amend the soil with compost or well-rotted manure to improve drainage and fertility.
* Support System: Luffa vines need a strong trellis, fence, or arbor to climb on. The structure should be at least 6-8 feet tall and sturdy enough to support the weight of the mature vines and gourds. I personally prefer a sturdy wooden trellis.
* Spacing: Space the plants about 2-3 feet apart along the trellis. This allows them enough room to grow without overcrowding.
Transplanting and Growing Luffa
Once the danger of frost has passed and the soil has warmed up, it’s time to transplant your luffa seedlings into the garden.
1. Careful Removal: Gently remove the seedlings from their containers, being careful not to damage the roots.
2. Planting: Dig a hole that is slightly larger than the root ball. Place the seedling in the hole and backfill with soil.
3. Watering: Water thoroughly after planting.
4. Mulching: Apply a layer of mulch around the base of the plants to help retain moisture and suppress weeds.
5. Training the Vines: As the vines grow, train them to climb the trellis. Gently guide the vines and tie them to the trellis with soft twine or plant ties.
6. Watering: Luffa needs consistent watering, especially during hot, dry weather. Water deeply at the base of the plants, avoiding wetting the foliage.
7. Fertilizing: Fertilize the plants every 2-3 weeks with a balanced fertilizer. You can also use compost tea or fish emulsion.
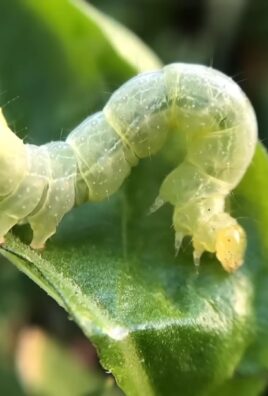
8. Pest and Disease Control: Keep an eye out for pests such as squash bugs, aphids, and cucumber beetles. Handpick them off the plants or use insecticidal soap. Luffa can also be susceptible to fungal diseases such as powdery mildew. Improve air circulation and avoid overhead watering to prevent these diseases. You can also use a fungicide if necessary.
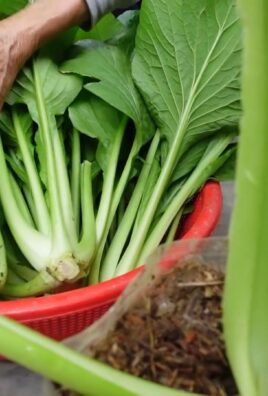
Harvesting Luffa for Eating
Young luffa gourds can be harvested and eaten like zucchini or summer squash. They have a mild, slightly sweet flavor and can be used in stir-fries, soups, and stews.
* Timing: Harvest young luffa gourds when they are about 6-8 inches long and still tender. The skin should be smooth and easily pierced with your fingernail.
* Harvesting: Use a sharp knife or pruners to cut the gourds from the vine.
Harvesting Luffa for Sponges
Harvesting luffa for sponges requires a bit more patience. You need to wait until the gourds are fully mature and the skin has dried and turned brown.
1. Timing: Harvest mature luffa gourds in the fall, after the vines have started to die back. The gourds should be lightweight and the skin should be dry and brittle.
2. Harvesting: Cut the gourds from the vine, leaving a few inches of stem attached.
3. Drying: Allow the gourds to dry completely in a well-ventilated area. This may take several weeks. You can hang them upside down to dry.
4. Peeling: Once the gourds are completely dry, the skin should be easy to peel off. You can soak the gourds in water for a few hours to make the peeling process easier. I find it easiest to start at the blossom end and work my way up.
5. Seed Removal: After peeling, remove the seeds from the luffa sponge. You can shake them out or use a hose to flush them out. Save the seeds for next year’s planting!
6. Washing: Wash the luffa sponge thoroughly with soap and water.
7. Bleaching (Optional): If you want a whiter sponge, you can soak it in a diluted bleach solution for a few minutes. Rinse thoroughly with water.
8. Drying: Allow the luffa sponge to dry completely before using it.
Using and Caring for Your Luffa Sponge
Now that you have your own homegrown luffa sponge, here’s how to use and care for it:
* Exfoliating: Use the luffa sponge to gently exfoliate your skin in the shower or bath. It helps remove dead skin cells and leaves your skin feeling smooth and refreshed.
* Cleaning: Luffa sponges can also be used for cleaning dishes, scrubbing vegetables, and other household tasks.
* Storage: Store your luffa sponge in a dry, well-ventilated area.
* Cleaning: Rinse your luffa sponge thoroughly after each use and allow it to dry completely. You can also wash it in the washing machine or dishwasher occasionally.
* Replacement: Replace your luffa sponge every few months, or when it starts to show signs of wear and tear.
Troubleshooting Common Luffa Growing Problems
Even with the best care, you might encounter some problems while growing luffa. Here are a few common issues and how to address them:
* Poor Germination: If your luffa seeds aren’t germinating, make sure the soil is warm enough and that you’ve soaked the seeds beforehand. You can also try scarifying the seeds to improve germination rates.
* Slow Growth: Slow growth can be caused by a lack of sunlight, poor soil, or insufficient watering. Make sure your luffa plants are getting enough sunlight and that the soil is fertile and well-drained. Water deeply and regularly, especially during hot, dry weather.
* Pest Infestations: Squash bugs, aphids, and cucumber beetles can all attack luffa plants. Handpick them off the plants or use insecticidal soap.
* Fungal Diseases: Powdery mildew and other fungal diseases can affect luffa plants. Improve air circulation and avoid overhead watering to prevent these diseases. You can also use a fungicide if necessary.
* Lack of Fruit Set: If your luffa plants are flowering but not producing fruit, it could be due to a lack of pollination

Conclusion
So, there you have it! Growing angled luffa at home, specifically training it to grow at an angle, isn’t just a gardening project; it’s an adventure in resourcefulness and a step towards sustainable living. We’ve explored the simple yet effective methods to achieve this, transforming your garden into a source of natural sponges that are both eco-friendly and incredibly satisfying to create yourself.
Why is this DIY trick a must-try? Because it offers a multitude of benefits. Firstly, you gain control over the quality and source of your luffa sponges, ensuring they are free from harsh chemicals and pesticides often found in commercially produced options. Secondly, you reduce your environmental footprint by minimizing waste and supporting a more sustainable lifestyle. Thirdly, it’s a deeply rewarding experience to nurture a plant from seed to sponge, witnessing the magic of nature unfold in your own backyard. And finally, let’s be honest, it’s just plain cool to say you grew your own sponges!
But the beauty of this DIY project lies in its adaptability. Feel free to experiment with different trellising methods. Instead of a simple angled trellis, consider creating a more elaborate structure that allows the luffa vines to climb and twist in unique ways. You could even train them along an existing fence or pergola, adding a touch of natural beauty to your landscape.
Consider the variety of angled luffa you choose to grow. Some varieties produce larger, coarser sponges, while others yield smaller, more delicate ones. Research different cultivars to find the perfect fit for your needs and preferences. You can also experiment with different growing mediums and fertilizers to optimize the growth and yield of your luffa plants.
Don’t be afraid to get creative with the uses of your homegrown luffa sponges. Beyond their traditional use in the bath and kitchen, they can be incorporated into crafts, used as natural exfoliants, or even composted to enrich your garden soil. The possibilities are endless!
The key takeaway here is that growing angled luffa at home is an accessible and rewarding project for gardeners of all skill levels. It’s a chance to connect with nature, reduce your environmental impact, and create something truly unique and useful.
We wholeheartedly encourage you to give this DIY trick a try. Start small, experiment with different techniques, and don’t be discouraged by initial setbacks. Gardening is a learning process, and every mistake is an opportunity to grow (pun intended!).
Most importantly, we want to hear about your experiences! Share your photos, tips, and challenges in the comments below. Let’s create a community of angled luffa enthusiasts and inspire others to embrace the joys of homegrown sponges. What trellising methods worked best for you? What varieties of angled luffa did you find most successful? What creative uses have you discovered for your homegrown sponges? Your insights and experiences will be invaluable to other readers who are embarking on this exciting journey. So, get your hands dirty, embrace the challenge, and let’s grow some amazing angled luffa together!
Frequently Asked Questions (FAQ)
What is the best time of year to plant angled luffa seeds?
Angled luffa requires a long growing season and warm temperatures. Therefore, the best time to plant seeds is typically in late spring or early summer, after the last frost has passed and the soil has warmed up to at least 70°F (21°C). You can also start seeds indoors 6-8 weeks before the last expected frost to get a head start on the growing season. This is especially helpful in regions with shorter summers. Make sure to harden off the seedlings before transplanting them outdoors.
How much sunlight does angled luffa need?
Angled luffa thrives in full sun, requiring at least 6-8 hours of direct sunlight per day. Insufficient sunlight can lead to stunted growth, reduced flowering, and smaller, less developed luffa fruits. Choose a planting location that receives ample sunlight throughout the day. If you are growing luffa in a container, make sure to rotate the container regularly to ensure that all sides of the plant receive adequate sunlight.
What type of soil is best for growing angled luffa?
Angled luffa prefers well-drained, fertile soil that is rich in organic matter. Amend the soil with compost or well-rotted manure before planting to improve drainage and fertility. A slightly acidic to neutral soil pH (6.0-7.0) is ideal. Avoid planting in heavy clay soil, as this can lead to waterlogging and root rot. If you have clay soil, consider amending it with sand and organic matter to improve drainage.
How often should I water angled luffa plants?
Angled luffa plants require consistent moisture, especially during hot, dry weather. Water deeply and regularly, ensuring that the soil remains consistently moist but not waterlogged. Avoid overhead watering, as this can increase the risk of fungal diseases. Drip irrigation or soaker hoses are ideal for delivering water directly to the roots of the plants. Mulching around the base of the plants can help to retain moisture in the soil.
How do I train angled luffa vines to grow at an angle?
Training angled luffa vines to grow at an angle involves providing a suitable support structure, such as a trellis or fence, and gently guiding the vines as they grow. As the vines begin to climb, use soft ties or twine to secure them to the support structure at the desired angle. Regularly check the vines and adjust the ties as needed to maintain the desired growth pattern. Pruning the vines can also help to encourage branching and direct growth.
When is the best time to harvest angled luffa?
The best time to harvest angled luffa is when the fruits are fully mature and the skin has turned brown and dry. The fruits should feel lightweight and hollow when tapped. Avoid harvesting the fruits too early, as they will not develop properly and the fibers will be less dense. To harvest, simply cut the luffa fruit from the vine using a sharp knife or pruning shears.
How do I process angled luffa into a sponge?
Processing angled luffa into a sponge involves removing the skin, seeds, and pulp from the mature fruit. To do this, soak the luffa fruit in water for several days to soften the skin. Once the skin is soft, peel it away to reveal the fibrous interior. Remove the seeds and pulp by shaking the luffa fruit vigorously or rinsing it under running water. Allow the luffa sponge to dry completely in the sun before using it.
Are there any common pests or diseases that affect angled luffa?
Angled luffa can be susceptible to certain pests and diseases, such as squash bugs, squash vine borers, and powdery mildew. Regularly inspect your plants for signs of pests or diseases and take appropriate action to control them. Organic pest control methods, such as handpicking pests or using insecticidal soap, are often effective. To prevent fungal diseases, ensure good air circulation around the plants and avoid overhead watering.
Can I save seeds from my angled luffa plants?
Yes, you can save seeds from your angled luffa plants to grow new plants the following year. To save seeds, allow a few luffa fruits to fully mature on the vine and dry completely. Once the fruits are dry, remove the seeds and store them in a cool, dry place until planting time. Make sure to label the seeds with the variety and harvest date.
What are some creative uses for angled luffa sponges?
Beyond their traditional use in the bath and kitchen, angled luffa sponges can be used in a variety of creative ways. They can be incorporated into crafts, such as soaps, bath bombs, and decorative items. They can also be used as natural exfoliants for the skin. In the garden, luffa sponges can be used as compost material or as a natural scrubbing tool for cleaning pots and tools. The possibilities are endless!
Leave a Comment