

Grapevine propagation water method – ever heard of it? Probably not, but trust me, it’s about to become your new favorite gardening trick! I’m so excited to share this simple yet incredibly effective way to multiply your grapevines without spending a fortune on new plants. For centuries, grapevines have been cultivated, playing a vital role in cultures around the world, from ancient winemaking traditions to providing delicious table grapes for families.
But let’s be honest, buying new grapevine starts can be expensive and sometimes unreliable. That’s where this DIY propagation method comes in. Imagine effortlessly expanding your vineyard, sharing cuttings with friends, or simply enjoying the satisfaction of growing your own plants from scratch. This method is perfect for beginners and seasoned gardeners alike.
I’ll walk you through each step, showing you exactly how to use the grapevine propagation water method to create healthy, thriving grapevines. Get ready to ditch the complicated techniques and embrace this easy, cost-effective way to grow your own grapes!
DIY Grapevine Propagation: Rooting Cuttings in Water
Hey there, fellow gardening enthusiasts! Ever looked at a lush grapevine and thought, “I wish I could have one of those?” Well, guess what? You can! And it’s easier than you might think. Today, I’m going to walk you through a simple and effective method for propagating grapevines using water. This method is perfect for beginners because it allows you to visually monitor root development, giving you a higher chance of success. Let’s get started!
Gathering Your Supplies
Before we dive into the nitty-gritty, let’s make sure we have everything we need. Trust me, having all your tools ready will make the process much smoother.
* Grapevine Cuttings: This is the most crucial part! You’ll want to take cuttings from a healthy, dormant grapevine. Dormancy usually occurs in late fall or early winter, after the leaves have fallen.
* Sharp Pruning Shears: A clean cut is essential for preventing disease and promoting root growth. Make sure your shears are sharp and sanitized.
* Clean Water: Tap water is generally fine, but if your tap water is heavily chlorinated, let it sit out for 24 hours to allow the chlorine to dissipate. You can also use distilled or filtered water.
* Clear Glass or Plastic Containers: Jars, glasses, or even plastic bottles (cut in half) will work. The key is that they need to be clear so you can see the roots developing.
* Rooting Hormone (Optional): While not strictly necessary, rooting hormone can significantly increase your chances of success.
* Rubbing Alcohol or Bleach Solution: For sanitizing your pruning shears.
* Spray Bottle (Optional): For misting the cuttings.
* Well-Draining Potting Mix: You’ll need this when it’s time to transplant your rooted cuttings.
* Small Pots: For planting your rooted cuttings.
Taking the Cuttings
Timing is everything when it comes to taking grapevine cuttings. As I mentioned earlier, late fall or early winter, when the vine is dormant, is the ideal time.
1. Sanitize Your Pruning Shears: Before you even approach the grapevine, thoroughly clean your pruning shears with rubbing alcohol or a diluted bleach solution (1 part bleach to 9 parts water). This will prevent the spread of any diseases.
2. Select Healthy Canes: Look for healthy, one-year-old canes (the previous year’s growth). These canes should be about the thickness of a pencil and free from any signs of disease or damage.
3. Make the Cuts: Using your sanitized pruning shears, cut the canes into sections that are about 6-8 inches long. Make sure each cutting has at least 3-4 nodes (the points where leaves or buds emerge).
4. Cut at an Angle: Make the bottom cut (the end that will be submerged in water) at a 45-degree angle, just below a node. This will increase the surface area for root development.
5. Cut Straight Across: Make the top cut (the end that will be exposed to air) straight across, about an inch above a node.
6. Keep Track of Orientation: It’s crucial to remember which end is up and which end is down. Roots will only grow from the bottom end. A simple trick is to make the angled cut always the bottom.
7. Remove Excess Buds (Optional): Some people recommend removing all but the top one or two buds to encourage root growth rather than leaf growth. I’ve had success both with and without doing this, so it’s really up to you. If you choose to remove buds, do so carefully with your pruning shears.
Preparing the Cuttings for Rooting
Now that we have our cuttings, it’s time to get them ready for their water bath!
1. Rinse the Cuttings: Gently rinse the cuttings with clean water to remove any dirt or debris.
2. Apply Rooting Hormone (Optional): If you’re using rooting hormone, dip the bottom inch of each cutting into the powder or liquid. Follow the instructions on the rooting hormone package.
3. Prepare Your Containers: Fill your clear containers with clean water. Make sure the containers are clean to prevent the growth of algae or bacteria.
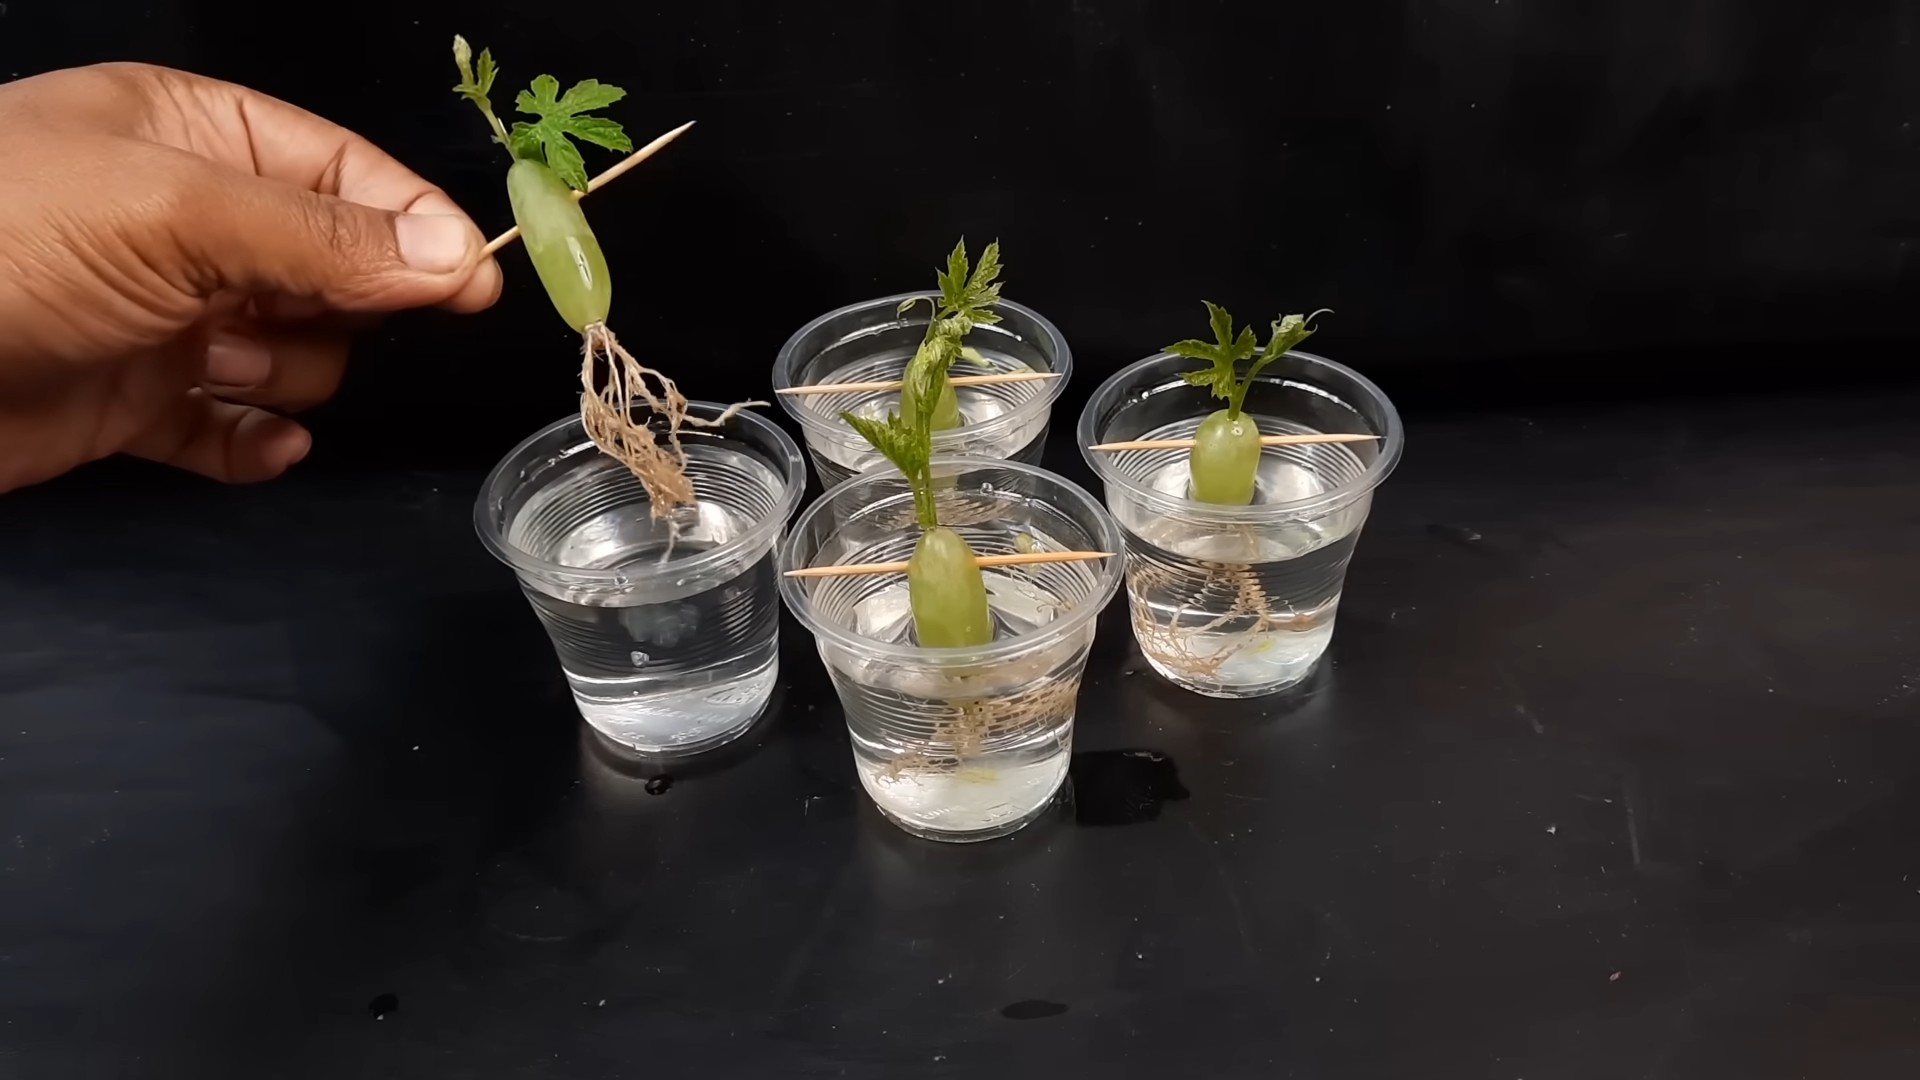
Rooting the Cuttings in Water
This is where the magic happens!
1. Place Cuttings in Water: Place the cuttings in the containers of water, ensuring that the bottom 1-2 inches of each cutting are submerged. Make sure the nodes at the bottom are submerged, as this is where the roots will emerge.
2. Choose the Right Location: Place the containers in a warm, bright location, but out of direct sunlight. A windowsill that receives indirect sunlight is ideal.
3. Change the Water Regularly: Change the water every 2-3 days to prevent the growth of algae and bacteria. This will also ensure that the cuttings have access to fresh oxygen.
4. Monitor Root Development: Keep a close eye on the cuttings. You should start to see roots emerging from the nodes within a few weeks. The time it takes for roots to develop can vary depending on the variety of grapevine and the environmental conditions.
5. Mist the Cuttings (Optional): If the air is dry, you can mist the cuttings with water every day or two to help prevent them from drying out.
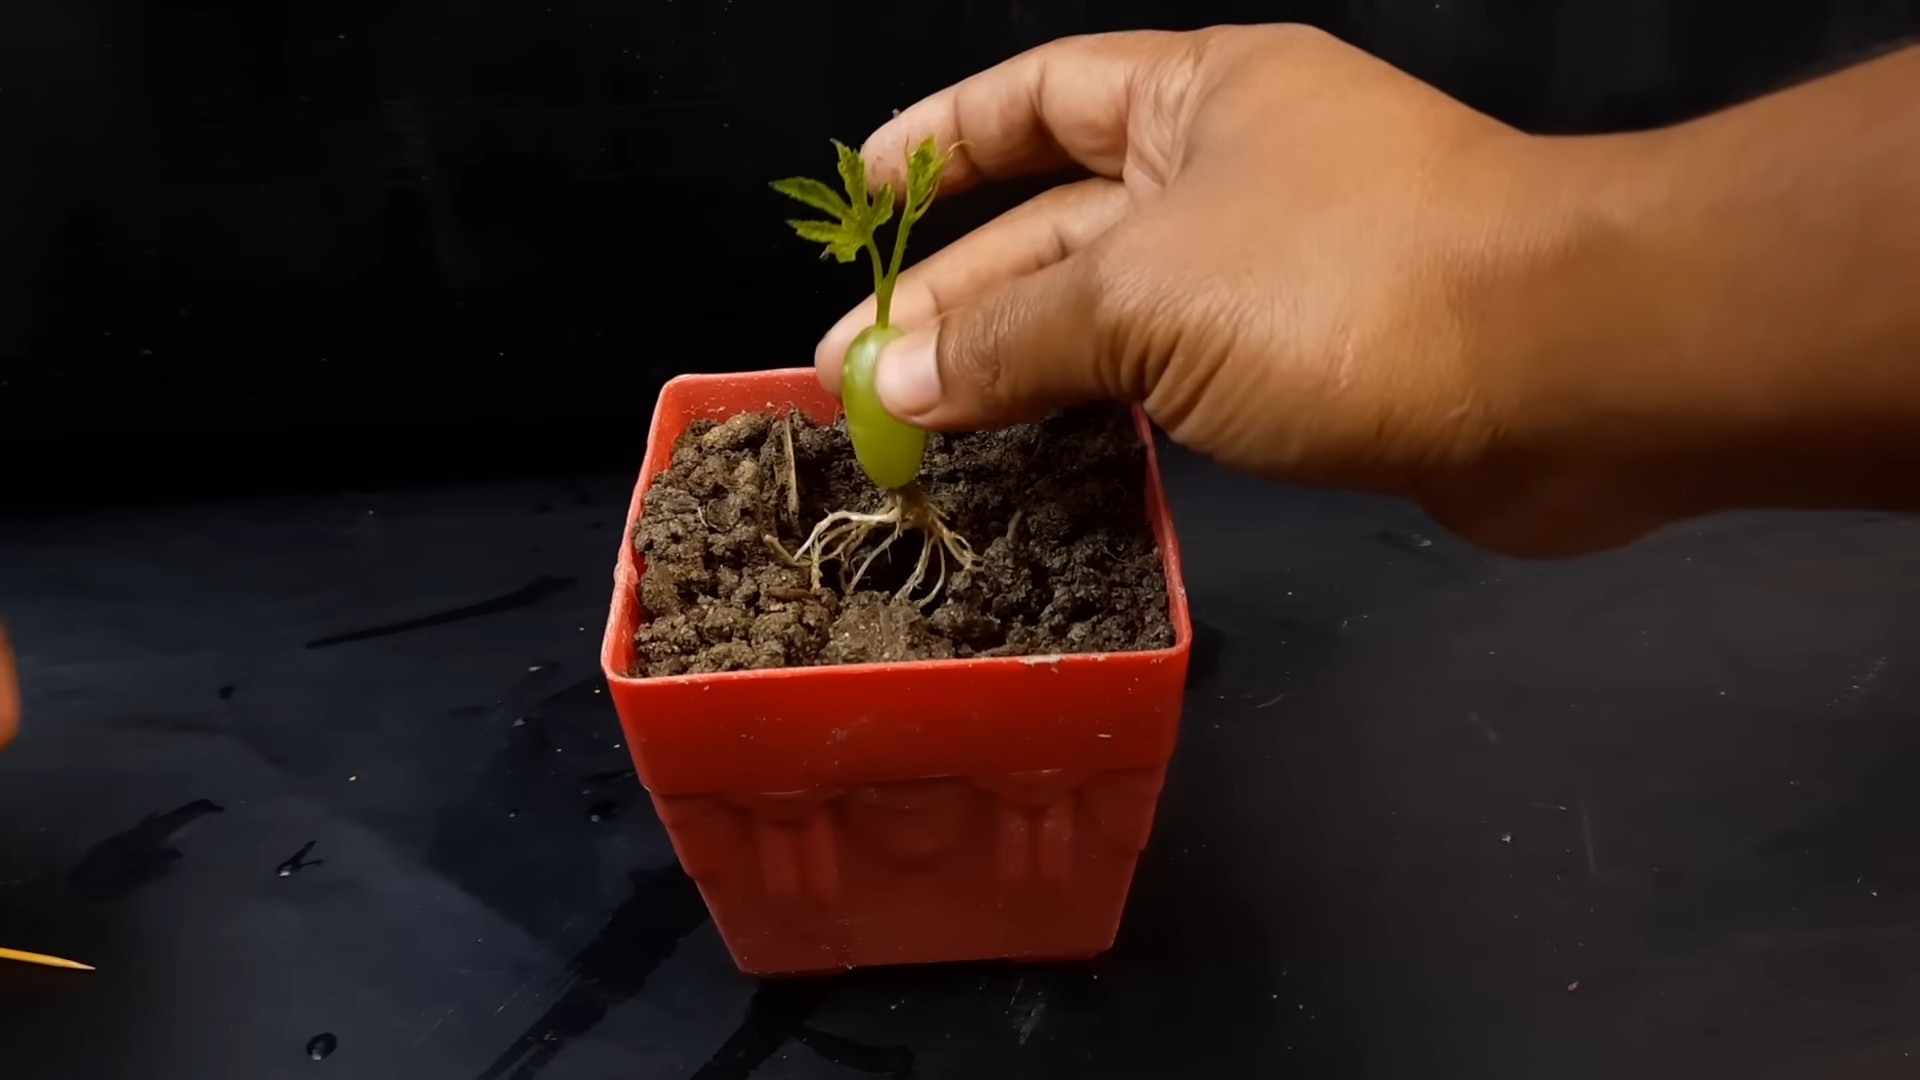
Transplanting the Rooted Cuttings
Once the roots are about 1-2 inches long, it’s time to transplant your cuttings into soil.
1. Prepare Your Pots: Fill small pots with well-draining potting mix.
2. Carefully Remove Cuttings: Gently remove the rooted cuttings from the water. Be careful not to damage the delicate roots.
3. Plant the Cuttings: Make a small hole in the potting mix and carefully place the rooted cutting into the hole. Gently backfill the hole with potting mix, making sure the roots are covered.
4. Water Thoroughly: Water the newly planted cuttings thoroughly.
5. Provide Humidity: To help the cuttings adjust to their new environment, you can create a humid environment by placing a clear plastic bag over the pot. Make sure to poke a few holes in the bag for ventilation.
6. Gradually Acclimate: Over the next few weeks, gradually acclimate the cuttings to outdoor conditions by removing the plastic bag for increasing periods of time each day.
7. Choose a Sunny Location: Once the cuttings have acclimated to outdoor conditions, place them in a sunny location.
8. Water Regularly: Water the cuttings regularly, keeping the soil moist but not waterlogged.
9. Fertilize (Optional): You can fertilize the cuttings with a diluted liquid fertilizer every few weeks to promote growth.
Troubleshooting
Even with the best intentions, things don’t always go as planned. Here are a few common problems you might encounter and how to address them:
* Cuttings Rotting: If your cuttings start to rot, it’s usually due to a fungal or bacterial infection. Remove the rotting cuttings immediately and sanitize your containers. Make sure you’re changing the water regularly and that the cuttings are not overcrowded.
* No Root Development: If you’re not seeing any root development after several weeks, it could be due to several factors. Make sure the cuttings are getting enough light and warmth. You can also try using rooting hormone to stimulate root growth.
* Mold Growth: If you see mold growing on the cuttings or in the water, it’s important to address it immediately. Change the water more frequently and make sure the cuttings are not overcrowded. You can also add a small amount of hydrogen peroxide to the water to help kill the mold.
* Cuttings Drying Out: If the cuttings are drying out, mist them more frequently. You can also try placing a clear plastic bag over the cuttings to create a more humid environment.
Tips for Success
Here are a few extra tips to help you succeed with grapevine propagation:
* Take More Cuttings Than You Need: Not all cuttings will root successfully, so it’s always a good idea to take more cuttings than you need.
* Be Patient: Rooting cuttings can take time, so be patient and don’t give up if you don’t see results immediately.
* Label Your Cuttings: If you’re propagating multiple varieties of grapevines, be sure to label your cuttings so you know which is which.
* Research Your Grapevine Variety: Different varieties of grapevines may have different rooting requirements, so it’s a good idea to research your specific variety.
* Don’t Overwater: Overwatering can lead to root rot, so make sure the soil is well-draining and that you’re not watering too frequently.
Conclusion
Propagating grapevines in water is a
Conclusion
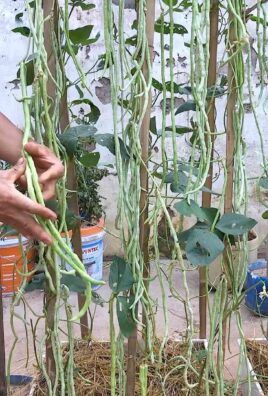
So, there you have it! The grapevine propagation water method isn’t just a clever gardening hack; it’s a gateway to expanding your vineyard, beautifying your garden, and experiencing the sheer joy of nurturing new life from a single cutting. Forget complicated setups and expensive equipment. This simple, accessible technique empowers anyone, regardless of their gardening experience, to successfully propagate grapevines.
Why is this a must-try? Because it’s effective, economical, and incredibly rewarding. Imagine the satisfaction of sipping wine made from grapes grown from vines you personally propagated! Or picture your garden adorned with lush, thriving grapevines, providing shade and beauty for years to come. The grapevine propagation water method offers a high success rate, allowing you to quickly multiply your favorite grape varieties or experiment with new ones. It’s also a fantastic way to preserve heirloom grapevines or share cuttings with friends and fellow gardening enthusiasts.
But don’t stop there! Once you’ve mastered the basic technique, feel free to experiment with variations. Try adding a rooting hormone to the water to further boost root development. Different grape varieties may respond differently to the water propagation method, so keep detailed notes on your progress. You could also try using different types of containers, such as colored glass jars or opaque plastic containers, to see if they affect root growth. Some gardeners even add a small air stone to the water to increase oxygenation, which can promote faster rooting.
Consider the timing of your cuttings as well. While late winter or early spring is generally recommended, you might find success at other times of the year, depending on your climate and the specific grape variety. Don’t be afraid to experiment and adapt the technique to suit your local conditions.
The key to success lies in patience and observation. Regularly check the water level and change it every few days to prevent algae growth. Keep an eye out for any signs of rot or disease and address them promptly. And most importantly, be patient! Root development can take several weeks, so don’t be discouraged if you don’t see results immediately.
We are confident that you’ll find the grapevine propagation water method to be a valuable addition to your gardening toolkit. It’s a simple, effective, and rewarding way to expand your vineyard and enjoy the beauty of grapevines in your garden.
Now, it’s your turn! We encourage you to try this DIY trick and share your experience with us. Let us know which grape varieties you’ve propagated, what variations you’ve tried, and what tips you’ve discovered along the way. Your feedback will help us refine this technique and make it even more accessible to other gardeners. Share your photos and stories in the comments below – we can’t wait to see your success! Happy propagating!
Frequently Asked Questions (FAQ)
What is the best time of year to take grapevine cuttings for water propagation?
The ideal time to take grapevine cuttings is during the dormant season, typically in late winter or early spring, before the buds begin to swell. This is when the vine’s energy is concentrated in the canes, making them more likely to root successfully. Avoid taking cuttings during the growing season, as they may not root as easily.
What type of grapevine cuttings should I use for water propagation?
Use hardwood cuttings, which are sections of mature, dormant canes that are about pencil-thick and 12-18 inches long. Choose healthy, disease-free canes from the previous year’s growth. Avoid using thin, weak canes or canes with signs of damage or disease. Make sure the cuttings have at least 3-4 nodes (buds).
How do I prepare the grapevine cuttings for water propagation?
First, make a clean, angled cut at the bottom of the cutting, just below a node. This will help the cutting absorb water more easily. Then, make a straight cut at the top of the cutting, about an inch above a node. Remove any leaves or tendrils from the bottom half of the cutting to prevent them from rotting in the water. You can also lightly scrape the bottom inch of the cutting to encourage root formation.
What kind of water should I use for grapevine propagation?
Use clean, non-chlorinated water for grapevine propagation. Tap water can contain chlorine and other chemicals that can inhibit root growth. Distilled water, rainwater, or filtered water are all good options. Change the water every few days to prevent algae growth and keep the water fresh.
How long does it take for grapevine cuttings to root in water?
Root development can take anywhere from 2 to 8 weeks, depending on the grape variety, the temperature, and other environmental factors. Be patient and continue to change the water regularly. You should start to see small roots emerging from the nodes along the bottom of the cutting.
What do I do once the grapevine cuttings have rooted?
Once the roots are about an inch long, you can transplant the cuttings into pots filled with well-draining potting mix. Be careful not to damage the delicate roots during transplanting. Water the newly potted cuttings thoroughly and keep the soil moist but not waterlogged. Gradually acclimate the cuttings to outdoor conditions before planting them in the ground.
Can I use rooting hormone to improve the success rate of grapevine propagation?
Yes, using rooting hormone can help to improve the success rate of grapevine propagation. Dip the bottom inch of the cutting in rooting hormone powder or liquid before placing it in the water. Follow the instructions on the rooting hormone package.
What are some common problems I might encounter when propagating grapevines in water?
Some common problems include rot, algae growth, and lack of root development. Rot can be prevented by using clean water and changing it regularly. Algae growth can be minimized by using an opaque container or placing the container in a shaded location. Lack of root development can be caused by using unhealthy cuttings, using chlorinated water, or not providing enough light.
How much light do grapevine cuttings need during water propagation?
Grapevine cuttings need bright, indirect light during water propagation. Avoid placing the cuttings in direct sunlight, as this can scorch the leaves and overheat the water. A location near a window with filtered sunlight is ideal.
What type of soil should I use when transplanting the rooted grapevine cuttings?
Use a well-draining potting mix when transplanting the rooted grapevine cuttings. A mix of equal parts peat moss, perlite, and vermiculite is a good option. Avoid using heavy, clay-based soils, as they can become waterlogged and inhibit root growth.
Can I propagate any type of grapevine using the water method?
While the water propagation method is generally effective for many grapevine varieties, some may be more challenging than others. Experimentation is key! Research the specific needs of the grape variety you’re trying to propagate to increase your chances of success.
How do I care for the newly planted grapevine cuttings?
After transplanting, water the cuttings regularly to keep the soil moist but not waterlogged. Fertilize them with a balanced fertilizer every few weeks. Protect them from frost and extreme temperatures. Prune them regularly to encourage healthy growth. With proper care, your newly propagated grapevines will thrive and produce delicious grapes for years to come.
Leave a Comment