

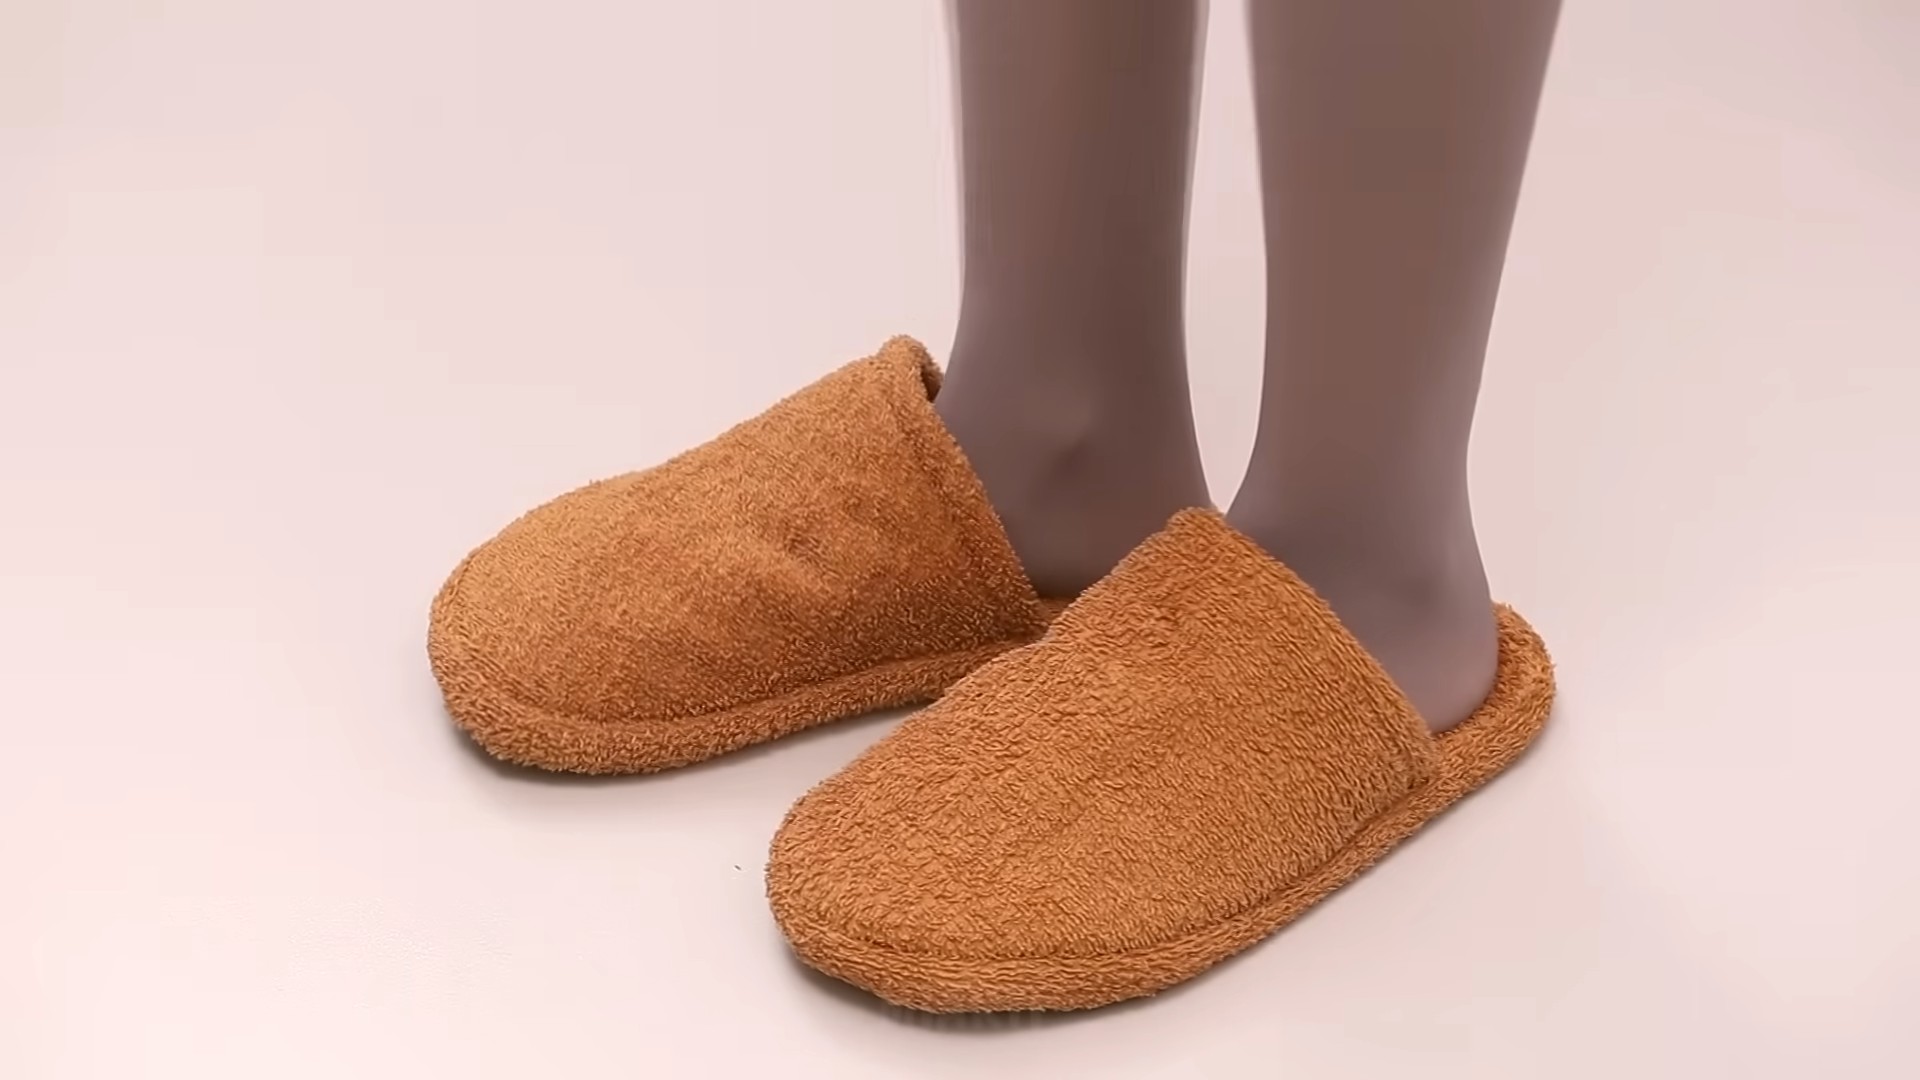
DIY Towel Slippers: Imagine sinking your feet into plush, comfortable slippers made entirely by your own two hands, using something you probably already have lying around – old towels! Forget those flimsy, disposable hotel slippers or expensive store-bought ones. We’re diving into a fun and incredibly practical DIY project that will transform your post-shower routine or lazy weekend lounging.
The concept of repurposing textiles is as old as textiles themselves! Throughout history, resourceful individuals have found creative ways to extend the life of fabrics, from patching clothes to crafting household items. This tradition of resourcefulness resonates deeply today, as we become increasingly aware of the importance of sustainability and reducing waste. Making your own DIY Towel Slippers is a fantastic way to participate in this tradition.
Why do you need this DIY trick in your life? Well, think about it: how many old towels do you have tucked away in your linen closet? Instead of letting them gather dust or tossing them out, you can give them a new life as cozy, custom-fit slippers. Plus, this project is incredibly budget-friendly and surprisingly easy. I’m going to guide you through each step, ensuring that even if you’re a beginner crafter, you’ll end up with a pair of comfy, eco-friendly slippers you’ll absolutely love. Get ready to unleash your inner DIY enthusiast and create something truly special!
DIY Towel Slippers: Cozy Comfort Underfoot!
Okay, friends, let’s talk about comfort. Specifically, the kind of comfort that greets your feet the moment they hit the floor. I’m talking about towel slippers! Forget those flimsy hotel slippers; we’re making our own, and they’ll be so much better. This project is perfect for using up old towels, adding a touch of spa-like luxury to your everyday life, and it’s surprisingly easy. Trust me, even if you’re a beginner sewer, you can totally nail this.
Materials You’ll Need
Before we dive in, let’s gather our supplies. Here’s what you’ll need:
* Old Towels: The thicker, the better! Bath towels work great, but even hand towels can be used for smaller sizes. You’ll need enough to cut out two slipper shapes and two sole shapes per slipper.
* Cardboard or Thick Felt: For the soles. Cardboard is cheap and readily available (cereal boxes work!), but thick felt will be more durable and comfortable.
* Scissors: Fabric scissors are ideal, but sharp regular scissors will do in a pinch.
* Pins: To hold the fabric layers together while you sew.
* Sewing Machine (Optional): A sewing machine will make the process much faster and neater, but you can definitely hand-sew these slippers.
* Needle and Thread: If you’re hand-sewing. Choose a strong thread that matches your towel color.
* Pencil or Fabric Marker: To trace your foot and pattern.
* Measuring Tape or Ruler: For accurate measurements.
* Optional: Non-slip fabric paint or rubber grips for the soles (to prevent slipping).
* Optional: Decorative embellishments like buttons, ribbon, or lace.
Creating Your Pattern
This is the most crucial step, so pay close attention! We’re going to create a custom pattern based on your foot size.
1. Trace Your Foot: Place a piece of paper (large enough to fit your entire foot) on a flat surface. Stand on the paper and carefully trace around your foot with a pencil or marker. Make sure to keep the pencil perpendicular to the paper for an accurate outline.
2. Add Seam Allowance: Around the tracing, add a seam allowance of about 1/2 inch (1.25 cm). This extra space will allow for sewing and prevent the slippers from being too tight.
3. Design the Slipper Shape: Now, let’s turn that foot outline into a slipper shape. You have a few options here:
* Simple Slipper: Extend the outline upwards, creating a rounded or slightly pointed toe. The height of the slipper will depend on how much of your foot you want covered. A good starting point is about 3-4 inches (7.5-10 cm) above the base of your toes.
* Open-Toe Slipper: Leave the toe area open. Simply draw a curved line across the foot outline, creating an opening for your toes.
* Sandal-Style Slipper: Add straps across the top of the foot. You’ll need to create separate pattern pieces for the straps.
I personally prefer the simple slipper shape for maximum coziness, but feel free to experiment!
4. Create the Sole Pattern: Use the original foot tracing (without the seam allowance) as your sole pattern. You can also slightly round the edges for a more comfortable fit.
5. Cut Out Your Patterns: Carefully cut out both the slipper pattern and the sole pattern. These will be your templates for cutting the fabric.
Cutting the Fabric
Now that we have our patterns, it’s time to cut the fabric.
1. Prepare the Towels: Lay your towels flat on a cutting surface. If your towels are very thick, you might want to use a rotary cutter and cutting mat for easier cutting.
2. Cut the Slipper Pieces: Pin the slipper pattern to the towel fabric. You’ll need to cut two slipper pieces for each slipper (four pieces total for a pair). Make sure to cut them as mirror images of each other (flip the pattern over for the second piece). This ensures that you have a left and a right slipper.
3. Cut the Sole Pieces: Pin the sole pattern to the towel fabric. You’ll need to cut two sole pieces for each slipper (four pieces total for a pair).
4. Cut the Cardboard/Felt Soles: Pin the sole pattern to your cardboard or felt. Cut out one sole piece for each slipper (two pieces total for a pair). These will provide structure and support.
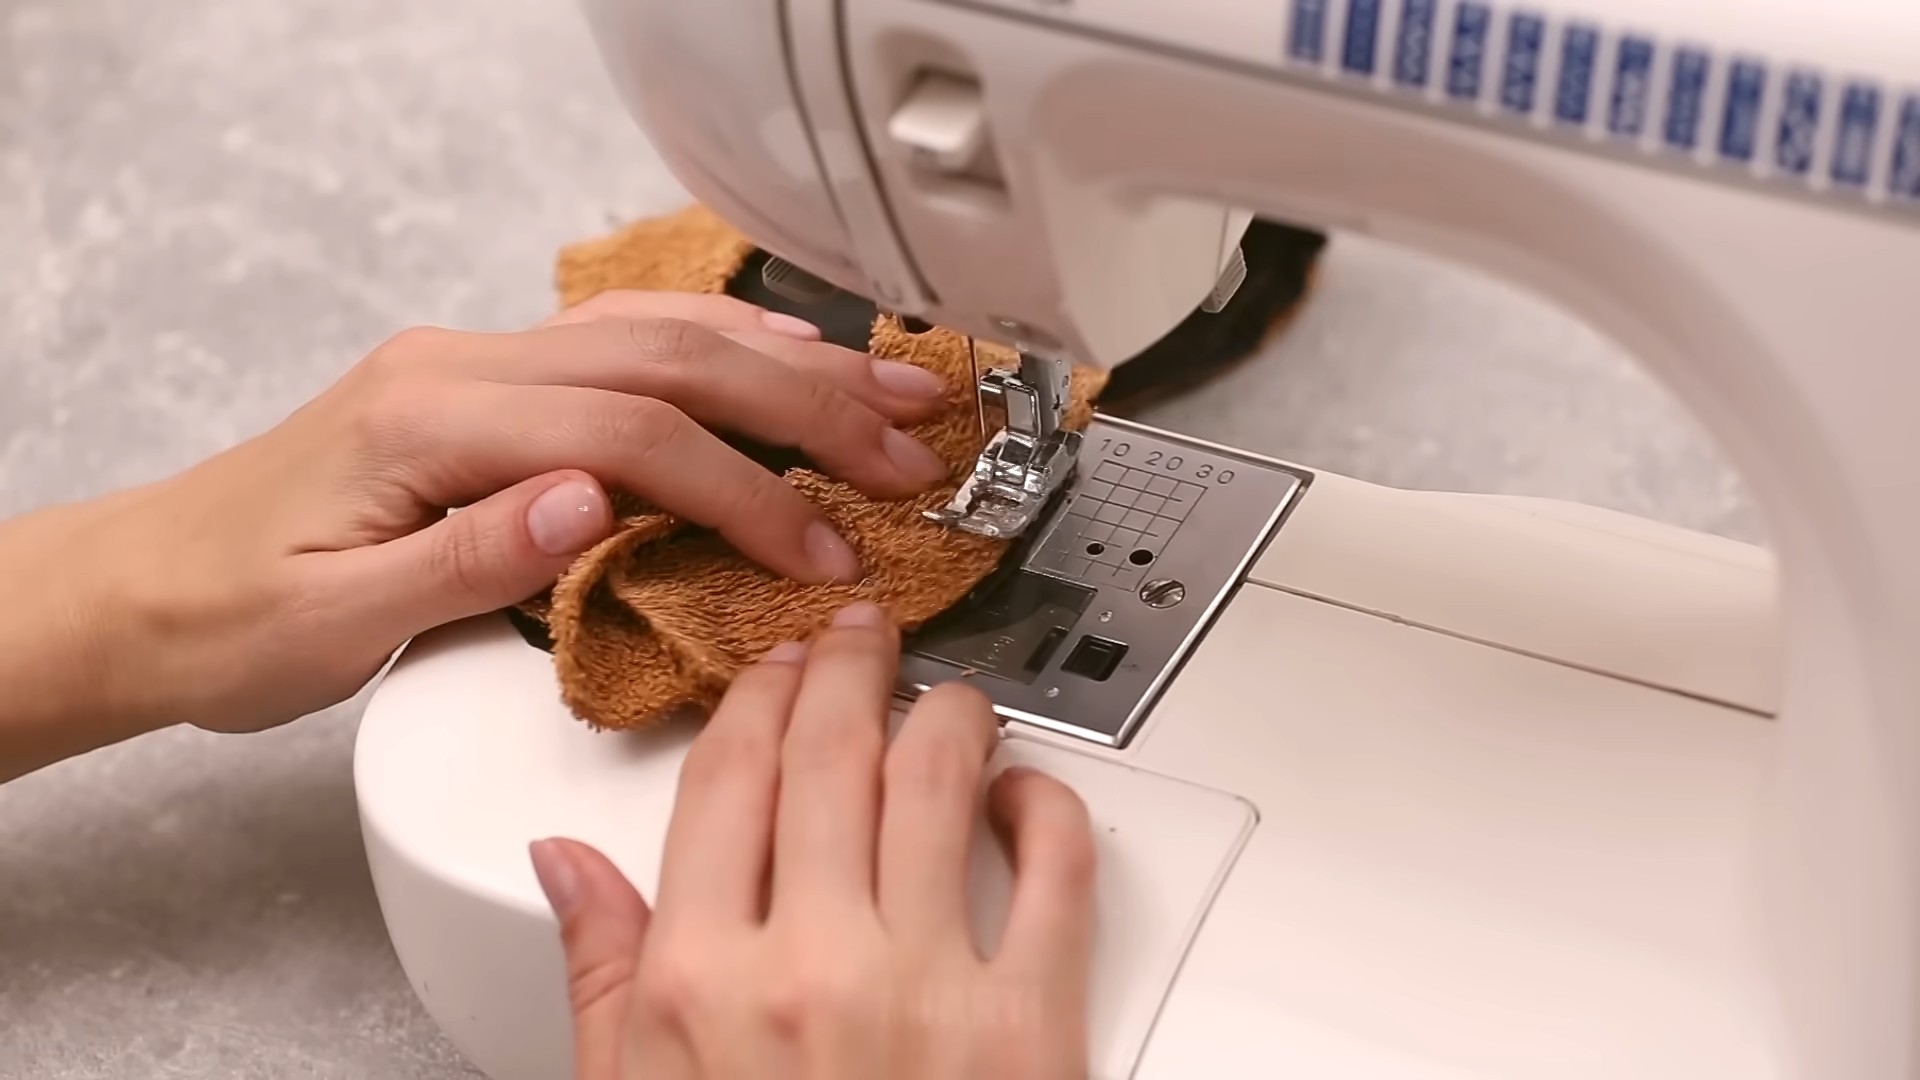
Sewing the Slippers
This is where the magic happens! We’ll be assembling the slipper pieces and creating the final shape.
1. Sew the Slipper Pieces Together: Take two slipper pieces (one left, one right) and pin them together, right sides facing each other. Sew along the curved edge, leaving the bottom edge open. Repeat for the other slipper.
2. Turn Right Side Out: Carefully turn both slipper pieces right side out. This will reveal the finished shape of the slipper.
3. Prepare the Sole Layers: Stack the sole pieces in the following order: towel sole piece, cardboard/felt sole, towel sole piece. This creates a cushioned and supportive sole.
4. Pin the Slipper to the Sole: Insert the open edge of the slipper into the sole layers, sandwiching it between the towel sole pieces. Pin the slipper securely to the sole, making sure the edges are aligned.
5. Sew the Slipper to the Sole: Sew around the entire perimeter of the sole, attaching the slipper to the sole layers. Use a strong stitch and go slowly, especially around the curves. If you’re hand-sewing, use a backstitch for extra durability.
6. Reinforce the Seams: For added strength, you can sew a second line of stitching around the sole, close to the first line. This will help prevent the seams from ripping.
7. Repeat for the Other Slipper: Follow the same steps to assemble the second slipper.
Adding Non-Slip Grips (Optional)
If you’re worried about slipping, you can add non-slip grips to the soles of your slippers.
1. Apply Fabric Paint: Use non-slip fabric paint to create dots, lines, or patterns on the soles of your slippers. Follow the instructions on the paint bottle for drying time.
2. Attach Rubber Grips: You can also purchase pre-made rubber grips and glue them to the soles of your slippers using a strong adhesive.
Embellishing Your Slippers (Optional)
Now for the fun part! Let’s add some personal touches to make your slippers extra special.
1. Add Buttons: Sew buttons onto the tops of the slippers for a decorative accent.
2. Attach Ribbon or Lace: Glue or sew ribbon or lace around the edges of the slippers for a feminine touch.
3. Embroider a Design: Embroider a simple design or your initials onto the tops of the slippers.
4. Add Pom-Poms: Attach small pom-poms to the toes of the slippers for a playful look.
Final Touches
1. Trim Any Loose Threads: Carefully trim any loose threads from the seams.
2. Try Them On! Slip on your new towel slippers and enjoy the cozy comfort!
Tips and Tricks
* Use Different Towels: Experiment with different types of towels for different textures and thicknesses.
* Adjust the Size: If your slippers are too tight, add more seam allowance to the pattern. If they’re too loose, reduce the seam allowance.
* Washable Materials: Make sure all your materials are washable so you can easily clean your slippers.
* Gift Idea: These towel slippers make a thoughtful and practical gift for friends and family.
* Durability: For extra durability, consider using a heavier-duty fabric for the soles, such as canvas or denim.
* Hand Sewing Alternative: If you don’t have a sewing machine, hand sewing is perfectly fine! Just be patient and use a strong stitch. A backstitch is recommended for durability.
* Pattern Modification: Feel free to modify the pattern to create different slipper styles. You can add a cuff around the ankle, create a mule-style slipper, or even add a wedge heel.
* Upcycling: This project is a great way to upcycle old towels and give them a new life.
* Sole Material Alternatives: If you don’t have cardboard or felt, you can use other materials for the soles, such as foam padding or even layers of thick fabric. Just make sure the material is sturdy enough to provide support.
* Non-Slip Alternatives: If you don’t have non-slip fabric paint or rubber
Conclusion
So, there you have it! Transforming old towels into cozy, custom-fit slippers is not just a fun craft project; it’s a practical and sustainable way to repurpose materials, save money, and treat your feet to some well-deserved comfort. This DIY towel slippers project is a must-try for anyone looking for a simple, eco-friendly, and rewarding activity.
Why is this a must-try? Because it addresses so many needs simultaneously. You’re reducing waste by giving old towels a new life, you’re saving money by avoiding the purchase of new slippers, and you’re creating a unique and personalized item that perfectly fits your feet. Store-bought slippers often come in limited sizes and styles, but with this DIY approach, the possibilities are endless.
Beyond the basic design, there’s a world of variations you can explore. Feeling fancy? Add a layer of fleece or faux fur to the inside for extra warmth and softness. Want more support? Insert a piece of cardboard or foam into the sole for added cushioning. You can even embellish your slippers with embroidery, buttons, or fabric paint to create a truly one-of-a-kind design.
Consider using different types of towels for varied textures and thicknesses. A thick bath towel will create a plush and supportive slipper, while a thinner hand towel might be better suited for warmer weather. Experiment with different colors and patterns to match your personal style or coordinate with your home decor.
For a spa-like experience, try adding a few drops of essential oil, like lavender or eucalyptus, to the inside of your slippers. The gentle warmth will help release the aroma, creating a relaxing and therapeutic effect. This is especially beneficial after a long day on your feet.
Don’t be afraid to get creative with the design. You can adapt the basic pattern to create different styles of slippers, such as open-toe slippers, mule slippers, or even slipper socks. The only limit is your imagination!
This project is also a great way to involve children in crafting and teach them about the importance of recycling and repurposing. They can help choose the fabrics, cut out the patterns, and decorate the finished slippers. It’s a fun and educational activity that the whole family can enjoy.
We wholeheartedly encourage you to give this DIY towel slippers project a try. It’s a simple, satisfying, and sustainable way to create something useful and beautiful from materials you already have on hand. Once you’ve made your own pair, we’d love to hear about your experience! Share your photos and tips on social media using #DIYTowelSlippers. Let’s inspire others to embrace the joy of crafting and the benefits of sustainable living. We are confident that you will love the comfort and satisfaction of wearing something you made yourself. So, gather your old towels, grab your scissors and needle, and get ready to create your own cozy and custom-made slippers!
Frequently Asked Questions (FAQ)
What kind of towels work best for making DIY slippers?
The best towels for making DIY slippers are those that are absorbent and durable. Thick bath towels are ideal for creating plush and supportive slippers, providing ample cushioning and warmth. However, you can also use thinner hand towels or even beach towels, depending on the desired thickness and texture of your slippers. Consider the weight and weave of the towel. A tightly woven towel will be more durable and less likely to fray, while a looser weave may be softer but less resistant to wear and tear. Experiment with different types of towels to find the perfect balance of comfort and durability for your needs. Remember to pre-wash the towels before cutting and sewing to prevent shrinkage and ensure a better fit.
How do I determine the right size for my towel slippers?
Determining the correct size is crucial for comfortable DIY towel slippers. The easiest way is to trace your foot onto a piece of paper while wearing socks. Add about half an inch to the outline for seam allowance and wiggle room. This will be your basic pattern. You can then adjust the pattern based on the thickness of the towel you’re using. For thicker towels, you might need to add a bit more to the width to ensure a comfortable fit. It’s always better to err on the side of slightly larger slippers, as you can always adjust them later. Consider making a test slipper from scrap fabric before cutting into your good towels to ensure the size is accurate. Remember to account for the thickness of any additional layers, such as fleece or foam, when determining the size.
Can I add a non-slip sole to my towel slippers?
Yes, adding a non-slip sole is highly recommended, especially if you plan to wear your towel slippers on hard floors. There are several ways to achieve this. You can purchase non-slip fabric or rubber sheeting from a craft store and attach it to the bottom of your slippers using fabric glue or by sewing it on. Another option is to use puffy paint or silicone sealant to create a textured surface on the soles. Simply apply dots or lines of the paint or sealant to the bottom of the slippers and let it dry completely. You can also repurpose old yoga mats or rubber placemats by cutting them to size and attaching them to the soles. For added durability, consider using a combination of methods, such as gluing a layer of non-slip fabric to the sole and then adding a layer of puffy paint for extra grip.
How do I wash and care for my DIY towel slippers?
Proper washing and care will extend the life of your DIY towel slippers. Before washing, remove any embellishments that might be damaged in the washing machine. Place the slippers in a mesh laundry bag to protect them from excessive wear and tear. Wash them in cold water on a gentle cycle with a mild detergent. Avoid using bleach, as it can damage the fabric and fade the colors. Tumble dry on low heat or, preferably, air dry them to prevent shrinkage and maintain their shape. If your slippers have a non-slip sole, check the manufacturer’s instructions for cleaning recommendations. For slippers with foam or cardboard inserts, hand washing is recommended to prevent damage. Regularly fluff and reshape your slippers to maintain their comfort and appearance.
What are some creative variations I can try with my DIY towel slippers?
The possibilities for creative variations are endless! For a luxurious feel, add a layer of fleece or faux fur to the inside of the slippers. You can also embellish them with embroidery, buttons, beads, or fabric paint to create a personalized design. Try using different colors and patterns of towels to create unique and eye-catching slippers. Consider adding a cuff or ankle strap for extra warmth and support. You can also experiment with different shapes and styles, such as open-toe slippers, mule slippers, or even slipper socks. For a spa-like experience, add a few drops of essential oil to the inside of the slippers. Get creative with the soles by using different materials, such as cork, leather, or even recycled denim. Don’t be afraid to experiment and personalize your slippers to reflect your own unique style and preferences.
Leave a Comment