

DIY Tile and Grout Cleaner: Are you tired of staring at dingy, stained tile and grout, wishing you could magically restore its sparkling glory? I know I have! It’s a common household woe, and store-bought cleaners can be expensive and filled with harsh chemicals. But don’t despair! You’re about to discover a simple, effective, and budget-friendly solution that will transform your floors and walls.
Tile has been used for centuries, dating back to ancient civilizations like the Egyptians and Romans, not just for its beauty but also for its durability and ease of cleaning. However, even the most resilient tile can fall victim to stubborn stains and grime, especially in the grout lines. That’s where this DIY trick comes in!
Let’s face it, nobody enjoys spending hours scrubbing away at tile and grout. Life is too short for that! This DIY Tile and Grout Cleaner recipe is a game-changer because it uses ingredients you probably already have in your pantry. It’s a quick, easy, and eco-friendly way to achieve professional-looking results without breaking the bank or exposing your family to harmful chemicals. Get ready to say goodbye to grimy grout and hello to a sparkling clean home!
DIY Tile and Grout Cleaner: Say Goodbye to Grime!
Okay, let’s face it: cleaning tile and grout is nobody’s favorite chore. But dingy grout can make even the cleanest bathroom or kitchen look… well, not so clean. Store-bought cleaners can be harsh and expensive, so I’m going to share my go-to DIY tile and grout cleaner recipe that’s effective, budget-friendly, and uses ingredients you probably already have in your pantry!
What You’ll Need: The Arsenal of Clean
Before we dive in, let’s gather our supplies. This is a simple recipe, so you won’t need anything fancy.
* Baking Soda: This is our gentle abrasive. It helps lift dirt and grime without scratching your tile.
* Hydrogen Peroxide (3%): This is a mild disinfectant and bleaching agent. It helps brighten grout and kill mold and mildew.
* Dish Soap (Dawn is my favorite!): This helps cut through grease and grime. A little goes a long way!
* Spray Bottle: For applying the cleaner to the tile and grout.
* Old Toothbrush or Grout Brush: For scrubbing those stubborn stains. An electric toothbrush with a small brush head can also work wonders!
* Sponge or Cloth: For wiping away the cleaner and rinsing the tile.
* Gloves: To protect your hands from the cleaning solution.
* Small Bowl: For mixing the paste (if you choose that method).
* Optional: White Vinegar: For extra stubborn stains or mold. (Use with caution and *never* mix with bleach!)
* Optional: Essential Oils (Tea Tree, Lemon, or Eucalyptus): For a fresh, clean scent.
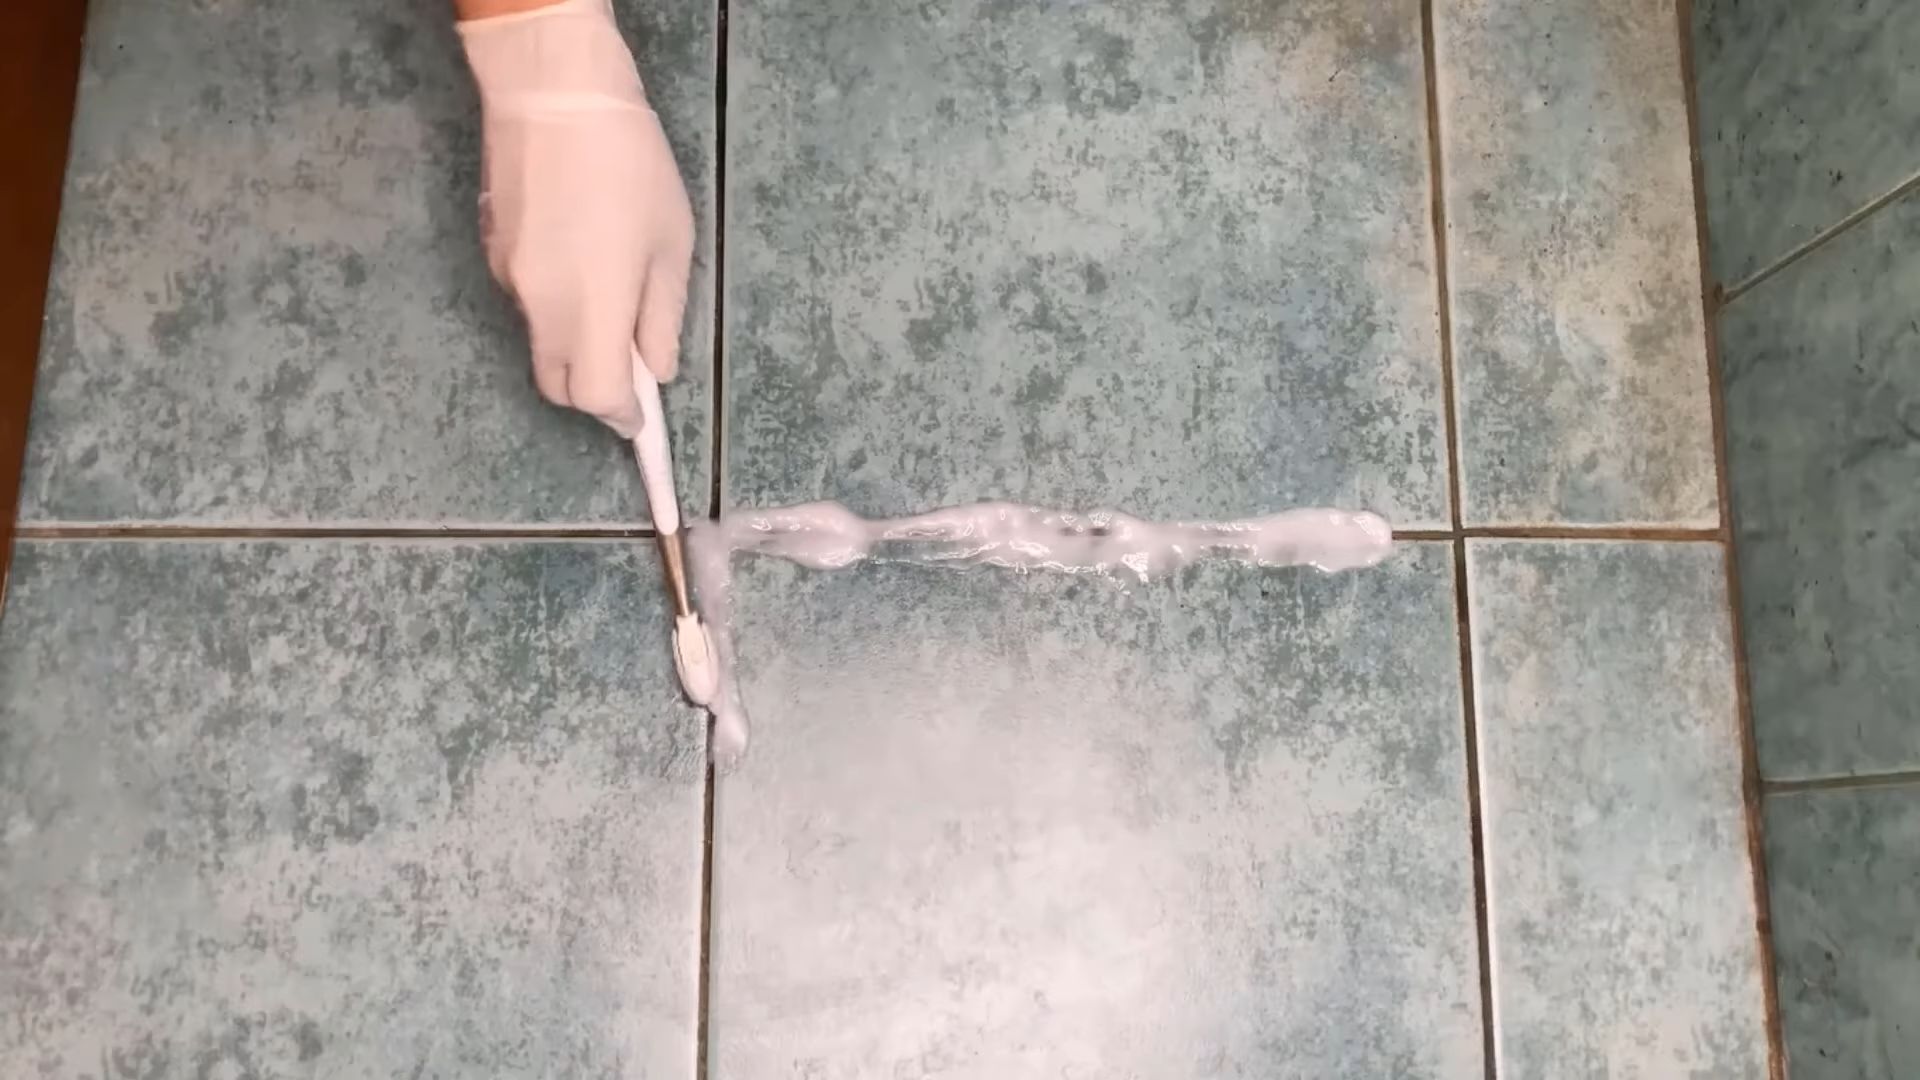
Method 1: The Baking Soda Paste Powerhouse
This method is great for tackling really tough stains and heavily soiled grout. It requires a little more elbow grease, but the results are worth it!
Step-by-Step Instructions: Paste Perfection
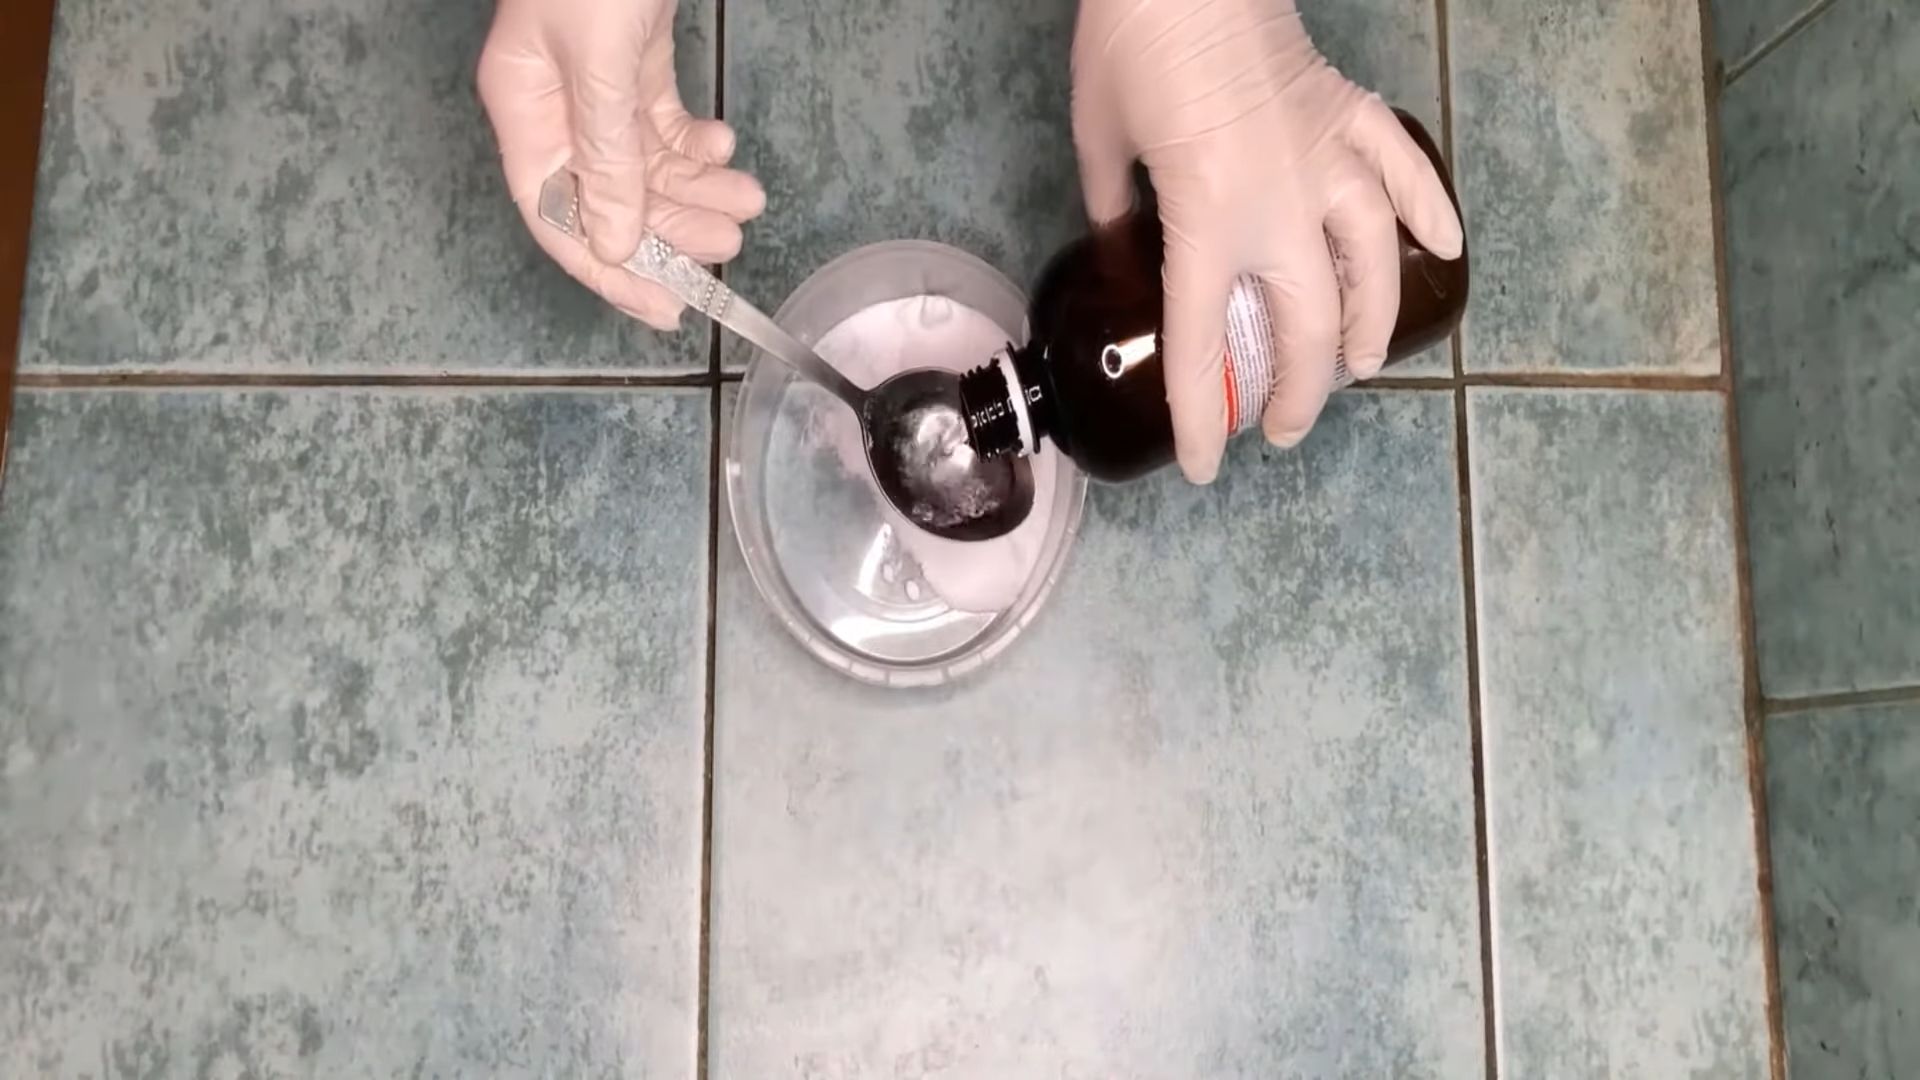
1. Mix the Paste: In your small bowl, combine baking soda and hydrogen peroxide to form a thick paste. You’ll want a consistency similar to toothpaste. Start with about 1/2 cup of baking soda and slowly add hydrogen peroxide until you reach the desired consistency. I usually add a tablespoon at a time.
2. Apply the Paste: Using your fingers (with gloves on, of course!) or a small spatula, apply the paste generously to the grout lines. Make sure to cover the entire area you want to clean.
3. Let it Sit: This is the key! Let the paste sit on the grout for at least 5-10 minutes. For really stubborn stains, you can let it sit for up to 30 minutes. The longer it sits, the more time the baking soda and hydrogen peroxide have to work their magic.
4. Scrub-a-dub-dub: Now comes the fun part (okay, maybe not *fun*, but satisfying!). Using your old toothbrush or grout brush, scrub the grout lines vigorously. You’ll see the grime start to lift away.
5. Rinse and Repeat (if needed): Rinse the area thoroughly with water. Use a sponge or cloth to wipe away any remaining paste. If the grout is still stained, repeat the process.
6. Dry and Admire: Once you’re satisfied with the results, dry the tile and grout with a clean towel. Step back and admire your sparkling clean grout!
Method 2: The Spray-and-Wipe Wonder
This method is perfect for regular maintenance cleaning and lighter stains. It’s quicker and easier than the paste method.
Step-by-Step Instructions: Spray Away the Grime
1. Prepare the Spray: In your spray bottle, combine the following:
* 1 cup of hydrogen peroxide
* 1 tablespoon of dish soap
* Optional: 5-10 drops of your favorite essential oil (tea tree is great for its antibacterial properties).
2. Shake it Up: Gently shake the spray bottle to mix the ingredients.
3. Spray and Let Sit: Spray the cleaner liberally onto the tile and grout. Let it sit for 3-5 minutes to allow the solution to penetrate the grime.
4. Scrub Lightly: Using your toothbrush or grout brush, lightly scrub the grout lines. You shouldn’t need to scrub as hard as you did with the paste method.
5. Wipe and Rinse: Wipe away the cleaner with a damp sponge or cloth. Rinse the area thoroughly with water.
6. Dry and Shine: Dry the tile and grout with a clean towel. Enjoy your sparkling clean surfaces!
Dealing with Stubborn Stains: The Vinegar Boost
Sometimes, you’ll encounter stains that just won’t budge with the baking soda and hydrogen peroxide alone. That’s where white vinegar comes in.
Important Safety Note: Never mix vinegar with bleach! This can create dangerous fumes.
Step-by-Step Instructions: Vinegar Victory
1. Test First: Before applying vinegar to a large area, test it on a small, inconspicuous spot to make sure it doesn’t damage your tile or grout.
2. Apply Vinegar: Pour or spray white vinegar directly onto the stained grout.
3. Let it Fizz: Let the vinegar sit for 5-10 minutes. You might see some fizzing, which is a good sign that it’s working.
4. Scrub and Rinse: Scrub the grout with your toothbrush or grout brush. Rinse thoroughly with water.
5. Repeat if Necessary: If the stain is still present, repeat the process.
Tips and Tricks for Tile and Grout Cleaning Success
* Ventilation is Key: Always make sure you have good ventilation when cleaning, especially when using hydrogen peroxide or vinegar. Open windows and turn on a fan.
* Protect Your Skin: Wear gloves to protect your hands from the cleaning solution.
* Spot Test First: Before cleaning a large area, always test the cleaner on a small, inconspicuous spot to make sure it doesn’t damage your tile or grout.
* Regular Cleaning is Easier: The more often you clean your tile and grout, the easier it will be to keep them looking their best. Aim to clean your tile and grout at least once a month.
* Dry After Cleaning: After cleaning, dry the tile and grout thoroughly to prevent mold and mildew growth.
* Consider a Grout Sealer: Once your grout is clean, consider applying a grout sealer to help protect it from future stains.
* For Colored Grout: Be extra cautious when cleaning colored grout, as some cleaners can cause discoloration. Test in an inconspicuous area first.
* Steam Cleaners: A steam cleaner can be a great way to clean tile and grout without using harsh chemicals.
Preventative Measures: Keeping Grout Clean Longer
* Wipe Up Spills Immediately: The sooner you wipe up spills, the less likely they are to stain your grout.
* Use a Doormat: Place a doormat at entrances to trap dirt and debris before it gets tracked onto your tile floors.
* Ventilate Bathrooms: Run the exhaust fan in your bathroom during and after showers to help prevent mold and mildew growth.
* Squeegee Shower Walls: After each shower, squeegee the walls to remove excess water and prevent water spots and mildew.
Troubleshooting Common Tile and Grout Problems
* Mold and Mildew: For mold and mildew, hydrogen peroxide and tea tree oil are your best friends. You can also try a solution of bleach and water (1 part bleach to 10 parts water), but be sure to ventilate the area well and wear gloves.
* Hard Water Stains: For hard water stains, vinegar is your go-to solution.
* Grease Stains: For grease stains, dish soap is your best bet. You can also try a paste of baking soda and water.
* Rust Stains: For rust stains, try a commercial rust remover or a paste of lemon juice and salt.
I hope these tips and tricks help you achieve sparkling clean tile and grout! Happy cleaning!
Conclusion
So, there you have it! A simple, effective, and budget-friendly way to tackle grimy tile and grout without resorting to harsh chemicals. This DIY Tile and Grout Cleaner recipe is more than just a cleaning solution; it’s a testament to the power of natural ingredients and a commitment to a healthier home environment. We’ve walked you through the process, highlighting the ease of preparation and the remarkable results you can achieve.
But why is this DIY trick a must-try? Beyond the cost savings and the avoidance of potentially harmful chemicals, it’s about control. You know exactly what’s going into your cleaner, and you can adjust the recipe to suit your specific needs. Have particularly stubborn stains? A little extra baking soda might do the trick. Dealing with mold or mildew? A higher concentration of hydrogen peroxide could be beneficial. The beauty of this DIY approach lies in its adaptability.
Consider these suggestions and variations to further personalize your cleaning experience:
* Essential Oil Boost: Add a few drops of your favorite essential oil, such as tea tree (known for its antimicrobial properties), lemon (for its degreasing power and fresh scent), or lavender (for a calming aroma). This not only enhances the cleaning power but also leaves your bathroom or kitchen smelling wonderful.
* Vinegar Infusion: For extra cleaning power, especially on tough stains, consider infusing your vinegar with citrus peels for a few weeks before using it in the recipe. The citrus oils will add an extra layer of cleaning and deodorizing power.
* Paste Variation: If you prefer a thicker consistency, create a paste by adding more baking soda until you achieve the desired texture. This is particularly useful for vertical surfaces like shower walls.
* Color-Safe Bleach Alternative: For colored grout, test the hydrogen peroxide in an inconspicuous area first to ensure it doesn’t cause any discoloration. You can also dilute the hydrogen peroxide with water to reduce its bleaching effect.
We understand that trying something new can sometimes feel daunting, but we urge you to give this DIY Tile and Grout Cleaner a try. The ingredients are readily available, the process is straightforward, and the results speak for themselves. Imagine stepping into a bathroom with sparkling clean tiles and grout, knowing that you achieved it with a safe and natural solution.
Don’t just take our word for it! We encourage you to experiment with this recipe, adapt it to your specific needs, and most importantly, share your experience with us. Let us know what variations you tried, what worked best for you, and any tips or tricks you discovered along the way. Your feedback will not only help us improve this recipe but also inspire others to embrace the power of DIY cleaning.
So, grab your ingredients, put on your cleaning gloves, and get ready to transform your tiles and grout. We’re confident that you’ll be amazed by the results. Happy cleaning!
Frequently Asked Questions (FAQ)
What kind of vinegar should I use?
White distilled vinegar is the best choice for cleaning. It’s inexpensive, readily available, and has a high acidity level, making it effective at cutting through grime and killing bacteria. Avoid using other types of vinegar, such as apple cider vinegar or balsamic vinegar, as they may contain sugars or coloring that could stain your grout.
Is hydrogen peroxide safe to use on all types of tile and grout?
While hydrogen peroxide is generally safe for most tile and grout, it’s always a good idea to test it in an inconspicuous area first, especially on colored grout or natural stone tiles. Hydrogen peroxide has a mild bleaching effect, so it could potentially lighten colored grout. If you’re concerned about discoloration, dilute the hydrogen peroxide with water or use a color-safe bleach alternative.
How often should I clean my tile and grout with this DIY cleaner?
The frequency of cleaning depends on the amount of foot traffic and the level of dirt and grime buildup. For high-traffic areas like bathrooms and kitchens, cleaning once a week is recommended. For less frequently used areas, cleaning every two to four weeks may be sufficient. Regular cleaning will prevent dirt and grime from becoming deeply embedded in the grout, making it easier to maintain.
Can I use this cleaner on other surfaces besides tile and grout?
This DIY Tile and Grout Cleaner is primarily designed for tile and grout, but it can also be used on other surfaces, such as porcelain sinks, bathtubs, and shower stalls. However, it’s important to test it in an inconspicuous area first to ensure it doesn’t damage the surface. Avoid using it on delicate surfaces like marble or granite, as the vinegar could etch the stone.
What if I don’t have hydrogen peroxide? Can I substitute it with something else?
If you don’t have hydrogen peroxide, you can substitute it with a mixture of water and bleach. However, bleach is a much harsher chemical than hydrogen peroxide, so it’s important to use it with caution. Always wear gloves and eye protection when working with bleach, and ensure the area is well-ventilated. Mix 1 part bleach with 10 parts water, and test it in an inconspicuous area before applying it to the entire surface.
The grout in my shower is heavily stained with mold and mildew. Will this cleaner be effective?
This DIY cleaner can be effective at removing mold and mildew, but for heavily stained grout, you may need to use a stronger solution. Increase the concentration of hydrogen peroxide or use a bleach solution as described above. You can also try applying the cleaner directly to the grout and letting it sit for 15-20 minutes before scrubbing. For stubborn stains, you may need to repeat the process several times. Consider using a grout brush with stiff bristles to scrub the grout thoroughly.
How do I prevent mold and mildew from growing in my shower?
Preventing mold and mildew growth is key to keeping your shower clean and healthy. Here are a few tips:
* Ventilate your bathroom: Always run the exhaust fan during and after showering to remove excess moisture.
* Dry the shower after each use: Use a squeegee or towel to wipe down the walls and floor after showering.
* Clean regularly: Clean your shower at least once a week to prevent dirt and grime from building up.
* Seal your grout: Apply a grout sealer to protect the grout from moisture and stains.
* Address leaks promptly: Repair any leaks in your shower or bathroom to prevent water damage and mold growth.
Can I store the leftover cleaner? If so, how long will it last?
Yes, you can store the leftover cleaner in a sealed container. It’s best to store it in a dark, cool place to prevent the hydrogen peroxide from degrading. The cleaner should last for several weeks, but it’s best to use it within a month for optimal effectiveness. If you notice any changes in color or consistency, discard the cleaner.
Leave a Comment