

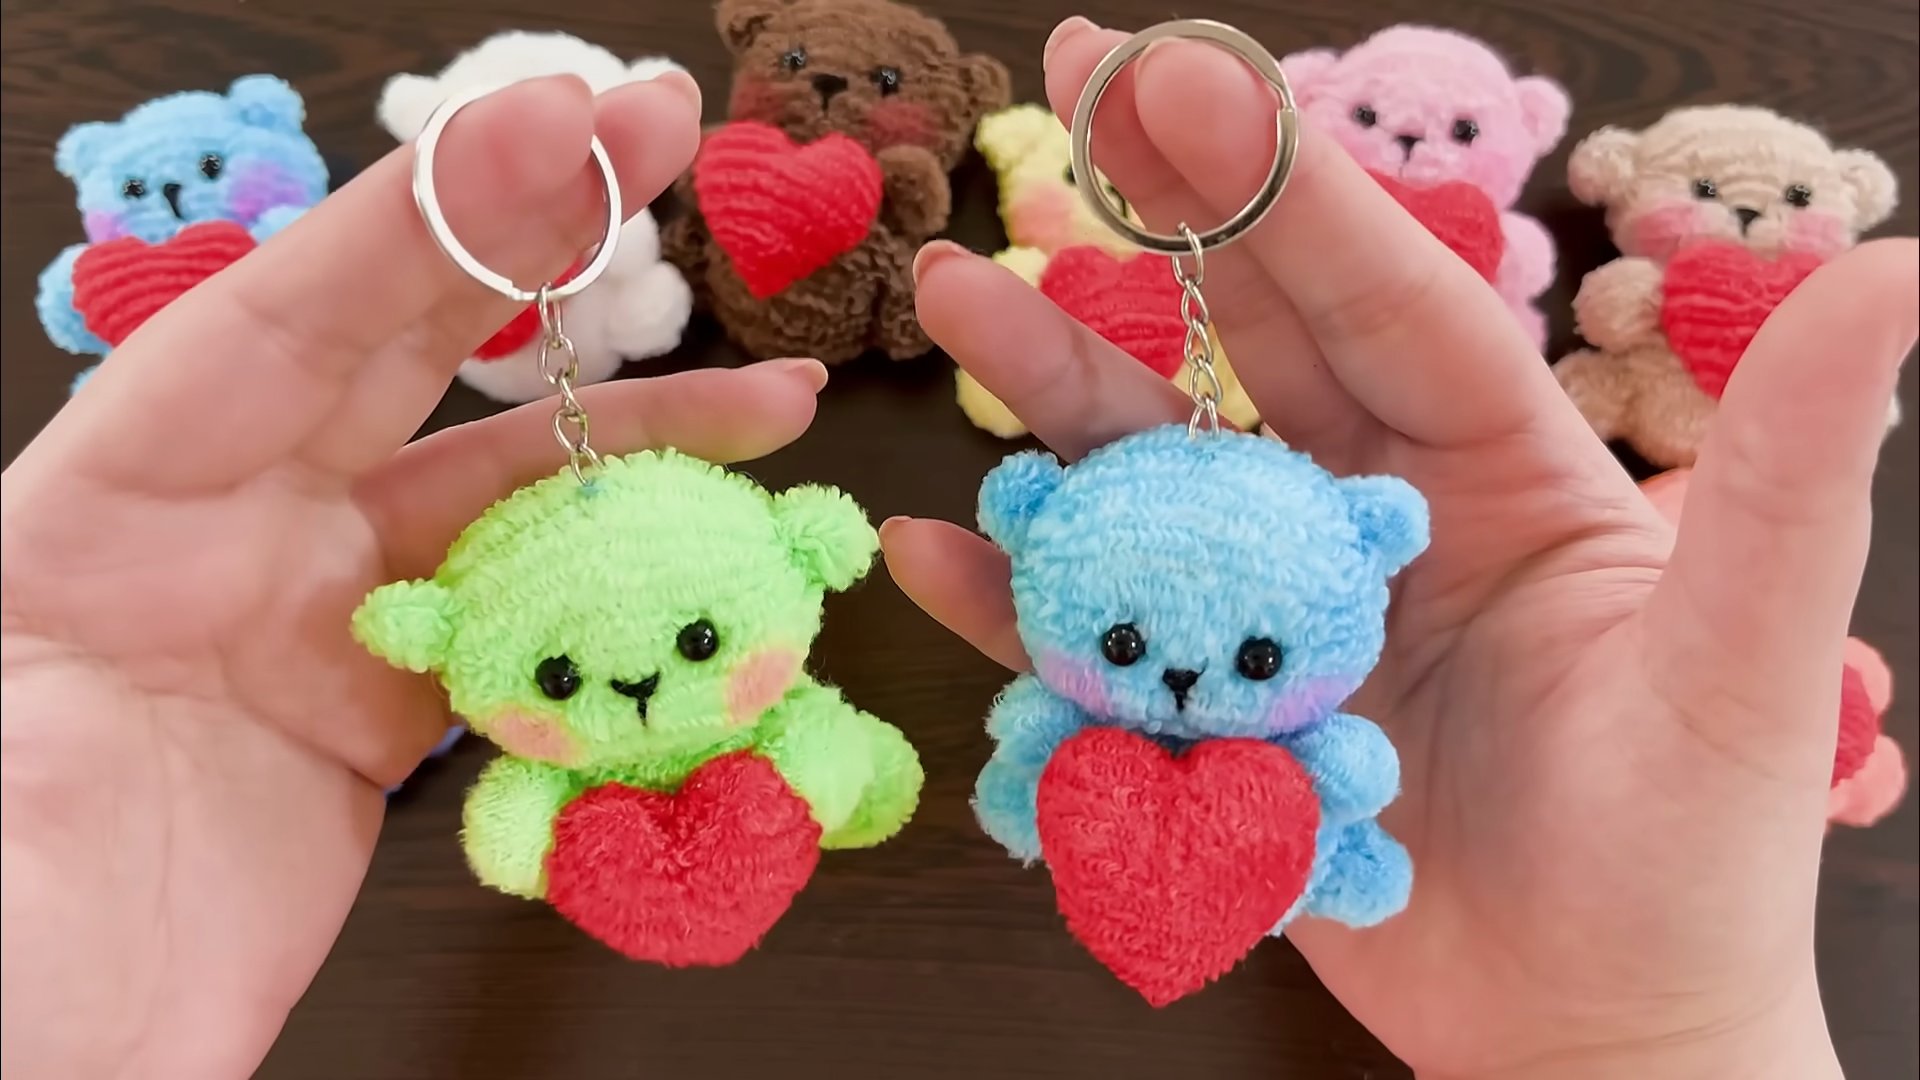
DIY Teddy Bear Keychain: Who doesn’t love a cute and cuddly accessory? I know I do! And what’s better than a keychain that’s not only adorable but also handmade with love? This isn’t just about adding a trinket to your keys; it’s about crafting a little piece of joy that you can carry with you everywhere.
The history of teddy bears is surprisingly heartwarming, dating back to the early 20th century and inspired by President Theodore “Teddy” Roosevelt. These cuddly companions quickly became a symbol of comfort and affection. Now, we’re taking that same sentiment and shrinking it down into a delightful DIY Teddy Bear Keychain project!
In today’s fast-paced world, we often crave a touch of personalization and creativity. Store-bought keychains are fine, but they lack that special something. This DIY project allows you to express your unique style, use up scrap materials, and create a truly one-of-a-kind accessory. Plus, it’s a fantastic way to de-stress and engage in a mindful activity. Whether you’re looking for a fun weekend project, a thoughtful gift idea, or simply a way to add some charm to your everyday life, this tutorial is for you. Let’s get crafting!
DIY Adorable Teddy Bear Keychain: A Step-by-Step Guide
Okay, let’s get crafty! I’m going to walk you through creating the cutest little teddy bear keychain you’ve ever seen. This project is perfect for using up scrap fabric, adding a personal touch to your keys, or even making a sweet little gift. Don’t worry if you’re not a sewing pro; I’ll break it down into easy-to-follow steps.
Materials You’ll Need
Before we dive in, let’s gather our supplies. Here’s what you’ll need:
* Fabric: Felt is fantastic for beginners because it doesn’t fray easily, but you can use any soft fabric you like – fleece, cotton, even upcycled sweater scraps! Choose a color you love for your teddy bear. You’ll need a small piece, about 6×6 inches should be plenty.
* Stuffing: Polyester fiberfill is the classic choice, but you can also use cotton balls, fabric scraps, or even rice (if you want a slightly heavier bear).
* Embroidery Floss or Thread: Choose a color that complements your fabric. Brown, black, or even a contrasting color can work well.
* Embroidery Needle: A sharp needle with a large eye will make threading easier.
* Scissors: Fabric scissors are ideal, but sharp regular scissors will do in a pinch.
* Keychain Ring: You can find these at most craft stores or online.
* Jump Ring (Optional): A small jump ring can make attaching the keychain ring easier and more secure.
* Pencil or Fabric Marker: For tracing the pattern.
* Teddy Bear Pattern: I’ll provide a simple pattern below, or you can find tons of free patterns online.
* Pins: To hold the fabric pieces together while sewing.
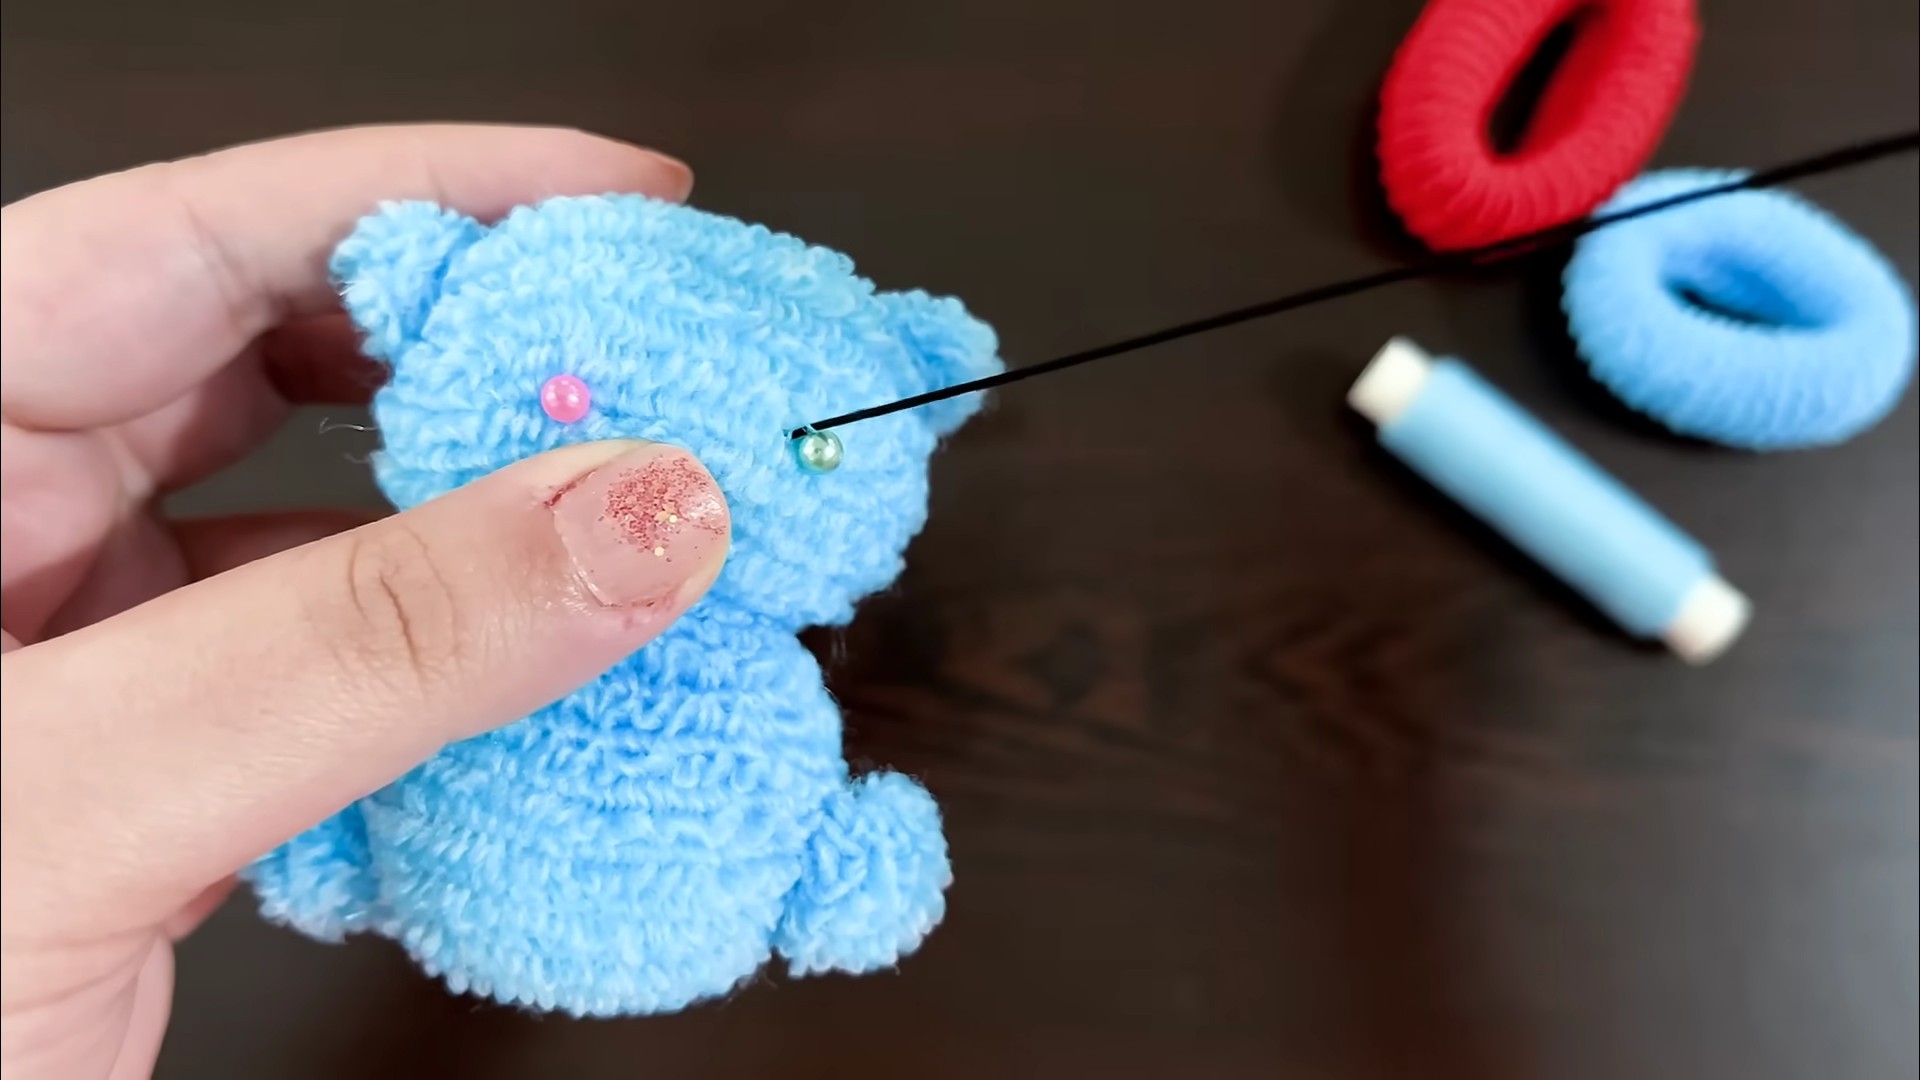
* Small Beads or Safety Eyes (Optional): For the eyes. If you’re making this for a small child, I recommend using embroidery instead of beads for safety.
* Hot Glue Gun (Optional): For attaching small details like the nose or eyes, but sewing is always a more secure option.
Teddy Bear Pattern
Here’s a simple pattern you can use. Feel free to adjust the size to your liking! You can draw this freehand or print it out. The pattern consists of:
* Body: A basic bear shape. Think of a slightly rounded rectangle with a head on top.
* Head: A circle or oval shape that fits nicely on top of the body.
* Ears: Two small circles.
* Snout: A small oval or circle for the nose area.
Creating Your Teddy Bear: Step-by-Step
Alright, let’s get started!
1. Print or Draw Your Pattern: First, print out the teddy bear pattern I provided, or draw your own on a piece of paper. Remember, you can adjust the size to make your keychain as big or small as you want.
2. Cut Out the Pattern Pieces: Carefully cut out each piece of your pattern: the body, head, ears, and snout.
3. Trace the Pattern onto Fabric: Place the pattern pieces onto your chosen fabric. Use a pencil or fabric marker to trace around each piece. Remember to trace *two* body pieces, *two* head pieces, and *four* ear pieces (two for each ear). For the snout, you only need one piece.
4. Cut Out the Fabric Pieces: Now, carefully cut out all the fabric pieces you traced. Try to cut as accurately as possible along the lines for a neat finish.
5. Sew the Ears: Take two ear pieces and place them right sides together (if your fabric has a right and wrong side). Sew around the curved edge of the ear, leaving the bottom straight edge open. Repeat for the other ear.
6. Turn the Ears Right Side Out: Carefully turn the ears right side out. You can use a pencil or chopstick to gently push the fabric out.
7. Sew the Snout: If you’re using a separate snout piece, position it on one of the head pieces. You can either sew it on by hand using a running stitch or use a hot glue gun to attach it. If you’re sewing, make sure to secure the thread well.
8. Attach the Ears to the Head: Position the ears on the front head piece, where you want them to be. Pin them in place to hold them steady. Sew them onto the head using a few small stitches. Make sure they are securely attached.
9. Embroider the Face: Now it’s time to give your teddy bear some personality! Use embroidery floss to create the eyes and nose. For the eyes, you can use small French knots or simple straight stitches. For the nose, you can create a small triangle or oval shape. If you’re using beads or safety eyes, now is the time to attach them. If using safety eyes, make sure they are securely fastened. If using beads, sew them on tightly.
10. Sew the Head to the Body: Place the completed head piece onto one of the body pieces, aligning the bottom of the head with the top of the body. Pin them together. Sew the head to the body using a running stitch or a blanket stitch.
11. Sew the Body Pieces Together: Place the front body piece (with the head attached) onto the back body piece, right sides together. Pin all around the edges, leaving a small opening at the bottom for stuffing.
12. Sew Around the Body: Sew around the entire body, leaving the opening at the bottom unsewn. Use a back stitch or a blanket stitch for a strong and decorative seam.
13. Turn the Body Right Side Out: Carefully turn the teddy bear right side out through the opening at the bottom. Use a pencil or chopstick to gently push out the arms and legs.
14. Stuff the Teddy Bear: Now it’s time to give your teddy bear some shape! Stuff the body firmly with polyester fiberfill, cotton balls, or your chosen stuffing material. Make sure to stuff it evenly to avoid any lumps.
15. Close the Opening: Once the teddy bear is stuffed to your liking, it’s time to close the opening at the bottom. Fold the raw edges of the fabric inward and pin them together. Sew the opening closed using a ladder stitch or a whip stitch.
16. Attach the Keychain Ring: Now for the final touch! Decide where you want to attach the keychain ring. The top of the head is usually a good spot. Use a needle and thread to create a loop at the top of the head. If you’re using a jump ring, attach it to the loop first, then attach the keychain ring to the jump ring. This will make the keychain more secure.
17. Secure the Keychain: Make sure the keychain ring is securely attached. Reinforce the stitches if necessary.
Adding Extra Touches (Optional)
Want to make your teddy bear even more special? Here are a few ideas:
* Add a Bow: Tie a small ribbon around the teddy bear’s neck for a cute touch.
* Embroider Initials: Personalize the teddy bear by embroidering initials on its belly.
* Add a Tiny Outfit: Create a miniature vest or scarf for your teddy bear.
* Use Different Fabrics: Experiment with different fabrics and textures to create a unique look.
* Add a Scent: Place a few drops of essential oil on the stuffing for a scented teddy bear. Lavender is a calming choice.
Tips and Tricks
* Use a Thimble: If you’re having trouble pushing the needle through the fabric, use a thimble to protect your finger.
* Practice Your Stitches: Before you start sewing the teddy bear, practice your stitches on a scrap piece of fabric.
* Don’t Be Afraid to Experiment: This is your project, so feel free to get creative and add your own personal touches.
* Take Your Time: Don’t rush the process. Enjoy the journey of creating something special.
* Secure Your Knots: Always make sure to tie secure knots at the beginning and end of your stitches to prevent them from unraveling.
* Iron Your Fabric: Ironing your fabric before you start cutting will make it easier to work with and give your finished product a neater look.
* Use a Walking Foot (If You Have One): If you’re using a sewing machine, a walking foot can help prevent the fabric from slipping while you sew.
* Clip Curves: When sewing curves, clip the seam allowance to reduce bulk and allow the fabric to lie flat.
* Turn Carefully: When turning the teddy bear right side out, be gentle to avoid tearing the seams.
* Stuff Firmly: Stuff the teddy bear firmly to give it
Conclusion
So, there you have it! Transforming a simple teddy bear into a charming and personalized keychain is not only incredibly easy but also a fantastic way to add a touch of whimsy to your everyday life. This DIY teddy bear keychain project is more than just a craft; it’s an opportunity to express your creativity, repurpose an old toy, or create a heartfelt, handmade gift for someone special.
Why is this a must-try? Because it’s quick, affordable, and yields a result that’s both adorable and functional. Think about it: you can carry a little piece of nostalgia with you wherever you go, or give a unique, personalized present that truly shows you care. Forget mass-produced keychains; this DIY project allows you to create something truly one-of-a-kind.
But the fun doesn’t stop there! Feel free to experiment with different variations to truly make it your own. Consider using different types of teddy bears – perhaps a miniature bear, a vintage bear, or even a bear made from a special fabric. You could also embellish your keychain with beads, sequins, ribbons, or even small charms that reflect the recipient’s personality or interests. Imagine adding a tiny initial charm for a personalized touch, or a miniature musical instrument charm for a music lover.
Another fantastic variation is to create themed keychains. For example, you could create a holiday-themed keychain with a small Santa hat or reindeer antlers for Christmas, or a spooky ghost or pumpkin for Halloween. The possibilities are truly endless! You can even use different types of keychains, like a carabiner clip for attaching to a backpack or a split ring for holding multiple keys.
Don’t be afraid to get creative with the bear itself. You could dye the fur a different color, add patches or embroidery, or even give it a little makeover with some fabric paint. If you’re feeling particularly ambitious, you could even try creating your own miniature teddy bear from scratch using felt or other materials.
The beauty of this project lies in its simplicity and versatility. It’s a perfect activity for a rainy day, a fun project to do with kids, or a relaxing way to unwind after a long day. Plus, it’s a great way to reduce waste by repurposing old toys that might otherwise end up in the landfill.
We wholeheartedly encourage you to give this DIY teddy bear keychain project a try. It’s a rewarding experience that will leave you with a charming and personalized accessory that you’ll be proud to show off. And most importantly, we want to hear about your creations! Share your photos and stories with us on social media using #DIYTeddyBearKeychain. We can’t wait to see what you come up with! Let your imagination run wild and create a keychain that truly reflects your unique style and personality. Happy crafting!
Frequently Asked Questions (FAQ)
What kind of teddy bear is best for making a keychain?
The best type of teddy bear for a keychain depends on your personal preference and the size you desire. Smaller teddy bears, often referred to as miniature or pocket-sized bears, are ideal as they won’t be too bulky on your keychain. However, you can certainly use a larger bear if you prefer a more substantial keychain. Consider the weight of the bear as well; a lighter bear will be more comfortable to carry around. Vintage teddy bears can add a unique charm, but ensure they are in good condition before attaching them to a keychain. Ultimately, choose a bear that you love and that fits your desired aesthetic.
How do I securely attach the keychain ring to the teddy bear?
The most secure method is to use a sturdy eye pin and strong adhesive. First, carefully create a small hole at the top of the teddy bear’s head, preferably in a reinforced area like a seam. Insert the eye pin into the hole, making sure it goes deep enough to be securely anchored. Apply a generous amount of strong adhesive, such as E6000 or a similar industrial-strength glue, around the base of the eye pin where it meets the teddy bear’s fur. Allow the adhesive to dry completely according to the manufacturer’s instructions. Once the adhesive is dry, attach the keychain ring to the eye pin. For added security, you can reinforce the area around the eye pin with a small piece of felt or fabric glued to the back of the bear’s head.
What if I don’t have an eye pin? Are there alternative ways to attach the keychain?
Yes, there are several alternatives! One option is to use a sturdy needle and thread to create a loop at the top of the teddy bear’s head. Reinforce the loop several times to ensure it’s strong enough to hold the keychain. Then, attach the keychain ring to the loop. Another option is to use a small metal jump ring. Create a small hole in the teddy bear’s head and insert the jump ring. Use pliers to close the jump ring securely. You can also sew the jump ring in place for added reinforcement. If you’re using a larger teddy bear, you might consider using a small metal D-ring, which can be sewn onto the back of the bear’s head.
Can I wash the teddy bear keychain?
It’s generally not recommended to fully submerge your DIY teddy bear keychain in water, especially if you’ve used glue or other adhesives. However, you can spot clean it with a damp cloth and mild soap. Gently dab the soiled areas and avoid getting the keychain ring or any embellishments wet. Allow the teddy bear to air dry completely before using it again. For more delicate teddy bears, you might consider using a dry cleaning sponge or a specialized fabric cleaner.
What kind of embellishments can I add to my teddy bear keychain?
The possibilities are endless! You can add beads, sequins, ribbons, charms, buttons, felt shapes, fabric paint, embroidery, or even small pieces of jewelry. Consider the overall aesthetic you’re aiming for and choose embellishments that complement the teddy bear’s color and style. For example, you could add a small bow tie for a more formal look, or a tiny flower crown for a whimsical touch. If you’re creating a themed keychain, choose embellishments that reflect the theme, such as miniature holiday ornaments or sports-related charms.
How can I make the keychain more durable?
To increase the durability of your DIY teddy bear keychain, use high-quality materials and reinforce all attachments. Choose a sturdy keychain ring and a strong adhesive. When attaching the eye pin or jump ring, make sure it’s securely anchored and that the adhesive is fully cured. Consider adding a protective coating, such as a fabric sealant, to the teddy bear’s fur to prevent wear and tear. Avoid exposing the keychain to excessive moisture or harsh chemicals. Regularly inspect the keychain for any signs of damage and repair them promptly.
Is this project suitable for children?
This project can be suitable for children with adult supervision. Younger children may need assistance with tasks such as creating the hole for the eye pin and using the adhesive. Ensure that children are using child-safe adhesives and that they are supervised when using sharp objects like needles or scissors. This project can be a fun and creative activity for children, but safety should always be the top priority.
Where can I find inspiration for my DIY teddy bear keychain?
There are many sources of inspiration online! Browse Pinterest, Instagram, and other social media platforms for ideas and tutorials. Search for “DIY keychain ideas,” “teddy bear crafts,” or “personalized keychains” to find a wealth of inspiration. You can also find inspiration in everyday life. Consider the recipient’s hobbies, interests, and favorite colors when designing your keychain. Let your imagination run wild and don’t be afraid to experiment with different materials and techniques.


Leave a Comment