

DIY Teacher’s Day Card: Show your appreciation with a heartfelt, handmade gift! Let’s be honest, finding the perfect Teacher’s Day gift can be a real challenge. Store-bought cards often feel impersonal, and sometimes, the best way to express gratitude is through something you’ve created yourself. That’s where the magic of DIY comes in!
The tradition of celebrating teachers dates back centuries, with roots in various cultures recognizing the vital role educators play in shaping future generations. From simple tokens of appreciation to elaborate ceremonies, the sentiment remains the same: teachers deserve our thanks. And what better way to say “thank you” than with a unique, personalized DIY Teacher’s Day card?
In this article, I’m going to share some fun and easy DIY card ideas that will not only save you money but also allow you to add a personal touch that your teacher will truly cherish. We’ll explore different techniques, from simple paper crafts to more elaborate designs, ensuring there’s something for everyone, regardless of your crafting skills. So, grab your scissors, glue, and let’s get crafting! Because a handmade card speaks volumes, and it’s a wonderful way to show your teacher just how much you appreciate their hard work and dedication.
DIY Teacher’s Day Card: A Heartfelt Handmade Gift
Let’s create a beautiful and personalized Teacher’s Day card that your teacher will truly cherish! Forget store-bought cards; this year, we’re going the extra mile with a handmade masterpiece. I’ll guide you through each step, making it easy and fun.
Materials You’ll Need
Before we dive in, gather these supplies. Don’t worry if you don’t have everything; get creative and substitute with what you have on hand!
* Cardstock: Choose your teacher’s favorite color or a classic white. A heavier weight cardstock (around 80-100 lb) will give your card a more professional feel.
* Construction Paper: For adding colorful accents and layering.
* Scissors: A good pair of scissors is essential for clean cuts.
* Glue Stick or Liquid Glue: I prefer a glue stick for less mess, but liquid glue works well too. Just be careful not to use too much!
* Ruler: For measuring and creating straight lines.
* Pencil: For sketching and outlining your design.
* Markers, Colored Pencils, or Crayons: To add color and detail to your card.
* Ribbon or Twine: For adding a decorative touch.
* Embellishments (Optional): Stickers, glitter, buttons, sequins, or anything else that sparks your creativity!
* Washi Tape (Optional): Great for adding borders and patterns.
* Stencils (Optional): If you’re not confident in your freehand drawing skills.
* Photos (Optional): A class photo or a picture of your teacher can make the card extra special.
Designing Your Card: Brainstorming Ideas
Before you start cutting and gluing, let’s think about the design. Here are a few ideas to get your creative juices flowing:
* Apple Theme: A classic Teacher’s Day symbol. You can cut out apple shapes from construction paper or draw an apple on the front of the card.
* Floral Design: Create a bouquet of paper flowers or draw a beautiful floral arrangement.
* School Supplies Theme: Decorate the card with images of pencils, books, rulers, and other school supplies.
* Thank You Message: Write a heartfelt thank you message on the front of the card or inside.
* Personalized Message: Think about what makes your teacher special and incorporate that into the design. Does your teacher love reading? Add a book. Are they passionate about science? Add a beaker.
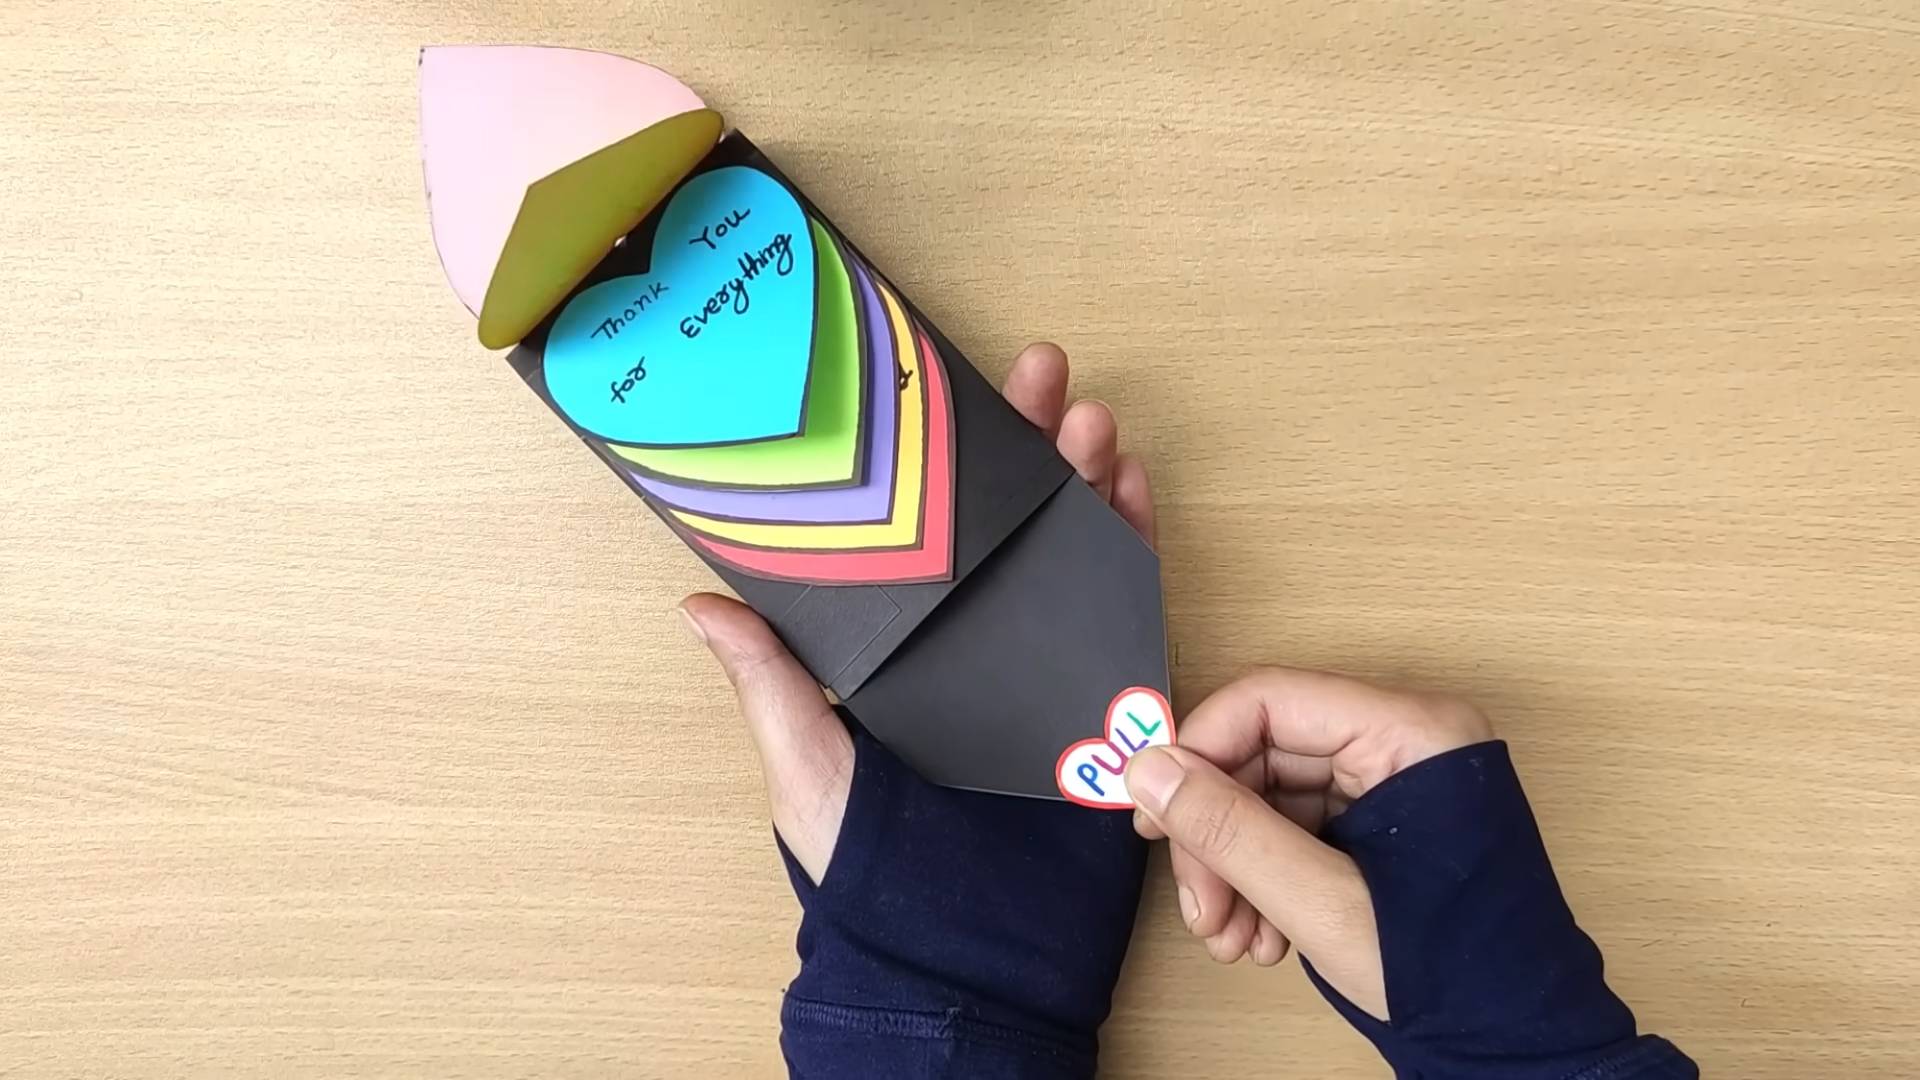
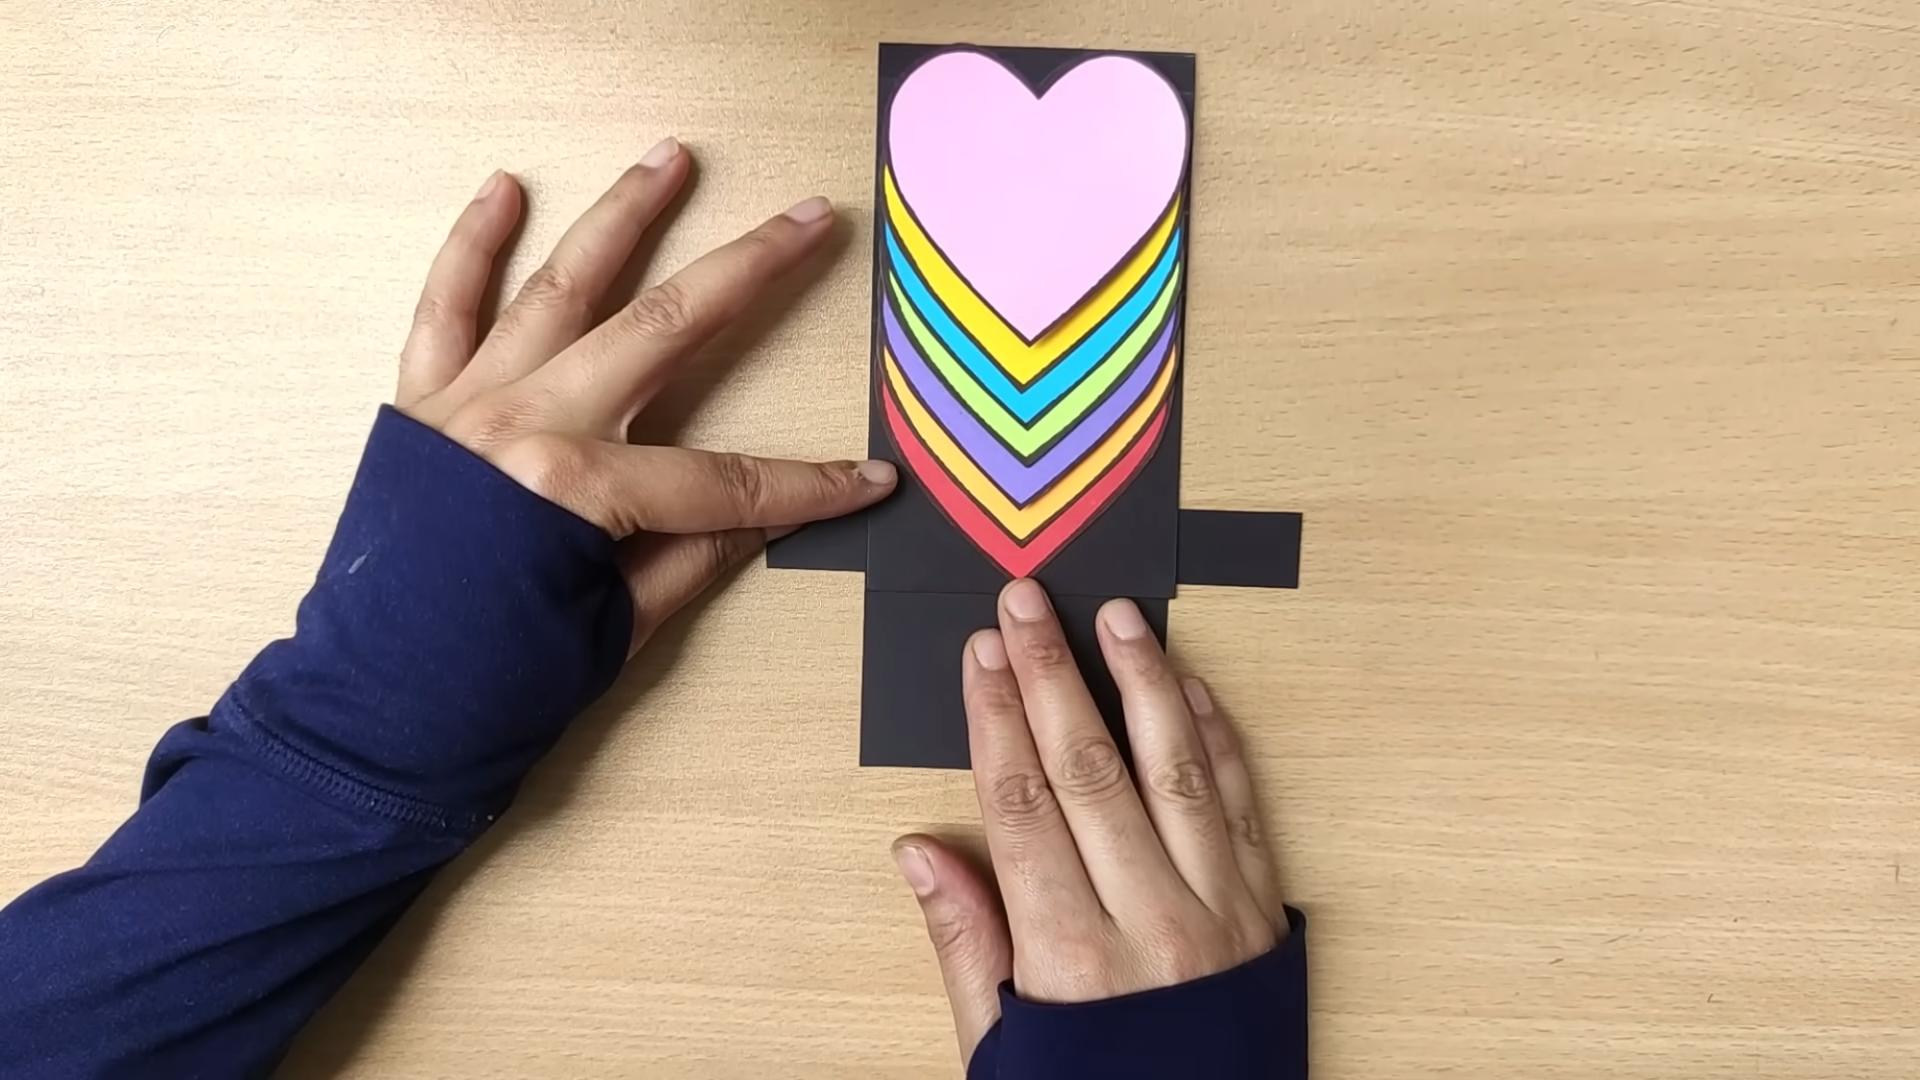
* Pop-Up Element: Add a pop-up element inside the card for a fun surprise. A simple pop-up heart or star is easy to create.
* Handprint Art: If you’re making the card with younger children, handprint art is a great way to personalize it.
Step-by-Step Instructions: Creating Your Masterpiece
Now for the fun part! Follow these steps to create your Teacher’s Day card:
Phase 1: Preparing the Card Base
1. Fold the Cardstock: Take your cardstock and fold it in half to create the base of your card. Make sure the fold is crisp and even. You can use a bone folder or the edge of a ruler to help create a sharp crease.
2. Measure and Cut (Optional): If you want a smaller card, you can measure and cut the cardstock to your desired size before folding.
3. Choose a Color Scheme: Decide on the colors you want to use for your card. Consider your teacher’s favorite colors or colors that complement each other.
Phase 2: Decorating the Card Front
1. Sketch Your Design (Optional): Lightly sketch your design on the front of the card with a pencil. This will help you visualize the layout and make sure everything is in the right place.
2. Add Background Elements: If you want to add a background to your card, now is the time to do it. You can use construction paper, washi tape, or markers to create a background pattern or texture.
3. Create the Main Design: This is where you bring your design ideas to life! Here are a few options:
* Paper Cutouts: Cut out shapes from construction paper and glue them to the front of the card. For example, you could cut out apple shapes, flower petals, or school supplies.
* Drawings: Use markers, colored pencils, or crayons to draw your design directly onto the card.
* Stencils: Use stencils to create precise shapes and patterns.
* Photos: Glue a photo of your teacher or the class to the front of the card.
4. Layering: Don’t be afraid to layer different elements to create depth and dimension. For example, you could glue a smaller apple cutout on top of a larger one.
5. Embellishments: Add embellishments like stickers, glitter, buttons, or sequins to add sparkle and personality to your card.
6. Adding a Border: Use washi tape or draw a border around the edge of the card to frame your design.
Phase 3: Writing Your Message Inside
1. Plan Your Message: Before you start writing, think about what you want to say to your teacher. Here are some ideas:
* Thank them for their hard work and dedication.
* Tell them what you appreciate about them.
* Share a favorite memory from their class.
* Wish them a happy Teacher’s Day.
2. Write Your Message: Use a marker or pen to write your message inside the card. Write neatly and legibly.
3. Add a Quote (Optional): Include a quote about teaching or learning that resonates with you.
4. Sign Your Name: Don’t forget to sign your name!
5. Decorate the Inside (Optional): Add some simple decorations to the inside of the card, such as small drawings or stickers.
Phase 4: Adding Finishing Touches
1. Ribbon or Twine: Tie a ribbon or twine around the card to add a decorative touch. You can tie it in a bow or simply wrap it around the card and tie a knot.
2. Envelope (Optional): If you want to give your card in an envelope, you can decorate the envelope to match the card.
3. Double-Check: Before you give your card to your teacher, double-check to make sure everything is glued down securely and that there are no smudges or mistakes.
Tips and Tricks for a Perfect Card
* Use High-Quality Materials: Using high-quality materials will make your card look more professional and last longer.
* Plan Your Design: Taking the time to plan your design before you start will help you avoid mistakes and create a more cohesive look.
* Don’t Be Afraid to Experiment: Try different techniques and materials to see what works best for you.
* Take Your Time: Don’t rush the process. Take your time and enjoy creating your card.
* Personalize It: The more personalized your card is, the more your teacher will appreciate it.
* Keep it Clean: Try to keep your workspace clean to avoid getting glue or other materials on your card.
* Let Glue Dry Completely: Before moving on to the next step, make sure the glue is completely dry to avoid smudging or tearing the paper.
* Practice Makes Perfect: If you’re not happy with your first attempt, don’t give up! Keep practicing and you’ll eventually create a card that you’re proud of.
* Get Inspired: Look online for inspiration and ideas. There are tons of tutorials and examples of handmade cards that you can use as a starting point. Pinterest and Instagram are great resources.
* Make it a Group Activity: If you’re making cards with a group of friends, you can share ideas and help each other out.
Alternative Design Ideas
* Pop-Up Card: Create a pop-up element inside the card for a fun surprise. You can find tutorials online for creating simple pop-up shapes like hearts, stars, or even a miniature school bus.
* Accordion Card: Make an accordion-style card with multiple panels. Each panel can feature a different design or message.
* Shaker Card: Create a shaker card with a clear window filled with glitter, sequins, or other small embellishments.
* Embossed Card: Use an embossing folder and a die-cutting machine to create a textured design on the front of the card.
* Watercolor Card: Use watercolors to create a beautiful and unique background for your card.
I hope this guide helps you create a Teacher’s Day card that your teacher will treasure! Remember, the most important thing is to
Conclusion
Creating a heartfelt, personalized gift doesn’t have to break the bank or require advanced crafting skills. This DIY Teacher’s Day card project is a testament to that. It’s more than just a card; it’s a tangible expression of gratitude, a small token that speaks volumes about the impact a teacher has had. In a world saturated with mass-produced items, a handmade card stands out, conveying a level of care and thoughtfulness that store-bought options simply can’t match.
Why is this DIY Teacher’s Day card a must-try? Because it’s customizable, affordable, and deeply personal. You can tailor the design, the colors, and the message to perfectly reflect your teacher’s personality and your unique relationship with them. Imagine the joy on their face when they receive a card that clearly shows you put time and effort into creating something special just for them. It’s a gift that will be cherished long after the chocolates are eaten and the gift cards are spent.
Beyond the basic design outlined, there are countless ways to personalize your DIY Teacher’s Day card. Consider incorporating elements that reflect your teacher’s interests or subject matter. For a science teacher, you could add small cutouts of beakers or atoms. For a literature teacher, perhaps a miniature book or a quote from their favorite author. You could even involve your child in the process, allowing them to add their own drawings or messages, making it a truly collaborative effort.
Another variation is to experiment with different materials. Instead of plain cardstock, try using textured paper, recycled materials, or even fabric scraps. Add embellishments like buttons, ribbons, or glitter to give your card a unique touch. You could also explore different card shapes and sizes, moving beyond the traditional rectangular format. A pop-up card, a layered card, or even a small booklet are all creative options that will make your card even more memorable.
Don’t be afraid to get creative and let your imagination run wild. The most important thing is to create a card that comes from the heart and expresses your sincere appreciation for your teacher’s hard work and dedication. This **DIY Teacher’s Day card** is a simple yet powerful way to show your gratitude.
We wholeheartedly encourage you to try this DIY project. It’s a fun and rewarding experience that will not only create a beautiful gift but also strengthen your bond with your teacher. Once you’ve created your masterpiece, we’d love to see it! Share your creations with us on social media using [Your Hashtag] and tell us about your experience. What materials did you use? What message did you write? What was your teacher’s reaction? We can’t wait to see your unique and heartfelt DIY Teacher’s Day cards! Let’s spread the love and appreciation for our amazing teachers!
Frequently Asked Questions (FAQ)
What kind of paper is best for making a DIY Teacher’s Day card?
The best type of paper depends on the look and feel you’re going for. Cardstock is a great all-around choice because it’s sturdy and comes in a variety of colors and finishes. If you want something more luxurious, consider using textured paper or watercolor paper. For a more eco-friendly option, recycled paper is a good choice. Avoid using very thin paper, as it may tear easily or not hold up well to embellishments.
What are some easy embellishments I can use to decorate my card?
There are tons of easy and affordable embellishments you can use! Buttons, ribbons, glitter, stickers, washi tape, and small paper cutouts are all great options. You can also use stamps, stencils, or even draw your own designs. Look around your house for materials you can repurpose, like fabric scraps, old magazines, or dried flowers.
How can I make my card more personal?
The key to making a card personal is to tailor it to your teacher’s interests and personality. Think about their favorite colors, hobbies, or subjects they teach. Incorporate these elements into your design and message. Write a heartfelt message that expresses your specific appreciation for their hard work and dedication. Share a specific memory or anecdote that shows how they’ve impacted you.
What if I’m not very artistic?
Don’t worry if you don’t consider yourself an artist! This DIY project is all about expressing your gratitude, not creating a masterpiece. There are plenty of simple designs you can follow online, or you can simply focus on writing a heartfelt message. Remember, it’s the thought that counts! You can also use pre-made templates or stencils to help you with the design.
Can I involve my child in making the card?
Absolutely! Involving your child is a great way to make the card even more special. Let them draw pictures, write their own messages, or help with the embellishments. This is a fun and educational activity that will teach them about gratitude and creativity. Just be sure to supervise them and provide age-appropriate materials.
What if I don’t have time to make a card from scratch?
If you’re short on time, you can still create a personalized card. Start with a pre-made blank card and focus on adding your own embellishments and writing a heartfelt message. Even a few simple touches can make a store-bought card feel more personal. You can also print out a design from online and glue it onto cardstock.
What kind of message should I write in the card?
Your message should be sincere and express your appreciation for your teacher’s hard work and dedication. Thank them for their time, effort, and the impact they’ve had on you. Share a specific memory or anecdote that shows how they’ve helped you learn and grow. Wish them a happy Teacher’s Day and let them know how much you value their contributions.
Where can I find inspiration for my DIY Teacher’s Day card?
There are tons of resources online for DIY card inspiration. Check out Pinterest, Instagram, and YouTube for tutorials, design ideas, and message examples. You can also browse through greeting card stores to get ideas for layouts and embellishments. Don’t be afraid to adapt and combine different ideas to create your own unique design.
How can I make a pop-up card?
Making a pop-up card might seem intimidating, but it’s actually quite simple! There are many tutorials available online that will guide you through the process step-by-step. The basic principle involves making cuts and folds in the cardstock to create a three-dimensional effect when the card is opened. You can create simple pop-up shapes like hearts or stars, or more complex designs like buildings or animals.
What if I make a mistake?
Don’t worry about making mistakes! It’s all part of the creative process. If you make a small mistake, try to cover it up with an embellishment or simply embrace it as part of the card’s unique character. If you make a major mistake, you can always start over with a new piece of cardstock. The important thing is to have fun and not be too hard on yourself. Remember, the effort and thought you put into the card are what truly matter.
Leave a Comment