

DIY soda can cups: who knew your empty beverage containers could have a second life, and a stylish one at that? I’m always on the lookout for clever ways to reduce waste and add a personal touch to my home, and this project ticks all the boxes. From humble beginnings as a way to reuse scarce resources during wartime to becoming a symbol of resourcefulness and creativity, upcycling has a rich history.
Let’s be honest, we all have a collection of soda cans piling up, waiting for recycling day. But what if you could transform those cans into unique and functional cups? Not only is it a fantastic way to reduce your environmental footprint, but it’s also a fun and rewarding DIY project that anyone can tackle.
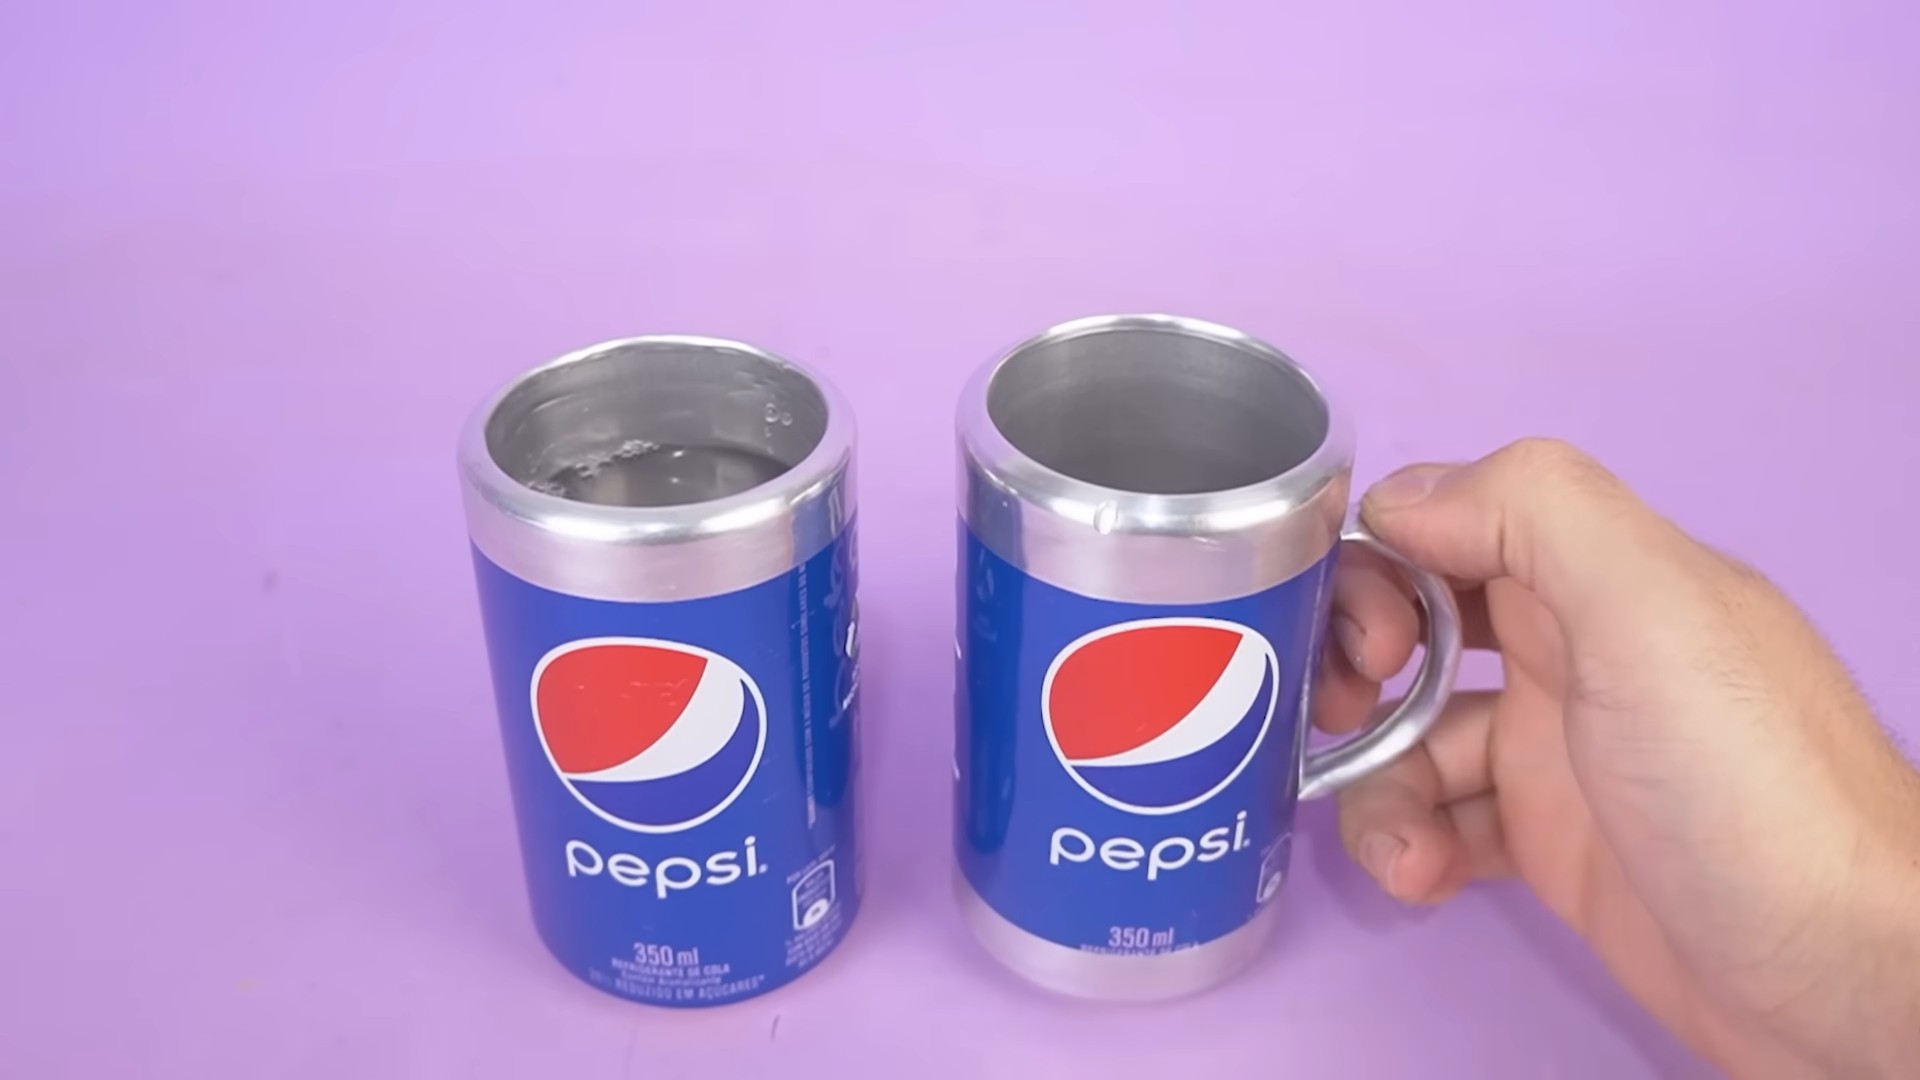
In this article, I’ll guide you through the simple steps to create your own DIY soda can cups. Imagine serving refreshing drinks in these handcrafted creations at your next gathering! It’s a guaranteed conversation starter and a testament to your commitment to sustainable living. Plus, it’s a great way to save money on buying new cups. So, grab your empty soda cans, and let’s get crafting!
Turn Your Empty Soda Cans into Stylish Drinking Cups!
Hey there, fellow DIY enthusiasts! Ever looked at a pile of empty soda cans and thought, “There has to be a better use for these than just recycling?” Well, you’re in luck! Today, I’m going to show you how to transform those aluminum cylinders into surprisingly chic and functional drinking cups. It’s a fun project, a great way to reduce waste, and you’ll end up with some unique conversation starters. Let’s get started!
What You’ll Need:
Before we dive in, let’s gather our supplies. Safety first, so make sure you have everything ready before you start cutting and sanding.
* Empty Soda Cans: Obviously! Aim for cans that are in good condition, without major dents or creases. Different sizes and brands can add variety to your cup collection.
* Can Opener (Side-Cutting): This is crucial! A regular can opener will leave a sharp, dangerous edge. A side-cutting can opener, also known as a smooth edge can opener, cuts the lid off from the side, leaving a smooth, safe rim.
* Scissors or Utility Knife: For trimming any excess aluminum after removing the top.
* Sandpaper (Various Grits): We’ll need coarse (around 120 grit), medium (around 220 grit), and fine (around 400 grit) sandpaper to smooth out any rough edges and create a polished finish.
* Sanding Block (Optional): Makes sanding easier and more consistent.
* Safety Glasses: Protect your eyes from aluminum shavings.
* Gloves: Protect your hands from sharp edges and cuts.
* Dish Soap and Water: For cleaning the cans thoroughly.
* Soft Cloth or Sponge: For washing and drying.
* Optional:
* Acrylic Paint or Spray Paint: To customize your cups with colors and designs.
* Clear Coat Sealer (Food-Safe): To protect the paint and make the cups more durable.
* Vinyl Stickers or Stencils: For adding decorative elements.
Preparing the Cans: The Foundation for Success
This is a crucial step. A clean and properly prepared can is essential for a safe and aesthetically pleasing cup.
1. Rinse Thoroughly: The first thing you need to do is rinse out your empty soda cans with warm water. Get rid of any leftover soda residue.
2. Wash with Soap and Water: Use dish soap and a soft cloth or sponge to thoroughly wash the inside and outside of the cans. Pay special attention to the rim area.
3. Rinse Again: Make sure all the soap is gone. Any soap residue can affect the paint adhesion later on, if you choose to paint them.
4. Dry Completely: Use a clean towel to dry the cans inside and out. You can also let them air dry completely.
Removing the Top: Safety First!
This is where the side-cutting can opener comes in. It’s the key to avoiding those nasty sharp edges.
1. Position the Can Opener: Place the side-cutting can opener on the top rim of the can. Make sure the cutting wheel is positioned correctly to grip the side of the can.
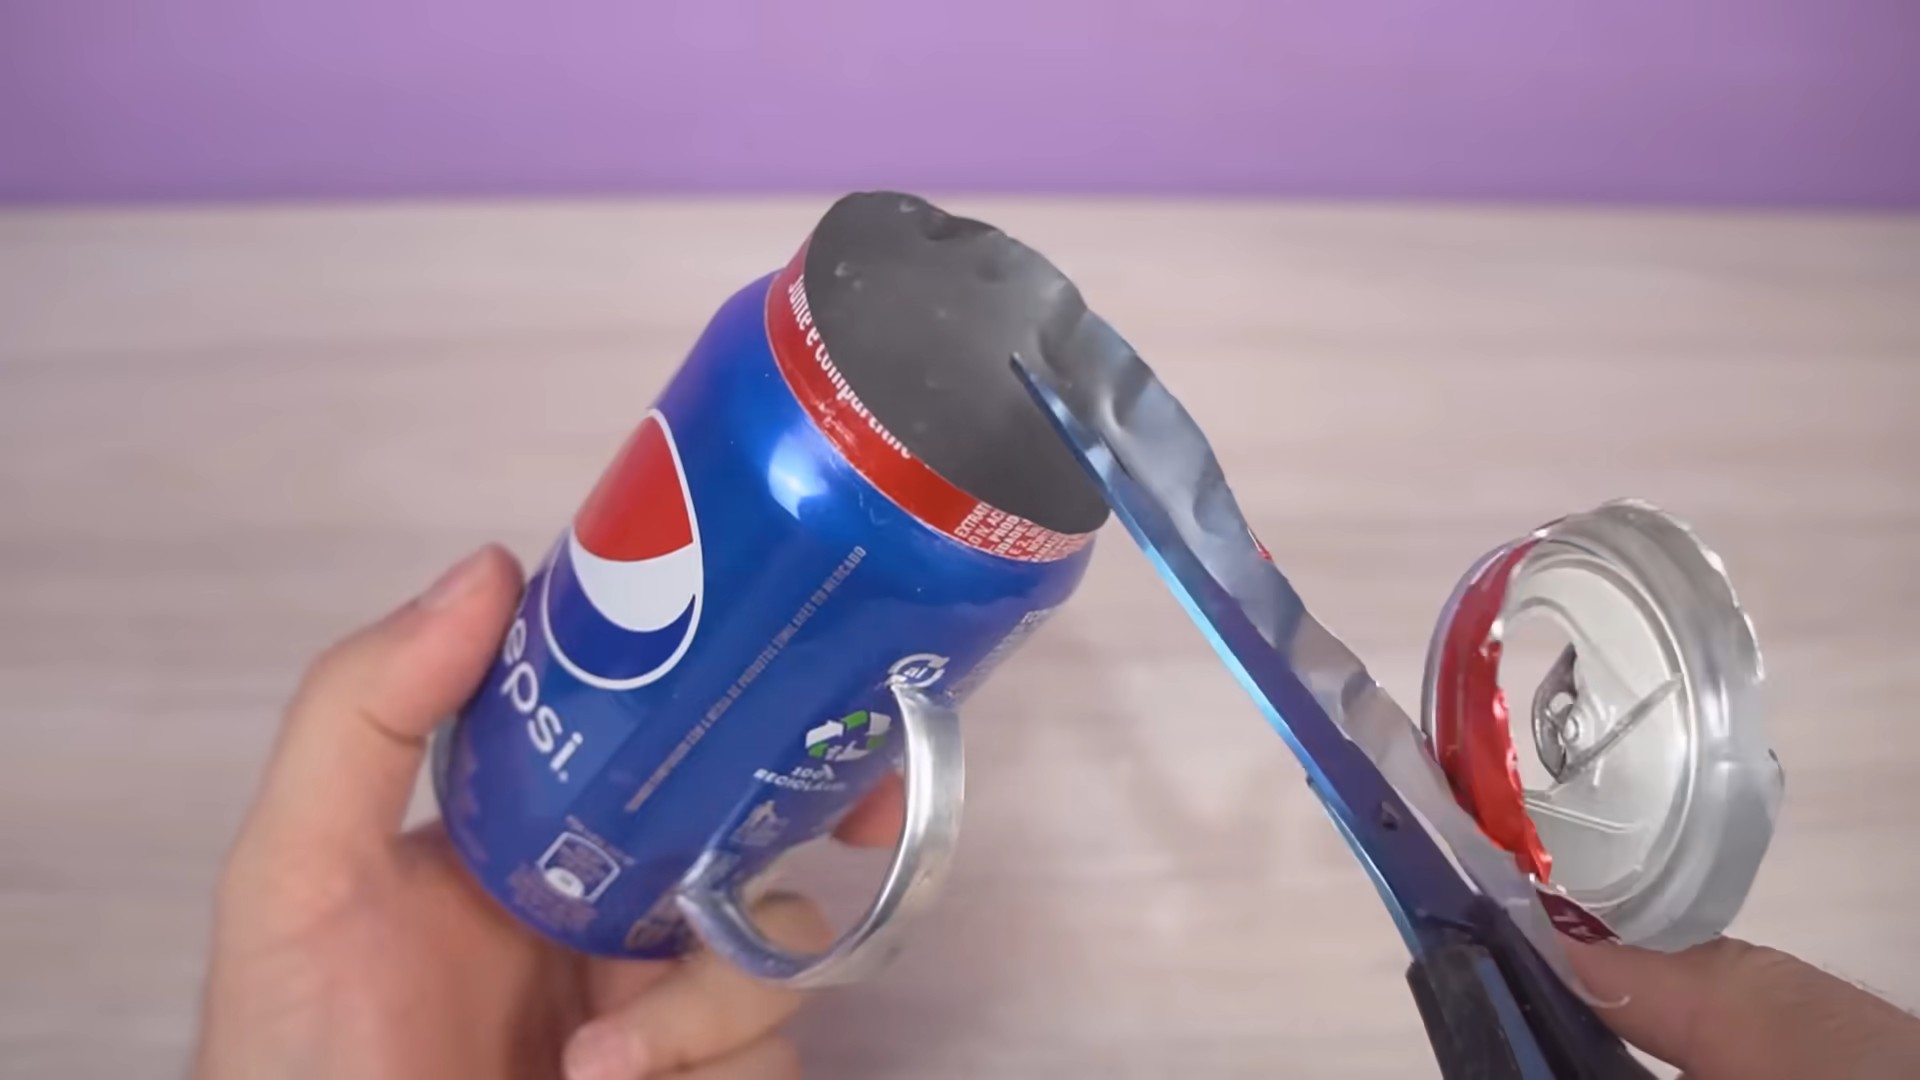
2. Begin Cutting: Start turning the handle of the can opener. The cutting wheel should smoothly cut around the circumference of the can, removing the top from the side.
3. Remove the Top: Once you’ve gone all the way around, carefully remove the top. The edge should be smooth and relatively safe.
4. Inspect the Rim: Run your finger (carefully!) along the rim to check for any sharp or jagged edges. If you find any, proceed to the next step.
Smoothing the Edges: The Art of Sanding
This is where we transform a potentially dangerous edge into a smooth, comfortable rim. Patience is key here!
1. Coarse Sanding (120 Grit): If there are any noticeable sharp edges or burrs, start with the coarse sandpaper. Gently sand the rim, focusing on removing the sharpness. Use a sanding block for a more even finish.
2. Medium Sanding (220 Grit): Once you’ve removed the major sharpness, switch to the medium sandpaper. This will help smooth out the scratches left by the coarse sandpaper. Continue sanding the rim, paying attention to any imperfections.
3. Fine Sanding (400 Grit): Finally, use the fine sandpaper to polish the rim and create a smooth, comfortable surface. This step is crucial for a professional-looking finish.
4. Rinse and Dry: After sanding, rinse the can thoroughly to remove any aluminum dust. Dry it completely with a clean towel.
5. Inspect Again: Run your finger along the rim one last time to ensure it’s smooth and safe to drink from. If you find any rough spots, repeat the sanding process.
Customizing Your Cups: Let Your Creativity Shine!
Now for the fun part! This is where you can personalize your soda can cups and make them truly unique.
1. Choose Your Design: Decide what kind of look you’re going for. Do you want a solid color, a patterned design, or a more intricate illustration? Gather inspiration from online sources or let your imagination run wild.
2. Prepare Your Work Area: Cover your work surface with newspaper or a drop cloth to protect it from paint splatters.
3. Priming (Optional but Recommended): If you’re using a dark color or want to ensure the paint adheres well, apply a thin coat of primer to the outside of the can. Let it dry completely according to the manufacturer’s instructions.
4. Painting:
* Acrylic Paint: Use acrylic paint and a brush to create your desired design. You can use multiple colors, stencils, or freehand techniques. Apply thin, even coats and let each coat dry completely before applying the next.
* Spray Paint: For a more uniform finish, use spray paint. Hold the can about 8-10 inches away from the soda can and apply thin, even coats. Avoid spraying too much paint in one area, as this can cause drips and runs. Let each coat dry completely before applying the next.
5. Adding Details: Once the base coat of paint is dry, you can add details using paint markers, vinyl stickers, or stencils.
6. Sealing (Highly Recommended): To protect the paint and make your cups more durable, apply a clear coat sealer. Make sure the sealer is food-safe if you plan to drink directly from the cups. Follow the manufacturer’s instructions for application and drying time.
7. Drying Time: Allow the paint and sealer to dry completely before using your new cups. This may take several hours or even overnight, depending on the type of paint and sealer you used.
Important Considerations:
* Food Safety: While aluminum is generally considered safe for food contact, it’s important to use a food-safe sealer if you’re painting the inside of the cups or if you’re concerned about the aluminum leaching into your drinks.
* Sharp Edges: Even with careful sanding, there’s always a slight risk of sharp edges. Be mindful when handling the cups and avoid letting children use them unsupervised.
* Durability: Soda cans are relatively thin and can be easily dented. Handle your cups with care to avoid damage.
* Dishwasher Safety: Hand washing is recommended to preserve the paint and sealer. Dishwashers can be harsh and may cause the paint to chip or peel.
* Hot Liquids: Aluminum can conduct heat, so be careful when using your cups for hot liquids. They may become too hot to handle comfortably.
Alternative Decoration Ideas:
* Decoupage: Use Mod Podge to glue fabric scraps, paper cutouts, or photos onto the cans.
* Washi Tape: Wrap the cans with colorful washi tape for a quick and easy decoration.
* Twine or Yarn: Wrap the cans with twine or yarn for a rustic look.
* Permanent Markers: Draw designs directly onto the cans with permanent markers.
Troubleshooting:
* Sharp Edges: If you still have sharp edges after sanding, repeat the sanding process with finer grit sandpaper. You can also use a metal file to remove any stubborn burrs.
* Paint Drips: If you get paint drips, let the paint dry completely and then sand them down with fine sandpaper. Apply another thin coat of paint to smooth out the surface.
* Uneven Paint: If the paint is uneven, apply another thin coat of paint, making sure to cover all areas evenly.
* Peeling Paint: If the paint is peeling, it may be due to poor surface preparation or using the wrong type of paint. Sand down the peeling paint and start over, making sure to prime the surface properly and
Conclusion
So, there you have it! Transforming humble soda cans into surprisingly stylish and functional cups is not just a fun craft project; it’s a testament to resourcefulness and a fantastic way to reduce waste. We’ve walked you through the steps, highlighting the importance of safety and precision, and hopefully, inspired you to look at those empty cans in a whole new light.
Why is this DIY soda can cup trick a must-try? Because it’s more than just a craft; it’s a statement. It’s a statement about your commitment to sustainability, your creativity, and your ability to turn something ordinary into something extraordinary. In a world increasingly focused on disposable items, this project offers a refreshing alternative, allowing you to repurpose materials and create something unique and useful. Plus, let’s be honest, sipping your favorite beverage from a cup you made yourself is just plain cool.
But the fun doesn’t stop there! Feel free to experiment with variations. Try using different sizes of soda cans to create cups of varying heights. Decorate your finished cups with paint, markers, or even decoupage techniques to personalize them and make them truly your own. Consider adding a protective coating, like food-safe epoxy resin, to enhance durability and prevent any potential leaching of aluminum (though, as mentioned earlier, this is generally considered safe with proper cleaning and preparation). You could even explore creating a set of matching cups for your next gathering, impressing your guests with your ingenuity and eco-consciousness. Think about adding a handle made from wire or even repurposed leather for a more ergonomic grip. The possibilities are truly endless!
This DIY soda can cup project is a fantastic way to unleash your inner artist and create something both practical and environmentally friendly. It’s a conversation starter, a unique gift idea, and a satisfying way to spend an afternoon.
We wholeheartedly encourage you to give this DIY trick a try. Gather your supplies, follow the steps carefully, and most importantly, have fun! Once you’ve created your own soda can cups, we’d love to see your creations. Share your photos and experiences in the comments below. Let us know what variations you tried, what challenges you faced, and what tips you have for other aspiring DIYers. Your feedback is invaluable and helps us all learn and grow together. Let’s start a community of creative recyclers, transforming waste into wonderful things, one soda can cup at a time!
Frequently Asked Questions (FAQs)
Is it safe to drink from a soda can cup?
This is a very common and important question. When properly cleaned and prepared, drinking from a DIY soda can cup is generally considered safe. However, it’s crucial to follow the instructions carefully. Thoroughly wash the can inside and out with soap and hot water before starting the project. After forming the cup, ensure there are no sharp edges or burrs that could cause cuts. Some people choose to line the inside of the cup with a food-safe epoxy resin to provide an extra layer of protection and prevent any potential leaching of aluminum. While aluminum is generally considered safe in small amounts, this lining offers added peace of mind. Always avoid using the cup for hot liquids, as heat can potentially increase the leaching of aluminum. Stick to cold or room-temperature beverages for optimal safety.
What tools do I need to make a soda can cup?
The essential tools for this project include a sharp craft knife or scissors, a ruler or measuring tape, sandpaper or a file, and a cutting mat or protective surface. A can opener (to safely remove the top of the can) is also necessary. Depending on the design you choose, you might also need pliers for bending edges, paint or markers for decoration, and epoxy resin for lining the cup. Safety glasses are highly recommended to protect your eyes from any flying debris during the cutting and sanding process. Remember, safety first!
How do I prevent sharp edges on my soda can cup?
Sharp edges are a primary concern when working with cut aluminum. The key is thorough sanding and filing. After cutting the can, use fine-grit sandpaper or a metal file to smooth down all edges. Pay particular attention to the rim of the cup and any areas where the metal has been cut or bent. Run your finger carefully along the edges to check for any remaining sharpness. If you find any, continue sanding or filing until they are smooth and rounded. You can also use pliers to carefully bend the edges inward, creating a rolled rim that is less likely to cut.
Can I use any type of soda can for this project?
While most standard-sized soda cans will work, some cans are easier to work with than others. Cans made from thicker aluminum are generally more durable and less prone to bending or denting. However, they can also be more difficult to cut and shape. Experiment with different brands and sizes to find what works best for you. Avoid using cans that are heavily dented or damaged, as these may be more likely to crack or break during the process.
How do I clean my soda can cup?
Cleaning your DIY soda can cup is similar to cleaning any other reusable cup. Wash it thoroughly with soap and hot water after each use. Avoid using abrasive cleaners or scouring pads, as these can scratch the surface of the aluminum. If you’ve lined the cup with epoxy resin, follow the manufacturer’s instructions for cleaning. It’s generally recommended to hand wash the cup rather than putting it in the dishwasher, as the high heat and harsh detergents can damage the aluminum or the epoxy lining.
Can I use my soda can cup for hot drinks?
It is generally not recommended to use your DIY soda can cup for hot drinks. Heat can potentially increase the leaching of aluminum into the beverage. While the amount of aluminum leached is likely to be small, it’s best to err on the side of caution and stick to cold or room-temperature drinks. If you absolutely must use the cup for a warm beverage, ensure it is lined with a food-safe epoxy resin and monitor the temperature closely.
How durable are these soda can cups?
The durability of your soda can cup will depend on the thickness of the aluminum and the care you take in its construction. Cans made from thicker aluminum will generally be more durable. Proper sanding and filing of the edges will also help to prevent cracks and tears. While these cups are not as durable as commercially manufactured cups, they can last for a reasonable amount of time with proper care. Avoid dropping or bending the cup, as this can cause it to dent or break.
What are some creative ways to decorate my soda can cup?
The possibilities for decorating your soda can cup are endless! You can use paint, markers, decoupage, or even stickers to personalize your creation. Consider using stencils to create intricate designs or patterns. You can also wrap the cup with fabric or yarn for a more textured look. If you’re feeling ambitious, you can even try etching designs into the aluminum using a specialized etching tool. Remember to seal your decorations with a clear coat of varnish or epoxy resin to protect them from wear and tear.
How can I make a handle for my soda can cup?
Adding a handle to your soda can cup can make it easier to hold and more comfortable to use. You can create a handle from wire, leather, or even repurposed plastic. Bend the material into the desired shape and attach it to the cup using glue, rivets, or by threading it through small holes drilled into the aluminum. Ensure the handle is securely attached and comfortable to grip.
Is this a good project for kids?
While this project can be a fun and educational activity, it’s important to exercise caution when involving children. The use of sharp tools, such as craft knives and scissors, should be strictly supervised by an adult. Children should also be instructed on the importance of safety and the proper use of tools. Consider having children focus on the decorating aspect of the project, while an adult handles the cutting and shaping of the can.
Leave a Comment