

DIY scrapbook ideas – are you ready to unlock a treasure trove of memories and transform them into stunning visual stories? I’m so excited to share some creative inspiration that will turn your precious photos and keepsakes into personalized works of art. Forget those generic photo albums; we’re diving deep into the world of scrapbooking, where every page tells a unique tale!
Scrapbooking, in its essence, is more than just sticking photos onto paper. It’s a craft with roots stretching back centuries, evolving from simple memory books to elaborate artistic expressions. Think of the Victorian era’s “commonplace books,” filled with pressed flowers, handwritten notes, and sketches – the ancestors of our modern scrapbooks. These books were a way to preserve personal experiences and knowledge, a tradition we continue today with a modern twist.
In today’s fast-paced digital world, tangible memories are more precious than ever. That’s why DIY scrapbook ideas are so important. They offer a chance to slow down, reflect on meaningful moments, and create something beautiful and lasting. Whether you’re documenting a family vacation, celebrating a milestone, or simply preserving everyday joys, a scrapbook allows you to curate your own personal history in a way that digital albums simply can’t replicate. Plus, it’s incredibly therapeutic! So, grab your scissors, glue, and favorite photos – let’s get crafting!
Creating a Personalized DIY Scrapbook: A Step-by-Step Guide
Hey there, fellow crafters! I’m so excited to share my ultimate guide to creating a beautiful and personalized scrapbook. Scrapbooking is such a rewarding hobby, allowing you to preserve precious memories in a tangible and creative way. This guide will walk you through every step, from gathering your supplies to adding those final, personal touches. Let’s dive in!
Gathering Your Supplies
Before we even think about glue and glitter, let’s make sure we have everything we need. This is a crucial step, as having all your materials organized will make the entire process much smoother and more enjoyable.
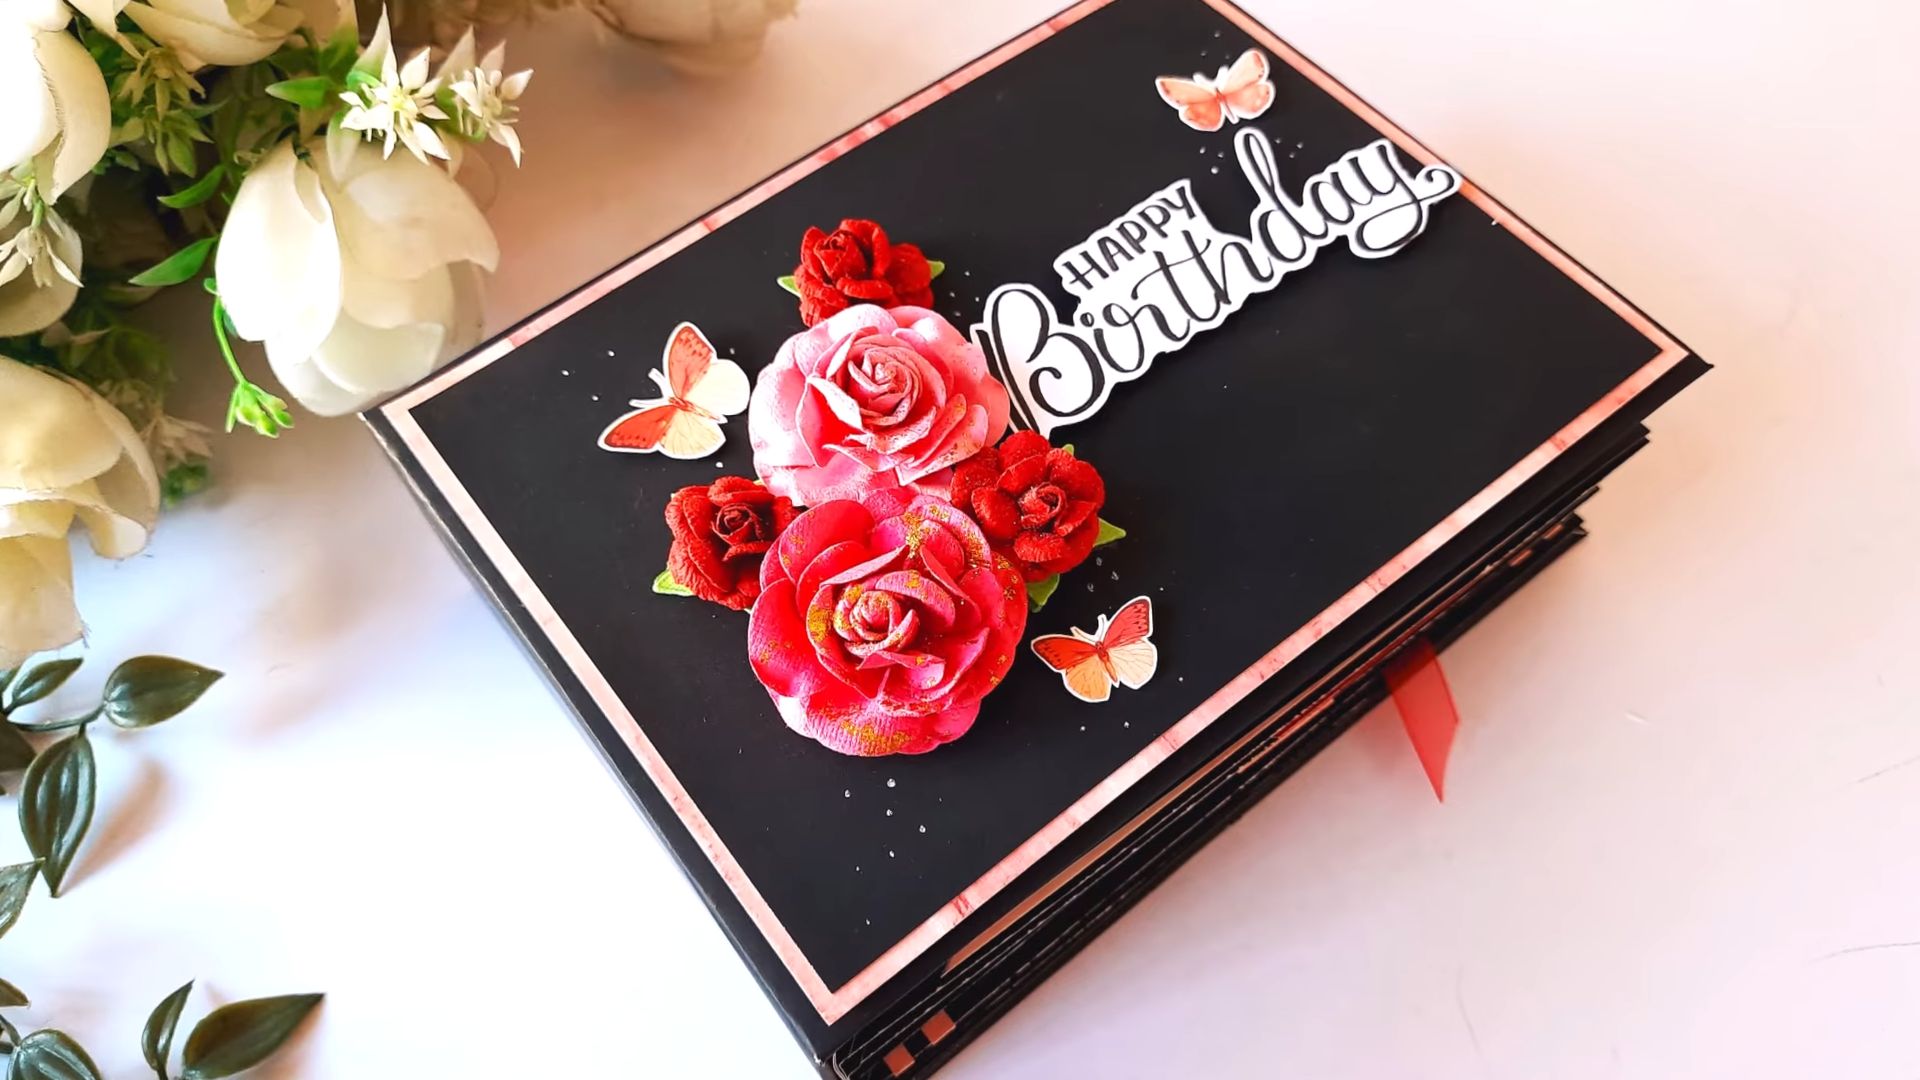
* Scrapbook Album: This is the foundation of your project! Choose a size and style that suits your needs. I personally love 12×12 inch albums because they offer plenty of space for layouts, but smaller sizes like 8×8 or even 6×6 can be great for specific themes or smaller projects. Consider a post-bound album, a ring-bound album, or a strap-hinge album. Post-bound albums are great because you can easily add or remove pages.
* Scrapbook Paper: This is where the fun begins! Select a variety of patterned and solid-colored papers that complement your photos and theme. Don’t be afraid to mix and match! I always recommend having a good selection of neutral papers as a base, and then adding pops of color and patterns. Look for acid-free and lignin-free paper to ensure your memories are preserved for years to come.
* Photos: The heart of your scrapbook! Print out your favorite photos in various sizes. I like to have a mix of large focal photos and smaller supporting images. Consider printing duplicates of your most cherished photos, just in case you want to use them in multiple layouts.
* Adhesives: Essential for sticking everything down! I recommend a combination of photo-safe adhesive runners, glue dots, and double-sided tape. Adhesive runners are great for large areas, while glue dots are perfect for small embellishments. Make sure your adhesive is acid-free to prevent damage to your photos.
* Scissors and Paper Trimmer: For precise cutting and trimming. A paper trimmer is a lifesaver for creating straight lines and consistent borders. Invest in a good quality pair of scissors for more detailed cutting.
* Embellishments: This is where you can really let your creativity shine! Think stickers, die-cuts, ribbons, buttons, brads, washi tape, and anything else that sparks your imagination. Choose embellishments that match your theme and add personality to your pages.
* Pens and Markers: For journaling and adding handwritten details. I love using archival-quality pens that won’t fade or bleed over time. Consider different colors and thicknesses for variety.
* Ruler and Pencil: For measuring and marking guidelines. A clear ruler is particularly helpful for aligning elements and creating even borders.
* Optional Tools: Corner rounder, hole punch, eyelet setter, die-cutting machine (like a Cricut or Silhouette). These tools can add extra flair and detail to your pages, but they’re not essential for getting started.
Creating Your Scrapbook Layouts
Now for the exciting part – designing your scrapbook pages! This is where you can really let your creativity flow and tell your story.
1. Choosing a Theme
Before you start gluing anything down, take some time to decide on a theme for your scrapbook or for individual sections. This will help you narrow down your paper and embellishment choices and create a cohesive look.
* Event-Based: Focus on a specific event, such as a vacation, wedding, birthday, or graduation.
* Person-Based: Dedicate a section to a particular person, such as a child, family member, or friend.
* Theme-Based: Choose a broader theme, such as travel, nature, holidays, or hobbies.
2. Arranging Your Photos
Experiment with different photo arrangements on your scrapbook page before you commit to anything. Consider the size and shape of your photos and how they relate to each other.
* Focal Point: Choose one photo to be the main focal point of your layout. This should be the largest and most visually interesting photo.
* Photo Clusters: Group smaller photos together to create visual interest. Overlap them slightly or arrange them in a grid pattern.
* Photo Mats: Matting your photos with colored paper can help them stand out and add a pop of color to your page.
3. Adding Background Paper
Select a background paper that complements your photos and theme. Consider using a solid-colored paper for a clean and simple look, or a patterned paper for added visual interest.
* Full Page Background: Cover the entire page with your chosen background paper.
* Partial Background: Use strips or pieces of background paper to create borders or accents.
* Layered Background: Layer multiple pieces of background paper to create depth and texture.
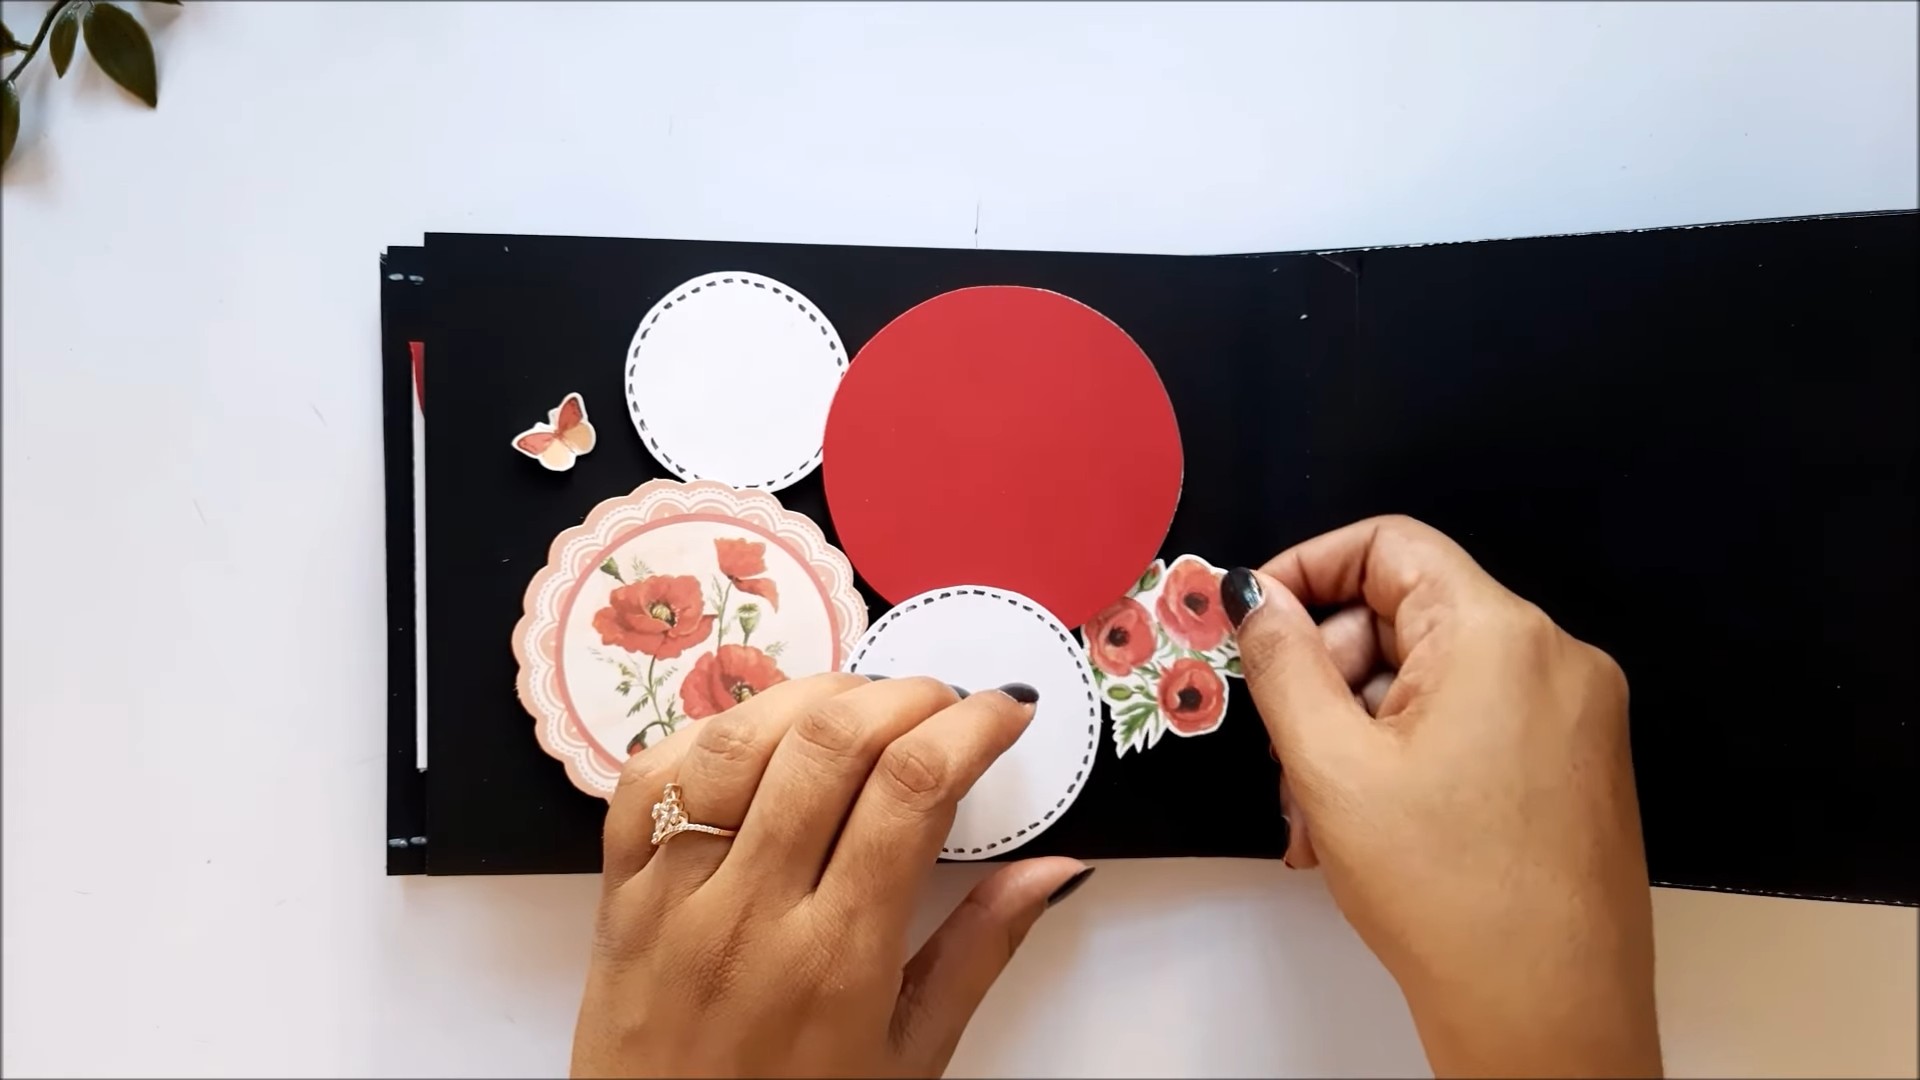
4. Incorporating Embellishments
Embellishments are the perfect way to add personality and flair to your scrapbook pages. Choose embellishments that match your theme and complement your photos.
* Stickers: Use stickers to add fun and whimsical details to your pages.
* Die-Cuts: Die-cuts are pre-cut shapes and designs that can add dimension and texture to your layouts.
* Ribbons and Buttons: Use ribbons and buttons to add a touch of elegance and sophistication.
* Washi Tape: Washi tape is a versatile embellishment that can be used to create borders, accents, and even photo frames.
5. Journaling
Don’t forget to add journaling to your scrapbook pages! This is your opportunity to tell the story behind your photos and capture your memories in your own words.
* Handwritten Journaling: Write directly on your scrapbook page using archival-quality pens.
* Typed Journaling: Type your journaling on a computer and print it out to adhere to your page.
* Journaling Prompts: If you’re struggling to come up with something to write, use journaling prompts to get your creative juices flowing. Some examples include: “What were you feeling in this moment?”, “What do you remember most about this day?”, or “Who were you with?”.
Step-by-Step Instructions: Creating a Vacation Scrapbook Page
Okay, let’s put all of this into practice! I’m going to walk you through creating a vacation-themed scrapbook page.
1. Choose Your Photos: Select 3-5 photos from your vacation that you want to feature on your page. I’m going to use a large photo of a beautiful sunset, two smaller photos of us exploring a local market, and a photo of a delicious meal we had.
2. Select Your Background Paper: I’m going to use a light blue patterned paper with a subtle wave design to represent the ocean. I’ll also use a strip of tan paper to represent the sand.
3. Mat Your Photos: Mat each of your photos with a coordinating color of cardstock. I’m using white cardstock for the sunset photo and a slightly darker blue for the market and meal photos. This will help them stand out against the background paper.
4. Arrange Your Photos: Arrange your photos on the page, starting with the largest photo as the focal point. I’m placing the sunset photo in the upper left corner and arranging the smaller photos around it. I’m overlapping them slightly to create a more dynamic layout.
5. Adhere Your Photos: Once you’re happy with the arrangement, adhere your photos to the page using photo-safe adhesive.
6. Add Embellishments: Now for the fun part! I’m going to add some travel-themed embellishments, such as a sticker of a palm tree, a die-cut of a suitcase, and some washi tape with a map design. I’m also adding some small buttons in coordinating colors.
7. Journaling: Write a short description of your vacation and the memories you made. I’m going to write about the amazing sunset, the delicious food, and the fun we had exploring the local market. I’ll use a fine-tipped black pen for a clean and classic look.
8. Final Touches: Take a step back and look at your page. Add any final touches that you think are needed. I’m adding a few more small stickers and a little bit of glitter to make the page sparkle.
Tips and Tricks for Scrapbooking Success
Here are a few extra tips and tricks I’ve learned over the years that can help you create stunning scrapbooks:
* Plan Your Layouts: Before you start gluing anything down, sketch out your layouts on a piece of paper. This will help you visualize the final product and avoid mistakes.
* Use a Color Palette: Choose a color palette for each page or section of your scrapbook. This will help you create a cohesive and visually appealing look.
* Don’t Be Afraid to Experiment
Conclusion
So, there you have it! Ditching expensive pre-made scrapbooks and embracing these DIY scrapbook ideas opens up a world of creative freedom and personalized expression. It’s more than just sticking photos in an album; it’s about crafting a tangible representation of your memories, infused with your unique style and personality.
Why is this a must-try? Because it’s empowering! You’re not limited by the constraints of pre-designed pages or the high cost of specialized materials. You control every aspect, from the paper texture and color palette to the embellishments and layout. This allows you to create a scrapbook that truly reflects the essence of your experiences and the people you shared them with.
Think about the possibilities! Instead of just chronological order, you could organize your scrapbook thematically – dedicating sections to travel adventures, family milestones, or even just everyday moments that bring you joy. Consider incorporating different textures and materials beyond paper. Fabric scraps, dried flowers, ticket stubs, maps, and even small mementos can add depth and visual interest.
For a rustic feel, try using kraft paper or recycled cardboard as your base. For a more elegant look, opt for linen or textured cardstock. Experiment with different binding methods, too. Beyond the traditional three-ring binder, explore options like Japanese stab binding or even a simple hand-stitched spine.
Don’t be afraid to get messy! Splatter paint, use stencils, or try hand-lettering to add a personal touch. The beauty of DIY is that there are no rules. It’s all about letting your creativity flow and having fun in the process.
And remember, these DIY scrapbook ideas aren’t just for preserving memories; they’re also a fantastic way to de-stress and unwind. The act of creating something beautiful with your own hands can be incredibly therapeutic. It’s a chance to disconnect from the digital world and reconnect with your inner artist.
We truly believe that everyone can create a stunning scrapbook, regardless of their artistic skill level. The key is to start small, experiment with different techniques, and most importantly, have fun! So, gather your photos, gather your supplies, and get ready to embark on a creative journey.
We’re confident that you’ll be amazed at what you can create. And we can’t wait to see your masterpieces! Please, share your DIY scrapbook creations with us. Tag us on social media, leave a comment below, or send us an email. We’re eager to see how you’ve personalized these ideas and made them your own. Let’s inspire each other to keep creating and preserving our precious memories in beautiful, handmade scrapbooks. Embrace the joy of crafting and the satisfaction of creating a lasting legacy for generations to come.
Frequently Asked Questions (FAQ)
What kind of paper is best for a DIY scrapbook?
The best paper for your DIY scrapbook depends on the aesthetic you’re going for and the types of embellishments you plan to use. Cardstock is a popular choice because it’s sturdy and comes in a wide variety of colors and textures. It can withstand glue, paint, and other embellishments without warping or tearing. For a more vintage or rustic look, consider using kraft paper or even recycled paper. If you plan on using wet media like watercolors or inks, make sure to choose a paper that is specifically designed for those mediums. Acid-free paper is crucial for preserving your photos and memories for the long term, as it prevents yellowing and deterioration over time.
How do I prevent my photos from fading in my scrapbook?
Protecting your photos from fading is essential for preserving your memories. Always use acid-free and lignin-free photo-safe adhesives. Avoid using regular glue or tape, as they can damage your photos over time. Store your scrapbook in a cool, dry place away from direct sunlight. Sunlight is a major cause of fading, so keeping your scrapbook in a dark or shaded area will help to prolong the life of your photos. You can also consider using photo-protective sprays or sleeves to provide an extra layer of protection.
What are some creative ways to embellish my DIY scrapbook?
The possibilities for embellishing your DIY scrapbook are endless! Think beyond just stickers and patterned paper. Consider incorporating fabric scraps, dried flowers, ticket stubs, maps, buttons, ribbons, and even small mementos that are relevant to the memories you’re documenting. Hand-lettering, calligraphy, and doodling can add a personal touch. Experiment with different techniques like stamping, stenciling, and embossing. Don’t be afraid to get creative and use unconventional materials. For example, you could use washi tape to create borders or patterns, or use old book pages to add a vintage feel.
How do I bind my DIY scrapbook?
There are several ways to bind your DIY scrapbook, depending on your skill level and the desired look. A three-ring binder is a simple and versatile option, allowing you to easily add or remove pages. For a more handcrafted look, consider Japanese stab binding, which involves sewing the pages together along the spine. Another option is to use a bookbinding kit, which typically includes all the necessary materials and instructions. You can also create a simple hand-stitched spine using a needle and thread. Experiment with different binding methods to find one that suits your style and skill level.
Where can I find inspiration for my DIY scrapbook?
Inspiration for your DIY scrapbook can be found everywhere! Browse online platforms like Pinterest, Instagram, and YouTube for ideas and tutorials. Visit craft stores and scrapbook shops to see what materials and embellishments are available. Look through magazines and books for layout and design inspiration. Don’t be afraid to draw inspiration from other art forms, such as painting, photography, and graphic design. The most important thing is to find inspiration that resonates with you and reflects your personal style.
What are some tips for organizing my scrapbook pages?
Organizing your scrapbook pages is key to creating a visually appealing and cohesive album. Start by planning out the overall layout of your scrapbook. Consider organizing your pages chronologically, thematically, or by event. Use a consistent color palette and font throughout your scrapbook to create a sense of unity. Leave white space around your photos and embellishments to avoid a cluttered look. Use photo mats to frame your photos and draw attention to them. Experiment with different layouts and arrangements until you find one that you like. Remember, the goal is to create a scrapbook that is both visually appealing and easy to navigate.
How can I make my DIY scrapbook more personal?
The best way to make your DIY scrapbook more personal is to incorporate elements that reflect your unique style and personality. Include handwritten notes, journaling entries, and personal anecdotes. Use photos that capture the essence of your memories and the people you shared them with. Incorporate mementos that are meaningful to you, such as ticket stubs, maps, and letters. Don’t be afraid to experiment with different techniques and materials to create a scrapbook that is truly one-of-a-kind. The more personal touches you add, the more special and meaningful your scrapbook will be.


Leave a Comment