

DIY Rope Basket Organizer: Tired of clutter taking over your home? I know I am! There’s something incredibly satisfying about creating functional and beautiful storage solutions yourself, and that’s exactly what we’re diving into today. For centuries, basket weaving has been a practical art form, used across cultures to store everything from food to tools. Think of the intricate baskets of ancient Egypt or the sturdy woven containers used by indigenous communities worldwide.
But we’re not just talking about any basket; we’re talking about a stylish and modern DIY rope basket organizer that you can whip up with just a few simple materials. In today’s fast-paced world, where organization is key to a peaceful mind, this project is a game-changer. Imagine transforming messy shelves or cluttered corners into neatly organized spaces with these charming rope baskets. Not only will they add a touch of rustic elegance to your decor, but they’ll also help you declutter and streamline your life.
This DIY trick is a must-have because it’s budget-friendly, customizable, and incredibly rewarding. Plus, it’s a fantastic way to reduce waste by repurposing old materials. So, grab your rope, your glue gun, and let’s get crafting! I’m excited to show you how easy it is to create your own beautiful and functional rope basket organizer.
DIY Rope Basket Organizer: A Stylish and Functional Project
Hey there, fellow DIY enthusiasts! I’m super excited to share this project with you – a gorgeous and practical rope basket organizer. I’ve always loved the look of rope baskets, but the store-bought ones can be pretty pricey. So, I decided to make my own, and I’m thrilled with how it turned out! This guide will walk you through every step, ensuring you create a beautiful and functional piece for your home.
Materials You’ll Need
Before we dive in, let’s gather all the necessary supplies. Trust me, having everything ready beforehand will make the process much smoother.
* **Cotton Rope:** This is the star of the show! I recommend using a thick cotton rope (around 1/4 to 1/2 inch in diameter) for a sturdy and visually appealing basket. The amount you’ll need depends on the size of your basket. I used about 100 feet for a medium-sized basket, but it’s always better to have a little extra.
* **Hot Glue Gun and Glue Sticks:** A high-temperature hot glue gun is essential for securely bonding the rope together. Make sure you have plenty of glue sticks on hand – you’ll be surprised how quickly you go through them!
* **Scissors or Utility Knife:** For cutting the rope. A sharp pair of scissors or a utility knife will do the trick.
* **Measuring Tape or Ruler:** To ensure your basket is the desired size and shape.
* **Bowl or Container (Optional):** This will serve as a mold to help you shape the base of your basket. I used a mixing bowl, but you can use any container that’s the size and shape you want your basket base to be.
* **Clothespins or Clips (Optional):** These can be helpful for holding the rope in place while the glue dries, especially when you’re working on the sides of the basket.
* **Leather Scraps or Fabric (Optional):** For creating handles. You can also use rope for handles, but I personally love the look of leather or fabric.
* **Awl or Leather Punch (Optional):** If you’re using leather for handles, you’ll need an awl or leather punch to create holes for attaching them.
* **Needle and Thread (Optional):** For sewing the handles onto the basket.
* **Protective Surface:** To protect your work area from glue spills. I used a piece of cardboard.
Preparing Your Workspace
Before you start gluing, it’s important to set up your workspace. This will help you stay organized and prevent any messes.
1. **Cover your work surface:** Lay down a piece of cardboard or a drop cloth to protect your table from glue spills.
2. **Gather your materials:** Make sure you have all your materials within easy reach. This will save you time and frustration.
3. **Plug in your hot glue gun:** Allow the glue gun to heat up completely before you start working. This will ensure that the glue bonds properly.
4. **Ventilate the area:** Hot glue can release fumes, so it’s important to work in a well-ventilated area.
Creating the Base of the Basket
This is where the magic begins! We’ll start by creating the foundation of our rope basket.
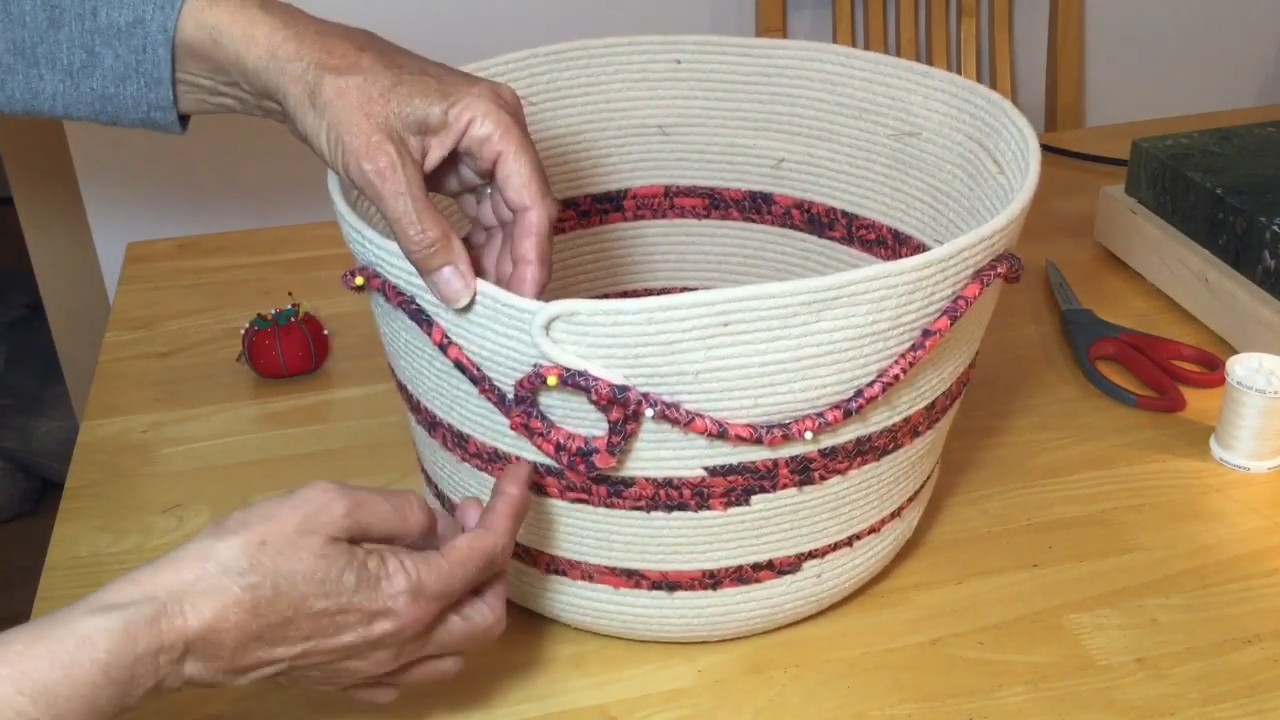
1. **Start the coil:** Apply a small amount of hot glue to the end of the rope and begin coiling it tightly. Press and hold the end in place until the glue sets.
2. **Continue coiling:** Apply a bead of hot glue to the side of the coil and continue wrapping the rope around it, pressing firmly to secure each layer. Keep the coil flat and even.
3. **Use a mold (Optional):** If you’re using a bowl or container as a mold, place the coil inside the mold and continue wrapping the rope around the base, following the shape of the mold. This will help you create a perfectly round or shaped base.
4. **Maintain a tight coil:** As you coil, make sure the rope is tightly packed together. This will create a sturdy and durable base for your basket.
5. **Continue until desired size:** Keep coiling and gluing until the base of your basket reaches your desired size. I made mine about 6 inches in diameter.
6. **Finishing the base:** Once the base is the desired size, carefully cut the rope at an angle and glue the end securely to the coil. This will create a smooth and seamless finish.
Building the Sides of the Basket
Now that we have a solid base, it’s time to build up the sides of our basket. This is where the basket starts to take shape!
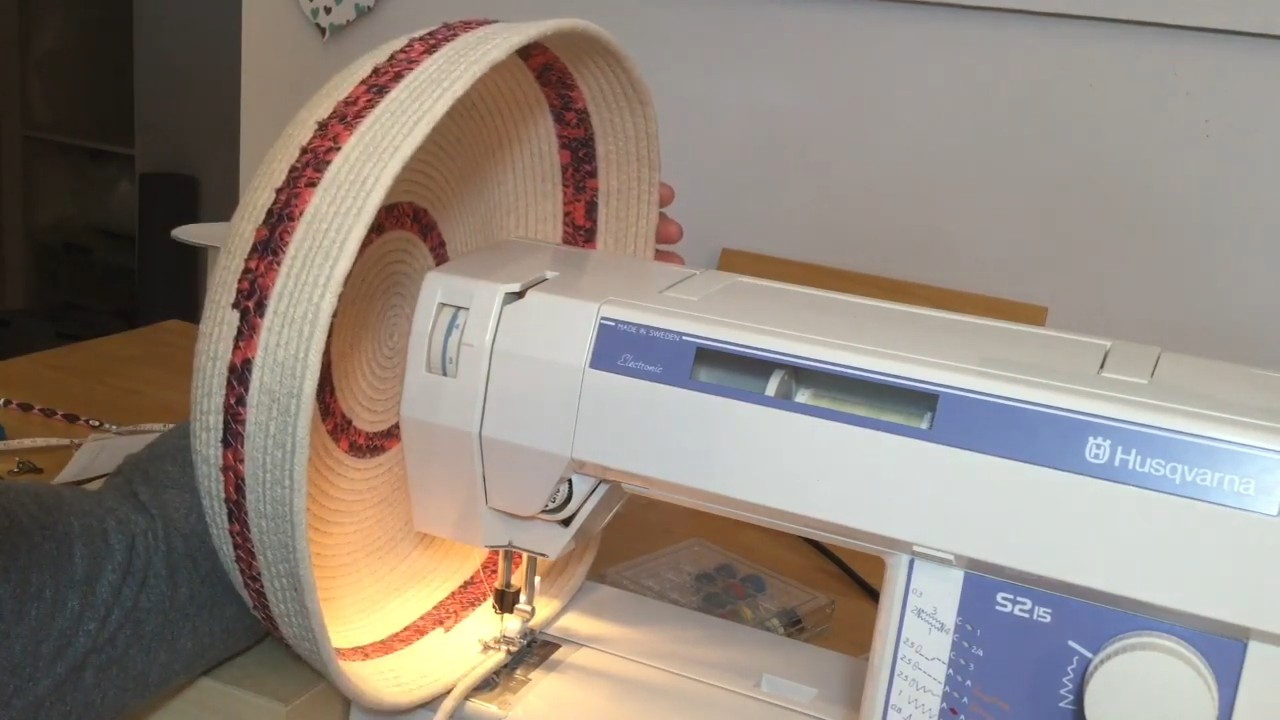
1. **Transition to the sides:** Once the base is complete, start gluing the rope on top of the outer edge of the base. This will begin to form the sides of the basket.
2. **Angle the rope (Optional):** If you want your basket to have a slightly angled shape, angle the rope slightly outwards as you glue it. For a straight-sided basket, keep the rope perpendicular to the base.
3. **Apply glue generously:** Apply a generous bead of hot glue to the rope and press it firmly against the previous layer. Make sure the rope is securely bonded to the base and to each other.
4. **Use clothespins or clips (Optional):** If you’re having trouble keeping the rope in place, use clothespins or clips to hold it together while the glue dries.
5. **Continue building the sides:** Continue gluing the rope around the base, layer by layer, until the sides of your basket reach your desired height. I made mine about 8 inches tall.
6. **Maintain consistent tension:** As you build the sides, try to maintain consistent tension on the rope. This will help prevent the basket from becoming lopsided or uneven.
7. **Check for gaps:** Periodically check for any gaps between the rope layers and fill them in with hot glue. This will ensure that your basket is strong and durable.
Creating the Handles (Optional)
Adding handles will make your basket even more functional and stylish. Here’s how to create them:
1. **Cut the leather or fabric:** Cut two pieces of leather or fabric to your desired handle size. I cut mine about 6 inches long and 1 inch wide.
2. **Punch holes (If using leather):** If you’re using leather, use an awl or leather punch to create two holes at each end of the leather strips. These holes will be used to attach the handles to the basket.
3. **Position the handles:** Decide where you want to position the handles on the basket. I placed mine on opposite sides, about 2 inches from the top edge.
4. **Attach the handles:** Use a needle and thread to sew the handles onto the basket. If you’re using leather, thread the needle through the holes you punched earlier. If you’re using fabric, simply sew the fabric strips securely to the basket.
5. **Reinforce the handles:** For extra durability, you can reinforce the handles by adding a few extra stitches or by using a stronger thread.
6. **Rope Handles (Alternative):** You can also create rope handles by braiding or twisting three strands of rope together. Secure the ends with glue and then attach them to the basket using glue or by sewing.
Finishing Touches
Now that our basket is complete, let’s add some finishing touches to make it extra special.
1. **Trim any loose ends:** Carefully trim any loose ends of rope with scissors or a utility knife.
2. **Secure any loose spots:** Check for any loose spots or gaps and fill them in with hot glue.
3. **Clean up any glue strings:** Remove any stray glue strings with your fingers or a pair of tweezers.
4. **Add embellishments (Optional):** You can add embellishments to your basket, such as beads, buttons, or tassels. Get creative and personalize your basket to match your style!
5. **Let it dry completely:** Allow the glue to dry completely before using your basket. This will ensure that the basket is strong and durable.
Tips and Tricks for Success
Here are a few extra tips and tricks to help you create the perfect rope basket organizer:
* Choose the right rope: The type of rope you use will greatly affect the look and feel of your basket. Cotton rope is a popular choice because it’s soft, durable, and easy to work with. Jute rope is another option, but it can be a bit rougher.
* Use a high-temperature glue gun: A high-temperature glue gun will provide a stronger bond than a low-temperature glue gun.
* Apply glue generously: Don’t be afraid to use plenty of glue. It’s better to use too much glue than not enough.
* Press firmly: Press the rope firmly against the previous layer to ensure a strong bond.
* Work in small sections: Work in small sections to prevent the glue from drying before you have a chance to secure the rope.
* Take your time: Don’
Conclusion
So, there you have it! Transforming ordinary rope into a stylish and functional basket organizer is not only achievable but surprisingly rewarding. We’ve walked you through the steps, highlighting the simplicity and adaptability of this fantastic DIY project. But why should you dedicate your time to crafting your own rope basket organizer?
Firstly, the satisfaction of creating something beautiful and useful with your own hands is unparalleled. In a world of mass-produced items, a handmade piece adds a touch of personality and uniqueness to your home. This isn’t just another storage solution; it’s a conversation starter, a testament to your creativity, and a reflection of your individual style.
Secondly, the cost-effectiveness of this DIY project is undeniable. Compared to purchasing a similar basket from a retail store, you’ll save a significant amount of money by using readily available rope and materials you might already have at home. Think of all the extra cash you’ll have for more rope, or maybe even a new plant to display in your gorgeous new basket!
Thirdly, and perhaps most importantly, this DIY rope basket organizer is incredibly versatile. Need a place to store your yarn and knitting needles? A stylish container for your bathroom toiletries? A charming home for your potted plants? This basket can do it all! The possibilities are truly endless.
But don’t stop there! Feel free to experiment with different types of rope. Consider using thicker rope for a more rustic look, or thinner, colorful rope for a playful, modern vibe. You can also incorporate embellishments like beads, tassels, or fabric scraps to further personalize your creation. Try painting the finished basket with acrylic paints for a pop of color, or adding a lining for extra durability and protection.
For a truly unique touch, consider using recycled materials. Old t-shirts or fabric scraps can be cut into strips and braided to create a colorful and eco-friendly rope alternative. This is a fantastic way to reduce waste and add a personal touch to your DIY project.
We encourage you to embrace your inner crafter and give this DIY rope basket organizer a try. It’s a fun, affordable, and rewarding project that will add both style and functionality to your home. And once you’ve created your masterpiece, don’t forget to share your experience with us! We’d love to see your unique creations and hear about any variations or tips you discovered along the way. Share your photos and stories on social media using #DIYRopeBasket and inspire others to get creative. Let’s build a community of DIY enthusiasts who appreciate the beauty and practicality of handmade crafts. So grab your rope, gather your supplies, and get ready to create a stunning and functional addition to your home. You won’t regret it!
Frequently Asked Questions (FAQ)
What kind of rope is best for making a rope basket organizer?
The best type of rope depends on the look and feel you’re going for. Natural fiber ropes like cotton or jute are popular choices for their rustic aesthetic and ease of handling. Cotton rope is soft and pliable, making it easy to work with, while jute rope offers a more textured and durable finish. Synthetic ropes like nylon or polypropylene are also options, offering greater water resistance and durability, but they may be more challenging to work with and less eco-friendly. Consider the thickness of the rope as well; thicker rope will create a sturdier basket, while thinner rope will result in a more delicate and flexible design. Ultimately, the best rope is the one that best suits your personal preferences and the intended use of your basket.
How do I prevent the rope from unraveling?
Preventing the rope from unraveling is crucial for a clean and professional-looking finish. There are several methods you can use to secure the ends of the rope. One common technique is to wrap the ends tightly with tape, such as masking tape or electrical tape. This will hold the fibers together and prevent them from fraying. Another option is to use a sealant like fabric glue or clear nail polish to coat the ends of the rope. This will create a hardened barrier that prevents unraveling. For a more permanent solution, you can whip the ends of the rope with twine or yarn, creating a decorative and functional binding. Choose the method that best suits your rope type and personal preference.
What kind of glue should I use to hold the rope together?
Choosing the right glue is essential for a strong and durable rope basket organizer. Hot glue is a popular choice for its quick-drying time and strong bond. However, it’s important to use a high-temperature hot glue gun and glue sticks for optimal results. Fabric glue is another excellent option, especially for natural fiber ropes. It provides a flexible and permanent bond that won’t crack or become brittle over time. Craft glue or all-purpose adhesive can also be used, but be sure to choose a product that is specifically designed for bonding porous materials like rope. Always test the glue on a small, inconspicuous area of the rope before applying it to the entire project to ensure it provides a strong and reliable bond.
Can I paint or decorate my rope basket organizer?
Absolutely! Painting and decorating your rope basket organizer is a fantastic way to personalize it and match it to your home decor. Acrylic paints are a great choice for painting rope, as they adhere well to the fibers and provide a durable, water-resistant finish. You can use stencils, freehand designs, or even ombre techniques to create unique and eye-catching patterns. Before painting, consider applying a primer to the rope to help the paint adhere better and prevent it from soaking into the fibers. You can also embellish your basket with beads, buttons, tassels, ribbons, or fabric scraps. Get creative and let your imagination run wild!
How do I clean my rope basket organizer?
Cleaning your rope basket organizer will depend on the type of rope used and the nature of the stain. For minor dirt and dust, you can simply vacuum the basket with a brush attachment or wipe it down with a damp cloth. For more stubborn stains, you can try spot cleaning with a mild detergent and warm water. Gently blot the stain with a clean cloth, being careful not to saturate the rope. Avoid using harsh chemicals or bleach, as these can damage the fibers and discolor the rope. If your basket is made from natural fiber rope, it’s best to avoid getting it too wet, as this can cause it to shrink or warp. Allow the basket to air dry completely after cleaning. For a deeper clean, you may consider hand-washing the basket in a tub of soapy water, but be sure to rinse it thoroughly and allow it to dry completely before using it again.
How can I make my rope basket organizer more sturdy?
There are several ways to enhance the sturdiness of your rope basket organizer. Using a thicker rope will naturally create a more robust and durable basket. You can also reinforce the base of the basket by adding a layer of cardboard or plywood to the bottom before attaching the rope. This will provide a solid foundation and prevent the basket from sagging or collapsing. Another technique is to use a tighter and more consistent coiling technique when constructing the basket. This will create a denser and more rigid structure. Finally, you can apply a sealant or varnish to the finished basket to protect the rope from moisture and wear and tear. This will also help to stiffen the fibers and make the basket more resistant to bending or warping.

Leave a Comment