

DIY Pot Protectors: Are pesky critters turning your precious potted plants into a buffet? I know the feeling! It’s incredibly frustrating to nurture your garden, only to find it’s become a free-for-all for squirrels, snails, or even the family cat. But don’t despair, fellow plant lovers! This article is your ultimate guide to creating simple, effective, and budget-friendly DIY pot protectors that will keep your green babies safe and thriving.
The concept of protecting plants is as old as gardening itself. Throughout history, gardeners have devised ingenious methods to shield their crops from pests and the elements. From ancient scarecrows to elaborate netting systems, the desire to safeguard our gardens is deeply ingrained in our agricultural heritage. Today, we’re taking that spirit of ingenuity and applying it to our beloved potted plants.
Why do you need these DIY tricks? Because store-bought solutions can be expensive and often lack the personal touch. Plus, crafting your own pot protectors is a fun and rewarding way to connect with your garden on a deeper level. Imagine the satisfaction of knowing you’ve created a safe haven for your plants, all while saving money and reducing waste. So, let’s dive in and discover how to build your own DIY pot protectors and reclaim your gardening space!
DIY Pot Protectors: Say Goodbye to Scratched Cookware!
Okay, friends, let’s talk about something near and dear to my heart (and my cookware!): keeping those precious pots and pans looking their best. I’ve been there – stacking them haphazardly, only to cringe later when I see the scratches and dings. That’s why I’m so excited to share this super easy and effective DIY pot protector project. It’s a game-changer!
Why You Need Pot Protectors (Trust Me!)
Before we dive in, let’s quickly cover why these little guys are so important.
* Prevent Scratches: This is the big one! Metal on metal is a recipe for disaster. Pot protectors create a soft barrier.
* Extend Cookware Lifespan: By preventing scratches and dents, you’re essentially prolonging the life of your pots and pans. Think of it as an investment!
* Reduce Noise: No more clanging and banging when you’re rummaging through your cabinets. These protectors dampen the sound.
* Easy and Affordable: Seriously, this is one of the easiest DIY projects ever, and it won’t break the bank.
Materials You’ll Need
Here’s what you’ll need to gather. Don’t worry, most of it you probably already have!
* Felt Fabric: This is the star of the show! I recommend using a thicker felt for better protection. You can find it at any craft store or online. Get a variety of colors to make it fun!
* Scissors: A good pair of sharp scissors is essential for clean cuts.
* Pencil or Fabric Marker: For tracing your pot sizes.
* Ruler or Measuring Tape: To measure the diameter of your pots and pans.
* Sewing Machine (Optional): If you want to get fancy and add a stitched edge.
* Thread (Optional): If you’re using a sewing machine.
* Hot Glue Gun and Glue Sticks (Optional): An alternative to sewing, but sewing is more durable.
* Cardboard (Optional): For creating templates, especially for odd-shaped pans.
Making Round Pot Protectors
This is the most common type, and it’s super simple.
1. Measure Your Pots and Pans: Use your ruler or measuring tape to determine the diameter of each pot and pan you want to protect. Add an extra inch or two to the diameter to ensure the protector is large enough to fully cover the surface. Write down the measurements for each pot.
2. Create a Template (Optional): If you’re making multiple protectors of the same size, creating a cardboard template can save you time. Draw a circle on cardboard using your measurements and cut it out.
3. Trace and Cut the Felt: Place your template (or directly measure and draw) onto the felt fabric. Trace around the template with your pencil or fabric marker. Cut out the felt circle using your scissors.
4. Cut a Second Layer (Recommended): For extra protection, cut out a second felt circle of the same size. This will give you a double layer of cushioning.
5. Assemble the Protector:
* Sewing (Optional): If you’re using a sewing machine, place the two felt circles together and sew around the edge, leaving a small seam allowance. This will create a neat and durable edge. A simple straight stitch is all you need.
* Hot Glue (Optional): If you’re using hot glue, carefully apply a thin line of glue around the edge of one felt circle. Quickly place the second felt circle on top and press firmly to adhere. Be careful not to burn yourself!
6. Repeat: Repeat steps 1-5 for all your round pots and pans.
Making Pot Protectors for Square or Rectangular Pans
Don’t worry, those oddly shaped pans can be protected too!
1. Measure Your Pans: Measure the length and width of each square or rectangular pan. Add an extra inch or two to each dimension.
2. Create a Template (Recommended): Creating a cardboard template is especially helpful for these shapes. Draw a rectangle or square on cardboard using your measurements and cut it out.
3. Trace and Cut the Felt: Place your template onto the felt fabric. Trace around the template with your pencil or fabric marker. Cut out the felt shape using your scissors.
4. Cut a Second Layer (Recommended): For extra protection, cut out a second felt shape of the same size.
5. Assemble the Protector:
* Sewing (Optional): Place the two felt shapes together and sew around the edge, leaving a small seam allowance.
* Hot Glue (Optional): Carefully apply a thin line of glue around the edge of one felt shape. Quickly place the second felt shape on top and press firmly to adhere.
6. Repeat: Repeat steps 1-5 for all your square or rectangular pans.
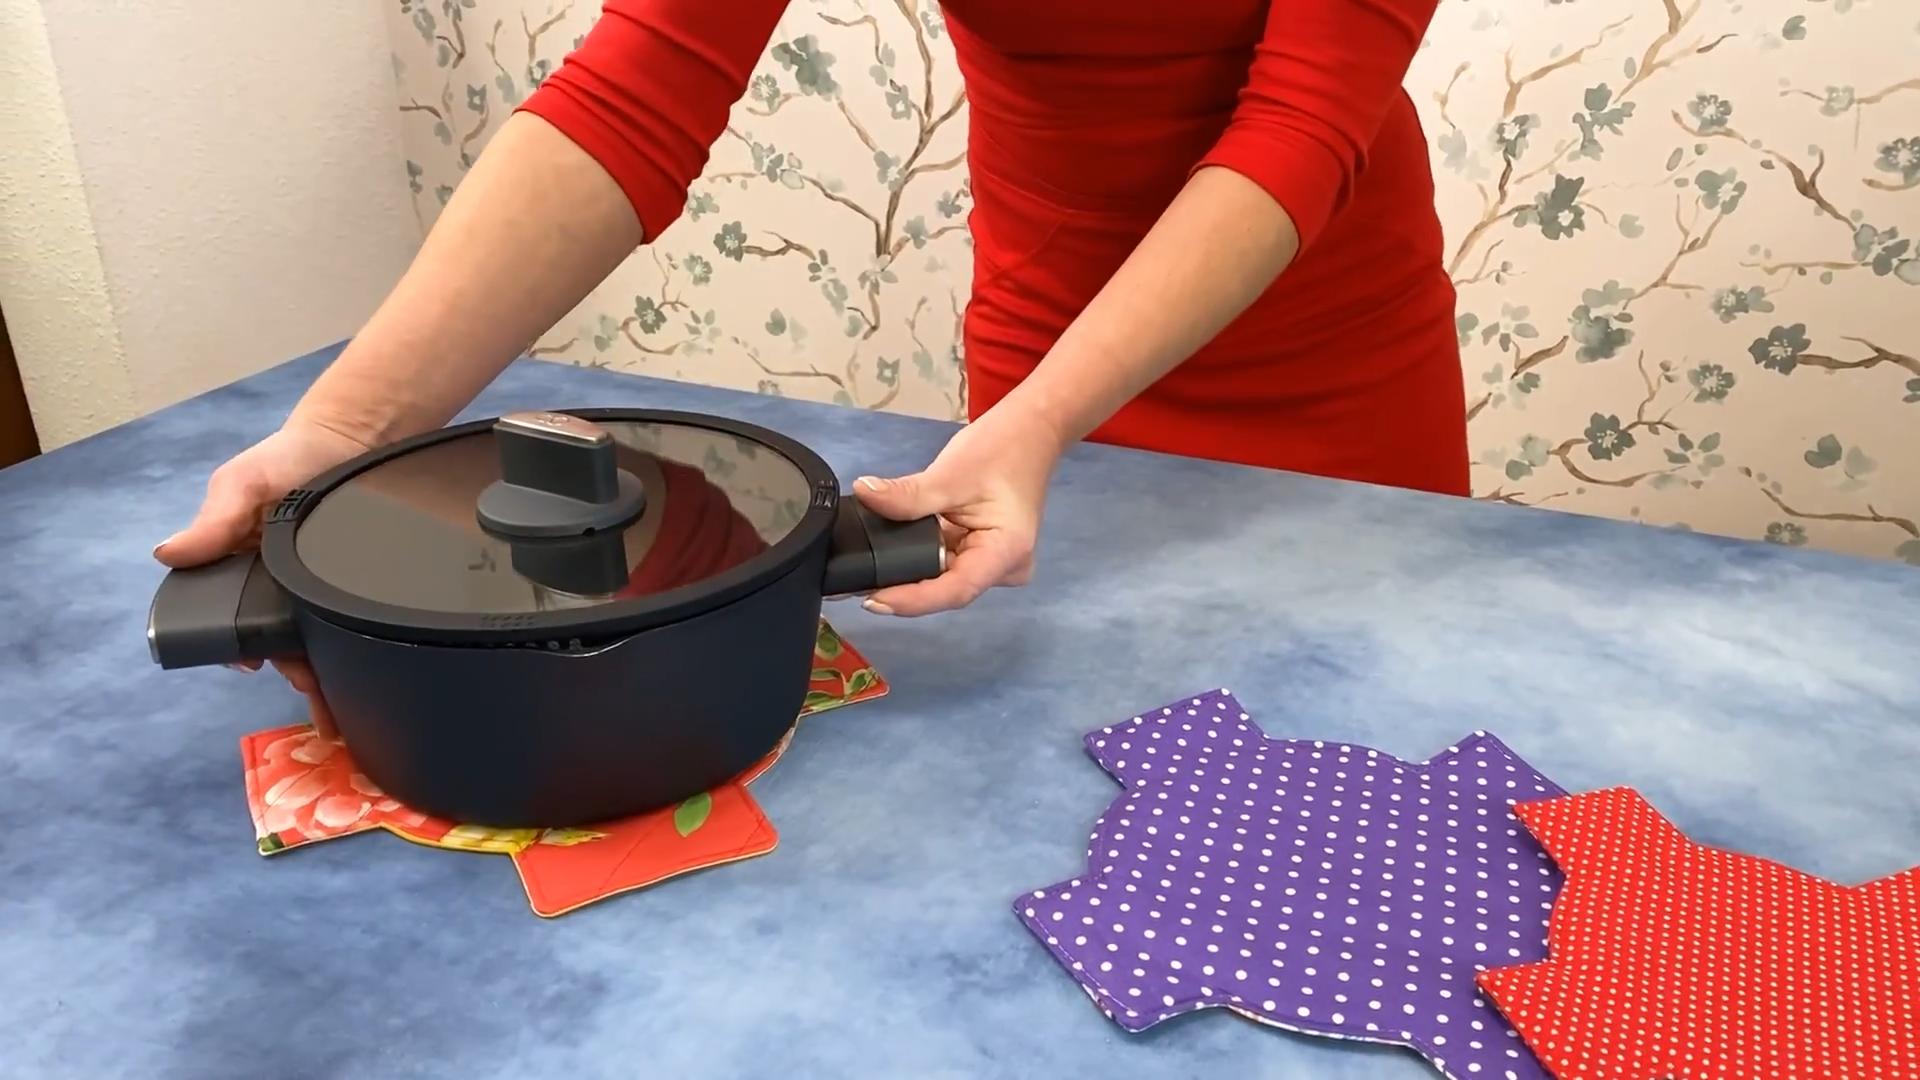
Making Pot Protectors for Pans with Handles
Handles can be a bit tricky, but we can handle it!
1. Measure Your Pan: Measure the diameter (or length and width) of the pan, excluding the handle.
2. Create a Template (Optional): Create a cardboard template of the pan’s shape, excluding the handle.
3. Trace and Cut the Felt: Place your template onto the felt fabric. Trace around the template. Now, here’s the trick: extend the tracing to include a small “flap” that will cover the handle area. The size of the flap will depend on the size and shape of your handle. Cut out the felt shape.
4. Cut a Second Layer (Recommended): Cut out a second felt shape of the same size, including the handle flap.
5. Assemble the Protector:
* Sewing (Optional): Place the two felt shapes together. Sew around the edge of the main pan shape, leaving the handle flap unsewn. You can optionally sew a small seam along the edge of the handle flap for a cleaner look.
* Hot Glue (Optional): Carefully apply a thin line of glue around the edge of the main pan shape, leaving the handle flap unglued.
6. Repeat: Repeat steps 1-5 for all your pans with handles.
Adding Extra Touches (Because Why Not?)
Want to personalize your pot protectors? Here are a few ideas:
* Embroidery: Add a simple embroidered design or initial to each protector.
* Appliqués: Sew or glue on small felt shapes, like flowers or stars.
* Different Colors: Use different colors of felt for each pot size to easily identify them.
* Scalloped Edges: Use decorative scissors to create scalloped edges.
Storing Your Pot Protectors
When you’re not using them, you can store your pot protectors in a drawer or basket near your cookware. I like to keep mine stacked neatly so they’re easy to grab when I need them.
Tips and Tricks for Success
* Use High-Quality Felt: Thicker felt provides better protection and will last longer.
* Measure Accurately: Accurate measurements are key to creating protectors that fit properly.
* Don’t Overdo the Glue: If you’re using hot glue, use a thin layer to avoid creating a bulky edge.
* Let the Glue Dry Completely: Before using your protectors, make sure the glue is completely dry.
* Washable Felt: If you anticipate needing to wash your pot protectors, use washable felt. Hand wash gently and air dry.
Troubleshooting
* Protector Too Small: If your protector is too small, you can try adding a border of felt around the edge.
* Protector Too Big: If your protector is too big, simply trim it down to size.
* Glue Not Holding: Make sure the surfaces are clean and dry before applying glue. Use a high-quality hot glue gun and glue sticks.
Alternative Materials
While felt is my go-to, here are a few other materials you could use:
* Old T-Shirts: Cut up old t-shirts and use the fabric to create your protectors. This is a great way to recycle!
* Quilted Fabric: Quilted fabric provides extra cushioning.
* Cork: Thin cork sheets can be cut into circles or squares.
Final Thoughts
And there you have it! DIY pot protectors that will keep your cookware looking its best. This is such a simple and rewarding project, and I know you’ll love the results. Happy crafting! I hope you found this guide helpful and that your pots and pans are now living their best, scratch-free lives!
Conclusion
So, there you have it! Crafting your own DIY pot protectors is not just a clever way to save money; it’s an investment in the longevity of your cookware and a testament to your resourcefulness in the kitchen. Think about it: no more cringing every time you stack your precious pots and pans, no more worrying about unsightly scratches and dents diminishing their performance and appearance. This simple project offers a tangible solution to a common kitchen woe, and the best part? It’s completely customizable to your specific needs and aesthetic preferences.
Why is this a must-try? Because it’s effective, economical, and eco-friendly. Store-bought pot protectors can be expensive and often come in limited sizes and materials. With this DIY approach, you control the materials, ensuring they are gentle on your cookware and align with your sustainability goals. You can repurpose old felt, fleece, or even thick cotton fabric scraps, giving them a new lease on life and reducing waste.
But the benefits extend beyond mere practicality. This project offers a creative outlet, allowing you to personalize your kitchen organization. Consider using patterned fabrics to add a pop of color to your cabinets or choosing colors that complement your existing kitchen décor. You could even embroider initials or small designs onto the protectors for a truly unique touch.
Looking for variations? Experiment with different materials to find what works best for your cookware. Thicker felt provides extra cushioning for heavier pots, while thinner fleece is ideal for delicate non-stick surfaces. You can also create protectors in various shapes and sizes to accommodate different types of cookware, from small saucepans to large stockpots. For added protection, consider adding a layer of batting or padding between the fabric layers. If you’re feeling particularly crafty, you could even knit or crochet your own pot protectors!
Don’t limit yourself to just pots and pans. These DIY protectors can also be used to protect other delicate items in your kitchen, such as glass bowls, serving dishes, and even cast iron skillets. The possibilities are endless!
We wholeheartedly encourage you to give this DIY pot protector project a try. It’s a rewarding and practical way to enhance your kitchen organization and protect your valuable cookware. Once you’ve created your own set of pot protectors, we’d love to hear about your experience! Share your photos, tips, and variations in the comments below. Let’s inspire each other to create a more organized and beautiful kitchen, one DIY project at a time. What materials did you use? What creative touches did you add? Your insights could be invaluable to other readers embarking on this project. So, grab your fabric scraps, dust off your sewing machine (or needle and thread), and get ready to transform your kitchen storage! Happy crafting!
Frequently Asked Questions (FAQ)
What type of fabric is best for DIY pot protectors?
The best fabric for DIY pot protectors is soft, non-abrasive, and heat-resistant. Felt, fleece, and thick cotton are all excellent choices. Felt is durable and provides good cushioning, while fleece is exceptionally gentle on non-stick surfaces. Cotton is a natural fiber that is breathable and easy to clean. Avoid using fabrics that are prone to shedding or that could potentially scratch your cookware. Consider the weight of your cookware when selecting your fabric; heavier pots may require thicker, more robust materials.
How do I determine the right size for my pot protectors?
To determine the right size, measure the diameter of your pots and pans. Add a few inches to this measurement to allow for overlap and ensure complete coverage. You can create circular or square protectors, depending on your preference. For odd-shaped cookware, trace the outline onto paper and use that as a template for cutting your fabric. Remember, it’s always better to err on the side of slightly larger protectors than ones that are too small.
Can I wash my DIY pot protectors?
Yes, most DIY pot protectors made from washable fabrics like cotton or fleece can be laundered. However, it’s essential to check the care instructions for the specific fabric you used. Machine wash on a gentle cycle with cold water and mild detergent. Tumble dry on low heat or air dry to prevent shrinkage. Felt protectors may require hand washing to maintain their shape and prevent felting. Avoid using bleach or harsh chemicals, as these can damage the fabric and potentially transfer to your cookware.
Do I need a sewing machine to make these?
No, a sewing machine is not essential. You can easily hand-sew your pot protectors using a simple running stitch or blanket stitch. Hand-sewing may take a bit longer, but it’s a perfectly viable option, especially for smaller projects or if you don’t have access to a sewing machine. If you choose to hand-sew, use a sturdy needle and durable thread.
How can I make my pot protectors more durable?
To enhance the durability of your pot protectors, consider adding a layer of batting or padding between the fabric layers. This will provide extra cushioning and protection against scratches and dents. You can also reinforce the edges with binding or bias tape to prevent fraying. Choose high-quality fabrics and use strong, durable thread for sewing. Regularly inspect your pot protectors for wear and tear and repair any damage promptly.
Are there any safety precautions I should take when making DIY pot protectors?
When using a sewing machine, always follow the manufacturer’s instructions and take necessary safety precautions. Keep your fingers away from the needle and use a seam ripper to remove any mistakes. If hand-sewing, be careful not to prick your fingers with the needle. When cutting fabric, use sharp scissors or a rotary cutter and a cutting mat to prevent accidents. Store your sewing supplies in a safe place, away from children and pets.
Can I use recycled materials for this project?
Absolutely! Using recycled materials is a great way to make your DIY pot protectors even more eco-friendly. Old felt sweaters, fleece blankets, and cotton t-shirts can all be repurposed into pot protectors. Just make sure the materials are clean and free of any stains or odors. This is a fantastic way to reduce waste and give new life to items that would otherwise end up in the landfill.
How do I store my DIY pot protectors when not in use?
When not in use, store your DIY pot protectors in a clean, dry place. You can stack them neatly in a drawer or cabinet, or hang them on hooks using loops sewn onto the protectors. Avoid storing them in damp or humid environments, as this can lead to mold or mildew growth. Regularly clean and inspect your pot protectors to ensure they remain in good condition.
What if I don’t have any fabric scraps? Where can I get affordable materials?
If you don’t have any fabric scraps on hand, there are several affordable options for sourcing materials. Check your local thrift stores for inexpensive felt, fleece, or cotton clothing that can be repurposed. Fabric stores often have remnants or sale sections where you can find discounted materials. You can also purchase fabric online from various retailers. Consider asking friends or family members if they have any fabric scraps they’re willing to donate.
Can I customize my pot protectors with embellishments?
Yes, absolutely! Customizing your pot protectors with embellishments is a great way to add a personal touch to your kitchen organization. You can embroider initials, monograms, or small designs onto the protectors. Appliqué is another fun option for adding decorative elements. Consider using fabric paint to create unique patterns or designs. Just be sure to use embellishments that are durable and won’t scratch your cookware.

Leave a Comment