

DIY Origami Box Tutorial: Unlock the Ancient Art of Paper Folding! Have you ever wanted to create something beautiful and functional with just a simple piece of paper? I’m thrilled to share a fantastic DIY project that’s both rewarding and surprisingly easy: crafting your own origami box! This isn’t just about folding paper; it’s about connecting with a centuries-old tradition.
Origami, the Japanese art of paper folding, has a rich history dating back to the 6th century. Initially, it was used for ceremonial purposes and reserved for the elite. Over time, it evolved into a beloved art form enjoyed by people of all ages and backgrounds. Today, we’re bringing this elegant craft into your home with a practical twist.
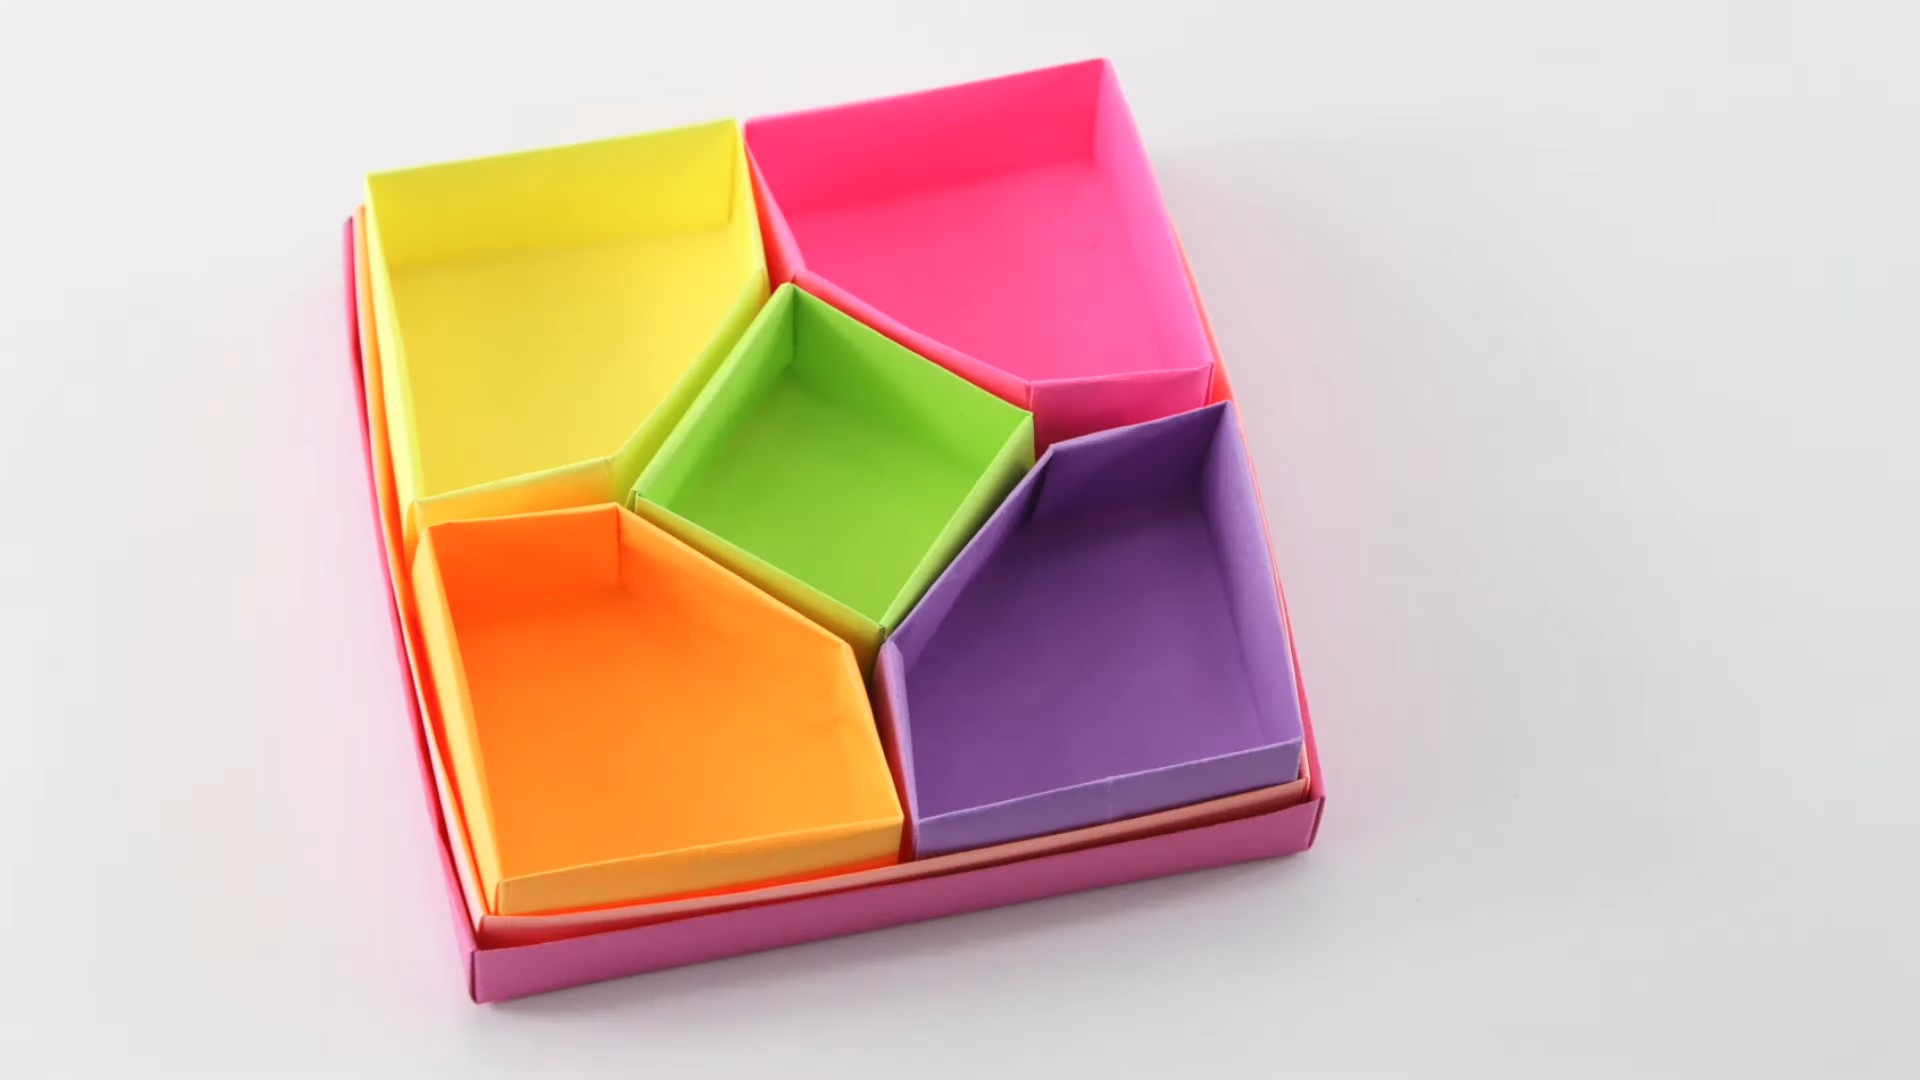
Why learn this DIY Origami Box Tutorial? Well, think about it: how often do you need a small container for jewelry, desk supplies, or little trinkets? Instead of buying plastic boxes, you can create unique, eco-friendly containers that reflect your personal style. Plus, it’s a fantastic way to relax, de-stress, and unleash your creativity. This DIY Origami Box Tutorial is perfect for anyone looking for a simple, satisfying project that adds a touch of handmade charm to their life. Let’s get folding!
DIY Origami Box: A Fun and Functional Project!
Hey there, fellow crafters! I’m so excited to share this super cool origami box tutorial with you. It’s surprisingly easy to make, and the best part is, you only need paper! This box is perfect for storing small items like jewelry, paperclips, or even little candies. Plus, it makes a fantastic handmade gift. Let’s get folding!
Materials You’ll Need:
* Two square sheets of paper. Make sure they are the same size! I recommend using paper that’s at least 6×6 inches for a decent-sized box. Cardstock works well for a sturdier box, but regular origami paper is fine too.
* A ruler (optional, but helpful for crisp folds).
* Scissors (optional, for trimming any uneven edges).
Understanding the Basics:
Before we dive in, let’s quickly go over some basic origami folds. Don’t worry, it’s not as intimidating as it sounds!
* Valley Fold: This is a fold where the paper is folded towards you, creating a “valley” shape.
* Mountain Fold: This is the opposite of a valley fold, where the paper is folded away from you, creating a “mountain” shape.
* Squash Fold: This is a slightly more advanced fold, but I’ll guide you through it step-by-step. It involves opening up a pocket and flattening it down.
Making the Box Base:
We’ll start by making the base of the box. This is the slightly smaller of the two pieces we’ll be creating.
1. Start with your first square sheet of paper. Place it on a flat surface with the colored side (if you’re using patterned paper) facing down.
2. Fold the paper in half diagonally, creating a valley fold. Make sure the corners line up perfectly. Crease the fold sharply. Unfold.
3. Fold the paper in half diagonally again, in the opposite direction, creating another valley fold. Again, ensure the corners are aligned and crease sharply. Unfold. You should now have two diagonal creases that intersect in the center of the paper.
4. Fold the paper in half horizontally, creating a valley fold. Crease sharply and unfold.
5. Fold the paper in half vertically, creating a valley fold. Crease sharply and unfold. Now you should have a grid of creases on your paper.
6. Collapse the paper into a square. This might sound tricky, but it’s easier than it looks. Use the creases you’ve made to gently push the sides of the paper inwards. The four corners should meet in the center, forming a smaller square.
7. Fold the top layer of the top two flaps to the center line. Imagine a line running vertically down the middle of the square. Fold the top right corner to meet this line, and then fold the top left corner to meet the same line. Crease sharply.
8. Repeat on the bottom two flaps. Fold the bottom right corner to the center line, and then fold the bottom left corner to the same line. Crease sharply. You should now have a shape that looks like a diamond.
9. Unfold the last four folds you just made. You’ll see the creases you made.
10. Fold the top flap upwards, using the creases you made in step 7 as a guide. You’re essentially folding along the creases to create a small triangle at the top.
11. Repeat on the bottom flap. Fold the bottom flap upwards, using the creases from step 8 to create a small triangle at the bottom.
12. Now, fold the right flap inwards, using the creases as a guide. This will create a side wall for the box.
13. Repeat on the left flap. Fold the left flap inwards to create the other side wall.
14. Repeat steps 10-13 on the back side of the paper. This will create the remaining two side walls of the box.
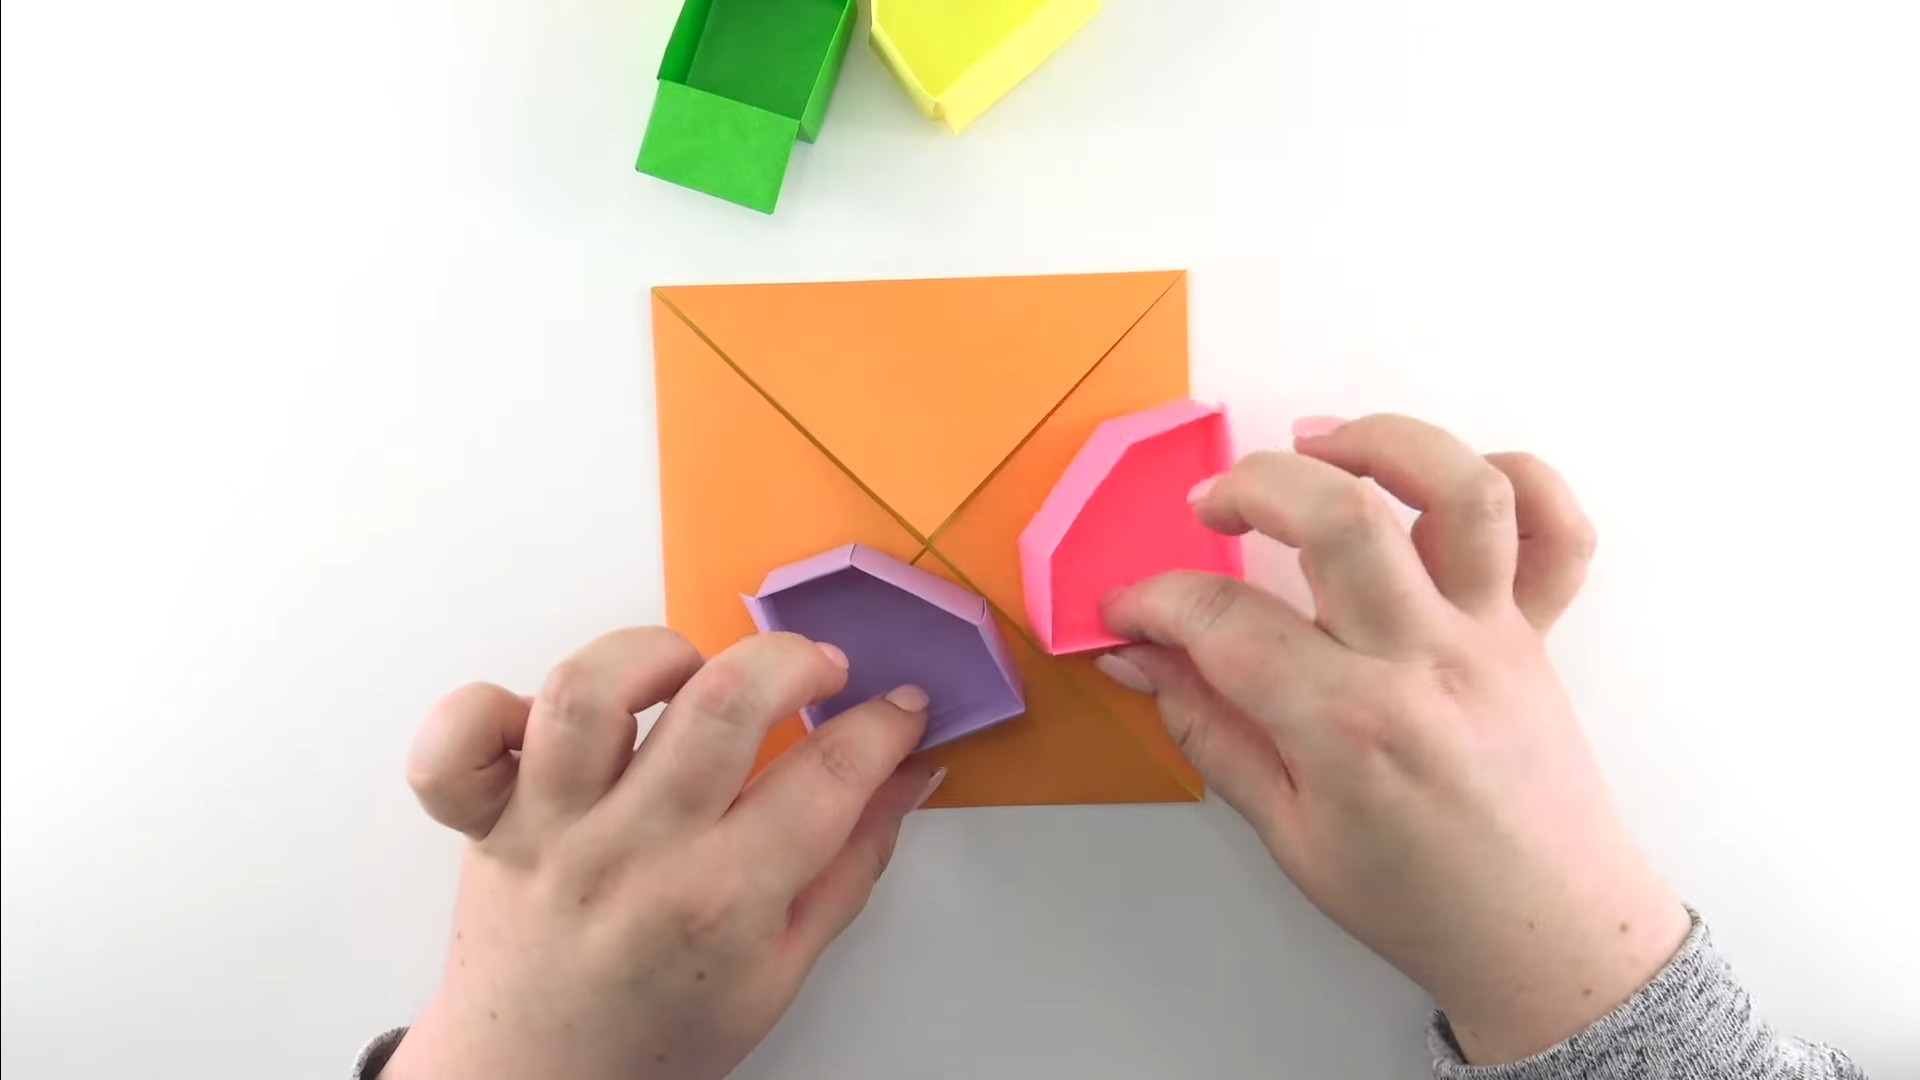
15. Shape the box. Gently push the corners of the box outwards to give it a more defined shape. You might need to adjust the folds slightly to get it looking just right.
Making the Box Lid:
Now, let’s move on to making the lid. The process is almost identical to making the base, but with one small adjustment to ensure the lid fits snugly over the base.
1. Start with your second square sheet of paper. Place it on a flat surface with the colored side (if you’re using patterned paper) facing down.
2. Repeat steps 2-6 from the “Making the Box Base” section. This means folding the paper diagonally in both directions, horizontally, and vertically, and then collapsing it into a square.
3. Fold the top layer of the top two flaps to the center line. Just like before, fold the top right corner to meet the center line, and then fold the top left corner to meet the same line. Crease sharply.
4. Repeat on the bottom two flaps. Fold the bottom right corner to the center line, and then fold the bottom left corner to the same line. Crease sharply. You should now have a shape that looks like a diamond.
5. Unfold the last four folds you just made. You’ll see the creases you made.
6. Fold the top flap upwards, using the creases you made in step 3 as a guide. You’re essentially folding along the creases to create a small triangle at the top.
7. Repeat on the bottom flap. Fold the bottom flap upwards, using the creases from step 4 to create a small triangle at the bottom.
8. Now, fold the right flap inwards, using the creases as a guide. This will create a side wall for the box.
9. Repeat on the left flap. Fold the left flap inwards to create the other side wall.
10. Repeat steps 6-9 on the back side of the paper. This will create the remaining two side walls of the box.
11. Shape the box. Gently push the corners of the box outwards to give it a more defined shape. You might need to adjust the folds slightly to get it looking just right.
Ensuring a Perfect Fit:
Here’s the key to making sure the lid fits perfectly:
* Slightly adjust the folds of the lid. The lid needs to be just a tiny bit larger than the base. You can achieve this by gently stretching the folds outwards, especially the folds along the side walls. You can also try slightly flattening the triangles at the top and bottom of the lid.
Putting It All Together:
1. Test the fit. Carefully place the lid over the base. It should fit snugly, but not too tightly. If it’s too tight, gently adjust the folds of the lid until it fits comfortably.
2. Admire your creation! You’ve just created a beautiful and functional origami box.
Tips and Tricks for Success:
* Use crisp folds. Sharp, clean folds are essential for a well-made origami box. Use a ruler to help you create crisp creases.
* Be patient. Origami can be a bit tricky at first, so don’t get discouraged if you don’t get it right away. Just keep practicing, and you’ll get the hang of it.
* Experiment with different papers. Try using different colors, patterns, and textures of paper to create unique and personalized boxes.
* Watch video tutorials. If you’re having trouble following the written instructions, there are plenty of video tutorials available online that can help you visualize the folding process.
* Don’t be afraid to get creative! Once you’ve mastered the basic origami box, you can experiment with different variations and embellishments.
Troubleshooting:
* My lid is too small! Gently stretch the folds of the lid outwards, especially the folds along the side walls. You can also try slightly flattening the triangles at the top and bottom of the lid.
* My lid is too big! Try folding the side walls of the lid inwards a little bit more.
* My box is collapsing! Make sure your folds are crisp and secure. You can also try using a slightly thicker paper, like cardstock.
* I’m getting frustrated! Take a break! Origami can be challenging, so don’t be afraid to step away and come back to it later.
Variations and Embellishments:
* Add a ribbon. Tie a ribbon around the box for a decorative touch.
* Decorate with stickers or markers. Personalize your box with stickers, markers, or paint.
* Use patterned paper. Choose patterned paper that reflects your personal style or the occasion.
* Make a mini box. Use
Conclusion
So, there you have it! Crafting your own origami box is not just a fun and engaging activity; it’s a remarkably practical and rewarding one. Forget those flimsy, mass-produced containers that clutter your drawers and lack any personal touch. This simple yet elegant DIY origami box offers a sustainable, customizable, and undeniably charming alternative.
Why is this a must-try? Because it empowers you to create something beautiful and functional from a single sheet of paper. It’s a fantastic way to reduce waste, repurpose old materials like magazines or wrapping paper, and add a personal touch to your gift-giving or organizational efforts. Imagine presenting a small gift in a handcrafted box, perfectly tailored to the occasion and reflecting your thoughtfulness. Or picture your desk, neatly organized with a collection of these boxes, each holding different supplies and adding a touch of artistry to your workspace.
The possibilities are truly endless. Feel free to experiment with different paper types. Sturdy cardstock will create a more robust box, ideal for heavier items, while delicate patterned paper will lend an air of sophistication to your creations. Consider using double-sided paper for a visually stunning effect, revealing contrasting colors as the box is folded. You can also embellish your boxes with ribbons, beads, stamps, or paint to further personalize them. For a more secure closure, try adding a small piece of double-sided tape or a tiny magnet.
Don’t be afraid to scale the dimensions up or down to suit your specific needs. A larger box can hold jewelry, small trinkets, or even baked goods, while a smaller box is perfect for storing buttons, paperclips, or other tiny essentials. The beauty of this DIY project lies in its adaptability.
We wholeheartedly encourage you to give this DIY origami box tutorial a try. It’s a fantastic project for crafters of all skill levels, from beginners to seasoned origami enthusiasts. It’s also a wonderful activity to share with children, fostering their creativity and fine motor skills.
Once you’ve mastered the basic fold, we’re confident you’ll be hooked! We’d love to see your creations. Share your photos and experiences with us on social media using #DIYOrigamiBox. Let’s inspire each other with our unique designs and innovative uses for these charming little boxes. Happy folding!
Frequently Asked Questions (FAQ)
What kind of paper is best for making an origami box?
The best paper for your DIY origami box depends on the intended use and desired aesthetic. For beginners, we recommend using standard printer paper or origami paper. These papers are readily available, easy to fold, and come in a variety of colors and patterns. For a sturdier box, consider using cardstock or thicker paper. Decorative paper, such as scrapbook paper or wrapping paper, can add a unique touch. Experiment with different types to find what works best for you. Just be mindful of the paper’s thickness; excessively thick paper can be difficult to fold neatly.
Is this origami box difficult to make?
No, this DIY origami box is designed to be relatively simple, even for beginners. The tutorial provides clear, step-by-step instructions that are easy to follow. With a little patience and practice, you’ll be able to create a beautiful and functional box in no time. If you’re new to origami, we recommend starting with a larger piece of paper, as this will make the folds easier to manage. Don’t be discouraged if your first attempt isn’t perfect; keep practicing, and you’ll quickly improve your technique.
Can I use this origami box for gift wrapping?
Absolutely! A DIY origami box is a wonderful and eco-friendly alternative to traditional gift wrapping. It adds a personal touch to your gifts and shows that you put extra thought and effort into the presentation. You can customize the box to match the occasion or the recipient’s personality by using different paper colors, patterns, and embellishments. For a more secure closure, consider adding a ribbon or a small piece of tape.
How can I make the origami box more durable?
To make your DIY origami box more durable, choose a thicker paper, such as cardstock or heavy-weight paper. You can also reinforce the corners and edges of the box with glue or tape. For added stability, consider lining the inside of the box with a piece of cardboard or felt. If you plan to use the box to store heavier items, it’s best to use a sturdier paper and reinforce the construction.
What are some other uses for an origami box?
Besides gift wrapping, a DIY origami box can be used for a variety of purposes. They’re perfect for organizing small items, such as jewelry, buttons, paperclips, and other desk supplies. They can also be used as decorative containers for plants, candles, or potpourri. Children can use them to store their toys or art supplies. The possibilities are endless! Let your creativity guide you and find new and innovative ways to use these versatile little boxes.
Can I make different sizes of origami boxes?
Yes, you can easily adjust the size of your DIY origami box by using different sizes of paper. The larger the paper, the larger the box will be. To create a smaller box, simply use a smaller piece of paper. Experiment with different sizes to find the perfect dimensions for your needs. Keep in mind that the proportions of the box will remain the same, regardless of the paper size.
How do I prevent the origami box from unfolding?
To prevent your DIY origami box from unfolding, make sure your folds are crisp and precise. You can also use a bone folder or a similar tool to crease the folds more firmly. For added security, consider adding a small piece of double-sided tape or a tiny magnet to hold the box closed. If you’re using a thinner paper, you may want to reinforce the folds with glue.
Where can I find inspiration for decorating my origami box?
There are many sources of inspiration for decorating your DIY origami box. Browse online craft blogs, social media platforms like Pinterest and Instagram, and origami books for ideas. Consider using different paper colors, patterns, and textures. Embellish your boxes with ribbons, beads, stamps, paint, or other decorative elements. Let your imagination run wild and create unique and personalized boxes that reflect your style.
Is this a good project for kids?
Yes, making a DIY origami box is a great project for kids. It’s a fun and engaging activity that can help develop their fine motor skills, hand-eye coordination, and problem-solving abilities. It also encourages creativity and self-expression. Supervise children closely, especially when using scissors or glue. Start with a simple design and gradually introduce more complex folds as they gain confidence.
What if I make a mistake while folding?
Don’t worry if you make a mistake while folding your DIY origami box. Origami is all about practice and patience. If you make a mistake, simply unfold the paper and start again. If the paper is creased or torn, you may need to use a new sheet. Don’t be discouraged; everyone makes mistakes when learning origami. The more you practice, the better you’ll become.

Leave a Comment