

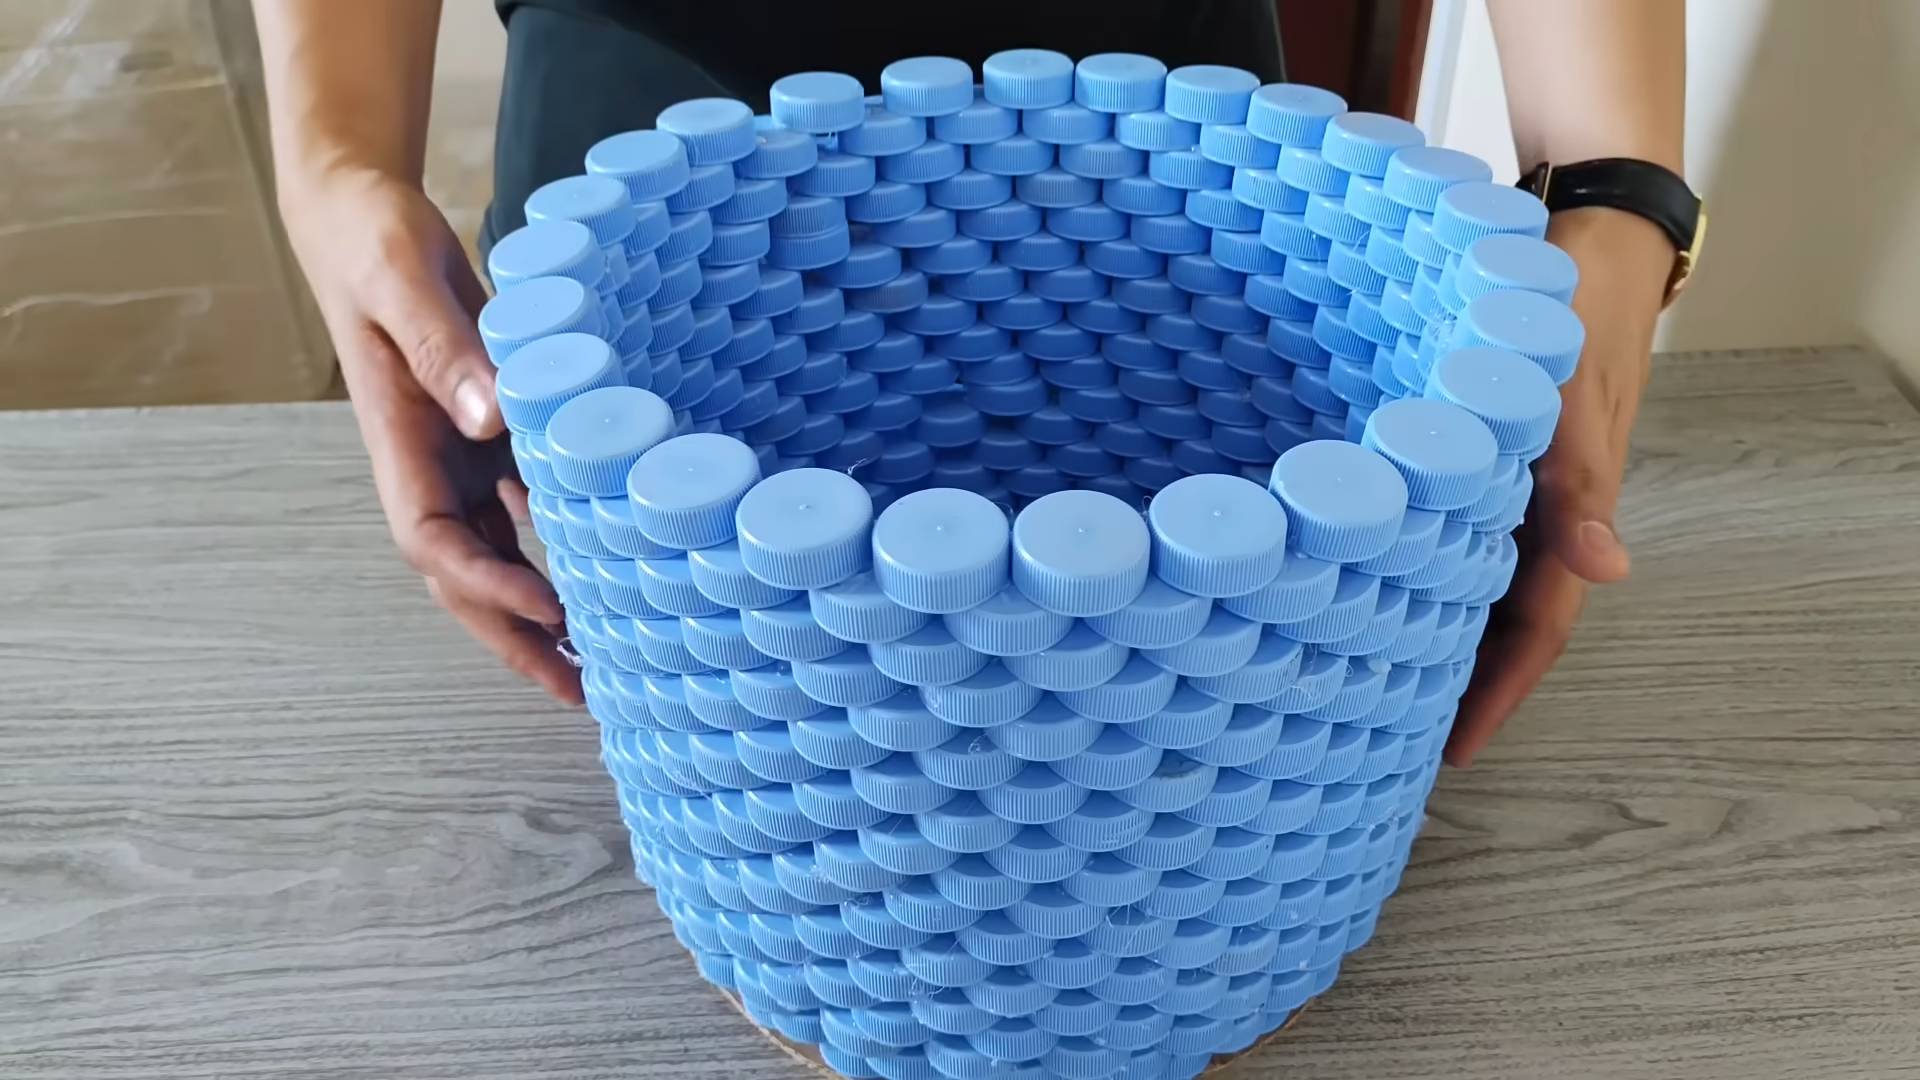
DIY Laundry Basket from Caps: Who knew those discarded bottle caps could be the key to a stylish and sustainable laundry solution? I’m always on the lookout for ways to reduce waste and add a personal touch to my home, and this project ticks all the boxes!
Recycling, in its various forms, has been practiced for centuries. From melting down bronze in ancient times to repurposing fabrics during wartime, the concept of giving materials a second life is deeply ingrained in human history. Today, with growing concerns about plastic pollution, finding creative ways to upcycle is more important than ever. This DIY Laundry Basket from Caps isn’t just a craft project; it’s a small step towards a more eco-conscious lifestyle.
Let’s face it, laundry baskets can be bulky, boring, and often made of materials that aren’t exactly environmentally friendly. But what if you could create a unique, durable, and visually appealing laundry basket using something you’d normally throw away? This DIY project offers a fantastic alternative, allowing you to personalize your laundry routine while contributing to a cleaner planet. Plus, it’s a great conversation starter! Imagine the look on your friends’ faces when they ask where you got such a cool laundry basket, and you proudly say, “I made it myself, from bottle caps!”
Ready to transform your trash into treasure? Let’s dive into the step-by-step guide to creating your very own DIY Laundry Basket from Caps!
DIY Laundry Basket from Plastic Bottle Caps: A Sustainable & Stylish Solution
Hey there, fellow DIY enthusiasts! Are you drowning in plastic bottle caps and wondering what to do with them? Well, I’ve got a fantastic project for you: a sturdy and surprisingly stylish laundry basket made entirely from recycled plastic bottle caps! This project is not only a great way to reduce plastic waste but also results in a unique and eye-catching piece for your home. It’s a bit time-consuming, I won’t lie, but the satisfaction of creating something beautiful and functional from discarded materials is totally worth it. Let’s get started!
Materials You’ll Need:
* A mountain of plastic bottle caps (seriously, you’ll need hundreds, maybe even thousands depending on the size of your desired basket). Start collecting now! Different colors will add visual interest.
* Strong adhesive (I recommend a high-quality epoxy or construction adhesive that bonds well with plastic). Make sure it’s waterproof!
* A sturdy base for your basket (a large plastic bucket lid, a piece of plywood cut into a circle or square, or even a pre-made basket base from a craft store will work).
* Gloves (to protect your hands from the adhesive).
* A well-ventilated workspace (the adhesive fumes can be strong).
* Clamps or weights (to hold the caps in place while the adhesive dries).
* Measuring tape or ruler.
* Patience! This project takes time and dedication.
* Optional: Spray paint (to seal and add a protective layer to the finished basket).
* Optional: Fabric liner (to protect delicate clothes).
Planning Your Basket: Size and Design
Before you dive in, it’s a good idea to plan the size and design of your laundry basket. Consider these factors:
* **Size:** How much laundry do you typically accumulate? A larger basket will require more caps and a sturdier base.
* **Shape:** Do you want a round, square, or rectangular basket? A round basket is generally easier to construct.
* **Color Scheme:** Will you use a random assortment of colors, or will you create a specific pattern? Sorting your caps by color beforehand will make the process much smoother.
* **Base:** The base will determine the overall shape and stability of your basket. Choose a base that is strong enough to support the weight of the laundry and the caps.
Step-by-Step Instructions: Building Your Laundry Basket
Okay, let’s get our hands dirty! Here’s the step-by-step guide to creating your amazing bottle cap laundry basket:
1. **Prepare Your Base:** If you’re using a plastic bucket lid or a piece of plywood, make sure it’s clean and dry. If you’re using plywood, you might want to seal it with a primer to prevent moisture damage.
2. **The First Layer: Attaching Caps to the Base:** This is the foundation of your basket, so take your time and make sure the caps are securely attached.
* Apply a generous amount of adhesive to the bottom of a bottle cap.
* Press the cap firmly onto the base, holding it in place for a few seconds until the adhesive starts to set.
* Repeat this process, placing the caps close together to create a solid ring around the edge of the base. Leave minimal gaps.
* Continue filling in the base, working your way towards the center. You can arrange the caps in a circular pattern or a random pattern, depending on your preference.
* Use clamps or weights to hold the caps in place while the adhesive dries completely (usually 24 hours). This will ensure a strong bond.
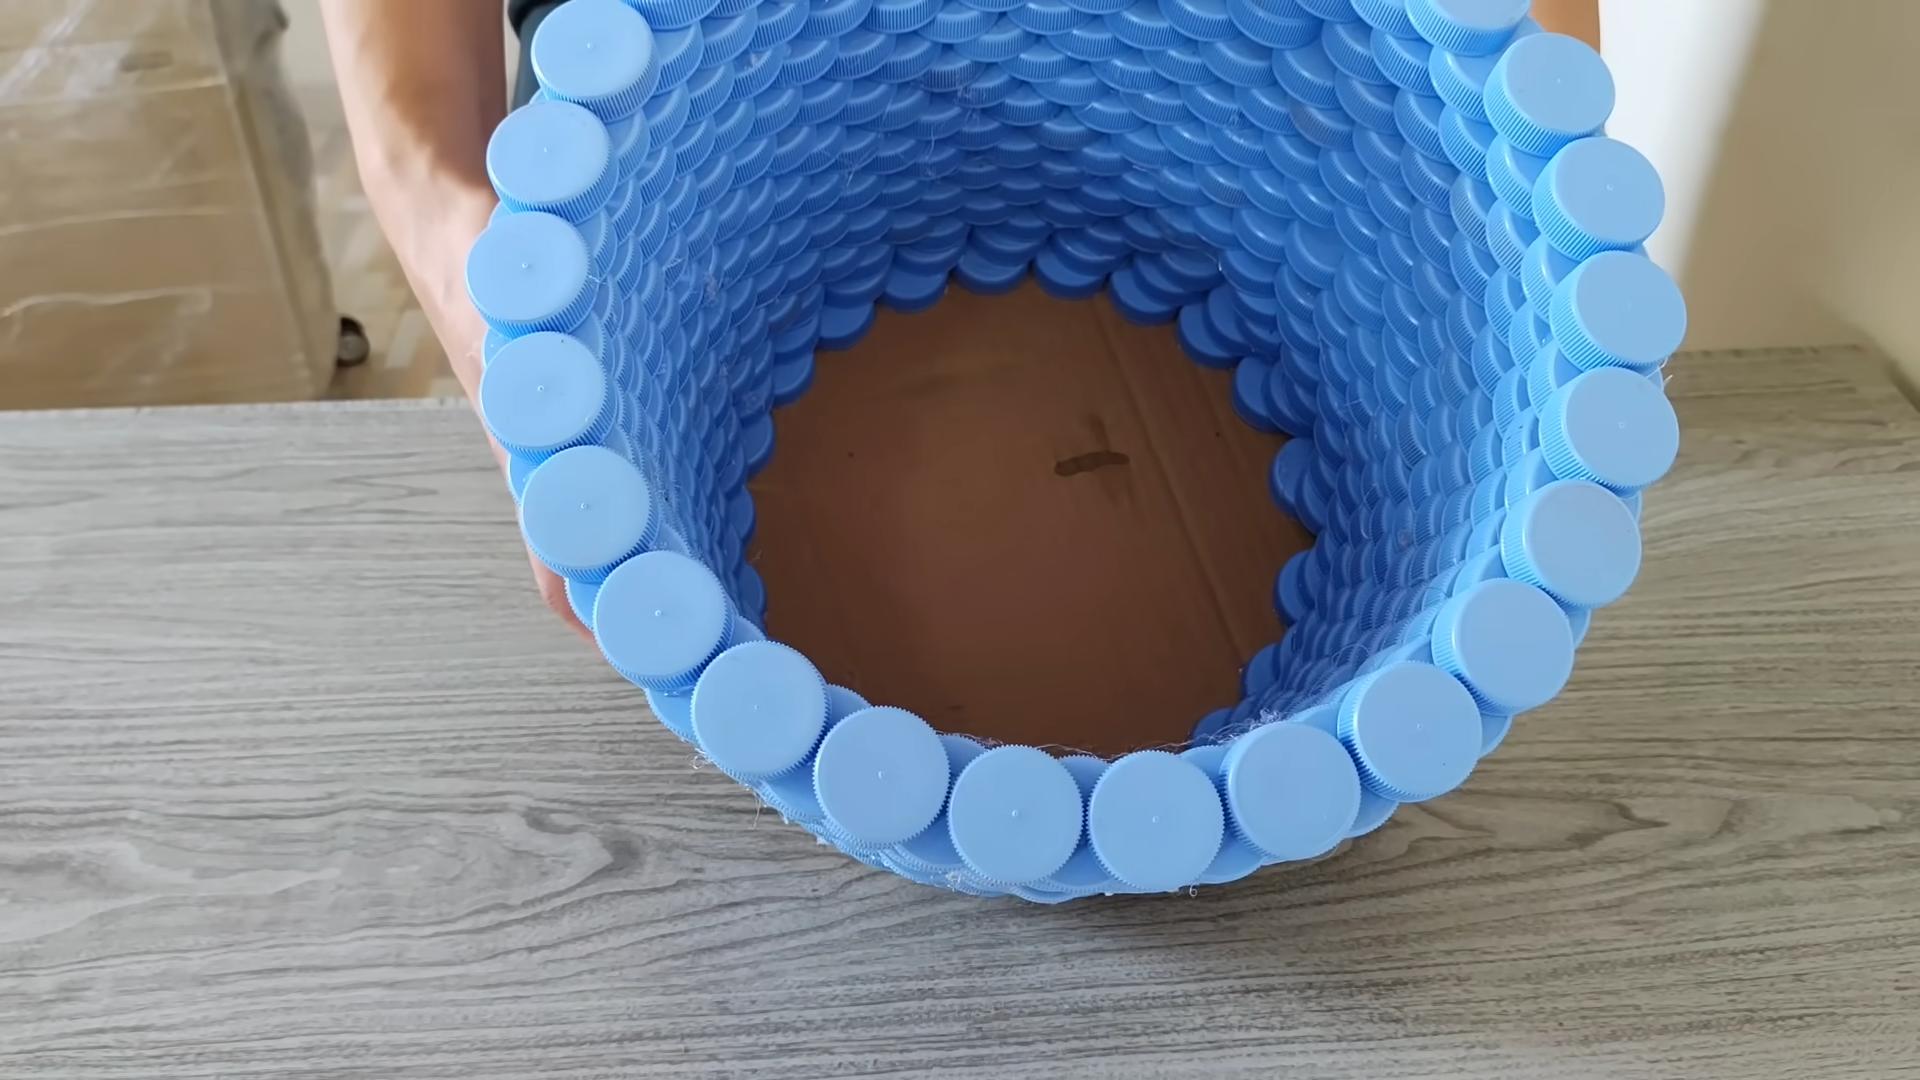
3. **Building the Walls: Layer by Layer:** This is where the basket starts to take shape!
* Once the first layer is completely dry, start building the walls of the basket.
* Apply adhesive to the side of a bottle cap and press it firmly against the caps in the first layer, creating a vertical wall.
* Make sure the caps are aligned properly and that there are no large gaps between them.
* Continue adding caps, row by row, building the walls of the basket to your desired height.
* Stagger the caps in each row to create a stronger and more visually appealing structure. Think of it like bricklaying.
* Use clamps or weights to support the walls as you build them, especially when working on taller baskets.
* Allow each layer to dry completely before adding the next layer. This will prevent the walls from collapsing.
4. **Reinforcing the Structure:** As you build the walls, it’s important to reinforce the structure to prevent it from becoming too flimsy.
* Periodically, add a layer of adhesive to the inside of the basket, filling in any gaps between the caps.
* You can also use small pieces of plastic or cardboard to reinforce the corners and edges of the basket.
* Consider adding a few vertical supports made from bottle caps glued together to provide extra stability.
5. **Creating the Rim (Optional):** A rim can add a finished look to your basket and make it easier to carry.
* To create a rim, glue a row of caps horizontally along the top edge of the basket, overlapping the caps in the previous layer.
* You can also use a strip of plastic or metal to create a more substantial rim.
* Make sure the rim is securely attached to the basket.
6. **Finishing Touches:** Once the basket is complete, it’s time to add the finishing touches.
* Inspect the basket carefully and fill in any remaining gaps with adhesive.
* Allow the adhesive to dry completely.
* If desired, spray paint the basket with a clear sealant or a color of your choice. This will protect the caps from moisture and add a protective layer.
* Consider adding a fabric liner to the basket to protect delicate clothes. You can sew a custom liner or use a pre-made laundry bag.
Tips and Tricks for Success:
* **Collect a Variety of Caps:** Different colors and sizes of caps will add visual interest to your basket.
* **Sort Your Caps:** Sorting your caps by color and size will make the construction process much easier.
* **Use a Strong Adhesive:** A high-quality adhesive is essential for creating a durable basket.
* **Work in a Well-Ventilated Area:** The adhesive fumes can be strong, so make sure you have plenty of ventilation.
* **Use Clamps and Weights:** Clamps and weights will help to hold the caps in place while the adhesive dries.
* **Be Patient:** This project takes time and dedication, so don’t get discouraged if it takes a while to complete.
* Don’t be afraid to experiment! This is your creation, so feel free to add your own personal touches.
* Clean the caps before using them. A quick wash with soap and water will remove any dirt or grime.
* Consider the weight distribution. As you build the walls, try to distribute the weight evenly to prevent the basket from becoming unbalanced.
* If you’re using different colored caps, plan your design beforehand. This will help you to create a more visually appealing basket.
* Don’t be afraid to ask for help. If you’re struggling with a particular step, ask a friend or family member for assistance.
Troubleshooting: Common Problems and Solutions
* **Caps are falling off:** Make sure you’re using a strong adhesive and that you’re applying enough adhesive to each cap. Also, make sure you’re allowing the adhesive to dry completely before adding more caps.
* **The walls are collapsing:** Use clamps or weights to support the walls as you build them. Also, consider adding vertical supports to provide extra stability.
* **The basket is wobbly:** Make sure the base is level and that the caps are aligned properly. Also, consider adding a layer of adhesive to the inside of the basket to fill in any gaps.
* **The adhesive is not sticking:** Make sure the caps and the base are clean and dry. Also, make sure you’re using an adhesive that is compatible with plastic.
Alternative Ideas and Variations:
* **Use different types of plastic lids:** You can incorporate lids from yogurt containers, margarine tubs, or other plastic containers into your basket.
* **Create a mosaic pattern:** Arrange the caps in a specific pattern to create a mosaic design.
* **Add handles:** Attach handles made from rope, plastic tubing, or even more bottle caps to make the basket easier to carry.
* **Make a smaller basket for toys or other items:** You can use the same technique to create smaller baskets for organizing toys, books, or other household items.
* **Create a planter:** With a few modifications, you can turn your bottle cap basket into a unique and sustainable planter. Just make sure to add drainage holes!
This project is a labor of love, but the end result is a truly unique and sustainable laundry basket that you can be proud of. Plus, you’ll be doing your part to reduce plastic waste! So
Conclusion
So, there you have it! Transforming discarded bottle caps into a functional and surprisingly stylish laundry basket is not just a clever upcycling project; it’s a statement. It’s a statement about your commitment to sustainability, your resourcefulness, and your ability to see potential where others see trash. This DIY laundry basket project is more than just a way to contain your dirty clothes; it’s a conversation starter, a unique piece of home decor, and a testament to the power of creative reuse.
Why is this a must-try? Because it’s incredibly rewarding. The process of collecting the caps, cleaning them, and then meticulously assembling them into a sturdy and useful basket is a journey in itself. You’ll feel a sense of accomplishment with every cap you glue, every row you complete. And when you finally stand back and admire your finished creation, you’ll know you’ve made something truly special – something that no one else has.
But the benefits extend beyond personal satisfaction. By diverting hundreds, even thousands, of plastic caps from landfills, you’re actively contributing to a cleaner, healthier planet. You’re reducing waste, conserving resources, and setting a positive example for others. Plus, let’s be honest, a laundry basket made of bottle caps is just plain cool! It’s a quirky, eye-catching addition to any laundry room, bathroom, or bedroom.
Don’t be afraid to get creative with your design. Consider using different colored caps to create patterns or mosaics. You could even incorporate other recycled materials, like plastic bottles or fabric scraps, to add texture and visual interest. For a more durable finish, consider applying a sealant or varnish to protect the caps from moisture and wear. You could also line the inside of the basket with fabric to prevent delicate items from snagging.
If you’re feeling ambitious, you could even scale up the project and create larger storage containers for toys, blankets, or other household items. The possibilities are endless!
We understand that this project might seem daunting at first, but we assure you that it’s manageable with a little patience and perseverance. Break it down into smaller steps, enlist the help of friends or family, and don’t be afraid to experiment.
We wholeheartedly encourage you to give this DIY laundry basket project a try. It’s a fun, fulfilling, and environmentally friendly way to transform waste into something wonderful. And most importantly, we want to hear about your experience! Share your photos, tips, and variations with us in the comments below. Let’s inspire each other to create a more sustainable and beautiful world, one bottle cap at a time. We can’t wait to see what you create!
Frequently Asked Questions (FAQ)
What kind of glue is best for this project?
The best type of glue for this project is a strong, waterproof adhesive that is designed for bonding plastic. Hot glue can work for initial tacking, but it may not provide the long-term durability needed for a laundry basket that will be handling weight and moisture. We recommend using a construction adhesive specifically formulated for plastics, or a high-quality epoxy resin. These adhesives will create a strong, permanent bond that can withstand the stresses of daily use. Make sure to read the instructions carefully and allow the glue to fully cure before using the basket. Also, consider the fumes of the glue and work in a well-ventilated area.
How many bottle caps will I need?
The number of bottle caps required will depend on the size of the laundry basket you want to create. A standard-sized laundry basket typically requires several hundred caps. To estimate the number of caps you’ll need, first determine the dimensions of your desired basket (height, width, and depth). Then, measure the diameter of your bottle caps. Use these measurements to calculate the approximate surface area of the basket and divide that by the area of a single bottle cap. This will give you a rough estimate of the number of caps needed. It’s always a good idea to collect more caps than you think you’ll need, just in case.
How do I clean the bottle caps?
Cleaning the bottle caps is an essential step to ensure a hygienic and aesthetically pleasing finished product. Start by rinsing the caps with warm, soapy water to remove any loose debris or residue. For stubborn stains or sticky substances, you can soak the caps in a solution of water and vinegar or baking soda. Use a scrub brush or sponge to thoroughly clean each cap, paying attention to any crevices or grooves. Once you’ve cleaned all the caps, rinse them thoroughly with clean water and allow them to air dry completely before starting the assembly process. You can also use a mild bleach solution for disinfection, but be sure to rinse thoroughly to remove any traces of bleach.
Is this laundry basket durable enough to hold heavy loads?
The durability of your DIY laundry basket will depend on the strength of the adhesive you use and the overall construction of the basket. If you use a strong, waterproof adhesive and ensure that each cap is securely bonded to its neighbors, the basket should be able to hold moderately heavy loads. However, it’s important to distribute the weight evenly and avoid overloading the basket, as this could cause the caps to separate or the basket to collapse. For added support, you can reinforce the bottom of the basket with a piece of plywood or cardboard. You can also add a layer of fabric lining to the inside of the basket to protect delicate items and prevent them from snagging on the caps.
Can I paint or decorate the bottle caps?
Absolutely! Painting or decorating the bottle caps is a great way to personalize your laundry basket and add a unique touch. You can use acrylic paints, spray paints, or even permanent markers to create colorful designs, patterns, or messages on the caps. Before painting, make sure the caps are clean and dry. You may also want to apply a primer to help the paint adhere better. After painting, consider applying a sealant or varnish to protect the paint from chipping or fading. You can also use stencils, stamps, or other decorative techniques to create intricate designs on the caps. Let your creativity run wild and have fun with it!
How long does this project take to complete?
The time it takes to complete this project will vary depending on the size of the basket, the number of caps you have, and your level of experience. Collecting the caps can take several weeks or even months, depending on your access to bottle caps. Cleaning the caps can take a few hours. The assembly process can take several days, especially if you’re working on a large basket. It’s important to be patient and break the project down into smaller, manageable steps. Don’t try to rush the process, as this could lead to mistakes or a less durable finished product.
What if I don’t have enough bottle caps?
If you don’t have enough bottle caps to complete the project, there are several things you can do. First, ask your friends, family, and neighbors to save their bottle caps for you. You can also contact local restaurants, bars, and recycling centers to see if they have any bottle caps they’re willing to donate. You can also supplement your collection with bottle caps purchased online from craft stores or online marketplaces. Another option is to reduce the size of your basket or incorporate other recycled materials into the design.
Is this project suitable for children?
This project involves the use of glue and potentially sharp tools, so it’s important to exercise caution when working with children. Adult supervision is required at all times. Children can help with tasks such as collecting and cleaning the bottle caps, but they should not be involved in the gluing or cutting process. Consider using non-toxic glue and providing children with appropriate safety gear, such as gloves and safety glasses. This project can be a great way to teach children about recycling, sustainability, and creative reuse, but it’s important to prioritize their safety at all times.
Leave a Comment