

DIY Globe Chandelier: Imagine stepping into a room bathed in the warm, inviting glow of a light fixture that’s not just functional, but a stunning conversation starter. Forget those generic, mass-produced chandeliers! I’m going to show you how to create a breathtaking DIY Globe Chandelier that reflects your unique style and adds a touch of wanderlust to your home.
Globes, with their intricate maps and vintage charm, have always held a special allure. They represent exploration, discovery, and a connection to the wider world. For centuries, they’ve adorned libraries, studies, and classrooms, inspiring dreams of far-off lands. Now, we’re taking that timeless appeal and transforming it into a dazzling lighting masterpiece.
Why a DIY Globe Chandelier? Well, let’s face it, finding a truly unique and affordable chandelier can be a real challenge. Store-bought options often lack personality or come with a hefty price tag. This DIY project allows you to recycle old globes (or find inexpensive ones at thrift stores), express your creativity, and create a one-of-a-kind statement piece that perfectly complements your décor. Plus, who doesn’t love the satisfaction of saying, “I made that!” when guests admire your handiwork? So, grab your tools, gather your globes, and let’s embark on this exciting DIY adventure to craft your very own DIY Globe Chandelier!
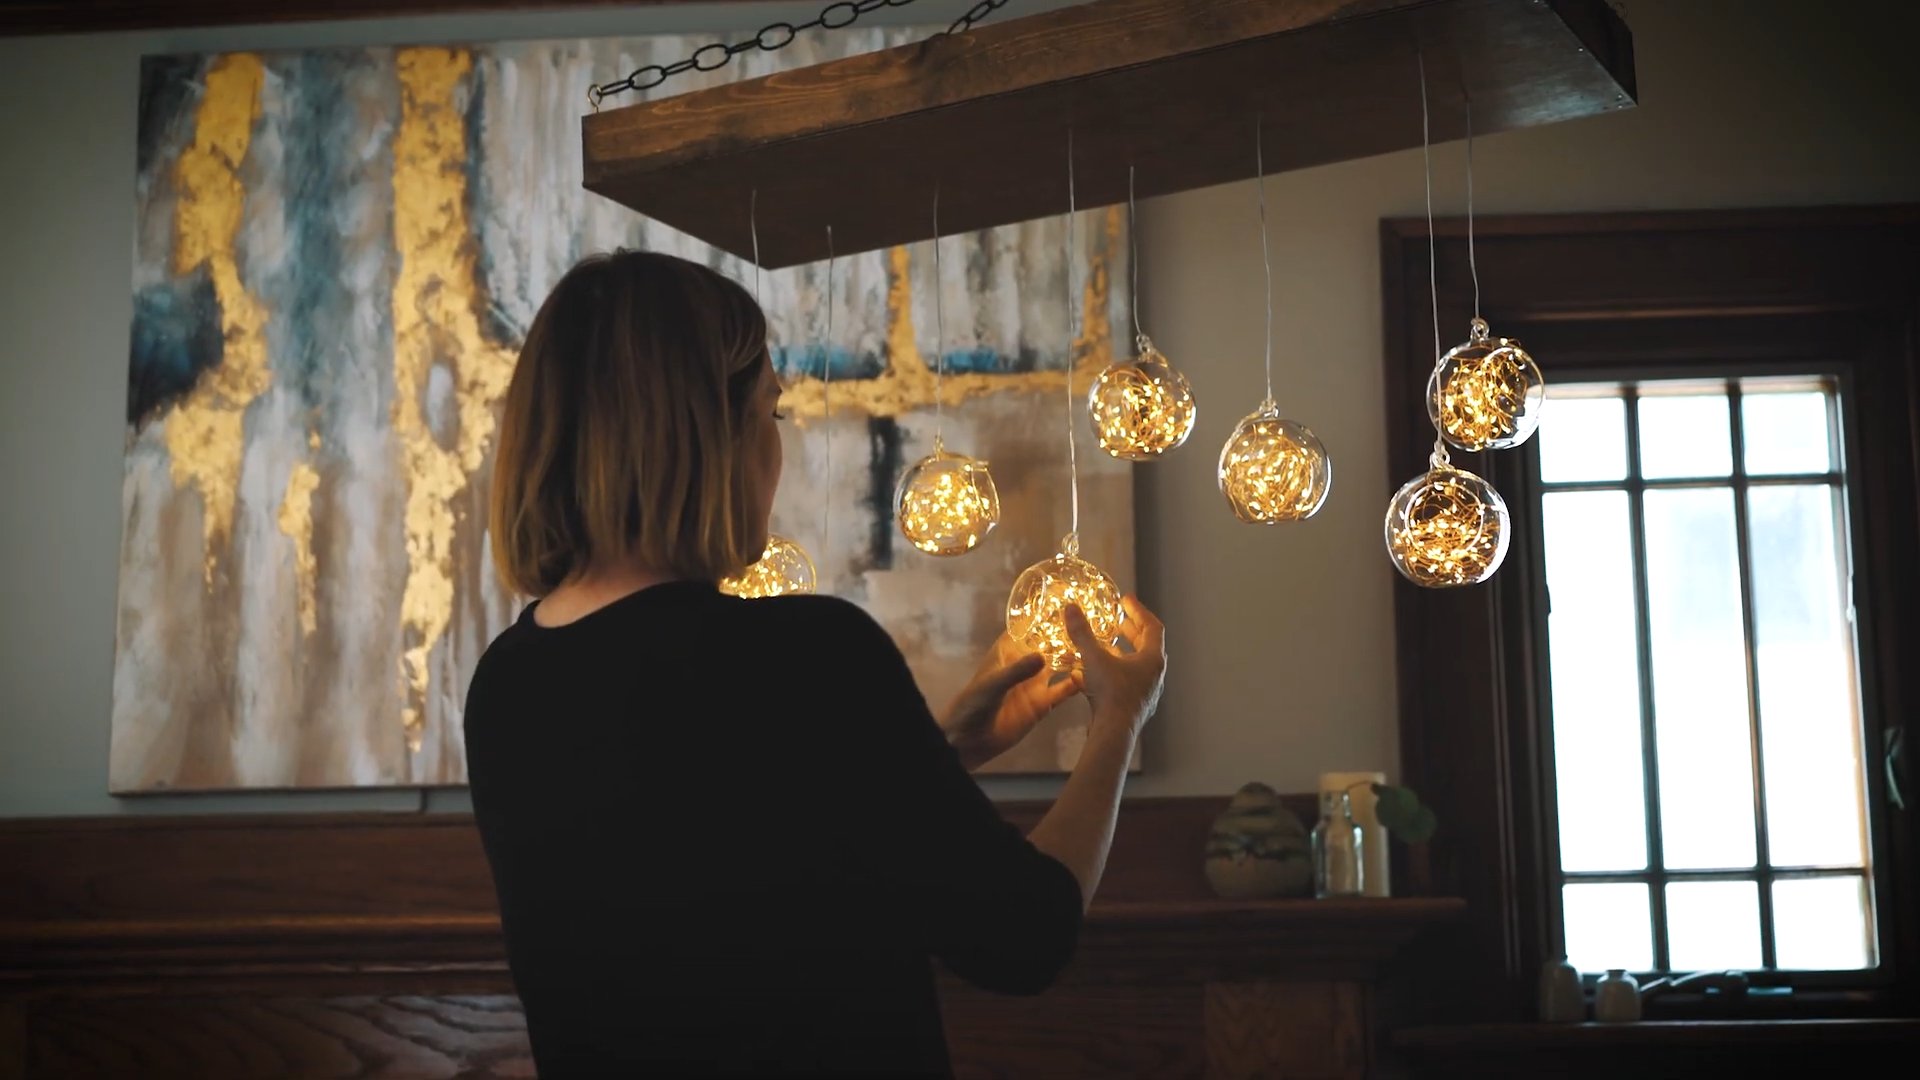
DIY Globe Chandelier: Light Up Your World!
Hey there, fellow DIY enthusiasts! Are you ready to embark on a project that’s both illuminating and geographically inspiring? I’m going to walk you through creating a stunning globe chandelier that will be the conversation starter of any room. This project might seem a little daunting at first, but trust me, with a little patience and these detailed instructions, you’ll have a unique and beautiful light fixture in no time.
Materials You’ll Need:
Before we dive in, let’s gather our supplies. Having everything on hand will make the process much smoother.
* Globe(s): The star of the show! You can use one large globe or several smaller ones. I recommend finding vintage globes at thrift stores or online for a more unique look. Consider the size of your room when deciding on the number and size of globes.
* Pendant Light Kit(s): You’ll need one kit for each globe you plan to use. Make sure the kit includes a light socket, wiring, a ceiling canopy, and any necessary hardware. Check the wattage rating to ensure it’s compatible with your chosen light bulbs.
* Light Bulbs: Choose bulbs that complement the style of your chandelier. Edison bulbs can add a vintage touch, while LED bulbs are energy-efficient and come in various color temperatures.
* Drill: A power drill is essential for creating holes in the globes.
* Hole Saw Attachment: Select a hole saw attachment that’s the appropriate size for your pendant light kit’s cord and socket. You might need different sizes depending on where you’re drilling the hole.
* Safety Glasses: Protect your eyes from debris!
* Gloves: To protect your hands.
* Measuring Tape: For accurate measurements.
* Pencil or Marker: For marking where to drill.
* Wire Strippers: For preparing the electrical wires.
* Wire Connectors (Wire Nuts): To safely connect the wires.
* Electrical Tape: For extra insulation and safety.
* Ladder or Step Stool: To reach the ceiling for installation.
* Optional: Chain or Wire: If you want to adjust the hanging height of your chandelier.
* Optional: Spray Paint (if desired): To customize the color of the pendant light kit components.
Preparing the Globes: The Heart of the Chandelier
This is arguably the most crucial part, so take your time and be careful!
1. Mark the Drilling Point: Decide where you want the light cord to enter the globe. I usually aim for the bottom, near a less prominent landmass. Use a pencil or marker to clearly mark the spot. Consider the globe’s design and choose a location that will minimize any visual disruption.
2. Drill a Pilot Hole: Before using the hole saw, drill a small pilot hole at your marked spot. This will help guide the hole saw and prevent it from slipping. Use a drill bit smaller than the hole saw’s pilot drill bit.
3. Use the Hole Saw: Attach the hole saw to your drill. Wearing safety glasses and gloves, carefully begin drilling through the globe at the marked spot. Apply gentle, consistent pressure. Avoid forcing the drill, as this could crack the globe. If you’re using a paper globe, go slowly to prevent tearing. If the globe is plastic, the plastic might melt slightly; just let the drill do the work.
4. Smooth the Edges: Once you’ve drilled the hole, the edges might be a bit rough. Use sandpaper or a file to smooth them out. This will prevent the cord from being damaged and give the hole a cleaner look.
5. Repeat for Each Globe: If you’re using multiple globes, repeat steps 1-4 for each one. Make sure the holes are in roughly the same location on each globe for a consistent look.
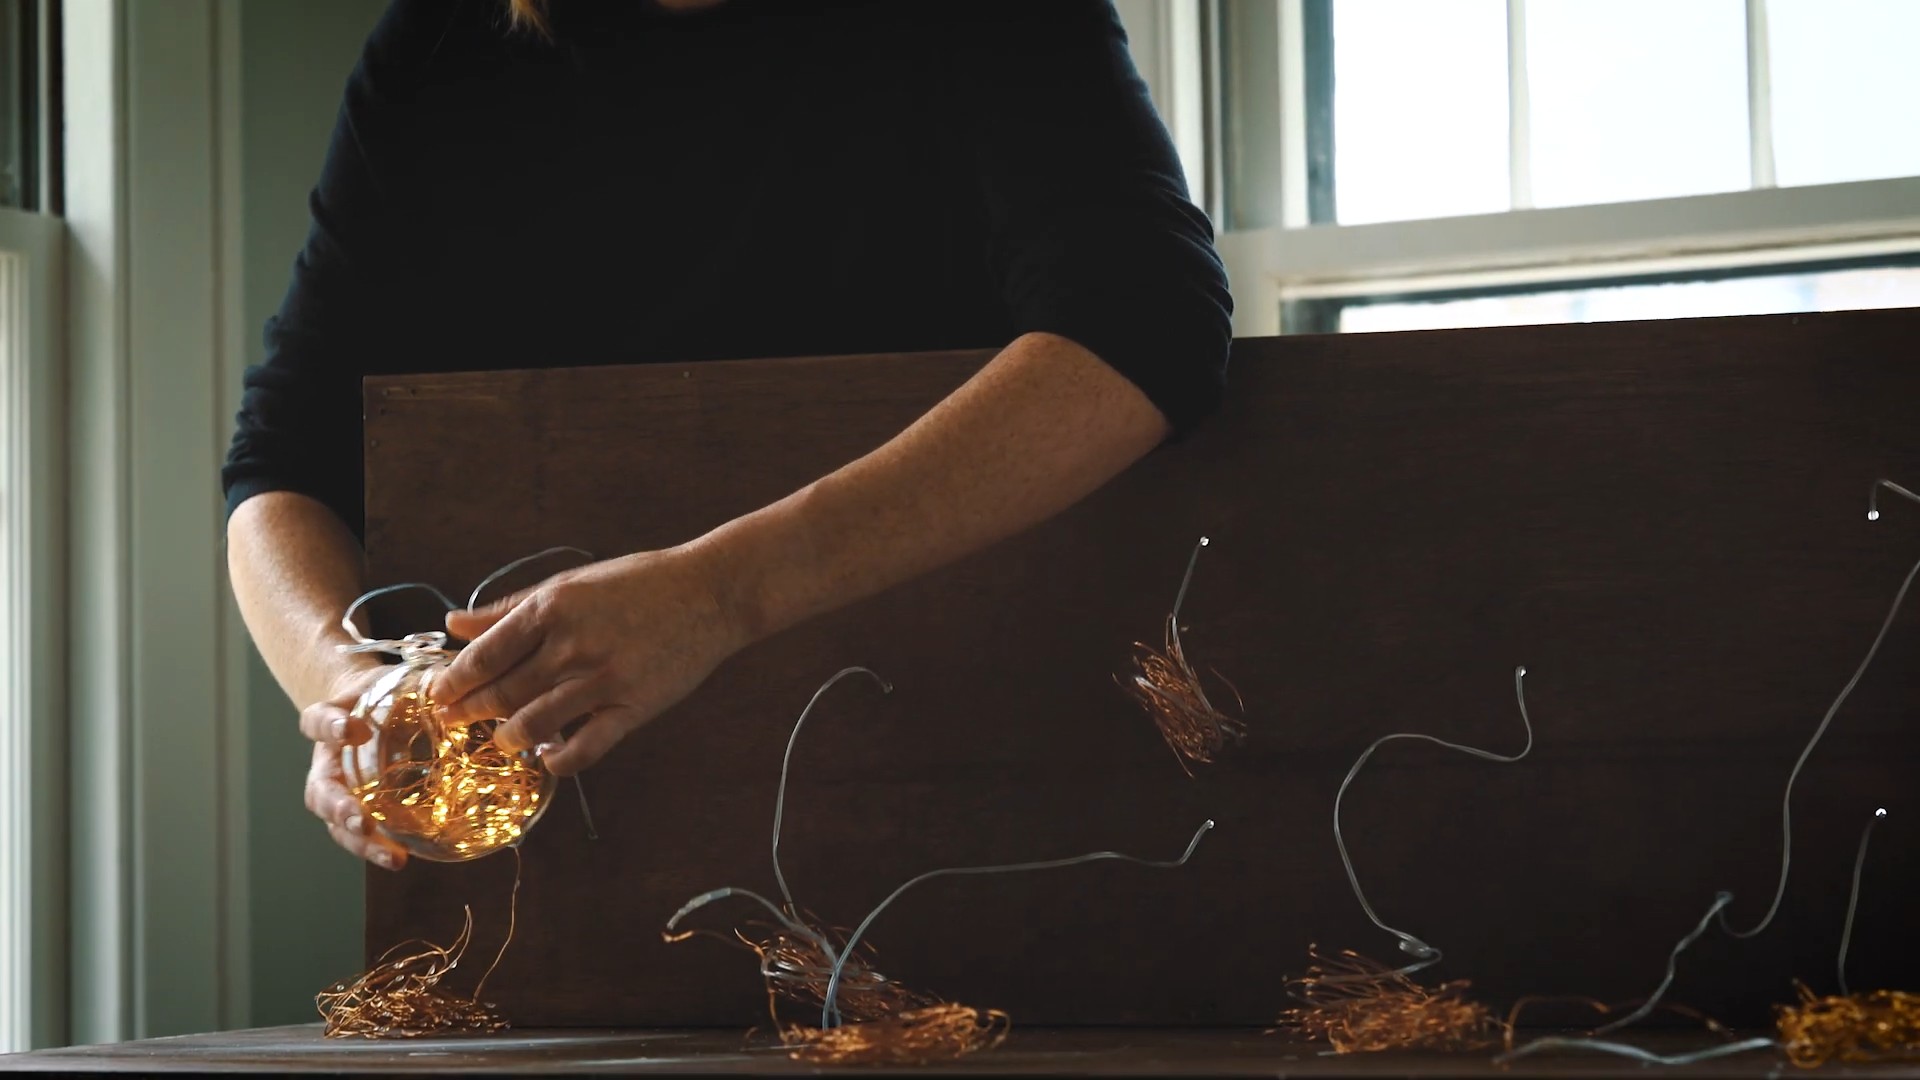
Assembling the Pendant Lights: Bringing the Light
Now, let’s get the electrical components ready. If you’re not comfortable working with electricity, please consult a qualified electrician. Safety first!
1. Prepare the Pendant Light Kit: Carefully unpack your pendant light kit. Read the manufacturer’s instructions thoroughly.
2. Thread the Cord: Thread the cord through the hole you drilled in the globe. Gently guide the cord through, being careful not to damage it. Leave enough cord inside the globe to easily connect to the light socket.
3. Attach the Light Socket: Following the pendant light kit’s instructions, connect the wires to the light socket. Typically, you’ll need to strip the ends of the wires and connect them to the corresponding terminals on the socket. Use wire connectors (wire nuts) to secure the connections. Make sure the connections are tight and secure.
4. Secure the Socket: Once the wires are connected, secure the light socket to the pendant light cord. The kit should have instructions on how to do this.
5. Test the Light: Before moving on, test the light to make sure it’s working properly. Plug it into an outlet (if possible, depending on the cord length) and turn it on. If it doesn’t light up, double-check your wiring connections.
6. Repeat for Each Globe: If you’re using multiple globes, repeat steps 1-5 for each one.
Creating the Chandelier Canopy: The Central Hub
This is where all the individual lights come together.
1. Prepare the Ceiling Canopy: The ceiling canopy is the part that attaches to the ceiling and covers the electrical box. Most pendant light kits come with a standard canopy.
2. Determine Hanging Lengths: Decide how long you want each pendant light to hang. You can create a uniform length or stagger them for a more dynamic look. Use a measuring tape to determine the desired length of each cord.
3. Adjust Cord Lengths: If necessary, adjust the length of the cords by cutting them to the desired length. Remember to leave enough cord to make the electrical connections inside the canopy. Use wire strippers to strip the ends of the wires.
4. Connect the Wires: Inside the ceiling canopy, connect the wires from each pendant light to the corresponding wires from the electrical box in your ceiling. Typically, you’ll connect the black (hot) wires together, the white (neutral) wires together, and the green (ground) wires together. Use wire connectors (wire nuts) to secure the connections. Make sure the connections are tight and secure.
5. Secure the Canopy: Attach the ceiling canopy to the electrical box in your ceiling. The kit should have instructions on how to do this.
Installing the Chandelier: The Grand Finale
This is the moment of truth! Make sure the power is turned off at the breaker before you begin.
1. Turn Off the Power: Before you touch any wires, turn off the power to the circuit at the breaker box. This is crucial for your safety.
2. Mount the Canopy: Carefully lift the chandelier and align the ceiling canopy with the electrical box in your ceiling. Secure the canopy to the box using the screws or hardware provided in the pendant light kit.
3. Connect the Wires (If Not Already Done): If you haven’t already connected the wires inside the canopy, do so now. Make sure the connections are tight and secure.
4. Tuck in the Wires: Carefully tuck all the wires inside the ceiling canopy.
5. Secure the Canopy Cover: Most canopies have a cover that snaps or screws into place. Secure the cover to the canopy.
6. Install the Light Bulbs: Screw in the light bulbs.
7. Turn On the Power: Turn the power back on at the breaker box.
8. Enjoy Your New Chandelier! Step back and admire your handiwork! You’ve just created a stunning globe chandelier that will add a unique and personal touch to your home.
Tips and Tricks for a Stellar Globe Chandelier:
* Globe Selection is Key: Spend time finding globes that you love. Consider the colors, styles, and sizes. A mix of vintage and modern globes can create an eclectic look.
* Safety First: Always turn off the power before working with electrical wires. If you’re not comfortable with electrical work, consult a qualified electrician.
* Customization is Encouraged: Don’t be afraid to get creative! You can paint the pendant light kit components, add decorative chains, or use different types of light bulbs to create a unique look.
* Consider the Room: Think about the size and style of the room where you’ll be hanging the chandelier. Choose globes and pendant light kits that complement the room’s decor.
* Spacing Matters: If you’re using multiple globes, pay attention to the spacing between them. You want to create a balanced and visually appealing arrangement.
* Test Everything Before Installation: Before you hang the chandelier, test each light to make sure
Conclusion
So, there you have it! Transforming an ordinary globe into a stunning, personalized chandelier is not only achievable but also incredibly rewarding. This DIY globe chandelier project is more than just a craft; it’s an opportunity to inject your personality and travel aspirations into your home decor. Forget generic lighting fixtures – this project allows you to create a truly unique statement piece that will undoubtedly spark conversation and admiration.
Why is this a must-try? Because it’s budget-friendly, eco-conscious (repurposing an old globe!), and allows for unparalleled customization. You’re not just buying a chandelier; you’re crafting an experience, a memory, and a reflection of your own adventurous spirit. Imagine the warm glow emanating from your handcrafted globe, casting shadows that whisper tales of far-off lands and future explorations.
But the fun doesn’t stop there! Feel free to experiment with different globe sizes, types (antique, political, even inflatable!), and lighting options. Consider using Edison bulbs for a vintage aesthetic, or opt for color-changing LEDs to create a dynamic and modern ambiance. You could even paint the continents with metallic accents for a touch of glamour, or decoupage travel photos onto the globe’s surface for a truly personalized touch. Think about adding small, decorative elements like miniature airplanes or compass charms dangling from the bottom for an extra layer of whimsy.
For a more sophisticated look, consider using a globe with raised relief to add texture and depth to the light patterns. If you’re feeling particularly ambitious, you could even incorporate a small, hidden Bluetooth speaker inside the globe to create a combined lighting and audio experience. The possibilities are truly endless!
Don’t be intimidated by the process. With a little patience and creativity, anyone can create a breathtaking DIY globe chandelier. The satisfaction of knowing you crafted something beautiful and functional with your own two hands is immeasurable. It’s a project that will not only illuminate your space but also ignite your creativity and inspire your next adventure.
We wholeheartedly encourage you to embark on this DIY journey. Gather your materials, unleash your inner artist, and create a globe chandelier that reflects your unique style and personality. And most importantly, don’t forget to share your creations with us! We’d love to see your interpretations and learn from your experiences. Post photos of your finished chandeliers on social media using #DIYGlobeChandelier and tag us so we can admire your handiwork and share your inspiration with others. Let’s create a community of globe-trotting crafters, one stunning chandelier at a time!
FAQ
What kind of globe is best for this project?
The best type of globe depends on the aesthetic you’re aiming for. For a vintage look, an antique globe with aged paper and faded colors is ideal. For a more modern feel, a globe with clean lines and bold colors works well. Consider the size of the room and the desired scale of the chandelier when choosing the globe’s diameter. A larger globe will make a bolder statement, while a smaller globe might be better suited for a smaller space. Inflatable globes can also be used, but require a different approach to wiring and support. Ultimately, the best globe is the one that best reflects your personal style and complements your existing decor.
What kind of lighting fixture should I use inside the globe?
The type of lighting fixture you use will significantly impact the overall look and feel of your DIY globe chandelier. Edison bulbs are a popular choice for their warm, vintage glow and exposed filaments. LED bulbs are more energy-efficient and come in a variety of colors and brightness levels. Consider using a dimmable fixture to control the intensity of the light. String lights can also be used to create a softer, more diffused light. Make sure the fixture is appropriately sized for the globe and that it doesn’t generate excessive heat. Safety is paramount, so always use UL-listed components and follow all electrical safety guidelines.
How do I safely drill a hole in the globe for the wiring?
Drilling a hole in a globe requires patience and care. Use a drill bit specifically designed for the material of your globe (plastic, paper mache, etc.). Start with a small pilot hole and gradually increase the size until it’s large enough to accommodate the wiring. Apply gentle pressure and avoid forcing the drill, as this can cause the globe to crack or shatter. For paper mache globes, consider reinforcing the area around the hole with glue or tape to prevent tearing. Always wear safety glasses to protect your eyes from debris. If you’re unsure about drilling the hole yourself, consider asking a professional electrician or handyman for assistance.
How do I hang the globe chandelier securely?
The method for hanging your DIY globe chandelier will depend on the weight of the globe and the type of ceiling you have. For lighter globes, a simple chain or cord may suffice. For heavier globes, you’ll need a more robust hanging system, such as a metal rod or a heavy-duty chain. Ensure that the hanging hardware is securely attached to the ceiling joist or a suitable anchor point. If you’re unsure about the structural integrity of your ceiling, consult with a qualified contractor. Always test the weight-bearing capacity of the hanging system before fully installing the chandelier. Safety is paramount, so take the time to ensure that the chandelier is securely and safely suspended.
Can I add other decorative elements to the globe chandelier?
Absolutely! Adding decorative elements is a great way to personalize your DIY globe chandelier and make it truly unique. Consider painting the continents with metallic accents, decoupaging travel photos onto the globe’s surface, or adding small, decorative elements like miniature airplanes or compass charms. You could also incorporate beads, crystals, or other embellishments to add sparkle and glamour. The possibilities are endless! Just be mindful of the weight of the added elements and ensure that they are securely attached to the globe. Let your creativity run wild and create a chandelier that reflects your personal style and interests.
What if I don’t have an old globe? Where can I find one?
If you don’t have an old globe lying around, there are several places you can find one. Thrift stores, antique shops, and flea markets are great places to search for vintage globes. Online marketplaces like eBay and Etsy also offer a wide selection of globes in various styles and sizes. You can also purchase new globes from educational supply stores or online retailers. Consider the size, style, and condition of the globe when making your purchase. Remember, even a slightly damaged globe can be transformed into a beautiful and unique chandelier with a little creativity and effort.
Is this project suitable for beginners?
Yes, this project is suitable for beginners with some basic DIY skills. The most challenging part is likely drilling the hole in the globe, but with patience and care, even a novice can accomplish this. It’s important to follow safety guidelines and take your time. If you’re unsure about any aspect of the project, don’t hesitate to ask for help from a more experienced DIYer or a professional electrician. The satisfaction of creating your own DIY globe chandelier is well worth the effort, and it’s a great way to learn new skills and express your creativity.


Leave a Comment