

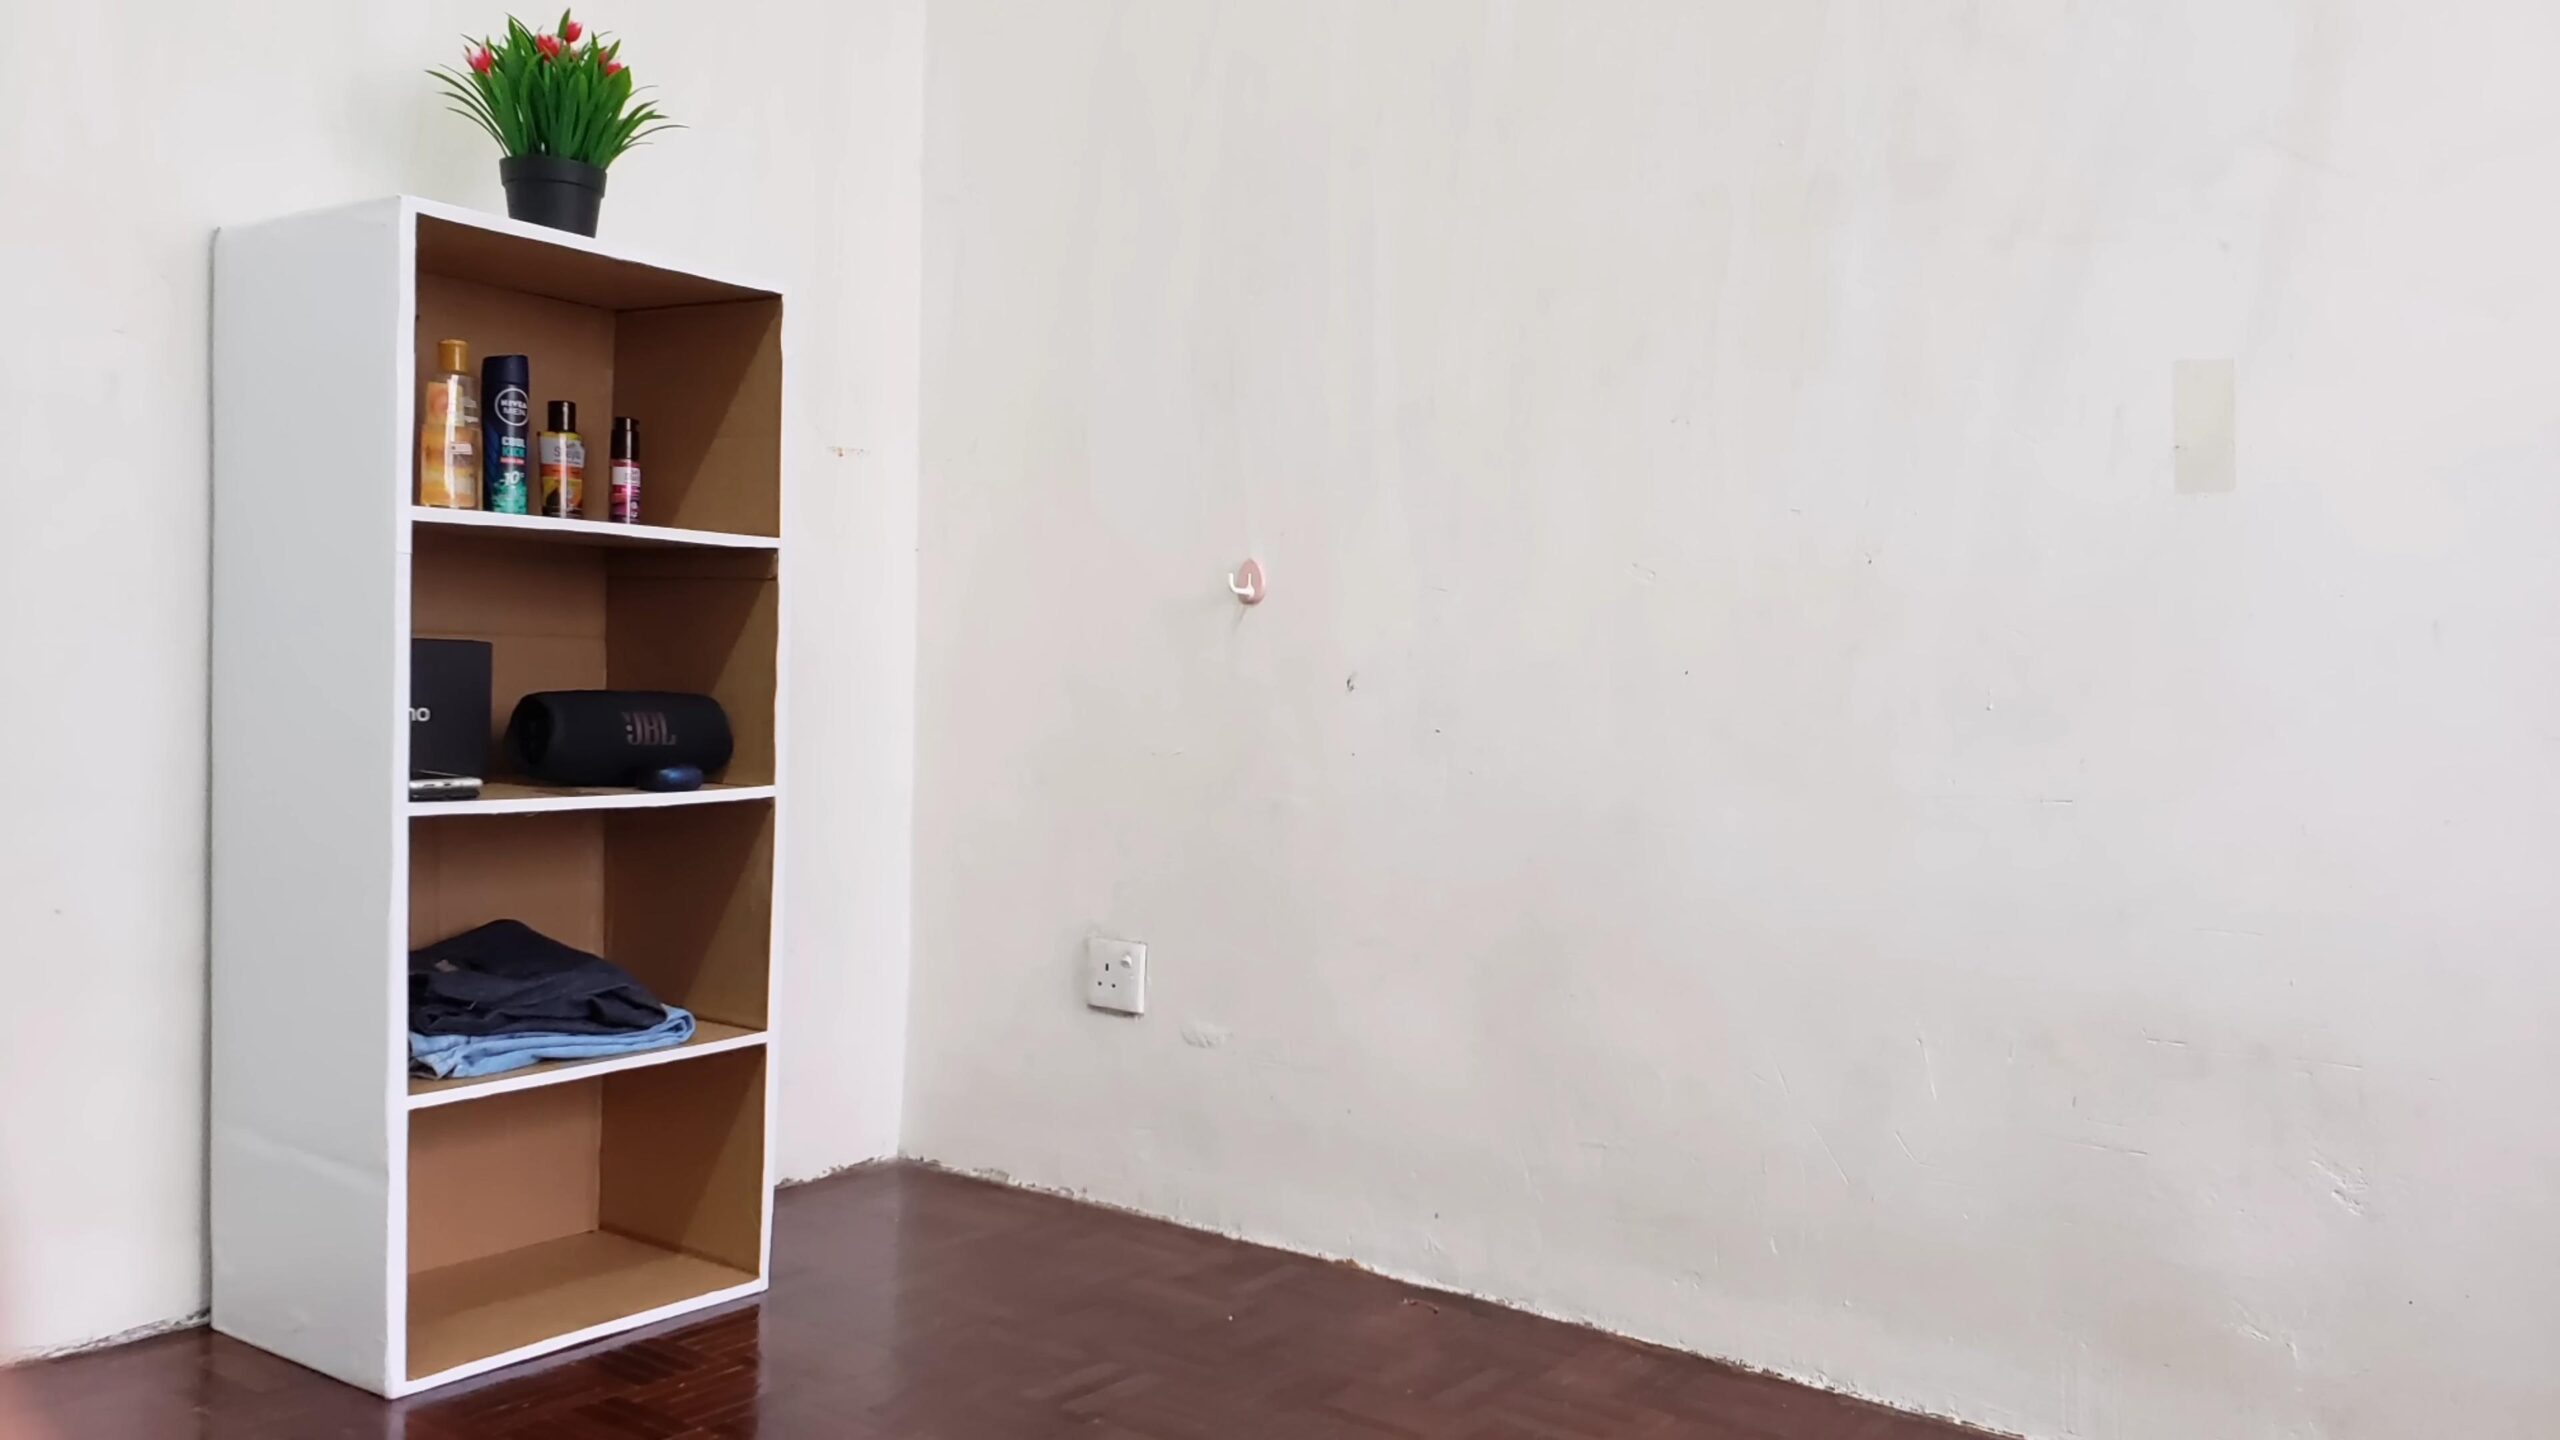
DIY Cardboard Wardrobe: Tired of clothes overflowing from your closet, or maybe you’re moving and need a temporary storage solution? Let’s face it, buying a new wardrobe can be expensive and time-consuming. But what if I told you that you could create a functional and surprisingly sturdy wardrobe using something you probably already have lying around – cardboard!
Cardboard, in its humble form, has been a packaging staple for over a century, quietly facilitating global trade and protecting our precious goods. But its potential extends far beyond just boxes. Throughout history, resourceful individuals have repurposed cardboard for various creative projects, from children’s toys to emergency shelters. Now, we’re taking that ingenuity a step further.
This DIY cardboard wardrobe project isn’t just about saving money; it’s about embracing sustainability and unleashing your inner creativity. In a world increasingly conscious of waste, repurposing materials like cardboard is a fantastic way to reduce our environmental footprint. Plus, building your own wardrobe allows you to customize it to your exact needs and space constraints. No more struggling with pre-made sizes that just don’t quite fit! So, grab your cardboard boxes, and let’s embark on this exciting DIY adventure to create a practical and eco-friendly DIY cardboard wardrobe that will solve your storage woes.
DIY Cardboard Wardrobe: Organize Your Clothes on a Budget!
Hey there, fellow DIY enthusiasts! Are you tired of clothes piling up everywhere? Need extra storage but don’t want to break the bank? Well, I’ve got the perfect solution for you: a DIY cardboard wardrobe! This project is surprisingly sturdy, customizable, and incredibly budget-friendly. Plus, it’s a great way to recycle those large cardboard boxes you might have lying around. Let’s get started!
What You’ll Need:
Before we dive in, let’s gather our supplies. This is crucial for a smooth and efficient building process.
* **Large Cardboard Boxes:** The bigger, the better! Think appliance boxes (refrigerator, washer/dryer), furniture boxes, or even several smaller boxes that we can combine. Aim for boxes that are relatively thick and sturdy. The number of boxes will depend on the size of the wardrobe you want to build. I used three large refrigerator boxes for mine.
* **Measuring Tape:** Essential for accurate measurements and planning.
* **Utility Knife or Box Cutter:** A sharp blade is a must for cutting cardboard cleanly and safely. Make sure you have a fresh blade!
* **Metal Ruler or Straight Edge:** This will help you make straight, precise cuts.
* **Pencil or Marker:** For marking measurements and guidelines.
* **Hot Glue Gun and Glue Sticks:** This is our primary adhesive. Make sure you have plenty of glue sticks on hand!
* **Packing Tape:** For reinforcing seams and adding extra stability. Clear packing tape is best for a cleaner look.
* **Optional: Cardboard Tubes (from wrapping paper or paper towels):** These will be used as a hanging rod.
* **Optional: Paint, Wrapping Paper, or Fabric:** For decorating and personalizing your wardrobe.
* **Optional: Shelf Liner:** To line the shelves and prevent clothes from snagging.
* **Optional: Handles or Knobs:** To add to the doors for easy opening.
* **Safety Glasses:** Protect your eyes from flying cardboard dust.
* **Cutting Mat or Scrap Cardboard:** To protect your work surface.
Planning Your Wardrobe
Before you start cutting, it’s important to plan the dimensions and layout of your wardrobe. This will help you maximize space and ensure that everything fits together properly.
* **Measure Your Space:** Determine the height, width, and depth of the area where you plan to place your wardrobe.
* **Sketch a Design:** Draw a rough sketch of your wardrobe, including the number of shelves, the placement of the hanging rod, and the size of the doors.
* **Consider the Box Sizes:** Take into account the dimensions of your cardboard boxes when planning your design. You may need to adjust your plans based on the available materials.
* **Think About Reinforcements:** Plan where you will need to add extra layers of cardboard or bracing to strengthen the structure. Corners and edges are particularly vulnerable.
Building the Wardrobe Frame
This is where the real fun begins! We’ll start by constructing the main frame of the wardrobe.
1. **Prepare the Base:** Choose one of your largest cardboard boxes to serve as the base of the wardrobe. If the box is too tall, trim it down to the desired height using your utility knife and ruler. Make sure the bottom flaps are securely taped together with packing tape. I like to overlap the tape for extra strength.
2. **Create the Side Walls:** Cut two large pieces of cardboard to the desired height and width for the side walls. These pieces should be the same size. I used the sides of another large box for this.
3. **Attach the Side Walls to the Base:** Apply hot glue along the bottom edges of the side walls and carefully attach them to the base. Hold them in place until the glue sets. Reinforce the seams with packing tape, both inside and outside.
4. **Cut and Attach the Top:** Cut a piece of cardboard to the same width as the base and the same depth as the side walls. This will be the top of the wardrobe. Apply hot glue to the top edges of the side walls and attach the top piece. Again, hold it in place until the glue sets and reinforce with packing tape.
5. **Reinforce the Corners:** Cut strips of cardboard and fold them into L-shapes. Glue these L-shaped pieces to the inside corners of the wardrobe to provide extra support and stability. This is especially important for a tall wardrobe.
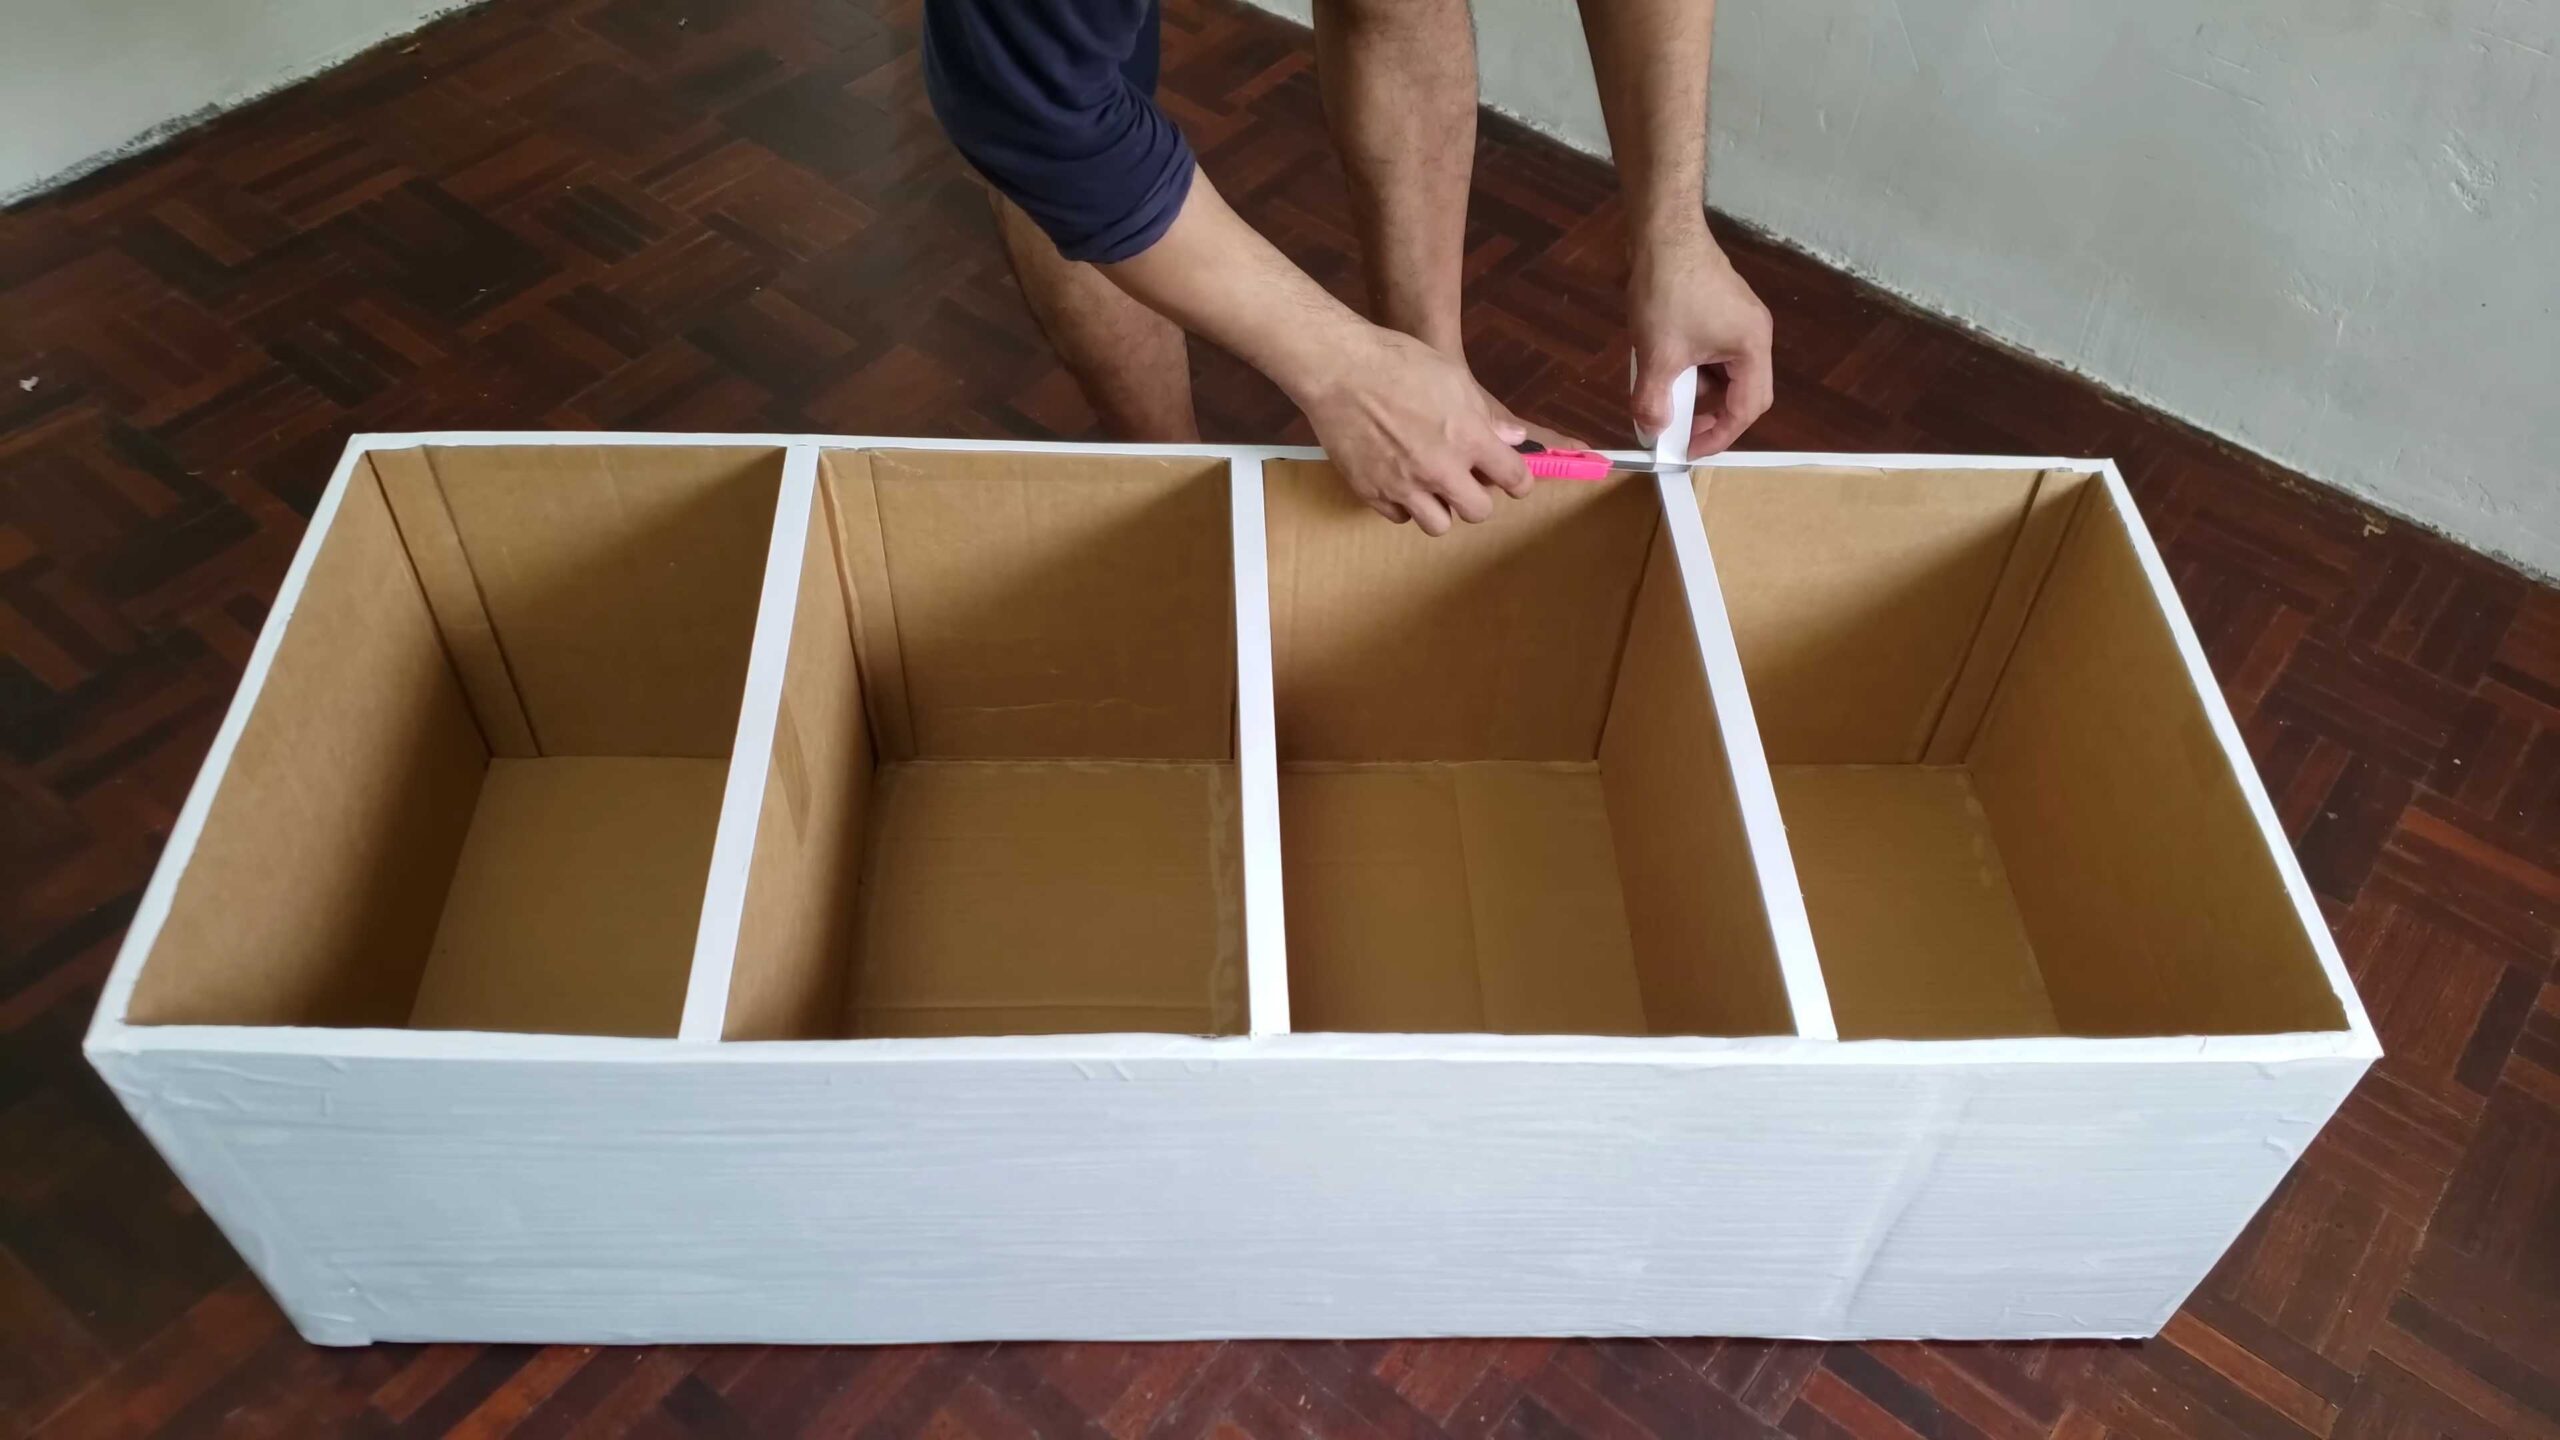
Creating Shelves
Now, let’s add some shelves to maximize storage space.
1. **Measure and Mark Shelf Positions:** Decide where you want to place your shelves and measure the distance between them. Mark the positions on the inside of the side walls with a pencil.
2. **Cut Shelf Supports:** Cut strips of cardboard to the desired width for the shelf supports. The width will determine how far the shelves extend into the wardrobe.
3. **Attach Shelf Supports:** Apply hot glue to the marked positions on the side walls and attach the shelf supports. Make sure they are level. Reinforce with packing tape.
4. **Cut the Shelves:** Cut pieces of cardboard to the desired size for the shelves. They should fit snugly between the side walls and rest on the shelf supports.
5. **Install the Shelves:** Slide the shelves into place, resting them on the shelf supports. You can add a dab of hot glue to secure them, but this is optional.
6. **Reinforce the Shelves (Optional):** For heavier items, you may want to reinforce the shelves with extra layers of cardboard or by adding vertical supports underneath.
Adding a Hanging Rod
If you want to hang clothes, you’ll need to install a hanging rod.
1. **Measure and Mark Hanging Rod Position:** Decide where you want to place the hanging rod and mark the positions on the inside of the side walls. Make sure the rod is high enough to accommodate your longest garments.
2. **Prepare the Cardboard Tubes:** If you’re using cardboard tubes, cut them to the desired length for the hanging rod.
3. **Create Supports for the Hanging Rod:** Cut small squares of cardboard and roll them into tight cylinders. These will serve as supports for the hanging rod. Glue them to the marked positions on the side walls.
4. **Install the Hanging Rod:** Place the cardboard tube (or other rod) on top of the supports. You can secure it with a dab of hot glue if desired.
5. **Reinforce the Hanging Rod (Optional):** For heavier loads, you may want to reinforce the hanging rod with extra layers of cardboard or by using a stronger material, such as a wooden dowel.
Creating Doors
Doors will help keep your clothes dust-free and out of sight.
1. **Measure and Cut the Doors:** Measure the opening of the wardrobe and cut two pieces of cardboard to the desired size for the doors. Make sure to leave a small gap between the doors and the frame for easy opening and closing.
2. **Create Hinges:** Cut strips of fabric or sturdy tape to use as hinges. Fold the fabric or tape in half and glue one side to the edge of the door and the other side to the frame of the wardrobe.
3. **Attach the Doors:** Carefully align the doors with the opening and attach them to the frame using the fabric or tape hinges.
4. **Add Handles or Knobs (Optional):** Attach handles or knobs to the doors for easy opening. You can use hot glue or screws, depending on the type of handle.
5. **Create a Closing Mechanism (Optional):** You can add a simple closing mechanism, such as a magnetic catch or a hook and eye, to keep the doors closed.
Decorating and Personalizing Your Wardrobe
Now for the fun part – making your wardrobe look amazing!
1. **Prepare the Surface:** If you plan to paint or cover your wardrobe, start by cleaning the surface with a damp cloth to remove any dust or debris.
2. **Paint or Cover the Cardboard:** You can paint the cardboard with acrylic paint, cover it with wrapping paper, or wrap it in fabric. Get creative and choose a design that matches your style. I used a combination of paint and patterned paper for mine.
3. **Add Decorative Details:** Add decorative details such as stencils, stickers, or trim to personalize your wardrobe.
4. **Line the Shelves (Optional):** Line the shelves with shelf liner to protect your clothes and prevent them from snagging.
5. **Add Finishing Touches:** Add any finishing touches, such as handles, knobs, or a mirror, to complete your wardrobe.
Tips and Tricks for a Sturdy Cardboard Wardrobe
* **Use Thick Cardboard:** The thicker the cardboard, the stronger your wardrobe will be.
* **Reinforce the Corners:** Reinforce the corners with L-shaped pieces of cardboard to prevent them from collapsing.
* **Use Plenty of Glue and Tape:** Don’t be afraid to use plenty of hot glue and packing tape to secure the seams and joints.
* **Distribute Weight Evenly:** Distribute the weight of your clothes evenly on the shelves and hanging rod to prevent the wardrobe from tipping over.
* **Avoid Overloading:** Don
Conclusion
So, there you have it! Building your own DIY cardboard wardrobe isn’t just a fun project; it’s a practical, budget-friendly, and surprisingly stylish solution to your storage woes. We’ve walked you through the process, highlighting the ease and adaptability of this incredible DIY trick. Forget expensive furniture store trips and frustrating assembly instructions. With a little creativity, some cardboard boxes, and our guidance, you can create a custom storage solution that perfectly fits your needs and your space.
But why is this a must-try? Beyond the obvious cost savings, a DIY cardboard wardrobe offers unparalleled flexibility. Need a taller wardrobe for those long dresses? Simply stack more boxes! Want to add shelves for folded clothes? Cut and insert cardboard platforms! The possibilities are truly endless, limited only by your imagination. You’re not stuck with pre-determined dimensions or configurations; you’re in complete control of the design process.
Furthermore, this project is incredibly eco-friendly. By repurposing cardboard boxes that would otherwise end up in landfills, you’re contributing to a more sustainable lifestyle. It’s a fantastic way to reduce your carbon footprint and give discarded materials a new lease on life. Plus, it’s a great project to involve the whole family in, teaching children about resourcefulness and the importance of recycling.
Looking for variations? Consider painting your finished wardrobe to match your room’s décor. Use stencils to add patterns or designs. Cover the cardboard with fabric for a more polished look. You could even decoupage it with old maps, newspapers, or magazine clippings for a truly unique and personalized piece. For added stability, reinforce the corners with duct tape or wooden dowels. If you’re storing heavier items, consider adding a cardboard base to the bottom of the wardrobe for extra support.
Don’t be intimidated by the thought of building your own wardrobe. It’s a surprisingly simple and rewarding project that anyone can tackle. The satisfaction of creating something functional and beautiful with your own hands is truly unmatched.
We wholeheartedly encourage you to give this DIY cardboard wardrobe a try. It’s a game-changer for anyone looking for affordable, customizable, and eco-friendly storage solutions. Once you experience the ease and versatility of this DIY trick, you’ll wonder why you didn’t try it sooner!
And most importantly, we want to hear about your experience! Share your photos, tips, and variations with us in the comments below. Let us know what challenges you faced, what creative solutions you came up with, and how your DIY cardboard wardrobe has transformed your space. Your feedback will not only inspire others but also help us improve our guide and provide even better resources for future DIY enthusiasts. So, grab your cardboard boxes, unleash your creativity, and get ready to build the wardrobe of your dreams! We can’t wait to see what you create!
Frequently Asked Questions (FAQ)
Is a cardboard wardrobe really strong enough to hold clothes?
Yes, surprisingly so! The strength of your DIY cardboard wardrobe depends on a few factors: the quality of the cardboard you use, the construction method, and the weight of the items you’re storing. Use sturdy, double-walled cardboard boxes whenever possible. Reinforce the corners and seams with strong packing tape or duct tape. Distribute the weight evenly throughout the wardrobe. For heavier items like coats or jeans, consider adding a cardboard base or reinforcing the hanging rod with a wooden dowel. With proper construction and reinforcement, a cardboard wardrobe can easily hold a significant amount of clothing.
What kind of cardboard boxes should I use?
The best cardboard boxes for a DIY cardboard wardrobe are sturdy, double-walled boxes. These boxes are typically used for shipping heavier items and offer greater strength and durability. Look for boxes that are clean, dry, and free from damage. Avoid using boxes that are thin, flimsy, or have been exposed to moisture. Appliance boxes, moving boxes, or boxes from large retailers are often good choices. Ensure all the boxes are of similar size and strength for a more uniform and stable structure.
How do I prevent the cardboard from bending or collapsing?
Preventing bending or collapsing is crucial for the longevity of your DIY cardboard wardrobe. Reinforce all corners and seams with strong packing tape or duct tape. Use multiple layers of tape for added strength. Consider adding cardboard supports inside the wardrobe, such as vertical dividers or horizontal shelves. These supports will help distribute the weight and prevent the cardboard from buckling. Avoid overloading the wardrobe with excessively heavy items. Distribute the weight evenly to prevent stress on any one area. If you’re storing heavier items, consider adding a cardboard base to the bottom of the wardrobe for extra support.
How can I make my cardboard wardrobe look more attractive?
There are many ways to enhance the appearance of your DIY cardboard wardrobe. Painting is a simple and effective way to transform the look of the cardboard. Use acrylic paint or spray paint for best results. Consider using stencils to add patterns or designs. Covering the cardboard with fabric is another great option. Use fabric glue or double-sided tape to adhere the fabric to the cardboard. Decoupage is a fun and creative way to personalize your wardrobe. Use old maps, newspapers, magazine clippings, or any other decorative paper to create a unique and eye-catching design. You can also add decorative trim, such as ribbon, lace, or beads, to further enhance the look of your wardrobe.
How do I create a hanging rod for my cardboard wardrobe?
Creating a sturdy hanging rod is essential for storing clothes in your DIY cardboard wardrobe. You can use a variety of materials for the hanging rod, such as a wooden dowel, a metal pipe, or even a sturdy cardboard tube. Measure the width of the wardrobe and cut the hanging rod to the appropriate length. Secure the hanging rod to the sides of the wardrobe using strong tape, glue, or screws. For added support, consider reinforcing the hanging rod with cardboard brackets or wooden blocks. Ensure the hanging rod is strong enough to support the weight of your clothes. If you’re storing heavier items, consider using a thicker and more durable hanging rod.
How do I protect my cardboard wardrobe from moisture?
Moisture can damage cardboard, so it’s important to protect your DIY cardboard wardrobe from dampness. Avoid placing the wardrobe in areas with high humidity or near sources of moisture. Consider applying a sealant or waterproof coating to the cardboard to protect it from water damage. You can use a clear acrylic sealant or a waterproof spray. Ensure the sealant is compatible with cardboard and won’t damage the material. If you live in a humid climate, consider using a dehumidifier in the room to reduce moisture levels. Regularly inspect the wardrobe for signs of moisture damage and address any issues promptly.
How long will a DIY cardboard wardrobe last?
The lifespan of a DIY cardboard wardrobe depends on several factors, including the quality of the cardboard, the construction method, the weight of the items stored, and the environmental conditions. With proper construction, reinforcement, and protection from moisture, a cardboard wardrobe can last for several months or even years. Regularly inspect the wardrobe for signs of wear and tear and make any necessary repairs. Avoid overloading the wardrobe with excessively heavy items. If you notice any significant damage, consider reinforcing the affected area or replacing the damaged cardboard.
Can I disassemble and reuse the cardboard boxes later?
Yes, one of the great advantages of a DIY cardboard wardrobe is that it can be easily disassembled and the cardboard boxes can be reused for other purposes. When disassembling the wardrobe, carefully remove the tape and any other fasteners. Flatten the cardboard boxes and store them in a dry place. You can then reuse the boxes for shipping, moving, or other storage needs. This makes a cardboard wardrobe a sustainable and eco-friendly storage solution.
What if I don’t have enough cardboard boxes?
If you don’t have enough cardboard boxes, there are several ways to obtain more. Ask friends, family, and neighbors if they have any spare cardboard boxes. Check with local businesses, such as grocery stores, retail stores, or appliance stores, as they often have a surplus of cardboard boxes that they are willing to give away. You can also purchase cardboard boxes from moving supply stores or online retailers. When sourcing cardboard boxes, ensure they are sturdy, clean, and free from damage.
Is this project suitable for renters?
Absolutely! A DIY cardboard wardrobe is an excellent storage solution for renters. It’s a temporary and non-permanent structure that won’t damage the walls or floors of your rental property. It’s also a cost-effective alternative to purchasing expensive furniture that you may not be able to take with you when you move. When you move out, you can easily disassemble the wardrobe and reuse the cardboard boxes or recycle them. This makes it a convenient and hassle-free storage solution for renters.
Leave a Comment