

DIY Cardboard Safe with Lock: Ever dreamt of having your own secret vault, a place where your precious treasures are safe from prying eyes? I know I have! Forget expensive safes and complicated security systems. Today, we’re diving into a fun and surprisingly effective project: building your very own DIY cardboard safe, complete with a working lock!
While the concept of a safe might conjure images of heavy steel doors and intricate mechanisms, the desire to protect valuables is as old as civilization itself. From ancient Egyptians burying their treasures with elaborate traps to medieval strongboxes guarded by complex keys, the need for secure storage has always been a part of human culture. This project taps into that primal instinct, but with a modern, eco-friendly twist.
Why would you need a DIY Cardboard Safe with Lock? Well, maybe you want to keep your younger siblings out of your candy stash, or perhaps you’re looking for a creative way to store important documents. It’s also a fantastic project to teach kids about resourcefulness, engineering, and the importance of security. Plus, let’s be honest, it’s just plain fun! This DIY project is a fantastic way to recycle those extra cardboard boxes lying around the house and create something both practical and entertaining. So, grab your cardboard, scissors, and a little bit of ingenuity, and let’s get started on building your own secure haven!
DIY Cardboard Safe with Combination Lock: Keep Your Treasures Secure!
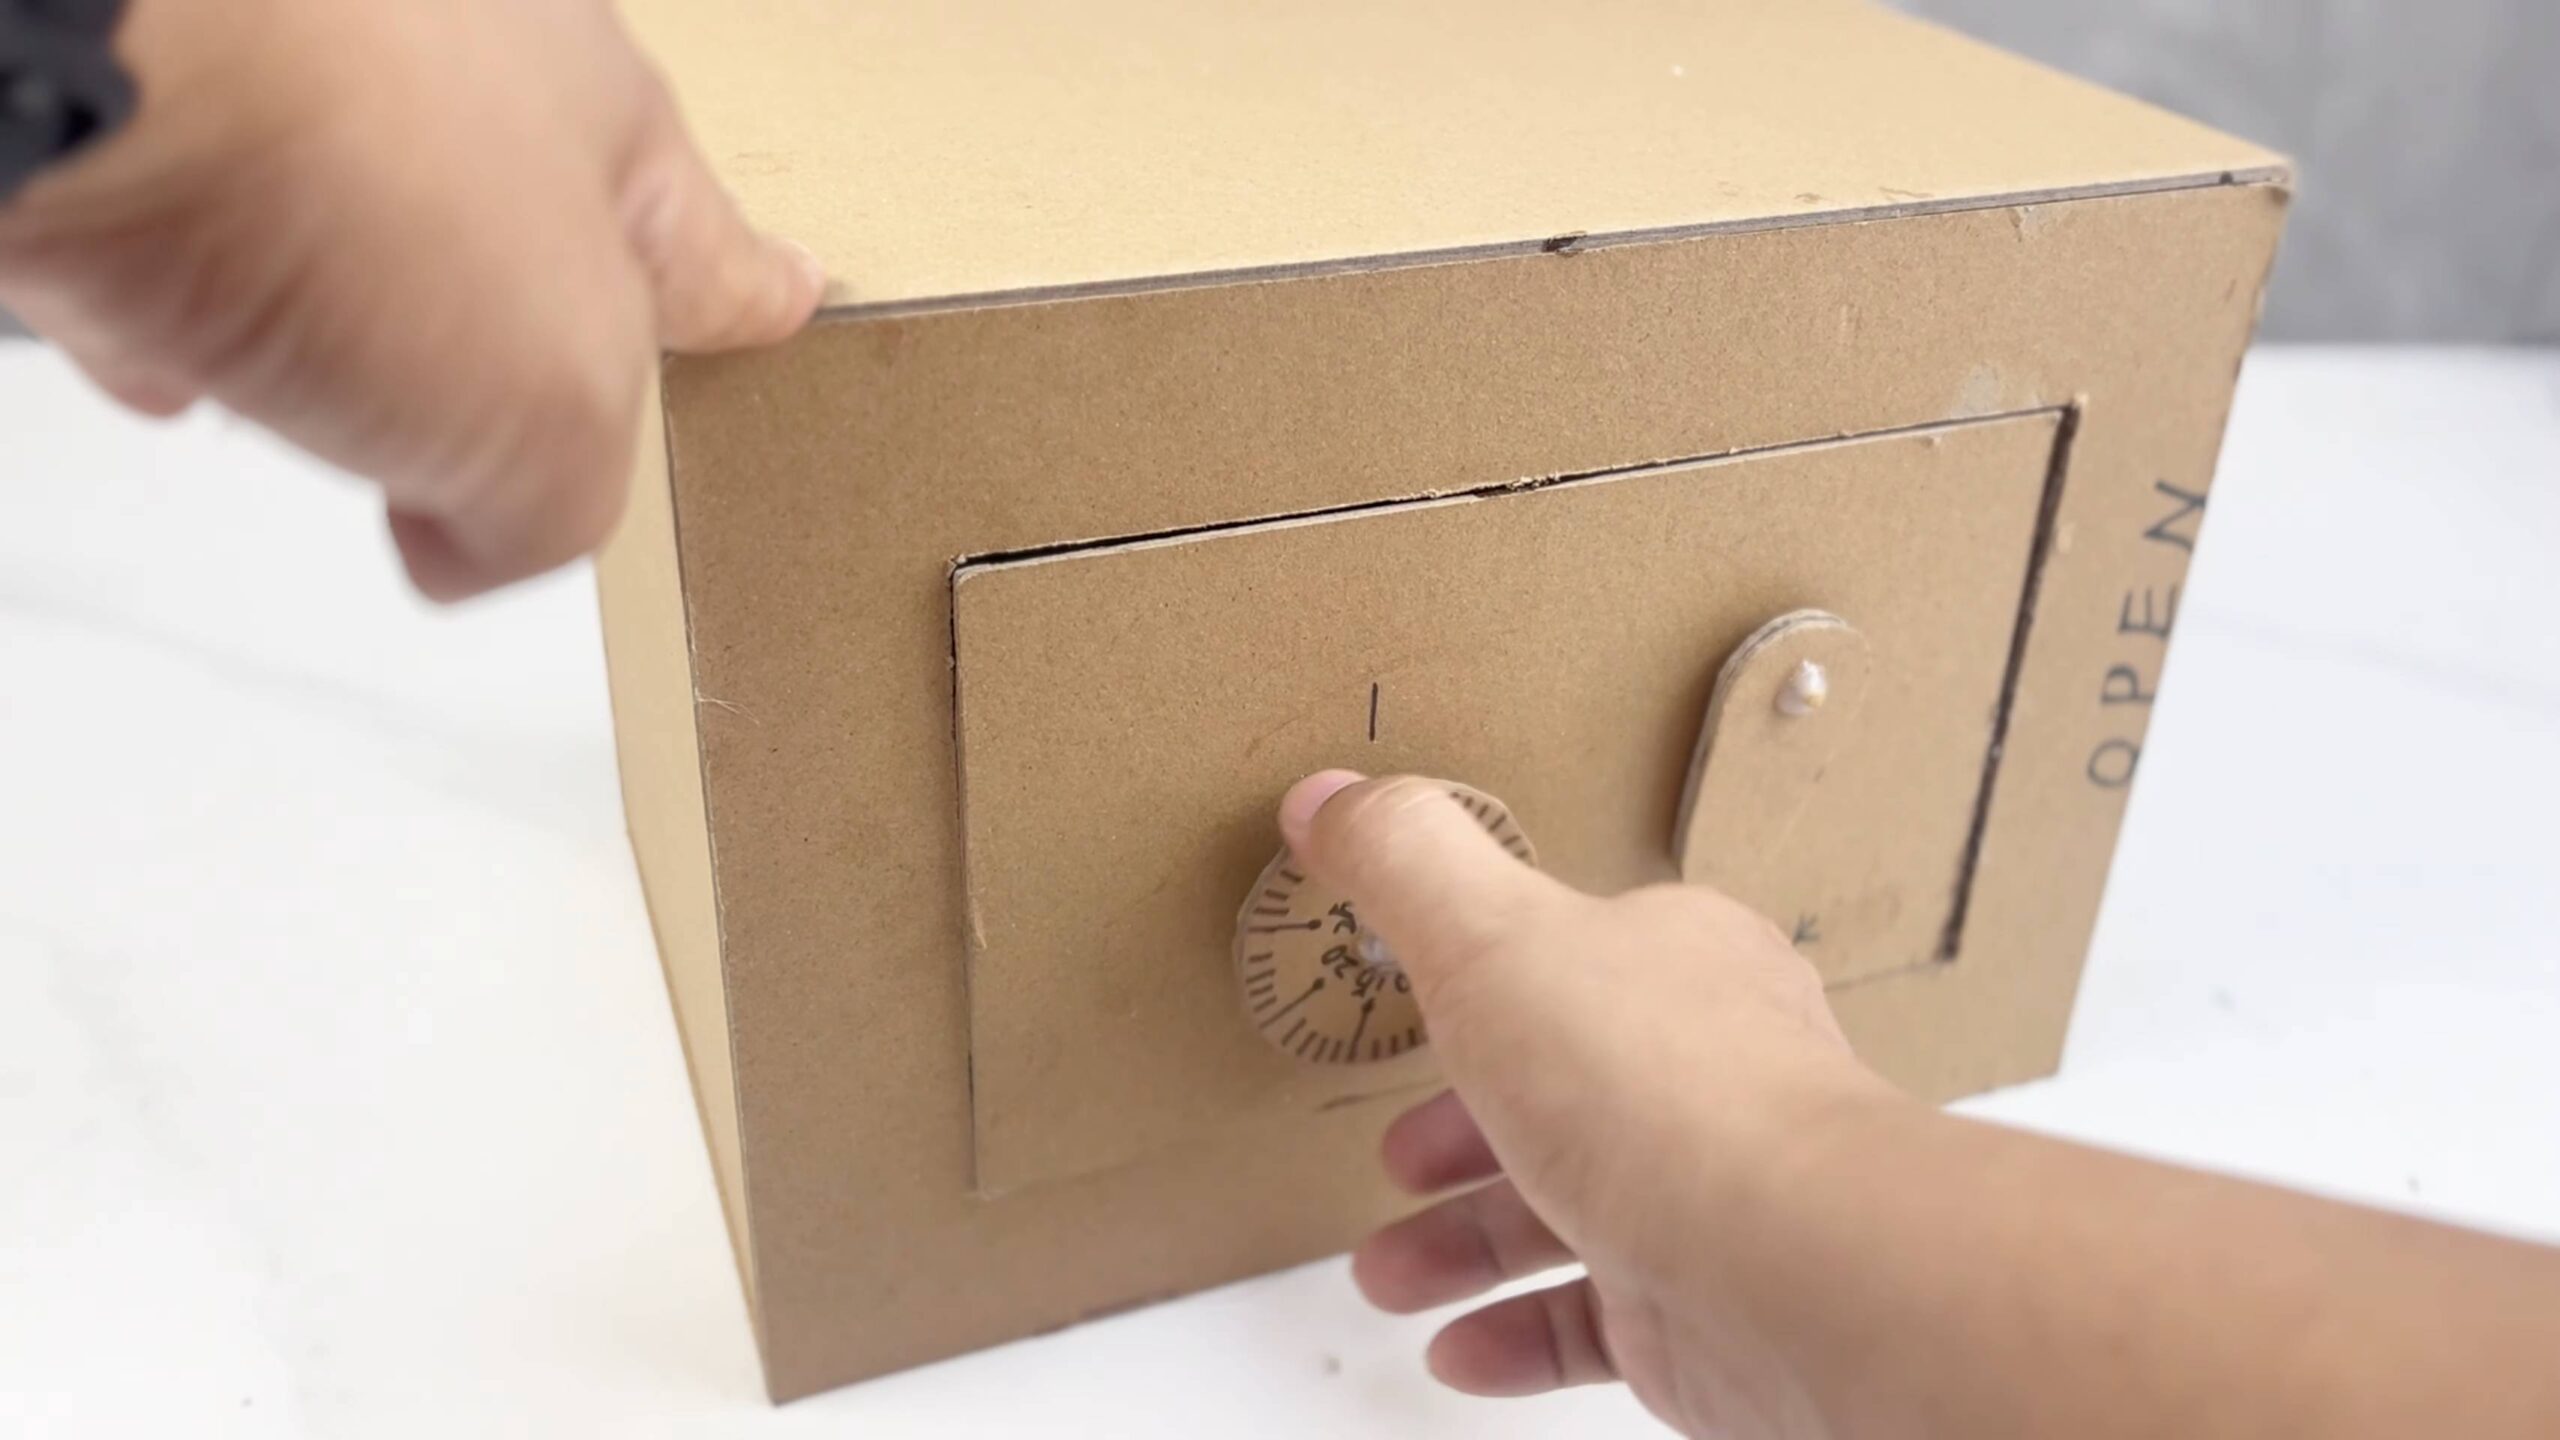
Hey everyone! Ever wanted a super cool, secret place to stash your stuff? I’m going to show you how to build an awesome cardboard safe, complete with a working combination lock! It’s a fun project, a great way to recycle, and you’ll have a secure little box to keep your valuables (or maybe just your candy stash!) safe from prying eyes. Let’s get started!
Materials You’ll Need:
* Cardboard Boxes: You’ll need a few different sizes. A larger, sturdy box for the main body of the safe, a medium-sized box for the door and internal components, and some smaller scraps for reinforcements and the locking mechanism. Think cereal boxes, shipping boxes, or even shoe boxes. The sturdier, the better!
* Ruler or Measuring Tape: Accuracy is key for a smooth-operating lock.
* Pencil: For marking measurements and drawing guidelines.
* Craft Knife or Scissors: Be careful and always cut away from yourself! A craft knife is ideal for clean cuts, but scissors will work in a pinch.
* Hot Glue Gun and Glue Sticks: This is our main adhesive. Make sure you have plenty of glue sticks!
* Wooden Skewers or Dowels: These will form the axles for our combination dials.
* Bottle Caps or Cardboard Discs: For the combination dials themselves. I used plastic bottle caps for a smoother feel, but cardboard works just as well.
* Paper Fasteners (Brads): To attach the dials to the skewers.
* Small Screws and Screwdriver (Optional): For extra reinforcement, especially if you’re using heavier items inside the safe.
* Paint, Markers, or Decorative Paper (Optional): To decorate your safe and make it look extra awesome!
* Small Magnets (Optional): For a magnetic door closure.
* Metal Washers (Optional): To reinforce the locking mechanism.
Planning and Design:
Before we start cutting, let’s plan out our safe. Here’s what we’re aiming for:
* The Main Body: This is the outer shell of the safe. It needs to be sturdy and large enough to hold your valuables.
* The Door: This will swing open and closed, secured by our combination lock.
* The Combination Lock: This is the heart of the project! We’ll have multiple dials that need to be set to the correct combination to unlock the door.
* The Locking Mechanism: This is what physically prevents the door from opening when the combination is incorrect.
Building the Main Body:
1. Choose Your Box: Select the largest and sturdiest cardboard box you have. This will be the foundation of your safe.
2. Reinforce the Box (Optional): If your box is a bit flimsy, reinforce the corners and edges with extra strips of cardboard glued in place. This will add strength and stability. I like to use hot glue for this, applying a generous amount along the seams.
3. Cut the Opening: Decide where you want the door to be (usually on the front). Use your ruler and pencil to draw a rectangle on the box, leaving a border of at least 1-2 inches around the edges. This border will provide support for the door frame.
4. Carefully Cut Out the Opening: Use your craft knife or scissors to carefully cut along the lines you drew. Be precise! A clean cut will make the door fit better.
5. Create the Door Frame: Cut strips of cardboard that are the same width as the border you left around the opening. Glue these strips around the inside of the opening to create a frame for the door to sit against. This will make the safe more secure and prevent the door from being easily pried open.
Creating the Door:
1. Measure the Opening: Carefully measure the opening you created in the main body.
2. Cut the Door: Cut a piece of cardboard that is slightly larger than the opening. You want it to overlap the opening by about 1/2 inch on all sides. This overlap will ensure a snug fit and prevent gaps.
3. Reinforce the Door: Just like the main body, reinforce the door with extra strips of cardboard glued to the inside. Pay special attention to the edges, as these are the most vulnerable points.
4. Attach Hinges: You can create simple hinges using strips of cardboard. Cut two strips of cardboard and fold them in half. Glue one half of each strip to the inside of the door and the other half to the inside of the door frame. Make sure the hinges are aligned so the door swings smoothly. Alternatively, you can use store-bought hinges if you want a more professional look.
5. Test the Door: Attach the door to the main body using the hinges. Make sure it swings open and closed smoothly. Adjust the hinges if necessary.
Building the Combination Lock:
This is the trickiest part, but also the most rewarding!
1. Prepare the Dials: If you’re using bottle caps, clean them thoroughly. If you’re using cardboard discs, cut out several circles of the same size.
2. Mark the Dials: Divide each dial into equal sections (e.g., 10 sections). Number each section from 0 to 9. You can use a marker or paint to write the numbers clearly.
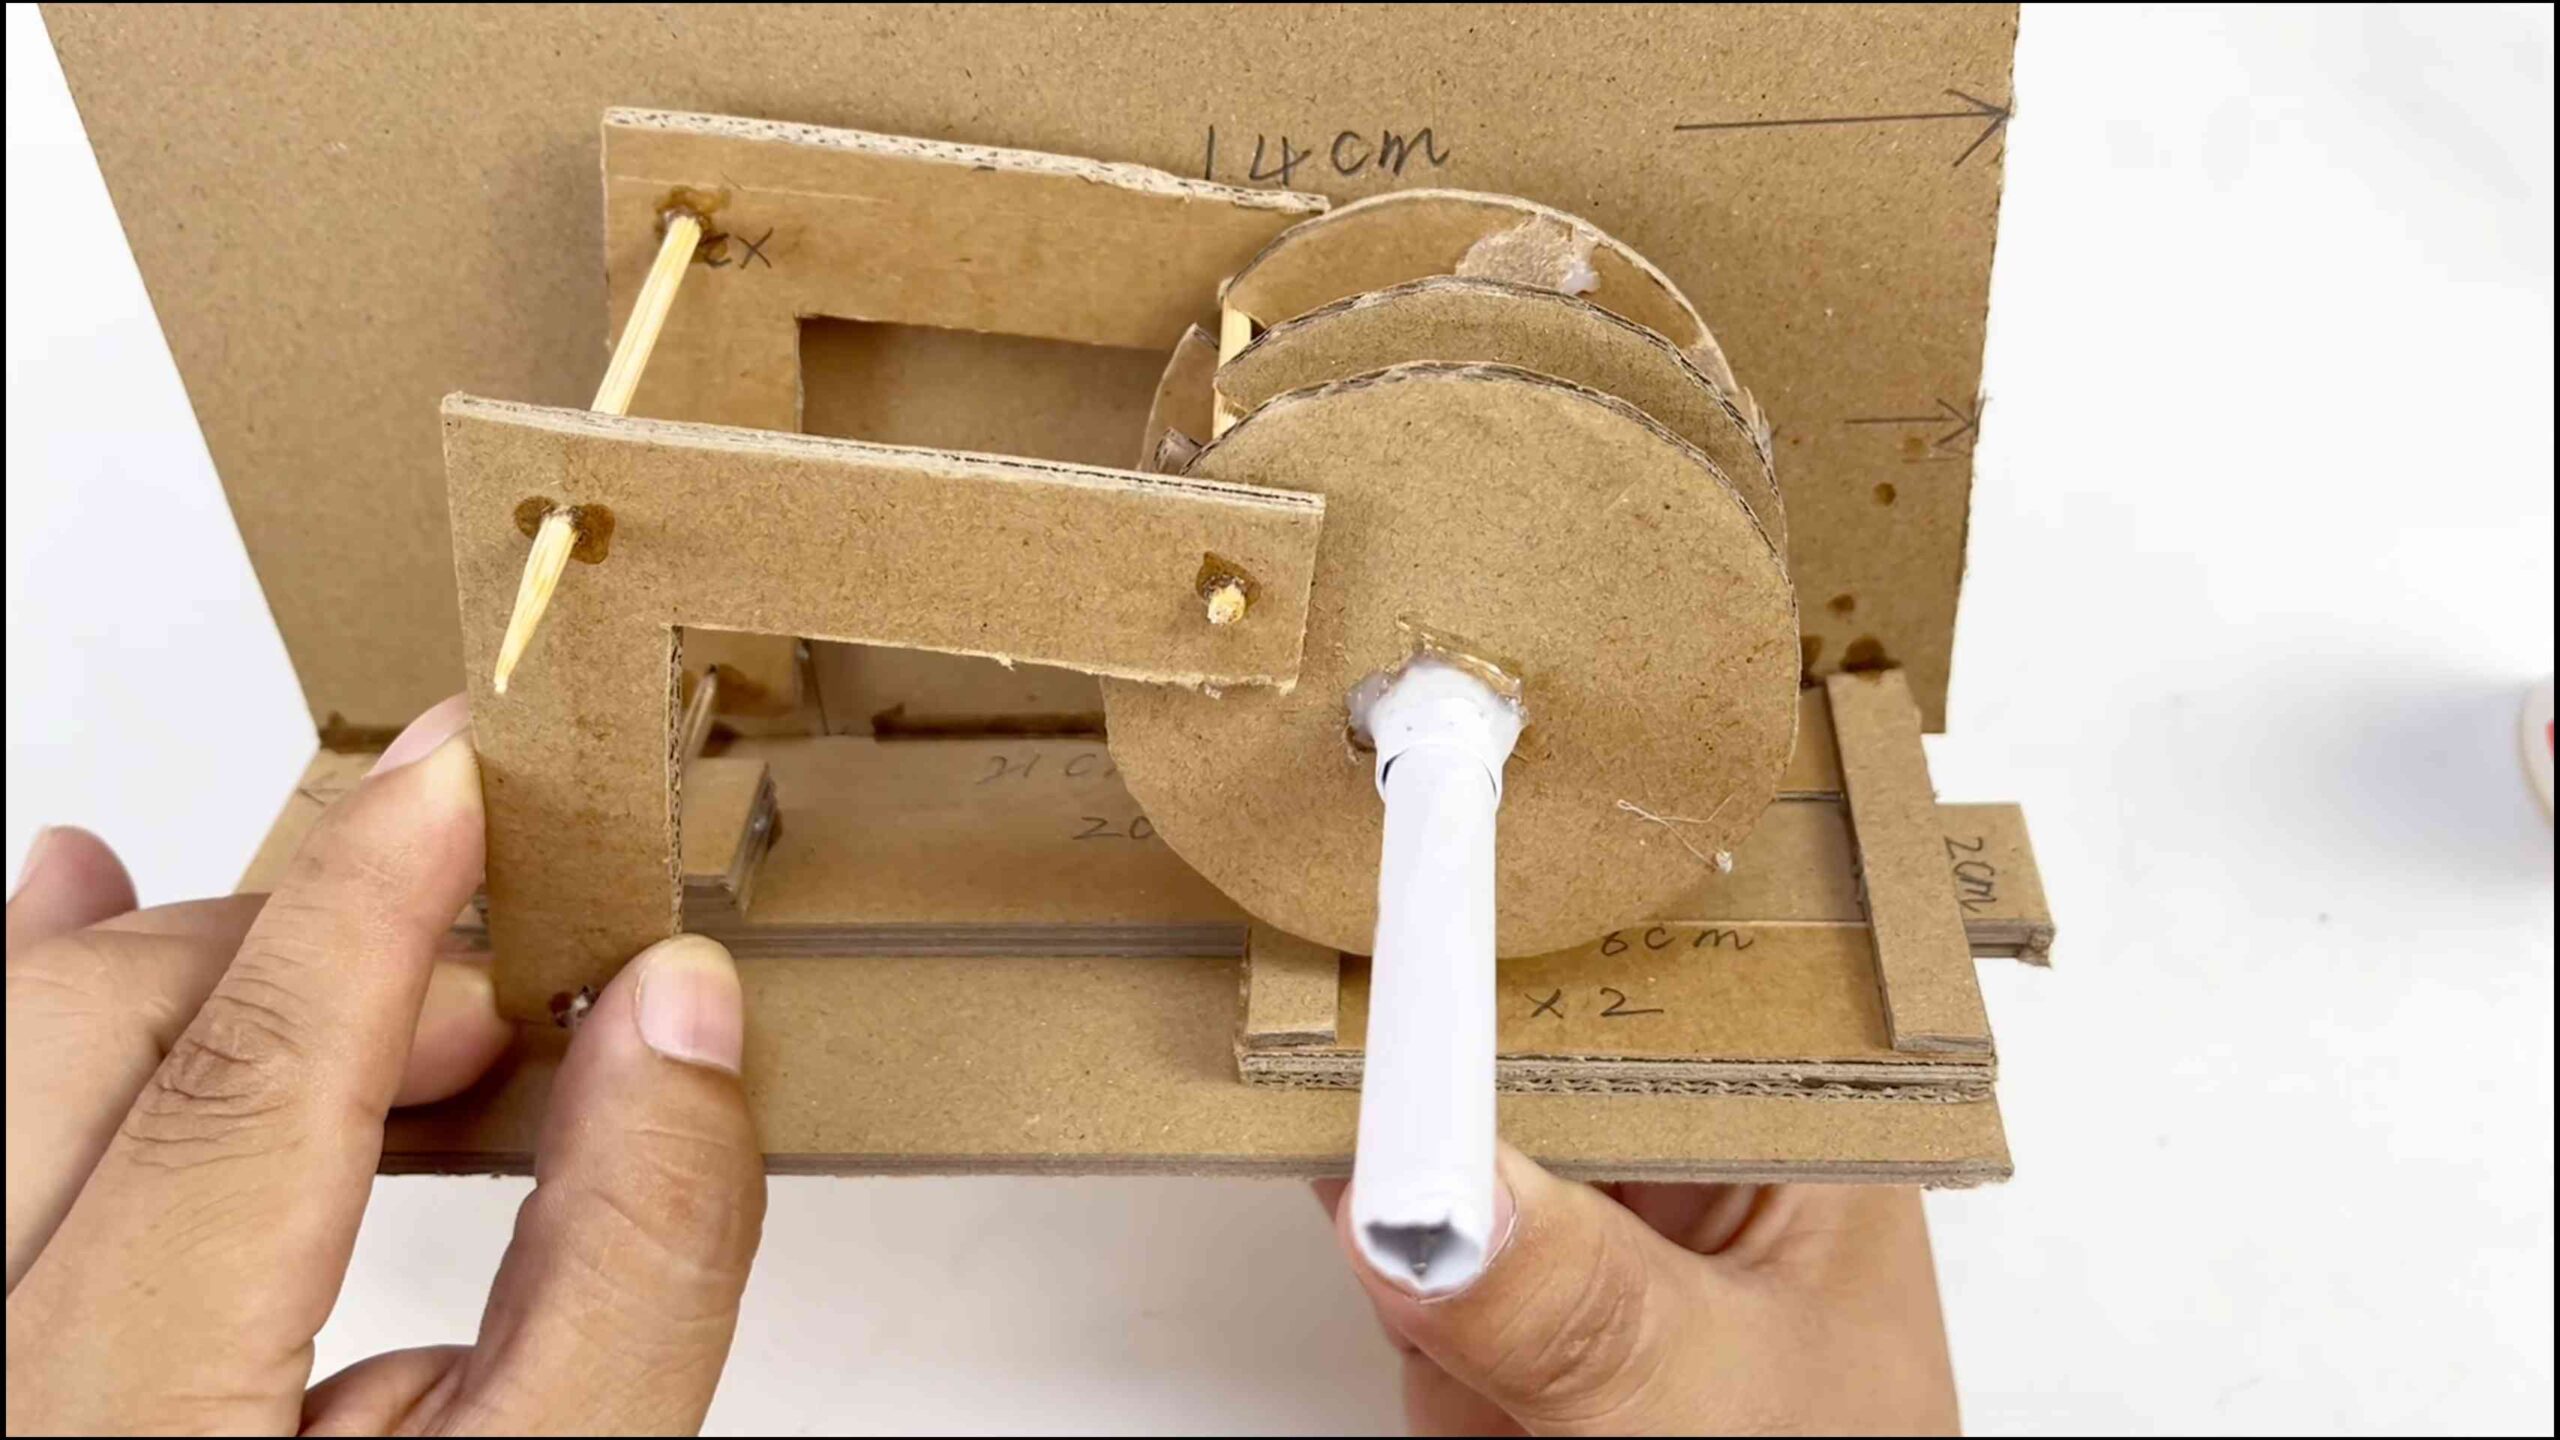
3. Create the Axles: Cut the wooden skewers or dowels to the desired length. The length will depend on the thickness of your safe and the number of dials you’re using. Make sure the axles are long enough to extend through the front of the safe and into the locking mechanism.
4. Attach the Dials to the Axles: Use paper fasteners (brads) to attach the dials to the skewers. Insert the brad through the center of the dial and into the end of the skewer. Secure the brad by bending the prongs outwards.
5. Create the Dial Holders: Cut small squares of cardboard and punch a hole in the center of each square. These squares will hold the axles in place and allow the dials to rotate freely.
6. Mount the Dial Holders: Glue the dial holders to the inside of the safe, in a row. Make sure the holes are aligned so the axles can pass through them easily. The spacing between the dial holders will depend on the size of your dials.
7. Insert the Axles: Insert the axles through the dial holders, so the dials are visible on the front of the safe.
Designing the Locking Mechanism:
This is where we get creative! The locking mechanism needs to prevent the door from opening unless the dials are set to the correct combination. Here’s one way to do it:
1. Create the Locking Bar: Cut a strip of cardboard that is long enough to extend across the inside of the door and into the main body of the safe. This strip will act as the locking bar.
2. Attach the Locking Bar to the Door: Glue the locking bar to the inside of the door, near the edge opposite the hinges.
3. Create the Locking Slots: Cut small slots in the locking bar, one for each dial. The position of the slots will correspond to the correct combination for each dial.
4. Create the Locking Pins: Cut small pieces of cardboard or use metal washers to create locking pins. These pins will fit into the slots in the locking bar and prevent the door from opening.
5. Attach the Locking Pins to the Axles: Attach the locking pins to the axles, behind the dial holders. The position of the pins on the axles will determine the correct combination. When the dials are set to the correct combination, the pins will align with the slots in the locking bar, allowing the door to open.
6. Test the Locking Mechanism: Close the door and test the locking mechanism. Rotate the dials to different positions and make sure the door remains locked. Then, set the dials to the correct combination and make sure the door opens smoothly. Adjust the position of the locking pins if necessary.
Final Touches:
1. Add a Handle: Attach a small piece of cardboard or a drawer pull to the door to make it easier to open.
2. Magnetic Closure (Optional): Attach small magnets to the door and the door frame to create a magnetic closure. This will help keep the door closed when the lock is not engaged.
3. Decorate Your Safe: Now comes the fun part! Decorate your safe with paint, markers, or decorative paper. You can add camouflage patterns, cool designs, or even write your name on it.
4. Set Your Combination: Decide on your secret combination and write it down somewhere safe (but not *inside* the safe!).
5. Store Your Treasures: Now you can proudly store your valuables in your very own DIY cardboard safe!
Troubleshooting Tips:
*
Conclusion
So, there you have it! Creating your own DIY cardboard safe with a lock isn’t just a fun project; it’s a practical way to secure small valuables, teach kids about responsibility, and unleash your inner maker. This project is a must-try because it’s incredibly affordable, using materials you likely already have around the house. Forget expensive store-bought safes that might not even fit your specific needs. With this DIY approach, you can customize the size, design, and locking mechanism to perfectly suit your requirements.
But the benefits extend beyond mere practicality. Building this safe is a fantastic exercise in problem-solving and creativity. You’ll be thinking critically about structural integrity, lock placement, and overall design. It’s a hands-on learning experience that’s both engaging and rewarding. Plus, the satisfaction of knowing you built something functional and secure with your own two hands is unparalleled.
Don’t be afraid to experiment with variations! Consider adding multiple compartments inside for better organization. You could also paint the safe with vibrant colors or decorate it with stickers to personalize it further. For a more sophisticated look, try covering the cardboard with fabric or faux leather. If you’re feeling ambitious, explore different locking mechanisms, perhaps incorporating a combination lock or even a simple electronic lock. The possibilities are truly endless.
This DIY cardboard safe with a lock is more than just a craft project; it’s a statement. It’s a statement that you value resourcefulness, creativity, and the ability to solve problems with your own ingenuity. It’s a statement that you’re not afraid to get your hands dirty and create something unique and functional.
We wholeheartedly encourage you to give this DIY project a try. It’s a fantastic way to spend an afternoon, learn new skills, and create something truly useful. And most importantly, we want to hear about your experience! Share your photos, tips, and variations in the comments below. Let’s build a community of makers and inspire each other with our creativity. What modifications did you make? What challenges did you encounter, and how did you overcome them? Your feedback is invaluable and will help others who are embarking on this DIY adventure. So, grab your cardboard, gather your tools, and get ready to build your very own secure haven. You won’t regret it!
Frequently Asked Questions (FAQ)
What kind of cardboard is best for this project?
The ideal cardboard is thick and sturdy, like that from appliance boxes or moving boxes. Single-layer corrugated cardboard is generally too flimsy. Look for double-walled or even triple-walled cardboard for maximum strength and durability. The thicker the cardboard, the more secure your safe will be. Avoid using cardboard that is already damaged or creased, as this will compromise its structural integrity. If you only have thinner cardboard available, consider layering it to create a thicker, stronger material.
What type of lock should I use?
A small padlock is the most common and readily available option. However, you can also use a combination lock or even a simple latch with a key. The choice depends on your desired level of security and your budget. For younger children, a simple latch might be sufficient, while older children or adults might prefer a more secure padlock. When choosing a lock, consider its size and weight, as a very heavy lock could potentially damage the cardboard. Ensure the lock is compatible with the size of the hasp or locking mechanism you create on the safe.
How can I make the safe more secure?
There are several ways to enhance the security of your DIY cardboard safe. Reinforce the corners and edges with strong tape, such as duct tape or packing tape. Consider adding extra layers of cardboard to the walls and lid for increased thickness. You can also glue wooden dowels or popsicle sticks along the edges for added support. For the locking mechanism, use metal washers or plates to reinforce the areas where the lock attaches to the cardboard. This will prevent the cardboard from tearing or breaking under pressure. Camouflage can also be a form of security.
How do I cut the cardboard accurately?
Use a sharp utility knife or box cutter for precise cuts. Always use a ruler or straight edge as a guide to ensure straight lines. Place the cardboard on a cutting mat or a sacrificial surface to protect your work area. Be careful when cutting, and always keep your fingers away from the blade. For curved cuts, you can use a compass or a template. If you’re working with thick cardboard, you may need to make multiple passes with the knife to cut all the way through.
What kind of glue is best for this project?
Hot glue is a popular choice because it dries quickly and creates a strong bond. However, it can be messy and may not be suitable for all types of cardboard. White glue or wood glue are also good options, but they require more drying time. For a more permanent bond, consider using construction adhesive. When using glue, apply it sparingly to avoid warping the cardboard. Clamp the pieces together while the glue dries to ensure a strong and secure bond.
Can I paint or decorate the safe?
Absolutely! Painting and decorating your DIY cardboard safe is a great way to personalize it and make it more visually appealing. Use acrylic paints, markers, or crayons to add color and designs. You can also cover the safe with fabric, wrapping paper, or stickers. Before painting, consider applying a primer to the cardboard to create a smooth surface and prevent the paint from soaking in. Let the paint dry completely before adding any decorations.
How long will this safe last?
The lifespan of your DIY cardboard safe depends on the quality of the materials used and how well it’s constructed. With proper care, it can last for several months or even years. However, cardboard is susceptible to moisture and damage, so it’s important to keep the safe in a dry and protected environment. Avoid placing heavy objects on top of the safe, as this could cause it to collapse. Regularly inspect the safe for any signs of wear and tear, and repair any damage as needed.
Is this safe truly secure?
While this DIY cardboard safe with a lock provides a degree of security, it’s important to remember that it’s not impenetrable. It’s primarily intended for storing small valuables and deterring casual theft. A determined thief could likely break into the safe with enough time and effort. Therefore, it’s not a substitute for a professional-grade safe or a secure storage facility. Use this safe for items that are not extremely valuable or irreplaceable.
What if the cardboard gets wet?
Cardboard is highly susceptible to water damage. If your DIY cardboard safe gets wet, it will likely become weakened and warped. If the cardboard gets only slightly damp, try to dry it as quickly as possible with a towel or hairdryer. However, if the cardboard is soaked, it’s best to replace it with new material. To prevent water damage, keep the safe in a dry location and avoid exposing it to rain or spills. You can also apply a waterproof sealant to the cardboard to provide some protection against moisture.
Can I make a larger version of this safe?
Yes, you can scale up the dimensions of the safe to create a larger version. However, keep in mind that larger safes will require thicker cardboard and more reinforcement to maintain their structural integrity. You may also need to adjust the size and type of lock accordingly. When building a larger safe, pay close attention to the weight distribution and ensure that the base is strong enough to support the weight of the contents.

Leave a Comment