

DIY Cardboard Fan: Beat the heat this summer without breaking the bank! Are you tired of sweltering in the summer heat, but dread the thought of a hefty electricity bill from running your air conditioner all day? Well, I’ve got fantastic news! This article unveils a super simple, surprisingly effective, and incredibly budget-friendly solution: a DIY cardboard fan.
Believe it or not, the concept of using manual fans for cooling dates back centuries. From the elaborate hand fans of ancient Egypt and China, symbols of status and artistry, to the simple palm leaf fans used in tropical climates, people have always sought ways to create a refreshing breeze. While our cardboard creation might not be as ornate as those historical examples, it embodies the same resourceful spirit of innovation.
Why do you need this DIY trick? Because it’s a game-changer! Not only is it an eco-friendly way to repurpose cardboard boxes that might otherwise end up in the recycling bin, but it’s also a fantastic project for kids and adults alike. Plus, in times of power outages or when you’re simply trying to reduce your carbon footprint, this DIY cardboard fan can provide a much-needed, gentle breeze. I’m excited to show you how to make your own personal cooling device with just a few simple materials and steps. Let’s get started!
DIY Cardboard Fan: Stay Cool on a Budget!
Hey there, fellow DIY enthusiasts! Feeling the heat but don’t want to break the bank on a fancy new fan? I’ve got just the project for you: a surprisingly effective and super fun DIY cardboard fan! This project is perfect for a hot afternoon, a camping trip, or just a cool conversation starter. Let’s get started!
Materials You’ll Need
Before we dive in, let’s gather our supplies. Don’t worry, you probably already have most of these lying around!
* Cardboard: The star of the show! Look for a large, sturdy piece. An old appliance box or a shipping box works perfectly. The bigger the cardboard, the bigger your fan can be.
* Small DC Motor: This is what will power our fan. You can find these online or salvage one from an old toy. A 3-6V motor is ideal.
* 9V Battery: To power the motor.
* 9V Battery Connector: This makes connecting the battery to the motor super easy.
* Switch (Optional): If you want to be able to easily turn the fan on and off, a small switch is a great addition.
* Hot Glue Gun and Glue Sticks: For secure and quick assembly.
* Craft Knife or Scissors: For cutting the cardboard. Be careful!
* Ruler or Measuring Tape: For accurate measurements.
* Pencil or Marker: For marking the cardboard.
* Wire Strippers (If using a switch): To strip the wires for connecting the switch.
* Safety Glasses: Always protect your eyes when working with tools.
Designing and Cutting the Fan Blades
This is where we bring our fan to life! The shape and size of the blades will affect how well the fan works, so let’s take our time.
1. Prepare the Cardboard: Lay your cardboard flat on a work surface. Make sure it’s clean and free of any debris.
2. Draw the Fan Blades: Using your ruler and pencil, draw the fan blades on the cardboard. I recommend starting with a circle. A diameter of 8-10 inches is a good starting point. Then, divide the circle into equal sections (usually 4 or 6) to create the individual blades. You can experiment with different blade shapes – curved, straight, or even slightly angled. I personally like a slightly curved blade for better airflow. Remember to leave a small circle in the center of the fan where the motor will attach. This center circle should be just slightly larger than the motor shaft.
3. Cut Out the Fan Blades: Carefully use your craft knife or scissors to cut out the fan blades. Take your time and follow the lines as closely as possible. A clean cut will make for a better-looking and more efficient fan. If you’re using a craft knife, always cut away from yourself and use a cutting mat to protect your work surface.
4. Reinforce the Blades (Optional): For added durability, you can reinforce the blades with extra cardboard. Cut out strips of cardboard and glue them along the back of each blade. This will help prevent the blades from bending or breaking, especially if you’re using thinner cardboard.
Building the Fan Base
Now we need a sturdy base to hold our fan and motor.
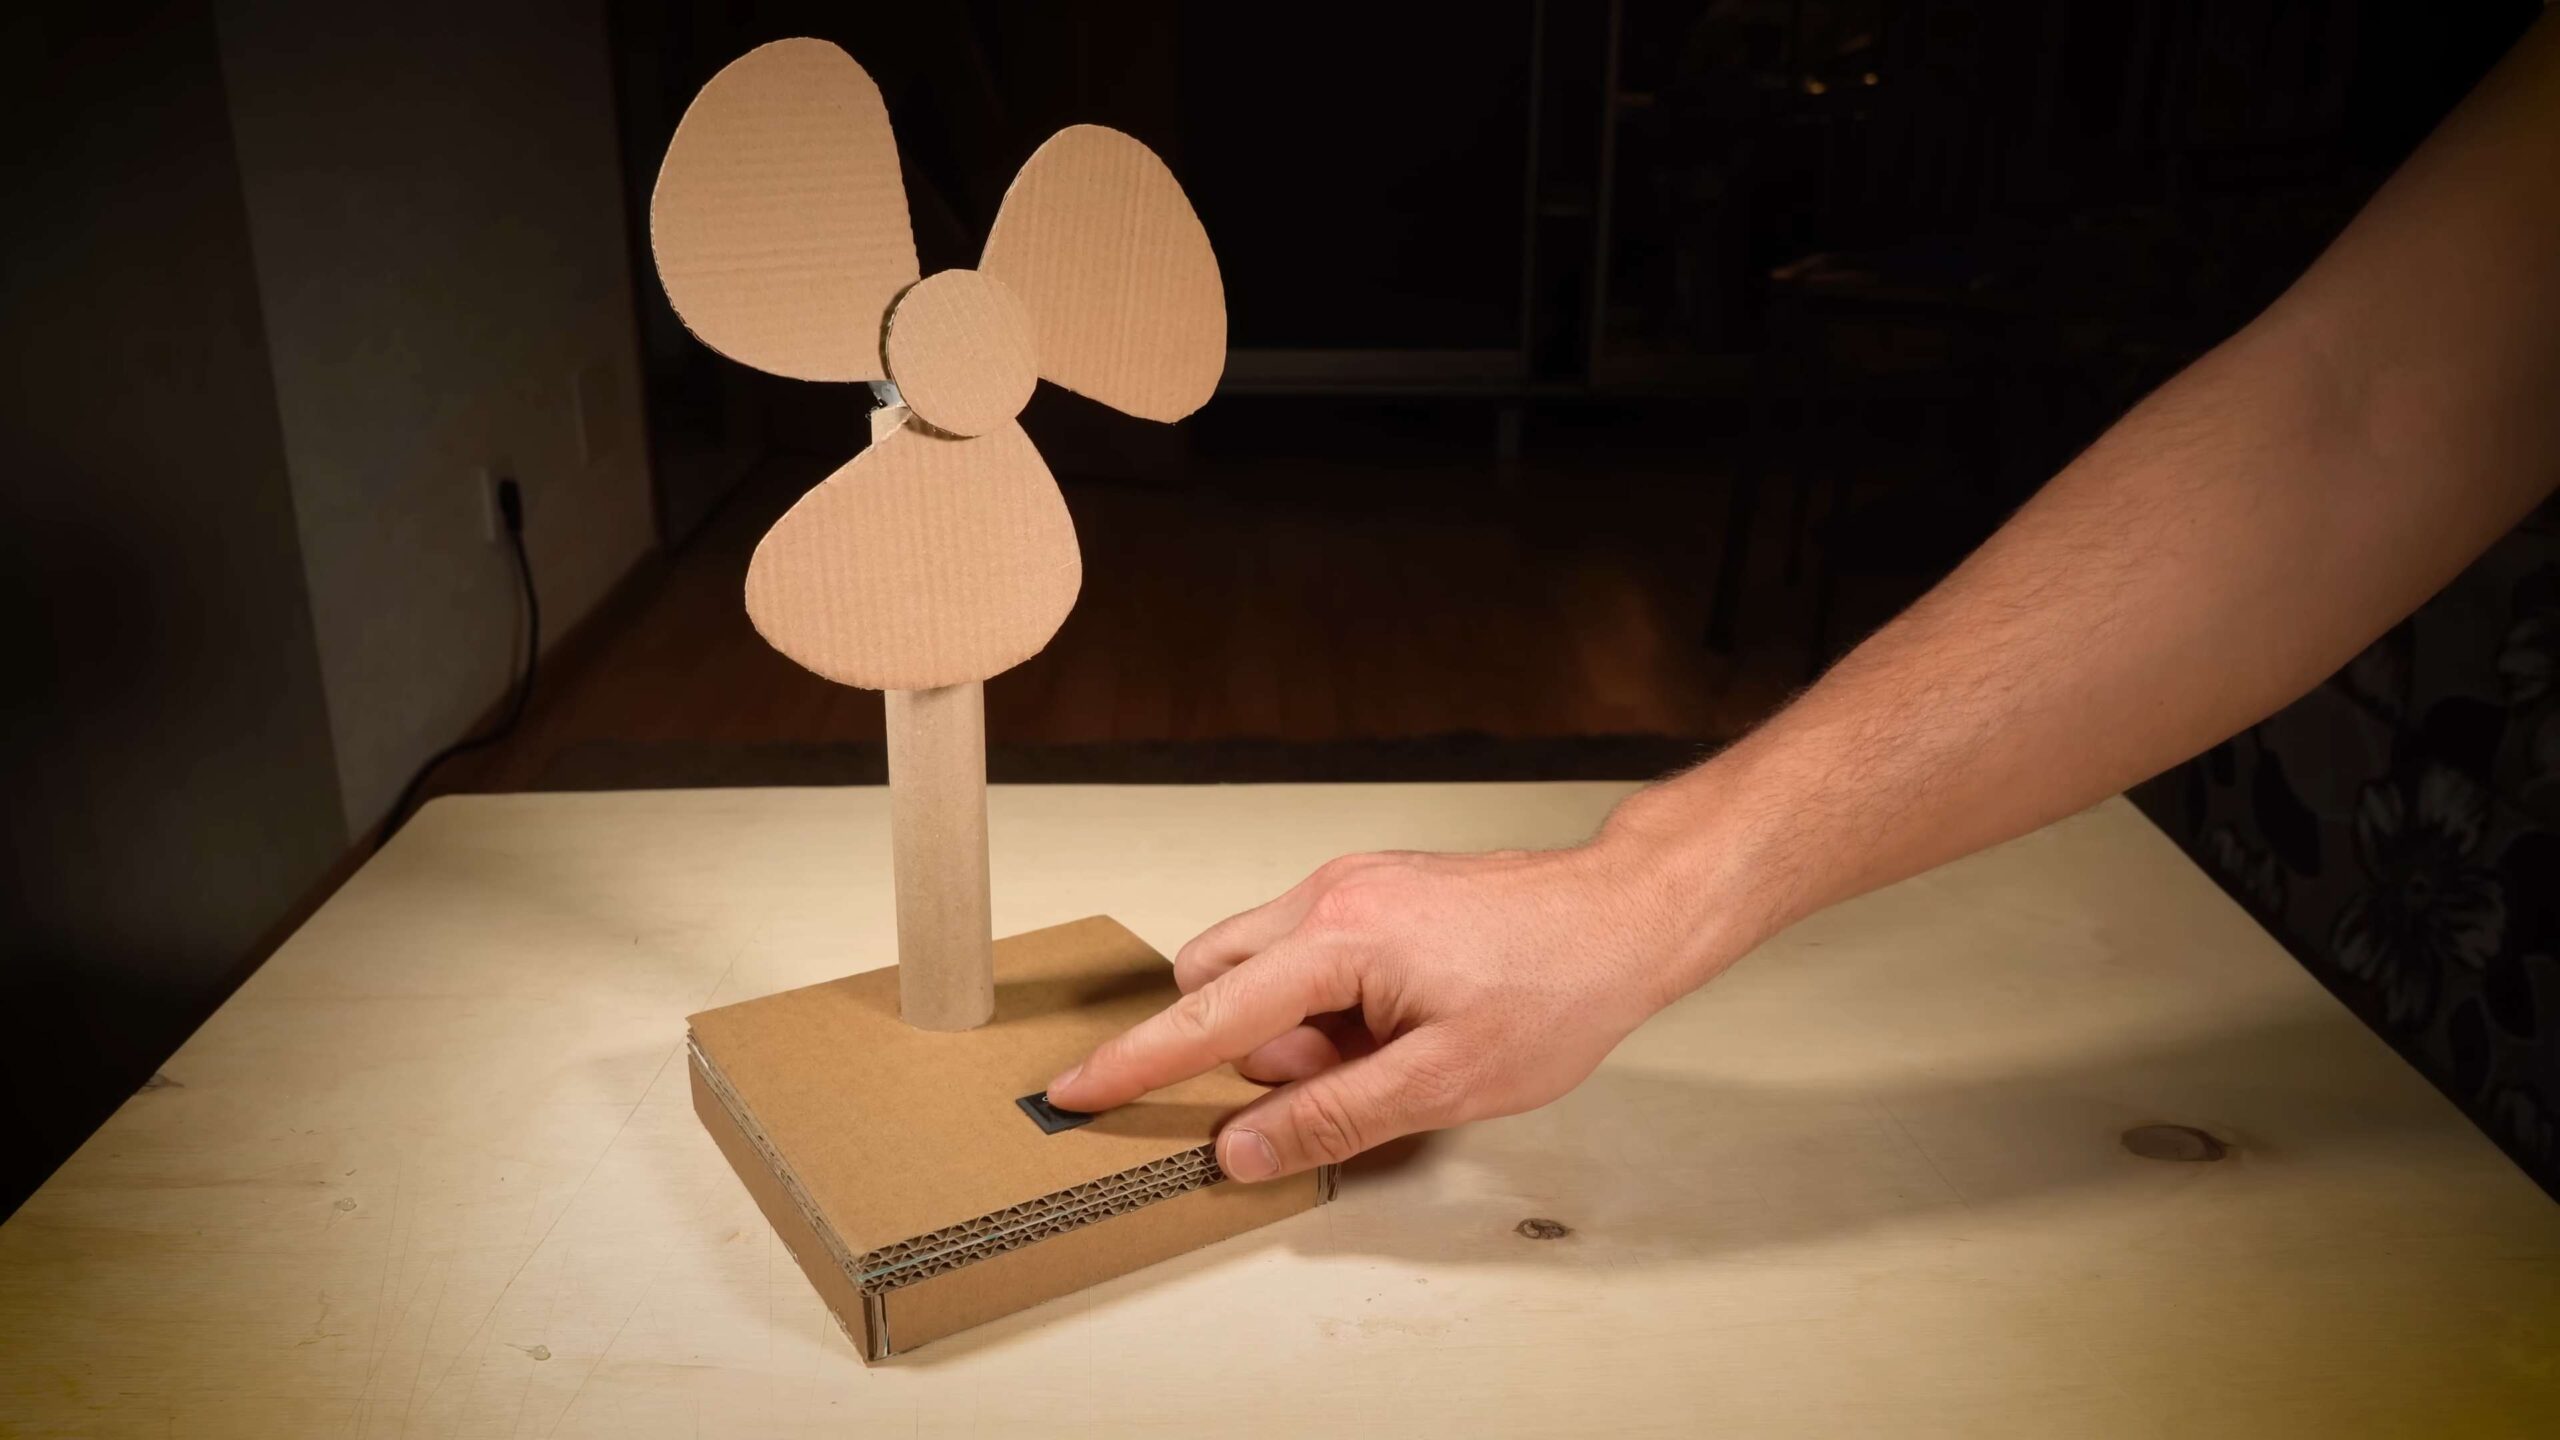
1. Design the Base: Think about the shape and size of your base. A simple rectangular box works well, but you can get creative! I like to make a triangular prism shape for stability. The base should be large enough to comfortably hold the motor and battery.
2. Cut the Base Pieces: Using your ruler and pencil, draw the pieces for your base on the cardboard. Remember to account for the thickness of the cardboard when measuring. For a rectangular box, you’ll need four sides and a bottom. For a triangular prism, you’ll need two triangles and three rectangles.
3. Assemble the Base: Use your hot glue gun to assemble the base pieces. Apply glue to the edges of the cardboard and carefully press them together. Hold the pieces in place until the glue cools and sets. Make sure the base is sturdy and can stand on its own.
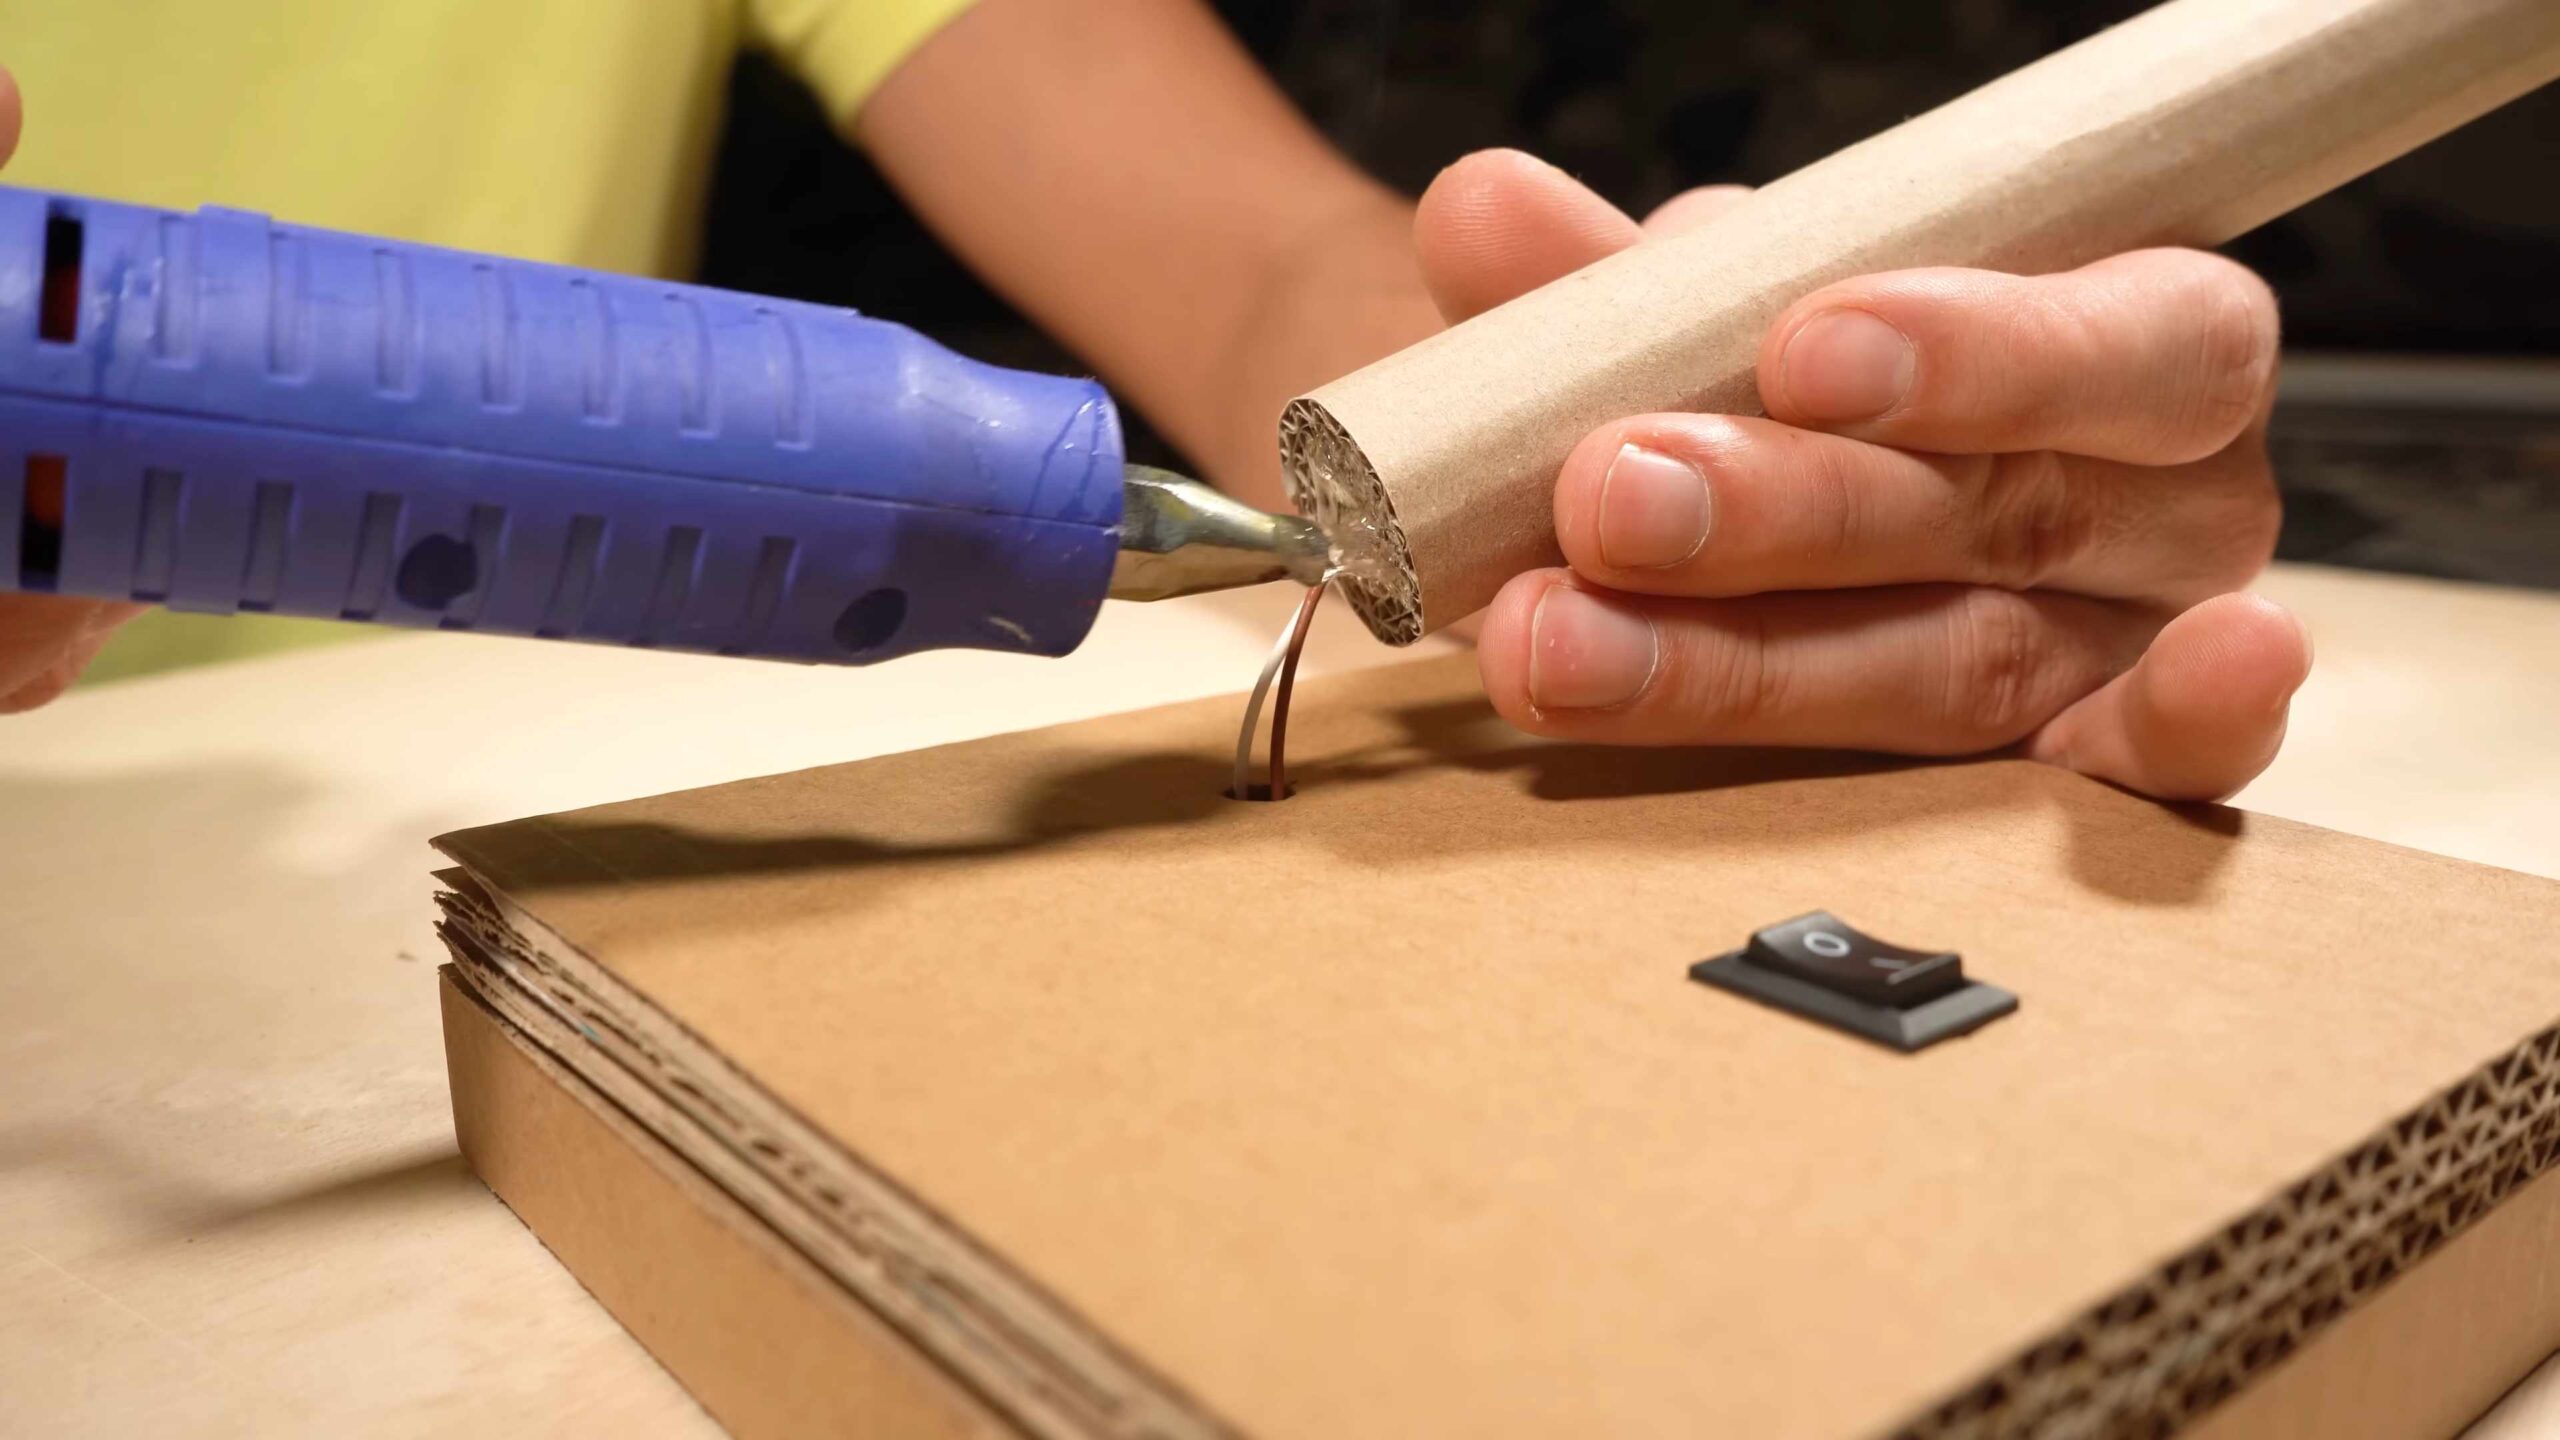
4. Create a Motor Mount: We need a way to securely attach the motor to the base. Cut out a small square or rectangle of cardboard. This will be our motor mount. Make a hole in the center of the mount that is just large enough for the motor shaft to fit through. Glue the motor mount to the top of the base, making sure the hole is centered.
Wiring and Assembly
This is where we bring everything together and make our fan spin!
1. Attach the Motor to the Fan Blades: Carefully insert the motor shaft through the hole in the center of the fan blades. Use hot glue to secure the motor to the blades. Apply glue around the motor shaft and the cardboard, making sure the blades are centered and balanced. Let the glue cool completely before moving on.
2. Mount the Motor to the Base: Place the motor (with the attached fan blades) onto the motor mount on the base. Use hot glue to secure the motor to the mount. Make sure the motor is firmly attached and doesn’t wobble.
3. Wire the Motor and Battery Connector: Connect the red wire from the battery connector to the positive (+) terminal of the motor. Connect the black wire from the battery connector to the negative (-) terminal of the motor. If you’re using a switch, cut one of the wires (either the red or the black) and strip the ends. Connect the stripped ends to the terminals of the switch.
4. Secure the Battery: Find a place inside the base to secure the battery. You can use hot glue or double-sided tape to hold it in place. Make sure the battery is easily accessible so you can replace it when needed.
5. Test Your Fan: Insert the 9V battery into the battery connector. If you used a switch, turn it on. The fan should start spinning! If it doesn’t, double-check your wiring and make sure all connections are secure.
Troubleshooting Tips
Sometimes things don’t go exactly as planned. Here are a few troubleshooting tips to help you get your fan working:
* Fan Doesn’t Spin:
* Check the battery. Is it fully charged?
* Check the wiring. Are all the connections secure?
* Make sure the motor is properly attached to the fan blades.
* Make sure the fan blades are not hitting anything.
* Fan Spins Slowly:
* The battery may be low.
* The motor may be too small.
* The fan blades may be too heavy.
* Fan is Unstable:
* Make sure the base is sturdy and level.
* Add weight to the base to make it more stable.
Optional Enhancements
Want to take your cardboard fan to the next level? Here are a few ideas:
* Paint and Decorate: Get creative and paint your fan with your favorite colors and designs. You can use acrylic paint, markers, or even spray paint.
* Add a Grill: Cut out a piece of cardboard and create a grill to protect the fan blades. This will also make the fan safer to use.
* Adjustable Speed: Use a potentiometer to control the speed of the motor. This will allow you to adjust the airflow to your liking.
* Solar Power: Replace the battery with a small solar panel to make your fan eco-friendly.
Final Thoughts
And there you have it! A fully functional, budget-friendly, and totally awesome DIY cardboard fan. I hope you enjoyed this project as much as I did. Remember to always be careful when working with tools and electricity. Now go enjoy the cool breeze! This project is a great way to recycle materials, learn about basic electronics, and stay cool all at the same time. Happy crafting!
Conclusion
So, there you have it! This DIY cardboard fan isn’t just a fun project; it’s a practical, eco-friendly, and surprisingly effective way to beat the heat. Forget those expensive, energy-guzzling electric fans for a moment and embrace the simplicity and ingenuity of this homemade solution. We’ve shown you how to transform humble cardboard into a personal cooling device that’s perfect for hot days, stuffy offices, or even outdoor adventures.
Why is this DIY trick a must-try? Because it’s accessible to everyone. You likely already have the materials lying around your house – cardboard boxes, scissors, glue, and maybe a few decorative items. It’s a fantastic way to repurpose materials that would otherwise end up in the recycling bin, reducing waste and promoting sustainability. Plus, it’s a rewarding project that you can complete in an afternoon, offering a sense of accomplishment and a unique conversation starter.
But the benefits don’t stop there. This cardboard fan is incredibly portable and lightweight, making it easy to carry with you wherever you go. It’s also whisper-quiet, unlike many electric fans that can be disruptive and distracting. And let’s not forget the cost savings! You’ll be saving money on electricity bills and avoiding the expense of purchasing a new fan.
Looking for ways to personalize your DIY cardboard fan? Here are a few suggestions:
* **Paint it:** Use acrylic paints, markers, or even spray paint to add color and personality to your fan. Get creative with patterns, designs, or even your favorite characters.
* **Add embellishments:** Glue on glitter, sequins, beads, or other decorative items to make your fan sparkle and shine.
* **Experiment with blade shapes:** Try different blade shapes to see how they affect the airflow. You could try curved blades, angled blades, or even blades with cutouts.
* **Incorporate essential oils:** Add a few drops of your favorite essential oil to a cotton ball and attach it to the back of the fan for a refreshing aromatherapy experience. Lavender, peppermint, and eucalyptus are all great choices for cooling and invigorating scents.
* **Make it rechargeable:** For a more advanced project, consider adding a small, rechargeable USB fan to the center of your cardboard fan. This will give you a boost of power and make your fan even more effective.
We’re confident that you’ll be amazed by the cooling power of this simple DIY project. It’s a fun, affordable, and eco-friendly way to stay comfortable all summer long. So, gather your materials, follow our instructions, and get ready to experience the refreshing breeze of your very own DIY cardboard fan.
Don’t just take our word for it – try it out for yourself! We encourage you to build your own cardboard fan and share your experience with us. Post photos of your creations on social media using the hashtag #DIYCardboardFan and let us know what you think. We can’t wait to see your unique designs and hear about your cooling adventures!
Frequently Asked Questions (FAQ)
1. What kind of cardboard is best for making a DIY fan?
The best type of cardboard to use is corrugated cardboard, which is the kind you find in most shipping boxes. This type of cardboard is strong and durable, providing the necessary support for the fan blades. Avoid using thin or flimsy cardboard, as it may not be able to withstand the stress of being rotated. You can also experiment with different thicknesses of cardboard to see how it affects the fan’s performance. Thicker cardboard will generally be more durable, but it may also be heavier and require more effort to rotate.
2. How do I make the fan blades spin smoothly?
Ensuring smooth rotation is crucial for an effective fan. First, make sure the central pivot point is perfectly centered on the cardboard circle. An off-center pivot will cause wobbling. Second, use a smooth, low-friction fastener for the pivot. A metal brad or a small bolt with washers works well. Avoid using glue as a pivot, as it can create friction. Third, ensure the blades are balanced. Unevenly sized or weighted blades will cause the fan to vibrate. Finally, check for any obstructions that might be hindering the rotation. The fan should be able to spin freely without rubbing against anything.
3. How can I make the fan more powerful?
Several factors contribute to the fan’s power. The size and shape of the blades are critical. Larger blades will move more air, but they will also require more effort to rotate. Experiment with different blade shapes, such as curved or angled blades, to see which design provides the best airflow. The angle of the blades also plays a role. A steeper angle will create more airflow, but it will also require more force to rotate the fan. The speed at which you rotate the fan is another important factor. The faster you rotate the fan, the more air it will move.
4. Is this DIY cardboard fan safe to use around children?
Safety is paramount, especially when children are involved. While the cardboard fan is generally safe, it’s important to supervise children while they are using it. The edges of the cardboard blades can be sharp, so be sure to smooth them down with sandpaper or tape. Avoid using sharp objects, such as knives or scissors, to rotate the fan. Instead, use your hand or a small stick. If you are using a motorized version of the fan, be sure to keep it out of reach of young children.
5. How long will a DIY cardboard fan last?
The lifespan of your cardboard fan depends on several factors, including the quality of the cardboard, the construction techniques, and the frequency of use. With proper care, a well-made cardboard fan can last for several weeks or even months. To extend the lifespan of your fan, avoid exposing it to moisture, as this can weaken the cardboard. Store the fan in a dry place when not in use. If the blades become damaged, you can easily replace them with new ones.
6. Can I use this fan outdoors?
Yes, you can use this fan outdoors, but keep in mind that cardboard is susceptible to moisture. Avoid using the fan in rainy or humid conditions. If the fan gets wet, dry it thoroughly before using it again. You can also apply a waterproof coating to the cardboard to protect it from moisture.
7. What are some other creative uses for this DIY cardboard fan?
Beyond cooling, this DIY cardboard fan can be used for a variety of other purposes. It can be used as a decorative item, a prop for a play or performance, or even a tool for drying paint or glue. You can also use it to create a gentle breeze for plants or pets. The possibilities are endless!
8. How does this DIY cardboard fan compare to an electric fan in terms of cooling efficiency?
While a DIY cardboard fan won’t provide the same level of cooling as an electric fan, it can still be surprisingly effective, especially in small spaces or for personal cooling. The key is to create a steady airflow that evaporates sweat and cools the skin. The cardboard fan is also a much more sustainable and energy-efficient option, as it doesn’t require electricity to operate.
9. Can I add a motor to my DIY cardboard fan?
Yes, you can add a small motor to your DIY cardboard fan to make it spin automatically. You can use a small DC motor, a USB fan, or even a repurposed toy motor. Be sure to secure the motor to the center of the fan and connect it to a power source. This will give your fan a boost of power and make it even more effective.
10. What if I don’t have cardboard? Are there alternative materials I can use?
While cardboard is the ideal material for this project due to its rigidity and availability, you can experiment with other materials. Stiff paper, thin plastic sheets (like those from recycled containers), or even lightweight wood could be used. However, you may need to adjust the construction techniques to accommodate the different properties of these materials. For example, you might need to reinforce paper blades with tape or glue.
Leave a Comment