

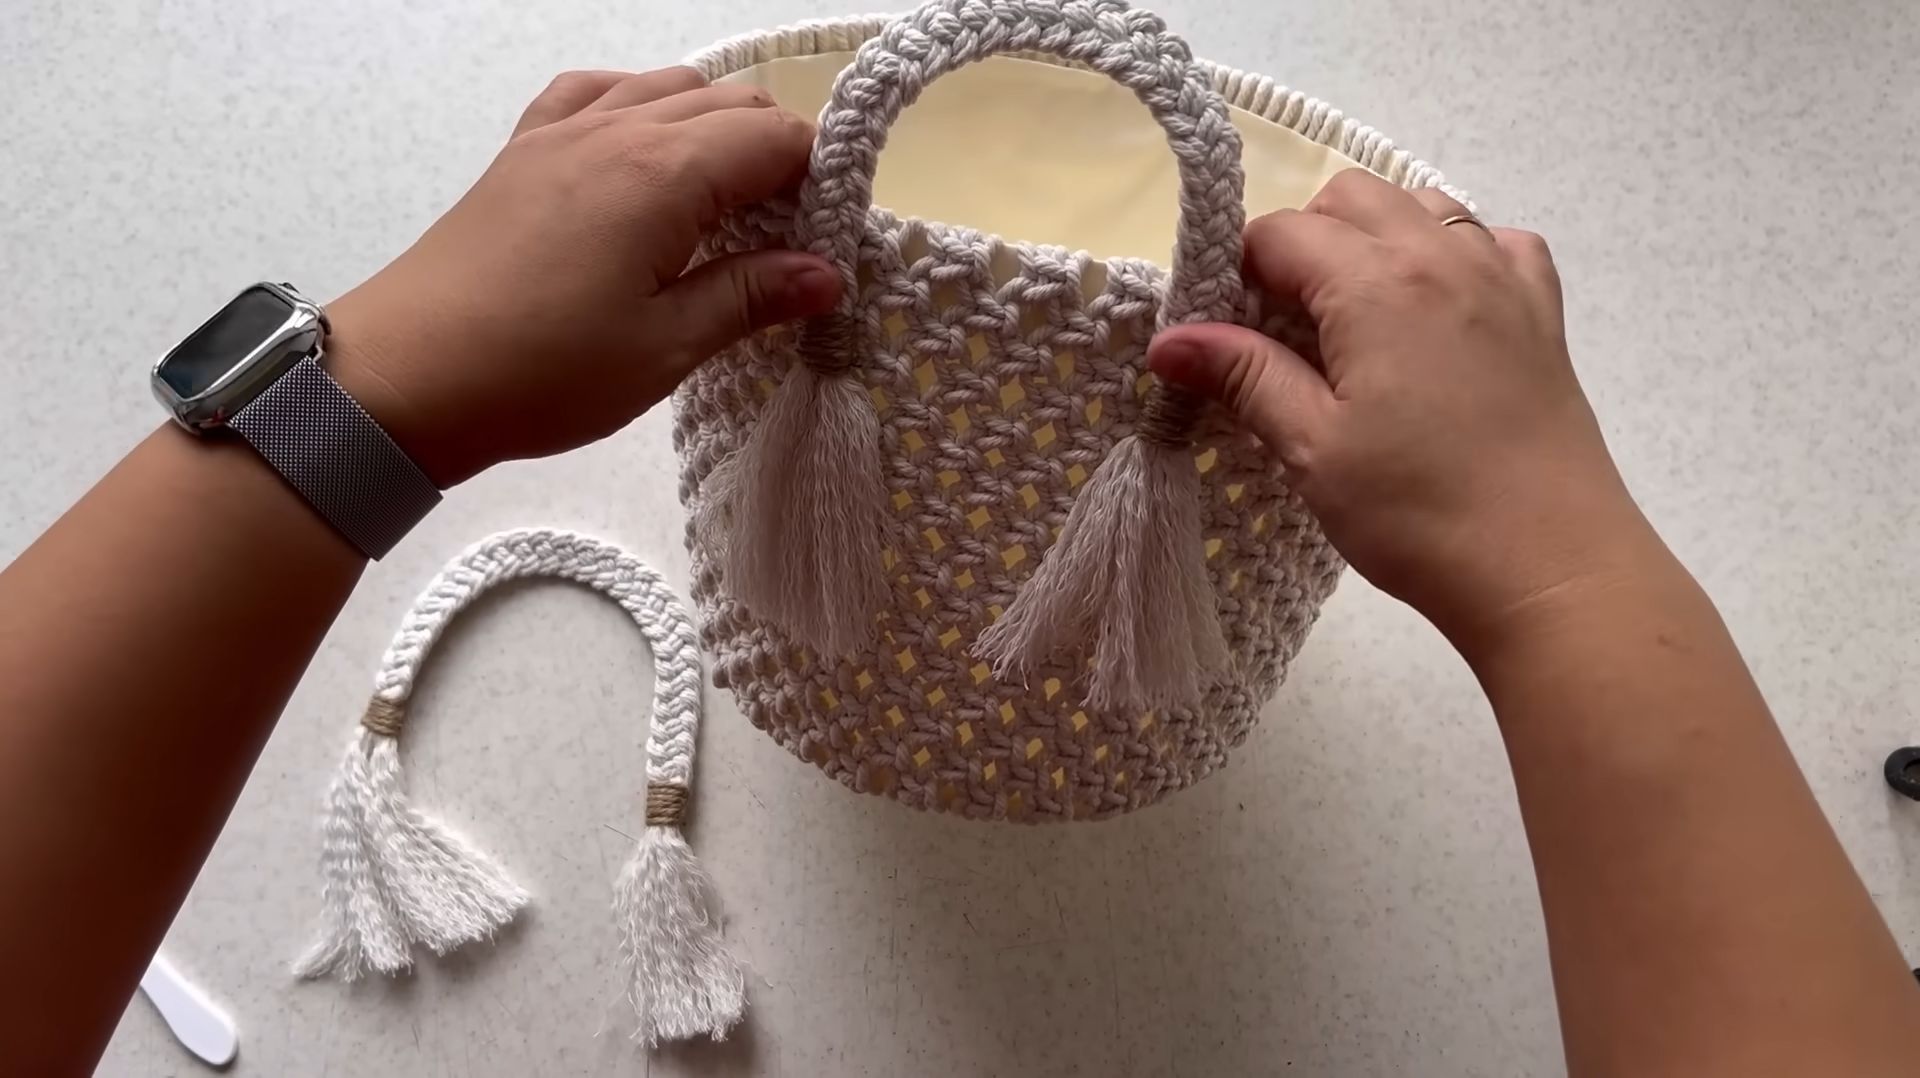
DIY Bucket Basket: Transform your ordinary buckets into charming and functional storage solutions! Are you tired of cluttered spaces and searching endlessly for misplaced items? I know I am! Well, get ready to unleash your inner crafter because this DIY project is about to revolutionize your organization game.
Basket weaving, in its various forms, has been around for millennia, with evidence suggesting its practice dates back to prehistoric times. Cultures worldwide have utilized woven containers for everything from carrying food to storing precious belongings. While our modern take might not involve reeds and intricate patterns, it honors that resourceful spirit by repurposing everyday materials into something beautiful and useful.
In today’s fast-paced world, we’re all looking for ways to simplify our lives and create a more organized home. That’s where this DIY Bucket Basket comes in. Not only is it a budget-friendly alternative to expensive store-bought baskets, but it also allows you to customize your storage to perfectly match your style and needs. Imagine transforming those plain, plastic buckets into stylish organizers for your pantry, bathroom, or even your garden! This simple DIY trick will not only save you money but also add a touch of handmade charm to your living space. So, grab your supplies, and let’s get crafting!

DIY Chic Bucket Basket: From Humble to Home Decor!
Okay, friends, let’s face it: we all have those plastic buckets lurking in the garage, remnants of a home improvement project or a forgotten car wash. Instead of letting them gather dust, let’s transform them into something beautiful and functional – a chic bucket basket! This DIY project is surprisingly easy, budget-friendly, and totally customizable to match your personal style. I’m going to walk you through every step, so grab your supplies and let’s get crafting!
What You’ll Need:
Before we dive in, let’s gather our supplies. This is where you can really get creative and personalize your basket!
* A Plastic Bucket: Any size will do, depending on what you plan to use the basket for. I’m using a standard 5-gallon bucket for this tutorial, but feel free to experiment!
* Rope: Lots of it! Jute rope, cotton rope, sisal rope – the choice is yours. I personally love the natural look of jute rope, but a thicker cotton rope will give you a softer, more luxurious feel. Consider the thickness of the rope too; thicker rope will cover more surface area faster. You’ll need enough to completely cover the outside of your bucket. A good estimate is to measure the height and circumference of your bucket and then multiply those numbers to get a rough idea of how much rope you’ll need. Add a little extra for good measure!
* Hot Glue Gun and Glue Sticks: This is our trusty adhesive. Make sure you have plenty of glue sticks on hand – you’ll be surprised how quickly you go through them!
* Scissors or Utility Knife: For trimming the rope.
* Measuring Tape or Ruler: To ensure your rope is applied evenly.
* Optional: Fabric Liner: If you want to add a soft touch and protect the inside of your basket, you’ll need fabric, scissors, a sewing machine (or needle and thread), and pins.
* Optional: Handles: Leather straps, rope handles, or even repurposed drawer pulls – the possibilities are endless! You’ll also need rivets, screws, or strong adhesive to attach them.
* Optional: Paint or Stain: If you want to change the color of your bucket before adding the rope, grab some paint or stain and a brush.
* Optional: Embellishments: Beads, buttons, shells, ribbon – anything that sparks your creativity!
Preparing the Bucket:
This step is crucial for ensuring a smooth and professional-looking finish.
1. Clean the Bucket: Give your bucket a good scrub with soap and water to remove any dirt, grime, or residue. This will help the glue adhere properly. Let it dry completely before moving on.
2. (Optional) Paint or Stain the Bucket: If you want to change the color of your bucket, now’s the time to do it. Apply a thin, even coat of paint or stain and let it dry completely according to the manufacturer’s instructions. I’m skipping this step because I like the look of the plastic peeking through the rope, but feel free to get creative!
3. (Optional) Sand the Bucket: If your bucket has a very smooth, glossy surface, you might want to lightly sand it with fine-grit sandpaper. This will give the glue something to grip onto. Wipe away any sanding dust before proceeding.
Wrapping the Bucket with Rope:
This is the heart of the project! Take your time and be patient – the results are worth it.
1. Apply the First Row of Glue: Start at the bottom of the bucket. Apply a generous bead of hot glue around the entire circumference of the bucket, close to the base. Work in small sections (about 4-6 inches at a time) to prevent the glue from drying before you can attach the rope.
2. Attach the Rope: Press the end of the rope firmly into the glue, making sure it’s securely attached. Continue wrapping the rope around the bucket, pressing it firmly into the glue as you go. Keep the rope tight and snug against itself to avoid any gaps.
3. Continue Wrapping: Repeat steps 1 and 2, working your way up the bucket. Overlap each row of rope slightly with the previous row to create a seamless look. This is where the measuring tape or ruler comes in handy – you can use it to ensure that each row is evenly spaced.
4. Dealing with the Handle: When you reach the handle, you have a few options. You can either cut the rope and glue it around the handle, leaving the handle exposed, or you can wrap the rope around the handle as well. If you choose to wrap the handle, you may need to use smaller pieces of rope and more glue to get a secure hold. I’m choosing to leave the handle exposed for now, but I might add a decorative rope wrap later.
5. Finishing the Top: When you reach the top of the bucket, trim the rope to the desired length. Apply a generous amount of hot glue to the top edge of the bucket and press the end of the rope firmly into the glue. Make sure the end is securely attached and won’t unravel.
6. Reinforce the Seams: Once the glue has dried completely, go back and reinforce any seams that look weak or loose. Add a small dab of hot glue to any areas where the rope is pulling away from the bucket.
Adding a Fabric Liner (Optional):
A fabric liner adds a touch of elegance and protects the inside of your basket.
1. Measure the Inside of the Bucket: Measure the height and circumference of the inside of the bucket. Add a few inches to each measurement for seam allowance.
2. Cut the Fabric: Cut a rectangle of fabric according to your measurements. You’ll also need to cut a circle of fabric for the bottom of the liner. The diameter of the circle should be equal to the diameter of the bottom of the bucket, plus seam allowance.
3. Sew the Sides Together: Fold the rectangle of fabric in half lengthwise, right sides together. Sew along the long edge to create a tube.
4. Attach the Bottom: Pin the circle of fabric to the bottom of the tube, right sides together. Sew around the circle, leaving a small opening for turning.
5. Turn and Press: Turn the liner right side out and press the seams.
6. Topstitch (Optional): Topstitch around the top edge of the liner for a more finished look.
7. Insert the Liner: Place the liner inside the bucket, folding the top edge over the rim. You can secure the liner with a few dabs of hot glue if desired.
Adding Handles (Optional):
Handles make your basket easier to carry and add a stylish touch.
1. Choose Your Handles: Select the handles you want to use. Leather straps, rope handles, or repurposed drawer pulls are all great options.
2. Position the Handles: Decide where you want to position the handles on the bucket. Make sure they are evenly spaced and securely attached.
3. Attach the Handles: Use rivets, screws, or strong adhesive to attach the handles to the bucket. Follow the manufacturer’s instructions for your chosen attachment method. If using adhesive, make sure the surface is clean and dry before applying the adhesive. Let the adhesive dry completely before using the handles.
Adding Embellishments (Optional):
This is where you can really let your personality shine!
1. Gather Your Embellishments: Collect any beads, buttons, shells, ribbon, or other embellishments you want to use.
2. Arrange the Embellishments: Arrange the embellishments on the basket until you are happy with the look.
3. Attach the Embellishments: Use hot glue or other adhesive to attach the embellishments to the basket. Be creative and have fun!
Final Touches:
1. Inspect Your Basket: Take a close look at your basket and make sure everything is securely attached. Trim any loose ends of rope or fabric.
2. Clean Up: Clean up any glue strings or debris.
3. Enjoy Your Creation! Now you have a beautiful and functional bucket basket that you can use for storage, organization, or decoration.
Ideas for Using Your Bucket Basket:
* Storage: Use your basket to store blankets, pillows, toys, magazines, or anything else you want to keep organized.
* Planter: Line your basket with plastic and use it as a planter for your favorite plants.
* Laundry Basket: A large bucket basket makes a great laundry basket.
* Gift Basket: Fill your basket with goodies and give it as a gift.
* Decorative Accent: Simply display your basket as a decorative accent in your home.
I hope you enjoyed this DIY tutorial! I can’t wait to see what you create. Remember to have fun and let your creativity guide you. Happy crafting!
Conclusion
So, there you have it! Transforming an ordinary bucket into a stylish and functional basket is not only incredibly easy, but it’s also a fantastic way to add a personal touch to your home decor while being kind to your wallet. This DIY bucket basket project is a testament to the power of creativity and resourcefulness. It’s a simple craft that yields surprisingly sophisticated results.
Why is this a must-try? Because it’s more than just a craft; it’s an opportunity to upcycle, personalize, and organize. Think about all those forgotten buckets lurking in your garage or shed. Instead of letting them gather dust, you can breathe new life into them, turning them into chic storage solutions for blankets, toys, plants, or even laundry. The possibilities are truly endless.
Beyond its practicality, this DIY project is incredibly satisfying. There’s a unique sense of accomplishment that comes from creating something beautiful and useful with your own hands. It’s a chance to disconnect from the digital world and reconnect with your creative side. Plus, it’s a fantastic project to do with kids, teaching them valuable skills and fostering their imagination.
Looking for variations? Absolutely! Consider painting the bucket in vibrant colors or using stencils to add intricate designs. Experiment with different fabrics for the lining, from rustic burlap to elegant silk. Add embellishments like beads, buttons, or ribbons to further personalize your creation. You could even try weaving rope or twine around the outside of the bucket for a more textured and bohemian look. For a sturdier basket, consider adding a wooden base. If you’re using the basket for plants, be sure to drill drainage holes in the bottom of the bucket.
Don’t be afraid to experiment and let your creativity shine! The beauty of this DIY project is that it’s completely customizable to your taste and needs.
We wholeheartedly encourage you to try this DIY bucket basket project. It’s a fun, rewarding, and budget-friendly way to add a touch of personality to your home. And most importantly, we want to hear about your experience! Share your creations with us on social media using #DIYBucketBasket. We can’t wait to see what you come up with! Let us know what materials you used, what challenges you faced, and what tips you have for other DIY enthusiasts. Your feedback will help us improve this guide and inspire others to embark on their own creative journeys. Happy crafting!
Frequently Asked Questions (FAQ)
What kind of bucket is best for this project?
The best type of bucket to use for this DIY project depends on the desired aesthetic and function of the basket. Plastic buckets are lightweight and easy to clean, making them ideal for storing toys or laundry. Metal buckets offer a more rustic or industrial look and are sturdy enough to hold heavier items like plants or firewood. Galvanized steel buckets are a popular choice for their durability and resistance to rust. Consider the size of the bucket as well, depending on what you plan to store in the finished basket. Smaller buckets are great for organizing small items, while larger buckets can hold blankets or pillows. Ultimately, the choice is yours, so pick a bucket that suits your style and needs.
What kind of fabric should I use for the lining?
The fabric you choose for the lining will significantly impact the overall look and feel of your DIY bucket basket. For a more rustic or farmhouse style, consider using burlap, canvas, or denim. These fabrics are durable and have a natural texture that complements the bucket’s shape. For a more elegant or sophisticated look, opt for silk, satin, or velvet. These fabrics are soft and luxurious, adding a touch of glamour to your creation. Cotton fabric is a versatile and affordable option that comes in a wide variety of colors and patterns. Consider the intended use of the basket when selecting your fabric. If you plan to use the basket for storing damp items like towels or plants, choose a water-resistant fabric like oilcloth or vinyl.
How do I attach the fabric lining to the bucket?
There are several ways to attach the fabric lining to the bucket. One option is to use hot glue. This is a quick and easy method, but it’s important to be careful not to burn yourself. Apply a thin line of hot glue to the inside of the bucket and press the fabric firmly into place. Another option is to use fabric glue. This is a more permanent solution, but it requires more time to dry. Apply a thin layer of fabric glue to the inside of the bucket and press the fabric firmly into place. You can also sew the fabric lining to the bucket. This is the most durable option, but it requires some sewing skills. Use a needle and thread to stitch the fabric lining to the top edge of the bucket. For a more decorative touch, consider adding a ribbon or trim to the top edge of the lining.
How can I make the basket more sturdy?
If you plan to use your DIY bucket basket for storing heavy items, you may want to reinforce it to make it more sturdy. One option is to add a wooden base to the bucket. Cut a piece of plywood or MDF to fit the bottom of the bucket and attach it using screws or glue. You can also add a layer of cardboard or foam padding to the inside of the bucket to provide extra support. Another option is to wrap the outside of the bucket with rope or twine. This will not only add a decorative touch but also strengthen the bucket’s structure. For a more permanent solution, consider using a metal bucket with a reinforced bottom.
What if I don’t have a sewing machine?
No sewing machine? No problem! You can easily create a beautiful fabric lining for your DIY bucket basket without one. Hand-sewing is a perfectly viable option, especially for smaller projects like this. Use a simple running stitch or backstitch to attach the fabric to the bucket. Alternatively, you can use fusible interfacing to bond the fabric to the bucket. This is a heat-activated adhesive that creates a strong and durable bond. Simply iron the interfacing onto the back of the fabric and then iron the fabric onto the bucket. Another option is to use fabric glue or hot glue to attach the fabric lining. While these methods may not be as durable as sewing, they are quick and easy alternatives.
How do I clean my DIY bucket basket?
The best way to clean your DIY bucket basket depends on the materials used. For plastic buckets, simply wipe them down with a damp cloth and mild soap. For metal buckets, use a dry cloth to remove dust and dirt. Avoid using harsh chemicals or abrasive cleaners, as these can damage the finish. If the fabric lining is removable, you can wash it in the washing machine on a gentle cycle. If the lining is not removable, spot clean it with a damp cloth and mild soap. Allow the basket to air dry completely before using it again. To prevent the basket from getting dirty, consider using a liner or placing a protective mat underneath it.
Can I use this technique for other containers besides buckets?
Absolutely! The principles behind this DIY project can be applied to a variety of containers, not just buckets. Think about using old tin cans, plastic tubs, or even cardboard boxes. The key is to adapt the fabric lining and embellishments to fit the shape and size of the container. For example, you could use a smaller tin can to create a cute pencil holder or a larger cardboard box to create a stylish storage bin. Get creative and experiment with different materials and techniques to transform ordinary containers into beautiful and functional pieces.
Where can I find inspiration for my DIY bucket basket?
The internet is a treasure trove of inspiration for DIY projects! Browse Pinterest, Instagram, and other social media platforms for ideas on how to decorate your bucket basket. Look for images of similar projects and pay attention to the colors, patterns, and embellishments used. You can also find inspiration in magazines, books, and even nature. Visit your local craft store and browse the aisles for fabrics, trims, and other supplies that spark your creativity. Don’t be afraid to experiment and try new things. The most important thing is to have fun and create something that you love.

Leave a Comment