

DIY Beeswax Wood Polish: Ever looked at your beloved wooden furniture and wished you could restore its natural luster without harsh chemicals? I know I have! There’s something incredibly satisfying about breathing new life into well-loved pieces, and that’s exactly what this article is all about. We’re diving into the world of homemade wood polish, specifically, a fantastic DIY beeswax wood polish that’s both effective and eco-friendly.
The use of beeswax for wood preservation dates back centuries. Ancient Egyptians used it to protect their sarcophagi, and furniture makers throughout history have valued it for its protective and beautifying properties. It’s a time-tested method that’s stood the test of time, and for good reason!
In today’s world, many commercial wood polishes are packed with synthetic ingredients that can be harmful to your health and the environment. Plus, they can be expensive! That’s where this DIY beeswax wood polish comes in. It’s a simple, cost-effective, and natural alternative that you can easily whip up in your own kitchen. Not only will you save money, but you’ll also have the peace of mind knowing exactly what’s going onto your furniture. So, let’s get started and learn how to create this amazing DIY Beeswax Wood Polish!
DIY Beeswax Wood Polish: Revive Your Furniture Naturally!
Hey there, fellow DIY enthusiasts! I’m so excited to share one of my favorite projects with you: making your own beeswax wood polish. Not only is it incredibly satisfying to create something yourself, but this polish is also a fantastic, natural alternative to store-bought products that often contain harsh chemicals. Plus, it’s super effective at bringing out the natural beauty of your wooden furniture and protecting it for years to come. Let’s dive in!
What You’ll Need
Before we get started, let’s gather all the necessary ingredients and equipment. This will make the whole process smoother and more enjoyable.
* Beeswax: This is the star of the show! You can find beeswax in pellet or block form. I personally prefer pellets because they melt more easily. Look for pure, cosmetic-grade beeswax for the best results.
* Carrier Oil: This helps to thin the beeswax and makes the polish easier to apply. My go-to is mineral oil because it’s odorless, colorless, and doesn’t go rancid easily. However, you can also use other oils like olive oil, jojoba oil, or even coconut oil (though coconut oil can solidify at cooler temperatures, so keep that in mind!).
* Essential Oils (Optional): If you want to add a pleasant scent to your polish, essential oils are a great option. I love using lemon, orange, or cedarwood essential oils for a fresh, natural fragrance. Just be sure to use pure essential oils and not fragrance oils.
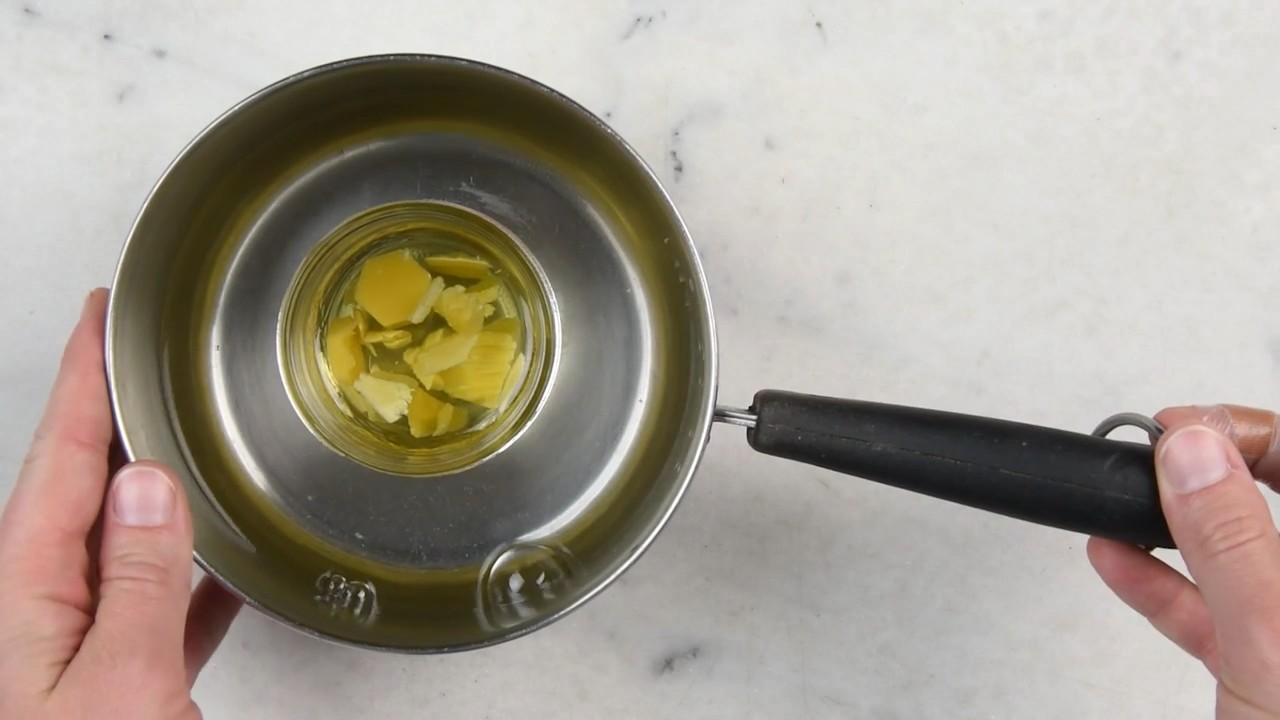
* Double Boiler or Heat-Safe Bowl and Saucepan: We’ll be using a double boiler to gently melt the beeswax. If you don’t have a double boiler, you can easily create one by placing a heat-safe bowl over a saucepan filled with simmering water.
* Wooden Spoon or Stirring Stick: For stirring the mixture. Avoid using metal spoons, as they can react with the beeswax.
* Measuring Cups and Spoons: To ensure accurate measurements.
* Storage Containers: You’ll need containers to store your finished polish. I like to use small glass jars or tins with tight-fitting lids.
* Cheesecloth or Fine-Mesh Strainer (Optional): To filter out any impurities from the beeswax.
* Labels: To label your finished product with the ingredients and date.
The Recipe: Getting the Ratios Right
The ratio of beeswax to carrier oil is crucial for achieving the right consistency. I’ve experimented with different ratios, and I’ve found that the following works best for me:
* 1 part Beeswax
* 4 parts Carrier Oil
* Optional: A few drops of your favorite essential oil per cup of finished polish.
This ratio creates a polish that’s firm enough to hold its shape but soft enough to apply easily. If you prefer a softer polish, you can increase the amount of carrier oil. If you want a harder polish, you can increase the amount of beeswax.
Step-by-Step Instructions: Making Your Beeswax Polish
Okay, let’s get down to the nitty-gritty! Follow these steps carefully, and you’ll have your own batch of beeswax wood polish in no time.
1. Prepare Your Double Boiler: Fill the saucepan with about an inch or two of water and bring it to a simmer over medium heat. Place the heat-safe bowl on top of the saucepan, making sure the bottom of the bowl doesn’t touch the water. This indirect heat will prevent the beeswax from burning.
2. Measure and Add the Beeswax: Measure out the desired amount of beeswax and add it to the bowl. I usually start with about 1/4 cup of beeswax, which will yield about 1 1/4 cups of polish.
3. Melt the Beeswax: Let the beeswax melt slowly and gently. Stir occasionally with your wooden spoon or stirring stick to help it melt evenly. This process can take anywhere from 10 to 20 minutes, depending on the size of the beeswax pieces. Be patient and don’t rush it!
4. Add the Carrier Oil: Once the beeswax is completely melted, carefully measure out the carrier oil and add it to the bowl. For 1/4 cup of beeswax, you’ll need 1 cup of carrier oil.
5. Combine the Ingredients: Stir the beeswax and carrier oil together until they are completely combined and the mixture is smooth and homogenous. This usually takes a few minutes.
6. Add Essential Oils (Optional): If you’re using essential oils, now is the time to add them. I usually add about 5-10 drops of essential oil per cup of finished polish. Start with a smaller amount and add more to your liking. Be sure to stir well to distribute the essential oils evenly.
7. Strain the Mixture (Optional): If you want to remove any impurities from the beeswax, you can strain the mixture through a cheesecloth or fine-mesh strainer. Simply place the cheesecloth or strainer over a clean bowl and pour the mixture through it.
8. Pour into Storage Containers: Carefully pour the hot polish into your storage containers. Be careful not to spill any, as the mixture can be quite hot.
9. Let it Cool and Harden: Allow the polish to cool and harden completely at room temperature. This can take several hours or even overnight. As it cools, the polish will solidify and become opaque.
10. Label and Store: Once the polish is completely cool and hardened, label your containers with the ingredients and date. Store the polish in a cool, dry place away from direct sunlight. It should last for several months, if not longer.
Applying Your Homemade Beeswax Polish: A Step-by-Step Guide
Now that you’ve made your own beeswax wood polish, it’s time to put it to use! Here’s how to apply it to your wooden furniture for the best results:
1. Clean the Surface: Before applying the polish, make sure the surface of your furniture is clean and free of dust, dirt, and grime. You can use a damp cloth or a mild soap and water solution to clean the surface. Be sure to dry the surface thoroughly before proceeding.
2. Test in an Inconspicuous Area: Before applying the polish to the entire piece of furniture, it’s always a good idea to test it in an inconspicuous area first. This will allow you to see how the polish reacts with the wood and ensure that you’re happy with the results.
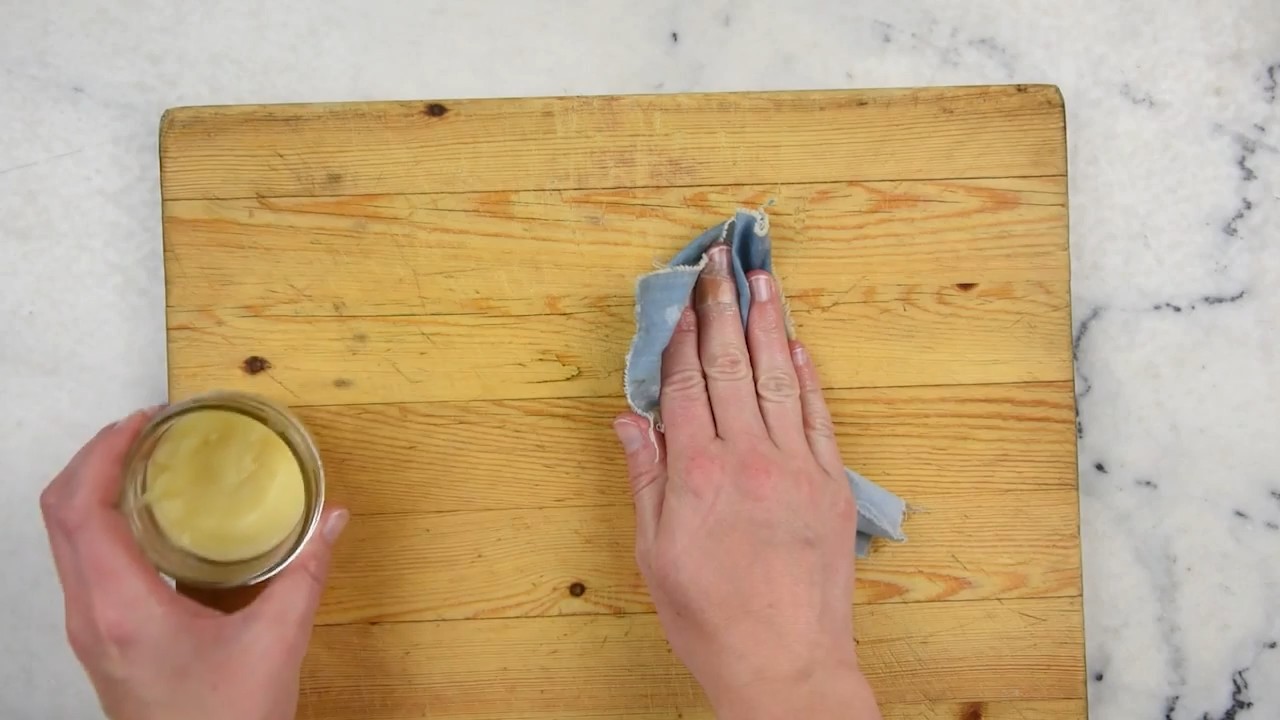
3. Apply a Small Amount of Polish: Using a clean, soft cloth, apply a small amount of polish to the surface of the furniture. A little goes a long way, so don’t overdo it!
4. Rub the Polish into the Wood: Using a circular motion, rub the polish into the wood. Be sure to work the polish into all the nooks and crannies.
5. Let the Polish Sit for a Few Minutes: Allow the polish to sit on the surface of the furniture for a few minutes to allow it to penetrate the wood.
6. Buff the Surface: Using a clean, dry cloth, buff the surface of the furniture to remove any excess polish and bring out the shine.
7. Repeat as Needed: If necessary, repeat the process to achieve the desired level of shine and protection.
Tips and Tricks for Success
Here are a few extra tips and tricks to help you make the perfect beeswax wood polish:
* Use High-Quality Ingredients: The quality of your ingredients will directly affect the quality of your finished product. Be sure to use pure, cosmetic-grade beeswax and high-quality carrier oils.
* Don’t Overheat the Beeswax: Overheating the beeswax can cause it to burn and become discolored. Be sure to use a double boiler or a heat-safe bowl over a saucepan of simmering water to melt the beeswax gently.
* Experiment with Different Essential Oils: Don’t be afraid to experiment with different essential oils to find your favorite scent. Just be sure to use pure essential oils and not fragrance oils.
* Store Your Polish Properly: Store your polish in a cool, dry place away from direct sunlight. This will help to prevent it from melting or going rancid.
* Reapply as Needed: Reapply the polish to your furniture every few months, or as needed, to maintain its shine and protection.
Troubleshooting: What to Do If Things Go Wrong
Even with the best instructions, things can sometimes go wrong. Here are a few common problems and how to fix them:
* Polish is Too Hard: If your polish is too hard, it’s likely because you used too much beeswax. To fix this, simply melt the polish again and add more carrier oil.
* Polish is Too Soft: If your polish is too soft, it’s likely because you used too much carrier oil. To fix this, simply melt the polish again and add more beeswax.
* Polish is Grainy: If your polish is grainy, it’s likely because the beeswax didn’t melt completely.
Conclusion
So, there you have it! Crafting your own DIY beeswax wood polish is not just a cost-effective alternative to store-bought products; it’s a gateway to understanding and appreciating the natural beauty of your wooden furniture and surfaces. It’s about taking control of the ingredients you use, ensuring they are safe for your family and the environment, and ultimately, creating a polish that’s perfectly tailored to your specific needs.
Why is this a must-try? Because it breathes new life into tired wood, leaving behind a warm, inviting sheen that enhances the natural grain and protects against everyday wear and tear. Unlike some commercial polishes that can contain harsh chemicals and artificial fragrances, our DIY version relies on the simple, time-tested power of beeswax and oil. This means you’re not only polishing your wood but also nourishing it, preventing it from drying out and cracking over time.
But the benefits extend beyond just the practical. There’s a certain satisfaction that comes from creating something yourself, from knowing exactly what went into it, and from seeing the tangible results of your efforts. It’s a small act of self-sufficiency that can bring a surprising amount of joy.
Looking for variations? Absolutely! Feel free to experiment with different types of oils to achieve your desired finish. For a lighter polish, try using mineral oil or fractionated coconut oil. For a richer, more conditioning polish, consider adding a touch of linseed oil (be sure to use boiled linseed oil, as raw linseed oil can take a very long time to dry). You can also infuse your oil with herbs or essential oils for a subtle, natural fragrance. Lavender, lemon, and cedarwood essential oils are all excellent choices for wood polish. Just remember to use essential oils sparingly, as a little goes a long way.
Another variation involves the ratio of beeswax to oil. If you live in a warmer climate, you might want to increase the amount of beeswax slightly to prevent the polish from becoming too soft. Conversely, if you live in a colder climate, you might want to reduce the amount of beeswax to make the polish easier to apply.
We wholeheartedly encourage you to give this DIY beeswax wood polish a try. It’s a simple, rewarding project that will leave your wood looking its best. And we’d love to hear about your experience! Share your photos and tips in the comments below. Let us know what variations you tried, what oils you used, and how your wood responded. Your feedback will not only help other readers but also inspire us to continue creating and sharing DIY solutions that are both effective and sustainable. So go ahead, unleash your inner artisan and create a wood polish that’s as unique and beautiful as the wood it protects!
Frequently Asked Questions (FAQ)
What kind of beeswax should I use?
We recommend using pure, filtered beeswax pellets or blocks. You can find beeswax at most craft stores, online retailers, or even local beekeepers. Avoid beeswax that has been heavily processed or bleached, as these processes can strip away some of its natural benefits. Yellow beeswax is generally preferred for its natural color and subtle honey scent, but white beeswax will also work if you prefer a completely neutral color.
What kind of oil is best for DIY beeswax wood polish?
The best oil depends on your desired finish and the type of wood you’re polishing. Mineral oil is a good all-purpose option that’s readily available and relatively inexpensive. It provides a good level of protection and leaves a nice sheen. Fractionated coconut oil is another good choice, especially for those with sensitivities to other oils. Boiled linseed oil provides a richer, more conditioning finish, but it’s important to use boiled linseed oil, as raw linseed oil can take a very long time to dry. Walnut oil is another option, but be aware that it can darken over time. Always test a small, inconspicuous area first to ensure you’re happy with the results.
How do I apply the DIY beeswax wood polish?
Apply a small amount of polish to a clean, soft cloth. Gently rub the polish into the wood in a circular motion, working with the grain. Allow the polish to sit for a few minutes to penetrate the wood. Then, use a clean, dry cloth to buff the surface until it shines. You may need to buff several times to remove any excess polish.
How often should I apply DIY beeswax wood polish?
The frequency of application depends on the type of wood, the environment, and how often the furniture is used. In general, you should apply polish every few months or as needed to maintain the shine and protect the wood. If the wood starts to look dull or dry, it’s time to reapply.
Can I use this DIY beeswax wood polish on all types of wood?
While this polish is generally safe for most types of wood, it’s always a good idea to test a small, inconspicuous area first, especially on antique or delicate pieces. Avoid using this polish on unfinished wood, as it may not absorb properly.
How should I store the DIY beeswax wood polish?
Store the polish in an airtight container in a cool, dry place. It should last for several months. If the polish hardens over time, you can gently warm it in a double boiler or microwave (in short intervals) until it softens.
Can I add essential oils to the DIY beeswax wood polish?
Yes, you can add essential oils for a subtle, natural fragrance. Lavender, lemon, and cedarwood essential oils are all excellent choices for wood polish. Add a few drops of essential oil to the melted beeswax and oil mixture before pouring it into the container. Be sure to use essential oils sparingly, as a little goes a long way. Start with just a few drops and add more if needed.
Is DIY beeswax wood polish safe for children and pets?
Because this polish is made with natural ingredients, it is generally considered safe for children and pets. However, it’s always a good idea to keep the polish out of reach of children and pets, as ingestion could cause stomach upset. If you are concerned about allergies, test a small area first.
What if my DIY beeswax wood polish is too hard or too soft?
If the polish is too hard, you can gently warm it in a double boiler or microwave (in short intervals) until it softens. Then, add a little more oil to the mixture and stir well. If the polish is too soft, you can melt it down and add a little more beeswax.
Can I use this DIY beeswax wood polish on leather?
While beeswax is sometimes used in leather conditioners, this particular recipe is formulated for wood. We recommend using a product specifically designed for leather care to avoid damaging your leather items.
What are the benefits of using DIY beeswax wood polish over commercial products?
DIY beeswax wood polish offers several benefits over commercial products, including:
* Natural ingredients: You know exactly what’s going into your polish, avoiding harsh chemicals and artificial fragrances.
* Cost-effective: Making your own polish is often cheaper than buying commercial products.
* Customizable: You can tailor the recipe to your specific needs and preferences.
* Environmentally friendly: You can reduce your reliance on plastic packaging and potentially harmful chemicals.
* Nourishing: The beeswax and oil help to nourish and protect the wood, preventing it from drying out and cracking.
Leave a Comment