

Clean Wooden Cutting Board: It’s the unsung hero of your kitchen, silently enduring countless chopping sessions, dicing dilemmas, and slicing sagas. But let’s be honest, that beloved wooden cutting board can quickly transform from a pristine surface to a breeding ground for bacteria and lingering odors. Are you tired of scrubbing endlessly, only to be met with stubborn stains and the faint aroma of yesterday’s garlic?
For centuries, wooden cutting boards have been a kitchen staple, prized for their durability and natural antibacterial properties. From the humble kitchens of ancient civilizations to the modern culinary landscapes we inhabit today, wood has been the go-to surface for food preparation. But even the most seasoned chef knows that maintaining a clean wooden cutting board requires more than just a quick rinse.
That’s where these DIY tricks and hacks come in! I’m going to share some simple, effective, and all-natural methods to keep your wooden cutting board sparkling clean, sanitized, and ready for its next culinary adventure. Forget harsh chemicals and expensive cleaners – these solutions use ingredients you probably already have in your pantry. Because let’s face it, nobody wants to risk contaminating their food with harmful substances. Plus, a well-maintained cutting board not only looks better but also lasts longer, saving you money in the long run. So, grab your apron, and let’s get started on giving your trusty wooden cutting board the TLC it deserves!
DIY: Reviving Your Beloved Wooden Cutting Board
Hey there, fellow DIY enthusiasts! I’m so excited to share this super satisfying project with you: restoring your wooden cutting board to its former glory. We all love our wooden cutting boards, right? They’re beautiful, durable, and gentle on our knives. But let’s be honest, they can get pretty beat up over time. Scratches, stains, and that general “used” look can make them seem less appealing. But don’t despair! With a little elbow grease and these simple steps, you can bring your cutting board back to life.
What You’ll Need
Before we dive in, let’s gather our supplies. This is a pretty straightforward project, so you probably have most of these items already.
* Coarse Grit Sandpaper (80-120 grit): This is for the initial sanding to remove deep scratches and imperfections.
* Medium Grit Sandpaper (150-180 grit): This will smooth out the surface after the coarse grit.
* Fine Grit Sandpaper (220+ grit): This is for the final sanding, creating a super smooth finish. I personally like to go even finer, around 320 grit, for that extra touch.
* Food-Safe Mineral Oil: This is essential for rehydrating and protecting the wood. Don’t use cooking oils like olive oil, as they can go rancid.
* Beeswax (Optional): Adding beeswax to the mineral oil creates a protective barrier and gives the board a lovely sheen.
* Clean Rags or Paper Towels: For wiping away sanding dust and applying the oil/wax mixture.
* Scraper or Putty Knife (Optional): Helpful for removing stubborn stuck-on food particles.
* Palm Sander (Optional): This will speed up the sanding process, but you can definitely do it by hand.
* Dust Mask: Protect your lungs from the sanding dust!
* Gloves (Optional): To keep your hands clean.
* Double Boiler or Heat-Safe Bowl and Saucepan (If using beeswax): For melting the beeswax.
Step-by-Step Guide to Cutting Board Restoration
Okay, let’s get started! I promise, it’s easier than it looks.
1. Cleaning and Preparation
* Remove any loose debris: Start by scraping off any stuck-on food particles with a scraper or putty knife. A good initial scrub with warm, soapy water and a stiff brush can also help. Make sure the board is completely dry before moving on to the next step.
* Assess the damage: Take a good look at your cutting board. Identify the areas with the most scratches, stains, or imperfections. This will help you focus your sanding efforts.
* Protect your workspace: Sanding can get messy, so lay down some newspaper or a drop cloth to protect your work surface.
2. Sanding the Cutting Board
This is the most important part of the process, so take your time and be thorough.
* Start with the coarse grit sandpaper: If your cutting board has deep scratches or significant imperfections, begin with the 80-120 grit sandpaper. If it’s in relatively good condition, you might be able to start with the medium grit.
* Sand with the grain: Always sand in the direction of the wood grain. This will prevent you from creating new scratches.
* Apply even pressure: Whether you’re sanding by hand or using a palm sander, apply even pressure across the entire surface of the cutting board. Avoid focusing on one area for too long, as this can create unevenness.
* Sand all surfaces: Don’t forget to sand the edges and sides of the cutting board as well.
* Move to the medium grit sandpaper: Once you’ve removed the major imperfections with the coarse grit, switch to the 150-180 grit sandpaper. This will smooth out the surface and remove any scratches left by the coarser grit. Again, sand with the grain and apply even pressure.
* Finish with the fine grit sandpaper: Finally, use the 220+ grit sandpaper (or even finer, like 320 grit) to create a super smooth finish. This step is crucial for making your cutting board feel like new.
* Inspect your work: After each sanding step, wipe the cutting board clean with a damp cloth to remove the sanding dust. This will allow you to see any remaining imperfections and address them accordingly.
* Repeat if necessary: If you’re not happy with the results after the first round of sanding, don’t be afraid to repeat the process. Sometimes it takes a few passes to get the desired smoothness.
3. Oiling the Cutting Board
Now that your cutting board is beautifully smooth, it’s time to rehydrate and protect the wood.
* Clean the cutting board thoroughly: Remove all traces of sanding dust with a damp cloth. Let the board dry completely before applying the oil.
* Apply a generous amount of mineral oil: Pour a liberal amount of food-safe mineral oil onto the cutting board.
* Spread the oil evenly: Use a clean rag or paper towel to spread the oil evenly over the entire surface of the cutting board, including the edges and sides.
* Let the oil soak in: Allow the oil to soak into the wood for at least a few hours, or even overnight. The longer you let it soak, the better. You’ll notice the wood absorbing the oil, becoming richer and more vibrant in color.
* Apply additional coats: After the first coat has soaked in, apply another coat of mineral oil. Repeat this process until the wood no longer absorbs the oil readily. This usually takes 2-3 coats.
* Wipe off excess oil: After the final coat has soaked in, wipe off any excess oil with a clean rag. You don’t want the surface to be sticky or greasy.
4. Adding Beeswax (Optional)
Adding beeswax to the mineral oil creates a protective barrier and gives the board a lovely sheen. This step is optional, but I highly recommend it!
* Melt the beeswax: In a double boiler or heat-safe bowl set over a saucepan of simmering water, melt the beeswax. Use approximately 1 part beeswax to 4 parts mineral oil. For example, if you’re using 1 cup of mineral oil, use 1/4 cup of beeswax.
* Combine the melted beeswax and mineral oil: Once the beeswax is completely melted, remove it from the heat and slowly whisk in the mineral oil. Stir until the mixture is smooth and well combined.
* Let the mixture cool slightly: Allow the mixture to cool slightly before applying it to the cutting board. It should still be liquid, but not too hot.
* Apply the beeswax mixture: Use a clean rag or paper towel to apply a thin, even layer of the beeswax mixture to the entire surface of the cutting board.
* Let the mixture sit: Allow the beeswax mixture to sit on the cutting board for about 20-30 minutes.
* Buff the cutting board: Use a clean, dry rag to buff the cutting board until it has a smooth, even sheen. This will remove any excess beeswax and create a protective barrier.
Maintaining Your Restored Cutting Board
Now that you’ve put in all this effort, you’ll want to keep your cutting board looking its best. Here are a few tips:
* Wash your cutting board after each use: Use warm, soapy water and a stiff brush to clean your cutting board after each use.
* Dry your cutting board thoroughly: After washing, dry your cutting board thoroughly with a clean towel. Don’t let it air dry, as this can cause it to warp or crack.
* Re-oil your cutting board regularly: Depending on how often you use your cutting board, you’ll need to re-oil it every few weeks or months. When the wood starts to look dry or faded, it’s time to re-oil.
* Avoid harsh chemicals: Don’t use harsh chemicals or bleach to clean your cutting board, as this can damage the wood and leach into your food.
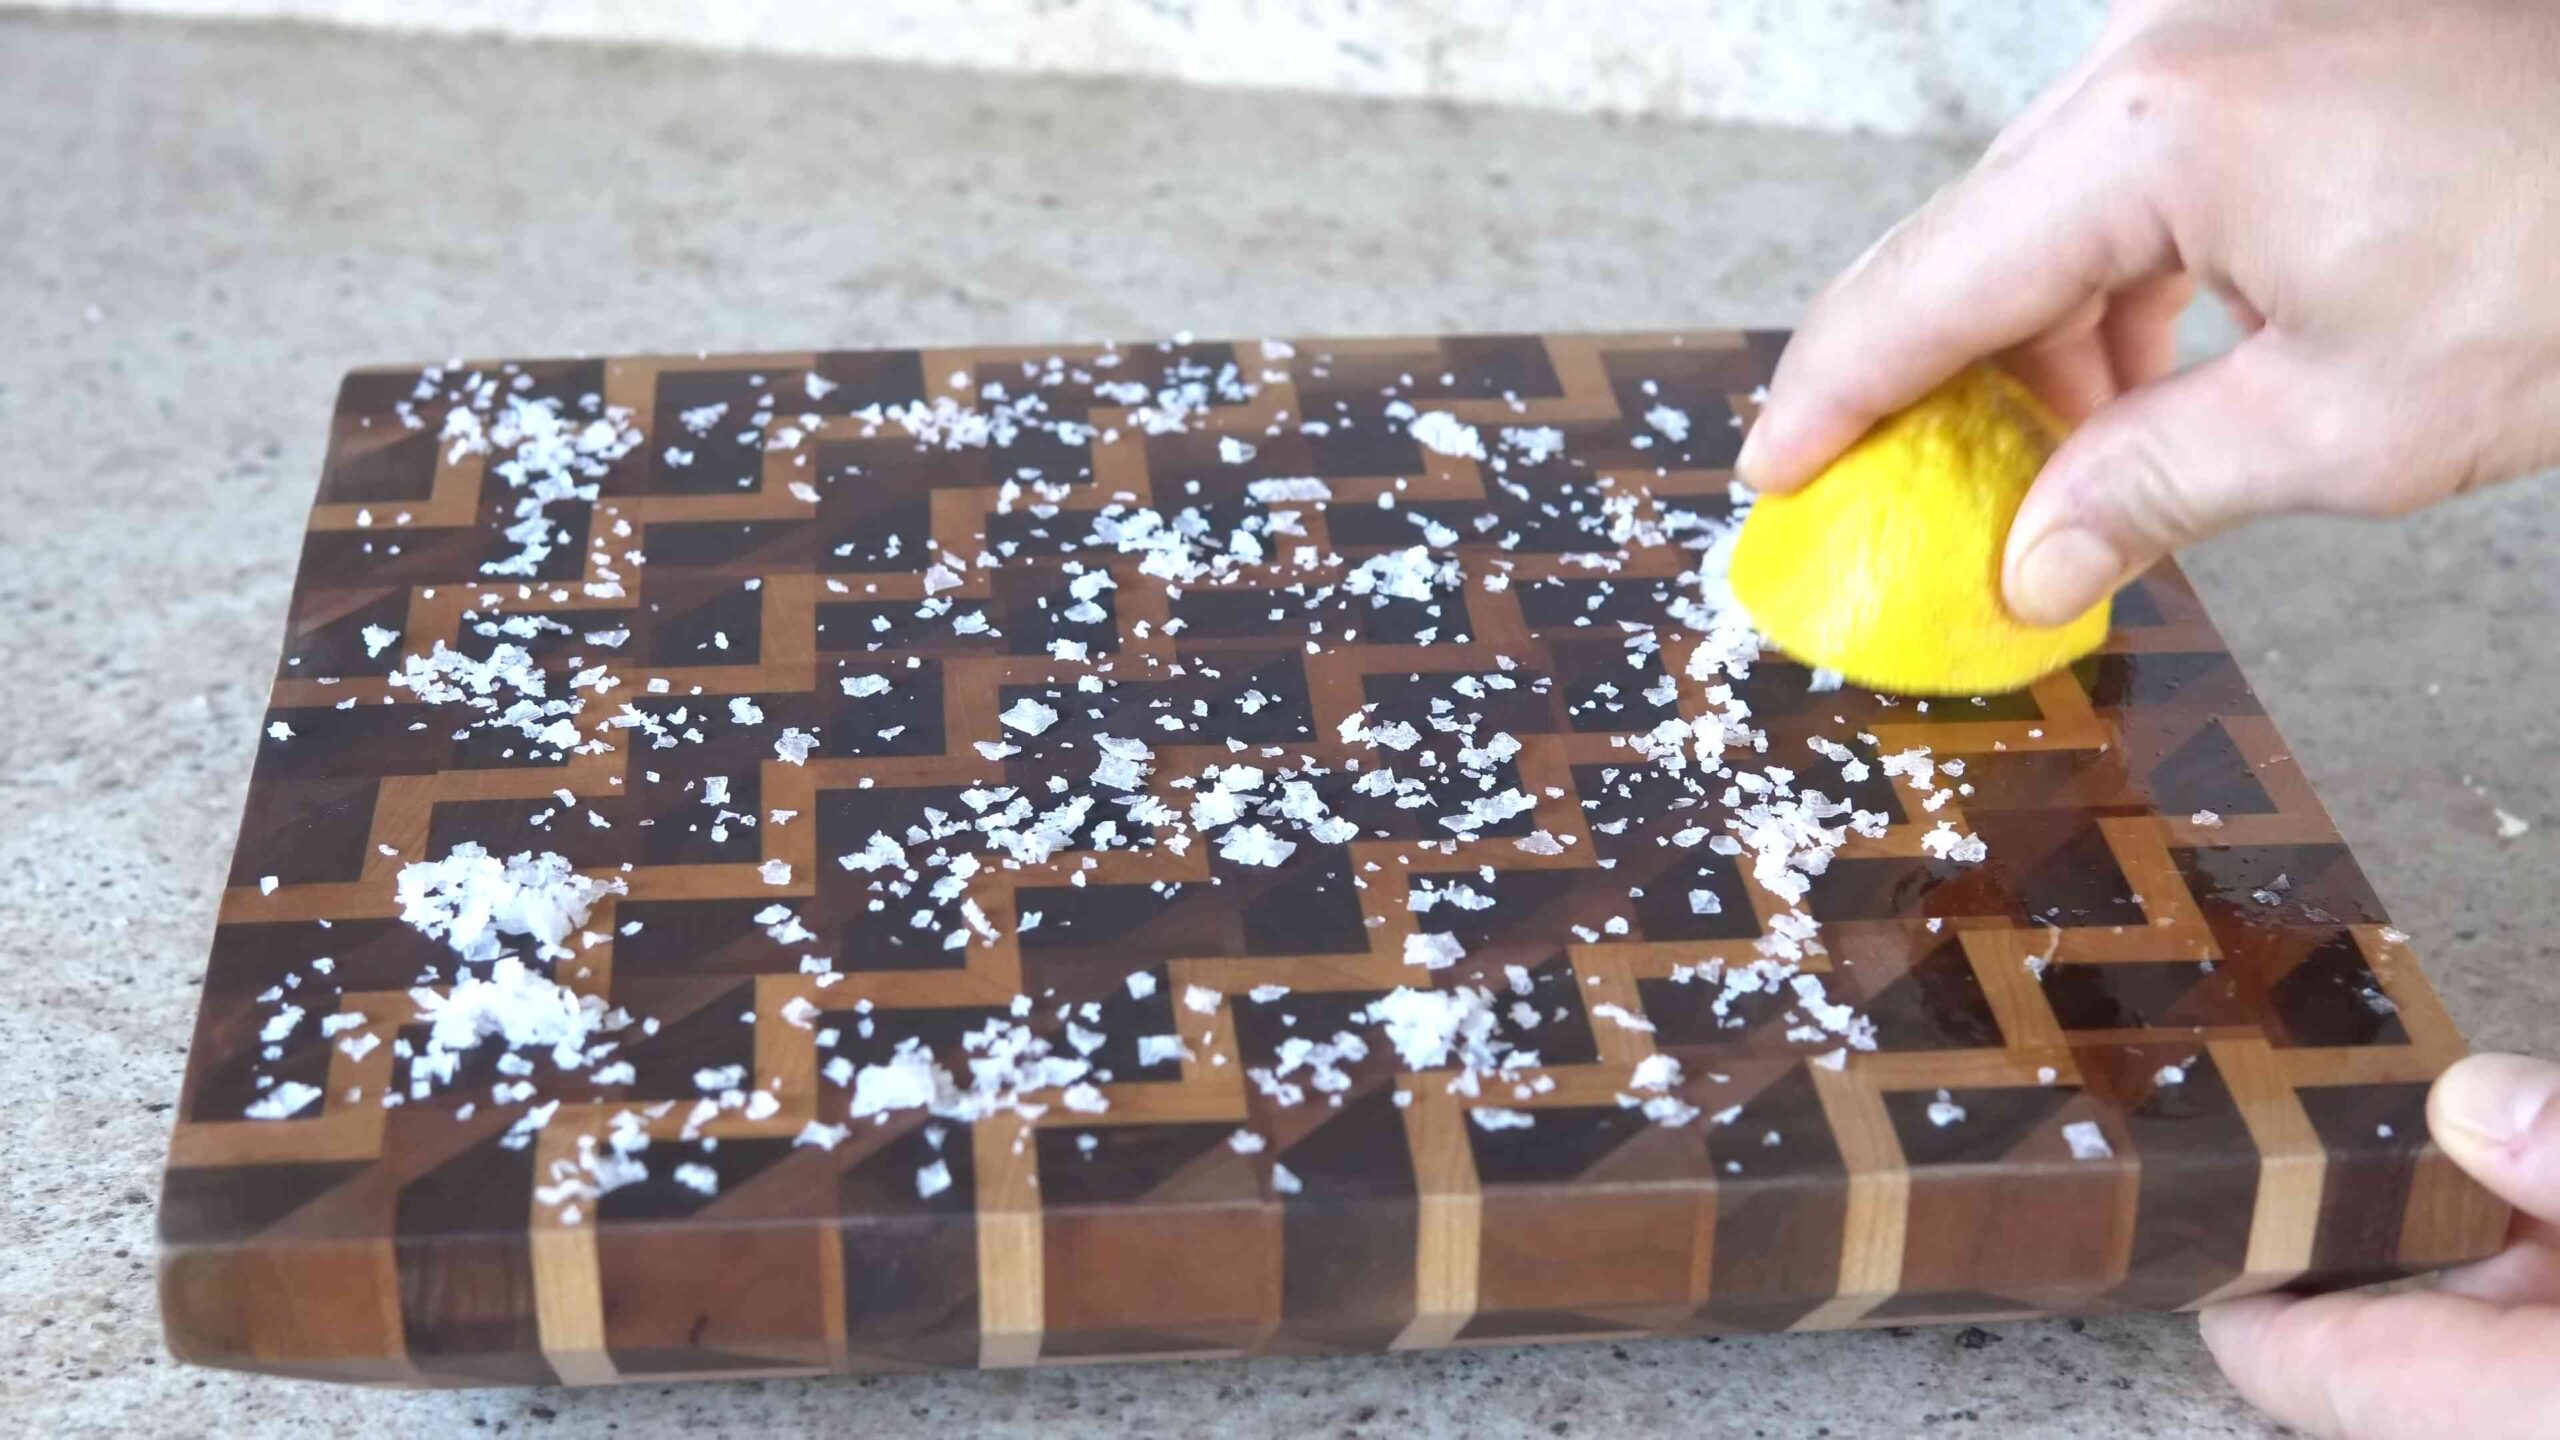
* Sanitize with vinegar or lemon juice: To sanitize your cutting board, you can wipe it down with a solution of vinegar and water or lemon juice.
* Store your cutting board properly: Store your cutting board on its side to allow air to circulate and prevent warping.
Troubleshooting
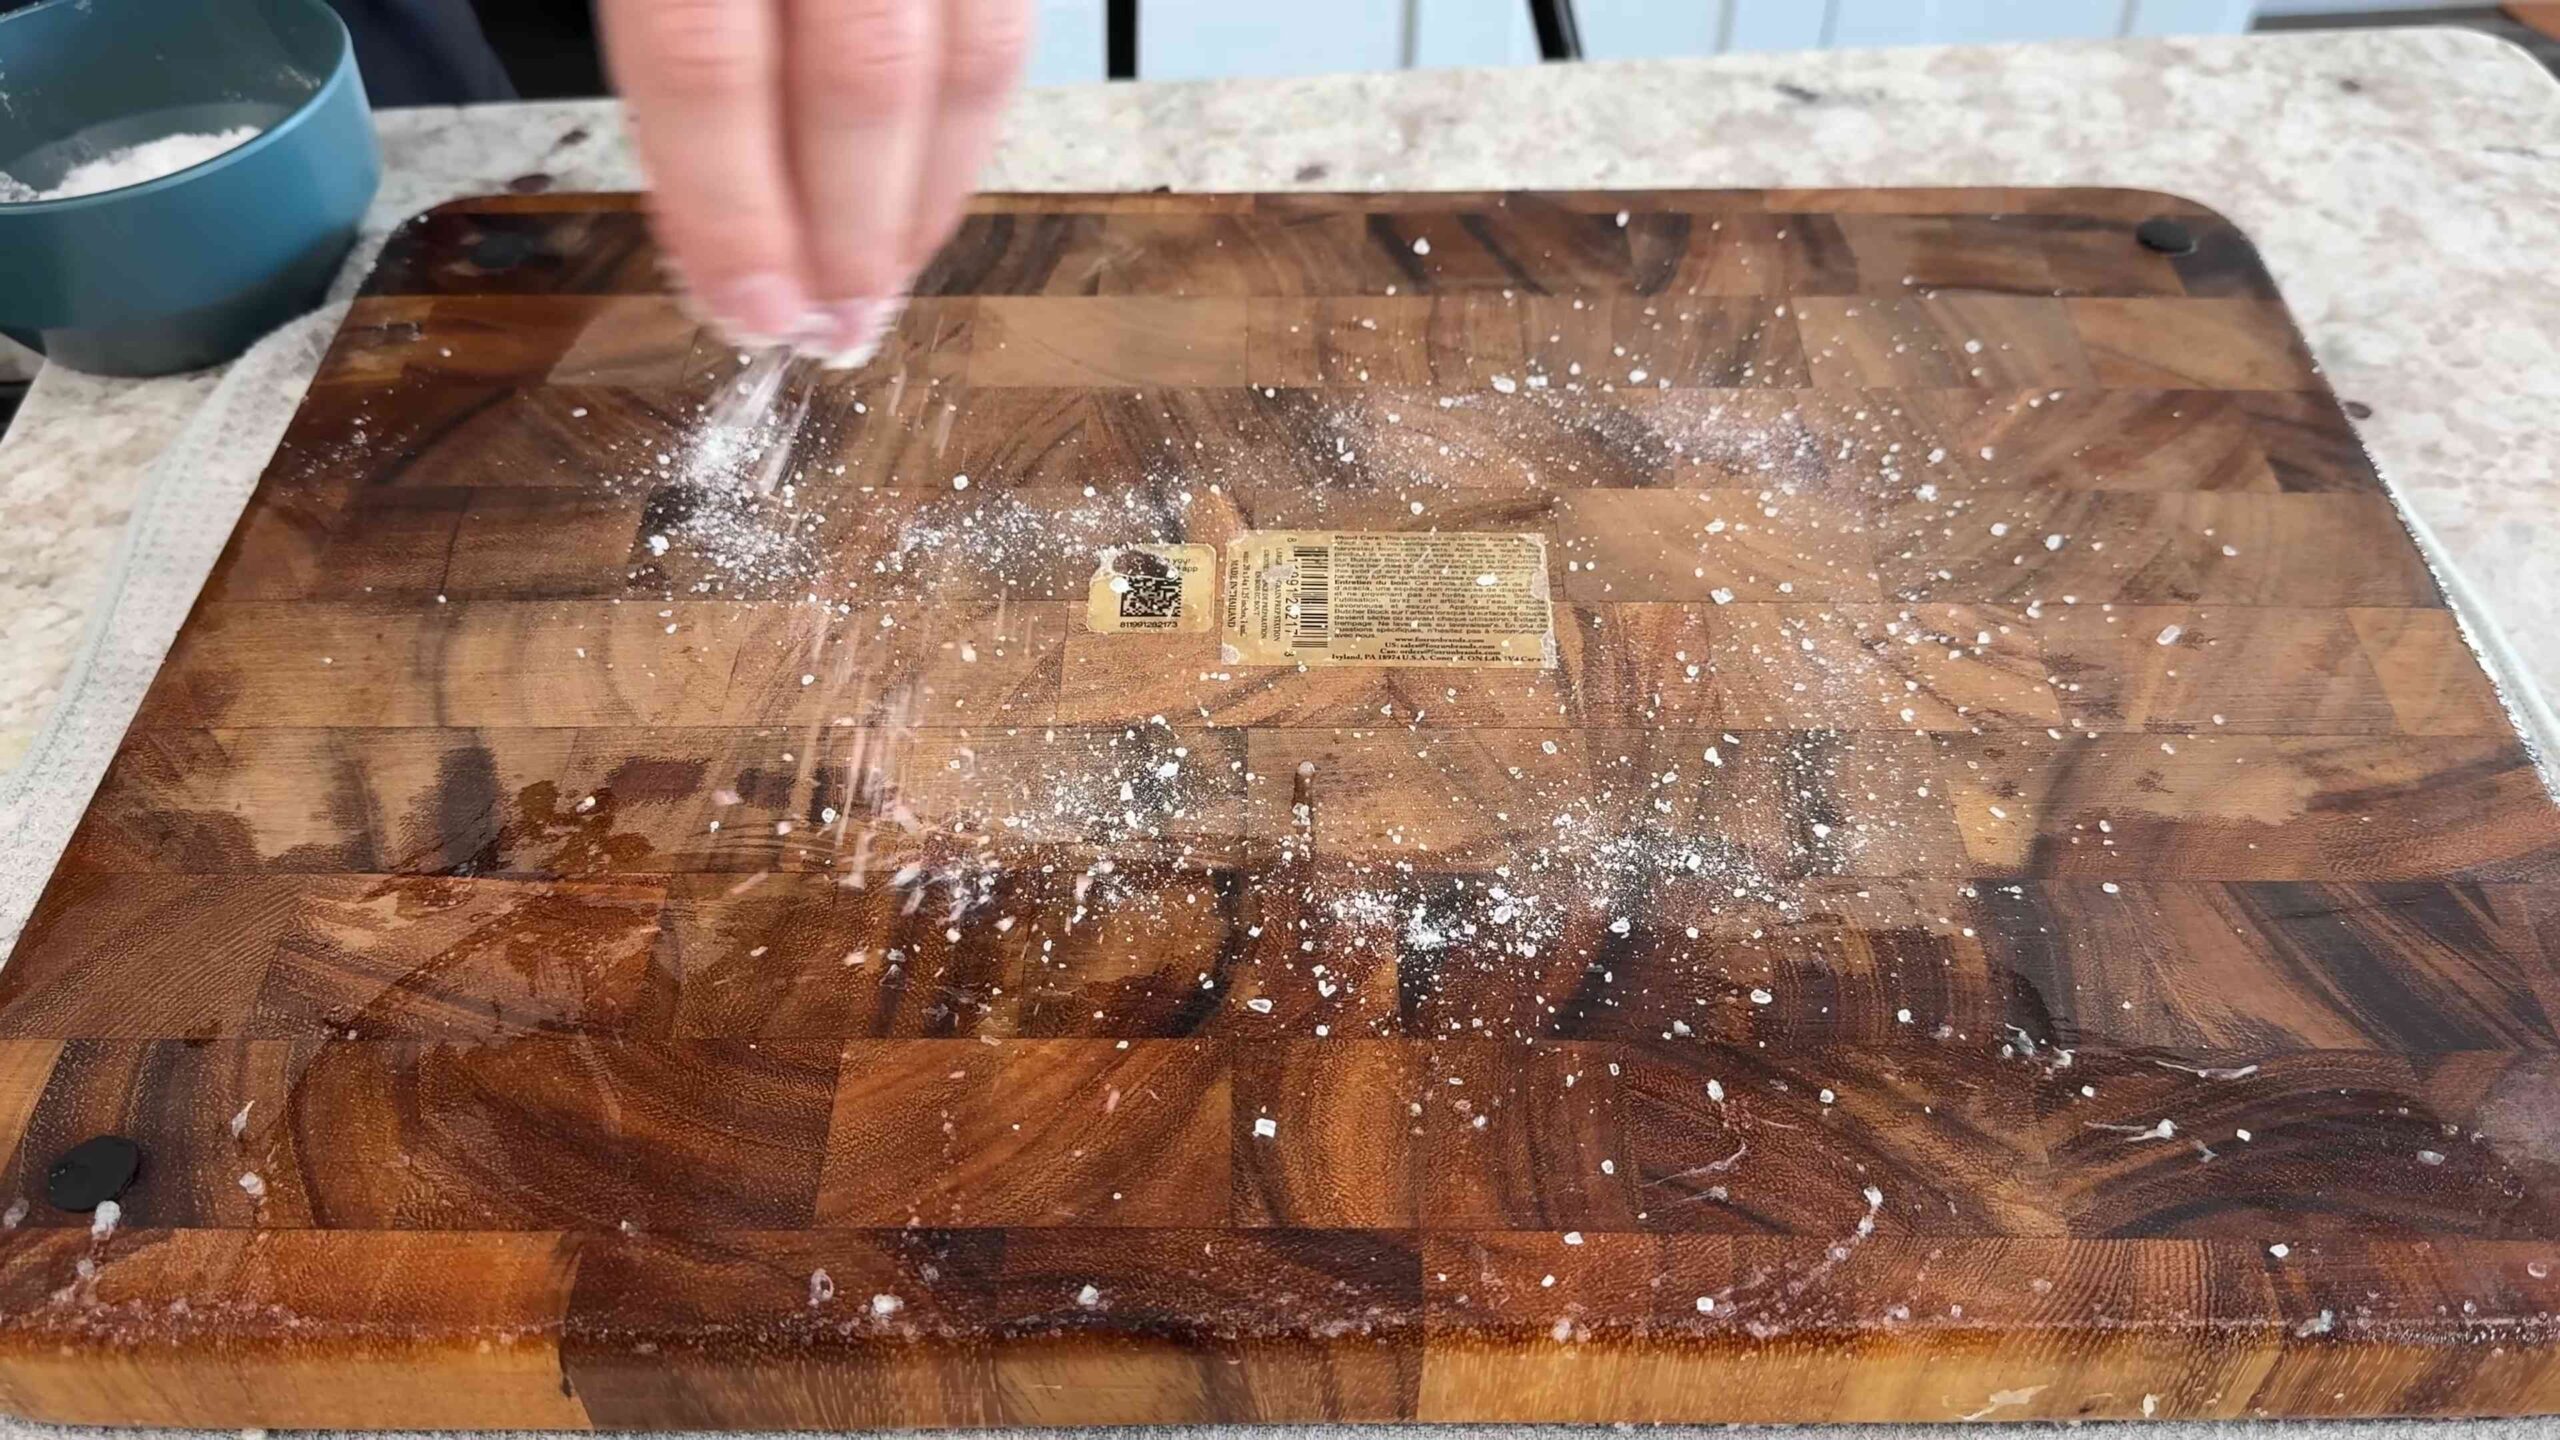
* Stubborn stains: For stubborn stains, try using a paste of baking soda and water. Apply the paste to the stain, let it sit for a few minutes, and then scrub with a brush.
* Warping: If your cutting board is warped, try placing it on a flat surface with a heavy object on top. You can also try dampening the board and letting it dry slowly.
* Cracking: If your cutting board is cracked,
Conclusion
So, there you have it! A simple, effective, and surprisingly satisfying method for keeping your wooden cutting boards pristine and ready for action. We’ve walked you through the process of cleaning and maintaining your wooden cutting board, and hopefully, you’re now convinced that this DIY approach is not just a good idea, but a kitchen essential.
Why is this a must-try? Because a clean cutting board is more than just aesthetically pleasing; it’s a matter of food safety. Store-bought cleaners can sometimes leave behind residues or contain harsh chemicals that you wouldn’t want near your food. Our method uses natural ingredients – lemon, salt, and oil – that are not only effective at removing stains and odors but are also safe for your family. Plus, it’s incredibly cost-effective! You likely already have these ingredients in your pantry.
But the benefits extend beyond cleanliness and safety. Regularly treating your wooden cutting board with oil helps to prevent it from drying out and cracking, significantly extending its lifespan. Think of it as a spa day for your cutting board, keeping it supple and ready to tackle all your chopping, slicing, and dicing needs.
Looking for variations? Absolutely!
* Infused Oil: Experiment with infusing your oil with herbs like rosemary or thyme for a subtle, aromatic touch. Simply add a few sprigs of your chosen herb to the oil and let it sit for a few days before using. This will impart a delicate flavor and fragrance to your cutting board.
* Vinegar Rinse: For extra sanitizing power, you can add a diluted vinegar rinse after the salt and lemon scrub. Mix equal parts white vinegar and water and wipe down the board before oiling.
* Beeswax Finish: For added protection and water resistance, consider using a beeswax finish after oiling. Melt beeswax with mineral oil (ratio of approximately 1 part beeswax to 4 parts mineral oil) and apply a thin layer to the board. Let it sit for a few hours, then buff off the excess.
We truly believe that this DIY trick is a game-changer for anyone who values a clean, safe, and long-lasting wooden cutting board. It’s a small investment of time that yields significant returns in terms of hygiene, durability, and overall kitchen enjoyment.
So, what are you waiting for? Gather your lemons, salt, and oil, and give your wooden cutting board the TLC it deserves. We’re confident that you’ll be amazed by the results. And most importantly, we want to hear about your experience! Share your before-and-after photos, your favorite variations, and any tips or tricks you’ve discovered along the way. Let’s build a community of clean cutting board enthusiasts! Use #CleanCuttingBoardDIY on social media so we can all see your amazing results. Happy cleaning!
Frequently Asked Questions (FAQ)
Why is it important to clean a wooden cutting board properly?
It’s crucial to clean a wooden cutting board properly to prevent the growth of bacteria and the spread of foodborne illnesses. Wood, being a porous material, can harbor bacteria if not cleaned and sanitized effectively. Proper cleaning removes food particles and sanitizes the surface, ensuring a safe and hygienic food preparation environment. Regular cleaning also prevents the buildup of odors and stains, keeping your cutting board looking and smelling fresh.
How often should I clean my wooden cutting board?
You should clean your wooden cutting board after each use with warm, soapy water. For a deeper clean, especially after cutting raw meat, poultry, or fish, follow the DIY method described in this article. Oiling the board should be done every few weeks, or whenever the wood starts to look dry. The frequency depends on how often you use the board and how dry your environment is.
Can I use dish soap to clean my wooden cutting board?
Yes, you can use dish soap to clean your wooden cutting board after each use. However, avoid soaking the board in soapy water, as this can cause it to warp or crack. Use a mild dish soap and warm water, scrub the board thoroughly, and rinse well. Be sure to dry the board completely after washing.
Is it safe to use bleach on a wooden cutting board?
While bleach is a powerful disinfectant, it’s generally not recommended for regular use on wooden cutting boards. Bleach can be harsh on the wood, drying it out and potentially causing it to crack. If you feel the need for extra sanitization, you can use a diluted bleach solution (1 tablespoon of bleach per gallon of water) sparingly. Rinse the board thoroughly with water after using bleach and allow it to air dry completely. The lemon and salt method is generally sufficient for most cleaning needs and is a gentler alternative.
What type of oil should I use to condition my wooden cutting board?
The best type of oil to use for conditioning your wooden cutting board is food-grade mineral oil. Mineral oil is non-toxic, odorless, and tasteless, and it won’t go rancid. You can also use other food-safe oils like coconut oil (refined, not virgin, to avoid the coconut scent), walnut oil, or linseed oil (ensure it’s food-grade and specifically intended for wood finishing). Avoid using vegetable oils like olive oil or canola oil, as they can become rancid over time and impart an unpleasant odor to your cutting board.
How do I know when my wooden cutting board needs to be oiled?
You’ll know your wooden cutting board needs to be oiled when it starts to look dry, dull, or feels rough to the touch. Water may also bead up on the surface instead of being absorbed. Oiling the board helps to replenish the natural oils in the wood, preventing it from drying out and cracking.
Can I put my wooden cutting board in the dishwasher?
No, you should never put your wooden cutting board in the dishwasher. The high heat and harsh detergents can cause the wood to warp, crack, and dry out. Always hand-wash your wooden cutting board with warm, soapy water and dry it thoroughly.
How do I remove stubborn stains or odors from my wooden cutting board?
The lemon and salt method described in this article is excellent for removing stubborn stains and odors. The abrasive action of the salt helps to scrub away stains, while the citric acid in the lemon acts as a natural disinfectant and deodorizer. For particularly stubborn odors, you can also try making a paste of baking soda and water and applying it to the affected area. Let it sit for a few minutes, then scrub and rinse.
How do I store my wooden cutting board?
Store your wooden cutting board in a dry, well-ventilated area. Avoid storing it flat on a countertop, as this can trap moisture and lead to warping. Instead, store it on its side or on a cutting board rack to allow air to circulate.
My wooden cutting board has developed cracks. Can I still use it?
Small surface cracks are generally not a major concern, but deep cracks can harbor bacteria and make the board difficult to clean. If your wooden cutting board has developed deep cracks, it’s best to replace it. Regularly oiling the board can help to prevent cracks from forming in the first place.
What is the best way to sanitize a wooden cutting board after cutting raw meat?
After cutting raw meat, poultry, or fish, it’s essential to sanitize your wooden cutting board thoroughly. First, wash the board with hot, soapy water. Then, you can use a diluted bleach solution (1 tablespoon of bleach per gallon of water) to sanitize the surface. Let the solution sit on the board for a few minutes, then rinse thoroughly with water and allow it to air dry completely. Alternatively, the lemon and salt method is a great natural way to sanitize.
Can I use the same cutting board for raw meat and vegetables?
It’s best to use separate cutting boards for raw meat and vegetables to prevent cross-contamination. If you only have one cutting board, be sure to clean and sanitize it thoroughly after cutting raw meat before using it for vegetables or other foods. Color-coded cutting boards can be helpful for keeping track of which board is used for which purpose.

Leave a Comment