

Clean Silver with Baking Soda: Is your cherished silverware looking a little lackluster? Are those antique trinkets gathering dust and tarnish, hiding their true beauty? I know the feeling! For generations, families have passed down silver heirlooms, each piece holding stories and memories. But let’s face it, silver tarnishes, and those harsh chemical cleaners can be intimidating, not to mention expensive.
That’s where this DIY trick comes in! Forget those pricey solutions; we’re going back to basics. This method of clean silver with baking soda is not only incredibly effective, but it’s also gentle on your precious items and the environment. Think of it as a spa day for your silverware, using ingredients you probably already have in your kitchen.
Why is this so important? Because restoring the shine to your silver isn’t just about aesthetics; it’s about preserving history and enjoying the beauty of these timeless pieces. Plus, who doesn’t love the satisfaction of a good DIY project that yields amazing results? So, grab your baking soda, and let’s get started! I’m going to show you how to bring back the sparkle to your silver, easily and affordably.
DIY Silver Cleaning with Baking Soda: A Sparkling Transformation!
Hey there, fellow DIY enthusiasts! Are you tired of looking at your tarnished silver jewelry, silverware, or decorative pieces? I know I was! Store-bought silver cleaners can be expensive and often contain harsh chemicals. That’s why I’m excited to share my favorite, super-effective, and budget-friendly method for cleaning silver using baking soda. Trust me, you’ll be amazed at the results!
What You’ll Need: The Silver Cleaning Arsenal
Before we dive in, let’s gather our supplies. This is a pretty simple project, so you probably already have most of these items at home:
* Baking Soda: The star of the show! It acts as a gentle abrasive and helps to lift the tarnish.
* Aluminum Foil: This is crucial for the chemical reaction that removes the tarnish.
* Boiling Water: The hot water speeds up the cleaning process.
* A Glass or Plastic Container: Make sure it’s large enough to hold your silver items and the water. Avoid using metal containers.
* Tongs or a Wooden Spoon: To safely handle the hot silver items.
* Soft Cloths: For drying and polishing your silver. Microfiber cloths work best!
* Optional: Dish Soap: For pre-cleaning heavily soiled items.
The Science Behind the Sparkle: How it Works
Okay, so here’s the cool part. The baking soda and aluminum foil create a chemical reaction called “ion exchange.” Tarnish (silver sulfide) forms when silver reacts with sulfur in the air. The aluminum is more reactive than silver, so it attracts the sulfur atoms, effectively pulling the tarnish off your silver items and onto the aluminum foil. Pretty neat, right?
Step-by-Step Guide: Let’s Get Cleaning!
Alright, let’s get down to business. Follow these steps carefully, and you’ll have your silver sparkling in no time!
1. Prepare Your Cleaning Station: Find a well-ventilated area and lay down some newspaper or a towel to protect your work surface.
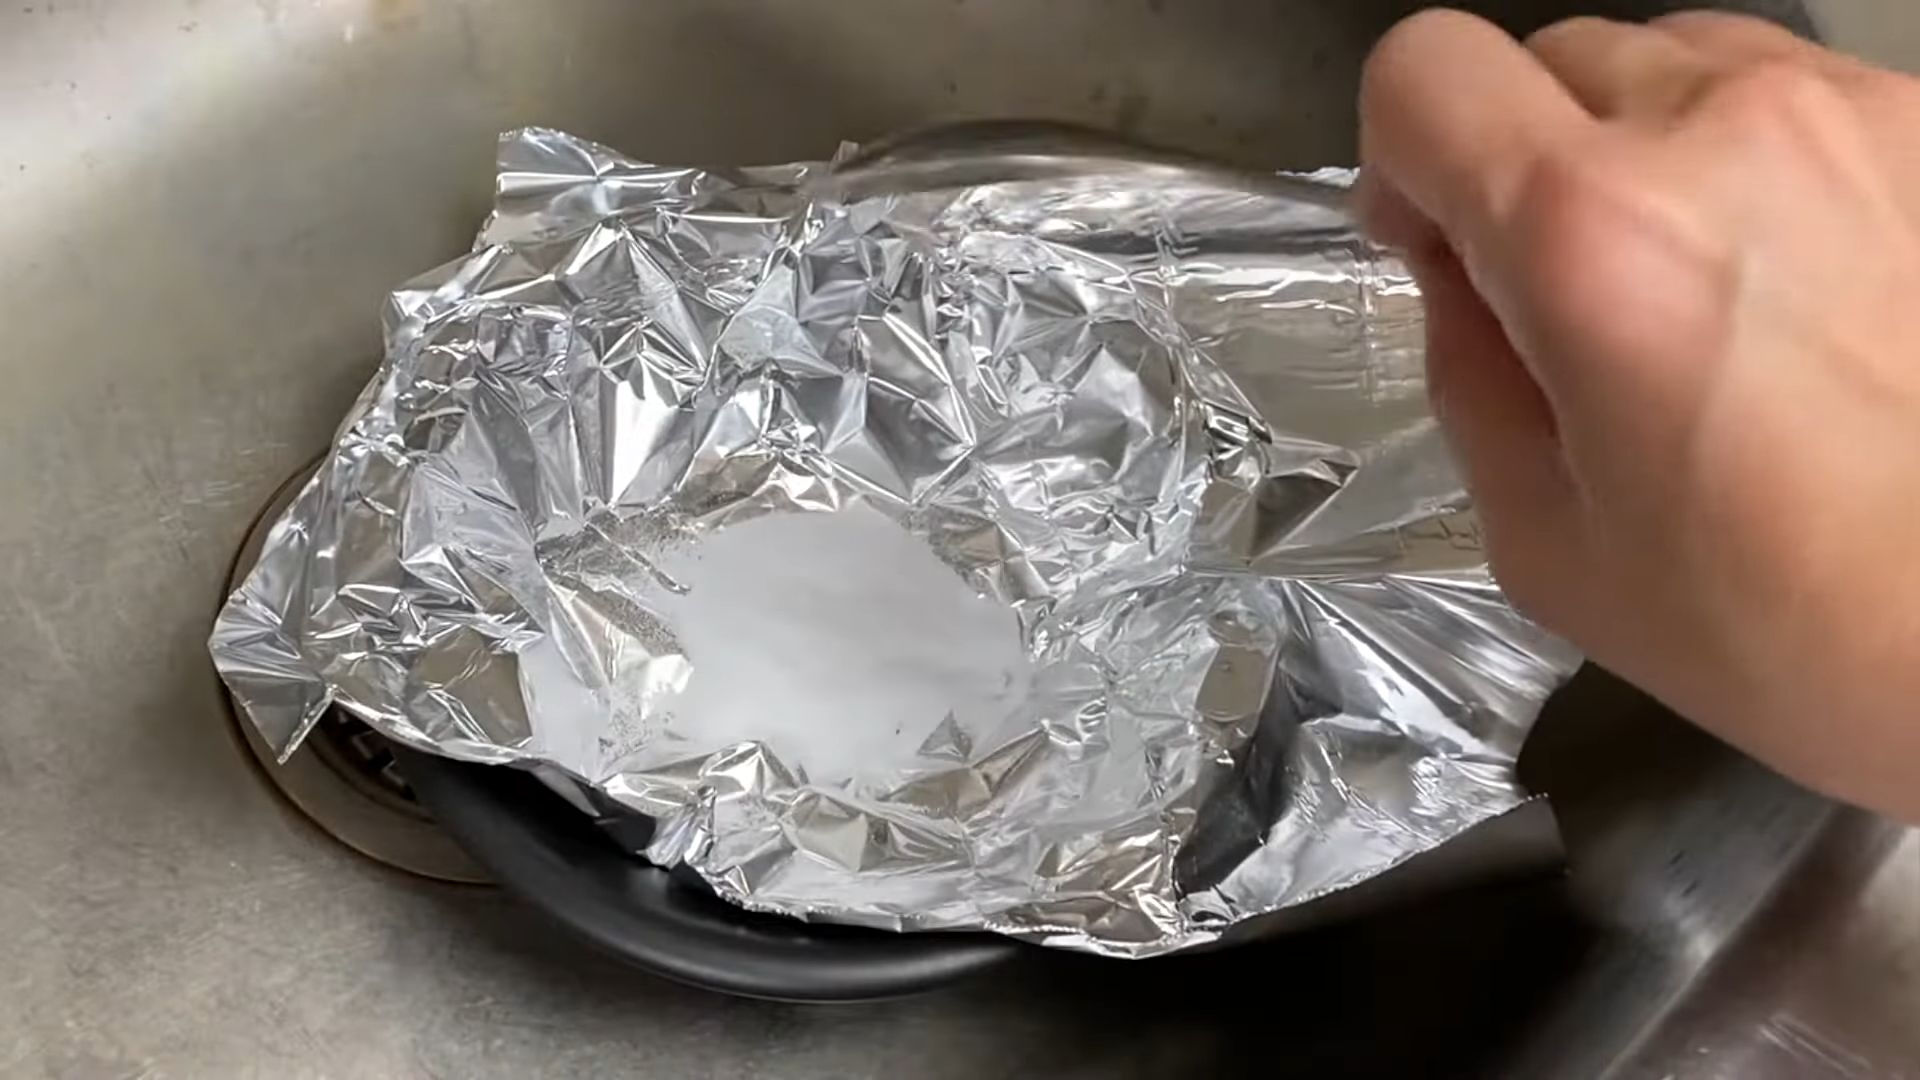
2. Line the Container with Aluminum Foil: Cut a piece of aluminum foil large enough to line the bottom and sides of your container. Make sure the shiny side of the foil is facing up, as this is the side that will come into contact with the silver.
3. Pre-Clean Heavily Soiled Items (Optional): If your silver is particularly dirty or greasy, you can pre-clean it with warm water and a mild dish soap. Rinse thoroughly and pat dry before proceeding. This will help the baking soda solution work more effectively.
4. Add Baking Soda: Pour about 1 tablespoon of baking soda per cup of water into the container. The amount you need will depend on the size of your container and the amount of silver you’re cleaning. A good rule of thumb is to use enough baking soda to create a noticeable layer on the bottom of the container.
5. Pour in the Boiling Water: Carefully pour the boiling water into the container, making sure to completely submerge the silver items. Be extremely cautious when handling boiling water to avoid burns.
6. Submerge the Silver: Place your silver items into the container, ensuring that they are touching the aluminum foil. This is crucial for the ion exchange to occur. If you have a lot of items, you may need to do this in batches to ensure good contact with the foil.
7. Observe the Magic: Now, sit back and watch the magic happen! You should start to see the tarnish disappearing from the silver and transferring onto the aluminum foil. The solution might bubble or fizz slightly, which is perfectly normal.
8. Soak Time: Let the silver soak in the solution for 5-10 minutes, or longer if the tarnish is particularly stubborn. You can check the progress periodically and remove the items when they look clean. For heavily tarnished items, you might need to flip them over to ensure all surfaces are in contact with the foil.
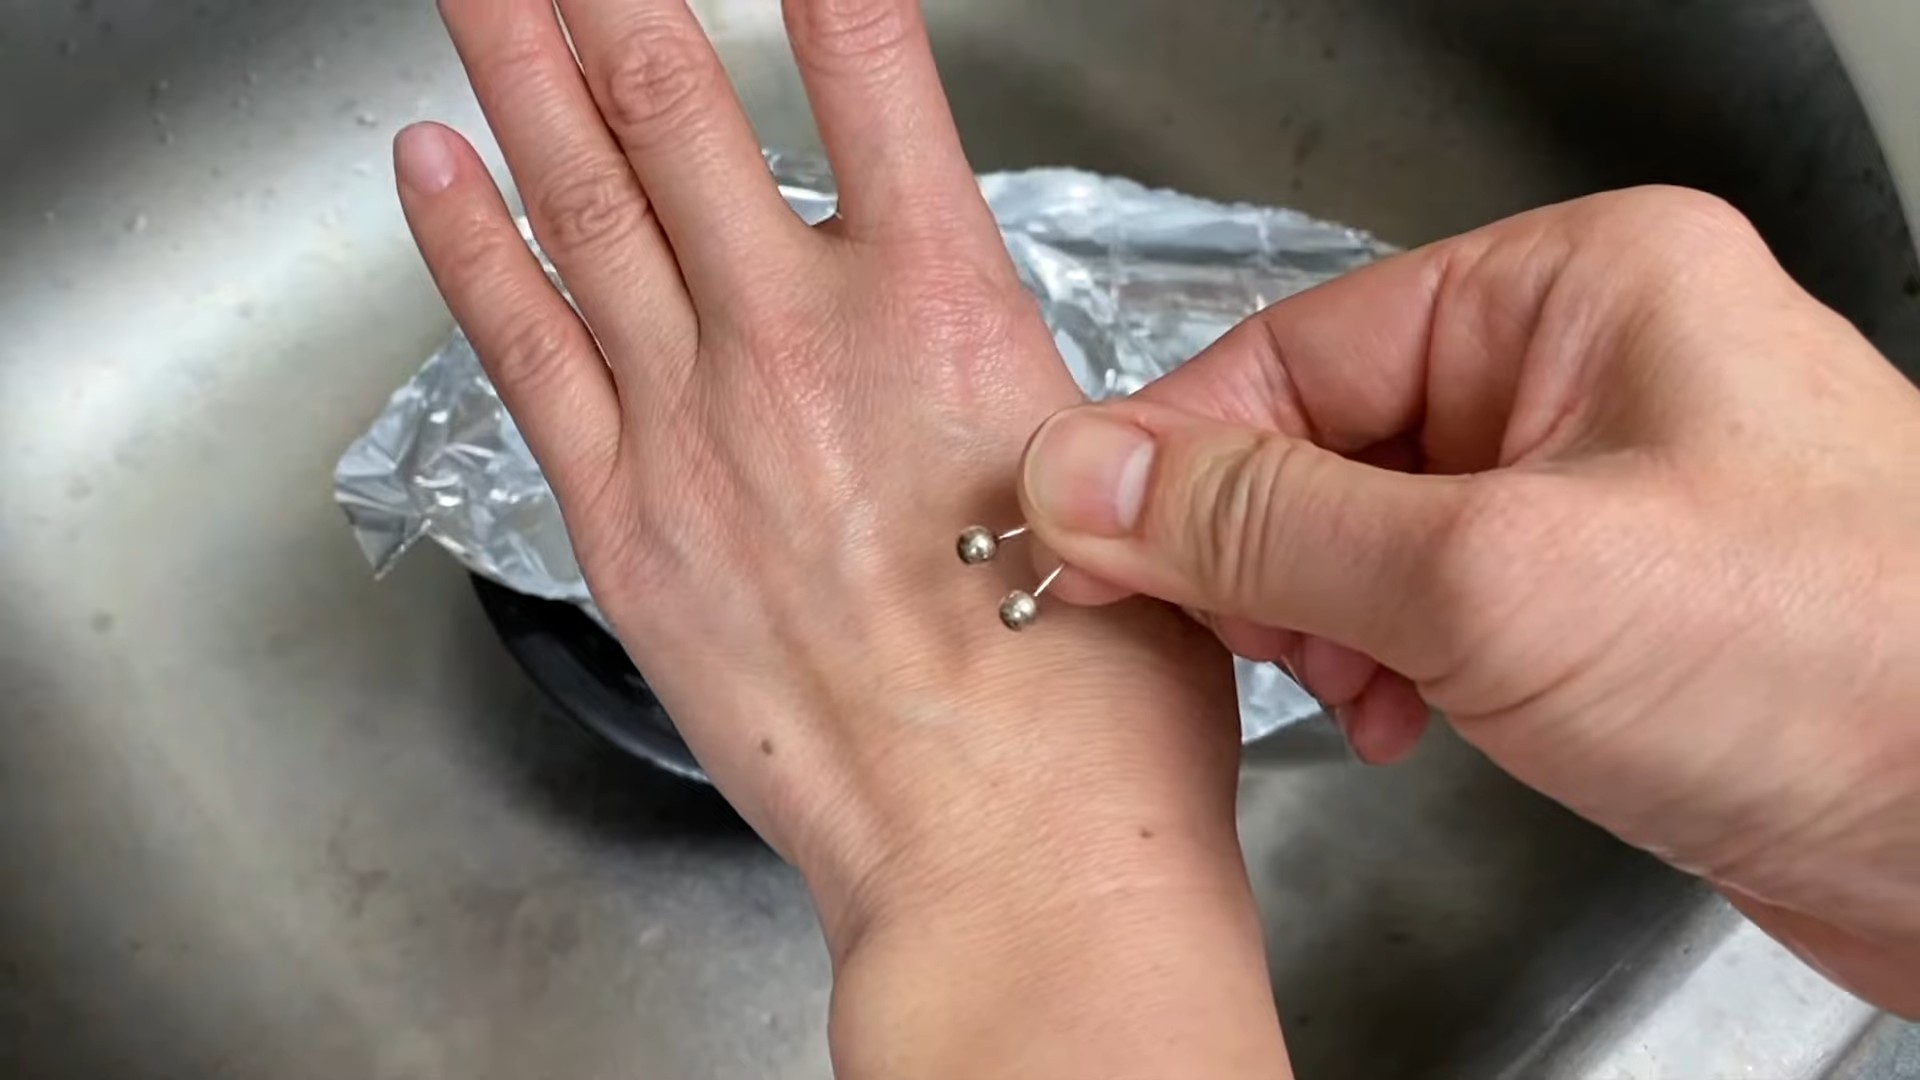
9. Remove the Silver: Using tongs or a wooden spoon, carefully remove the silver items from the hot water. Be careful, as they will be hot!
10. Rinse Thoroughly: Rinse the silver items under warm running water to remove any remaining baking soda residue.
11. Dry and Polish: Use a soft, clean cloth to thoroughly dry the silver items. Then, use a separate, dry cloth (preferably microfiber) to polish them to a brilliant shine.
12. Repeat if Necessary: If some tarnish remains, you can repeat the process with a fresh batch of baking soda solution and aluminum foil.
Dealing with Intricate Designs: Getting into the Nooks and Crannies
Some silver items have intricate designs or hard-to-reach areas where tarnish can accumulate. Here are a few tips for tackling those tricky spots:
* Soft-Bristled Brush: Use a soft-bristled brush (like an old toothbrush) to gently scrub away tarnish in the crevices.
* Cotton Swabs: Cotton swabs dipped in the baking soda solution can be used to clean small, detailed areas.
* Patience: Sometimes, it just takes a little extra time and effort to get those stubborn spots clean.
Important Considerations: Things to Keep in Mind
While this method is generally safe and effective, there are a few things to keep in mind:
* Not Suitable for All Silver: This method is best suited for sterling silver and silver-plated items. It’s not recommended for antique silver pieces with delicate finishes or gemstones, as it could potentially damage them. Always test a small, inconspicuous area first.
* Avoid Mixing Metals: Do not clean different types of metals together in the same solution. This can cause discoloration or damage.
* Handle Boiling Water with Care: Always be extremely cautious when handling boiling water to avoid burns.
* Dispose of the Solution Properly: Once you’re finished cleaning, carefully pour the used baking soda solution down the drain, followed by plenty of water.
Maintaining the Shine: Preventing Future Tarnish
Now that your silver is sparkling, you’ll want to keep it that way! Here are a few tips for preventing future tarnish:
* Store Silver Properly: Store your silver items in airtight containers or tarnish-resistant bags to protect them from exposure to air and moisture.
* Use Anti-Tarnish Strips: Place anti-tarnish strips in your silver storage containers to absorb sulfur and prevent tarnish.
* Regular Cleaning: Wipe down your silver items regularly with a soft cloth to remove dust and fingerprints.
* Avoid Contact with Certain Substances: Certain substances, such as rubber, wool, and some foods, can accelerate tarnishing. Avoid storing silver near these items.
* Wear Silver Jewelry Often: Believe it or not, wearing your silver jewelry can actually help prevent tarnish! The friction from your skin helps to polish the silver and remove any developing tarnish.
Troubleshooting: What to Do if Things Go Wrong
Sometimes, despite our best efforts, things don’t go exactly as planned. Here are a few common problems and how to fix them:
* Tarnish Not Removing Completely: If the tarnish is not removing completely, try soaking the silver for a longer period of time, using a stronger baking soda solution, or repeating the process with fresh aluminum foil.
* Discoloration: If you notice any discoloration, it could be due to cleaning different types of metals together or using a solution that is too strong. Try cleaning the item with a mild silver polish.
* Scratches: Avoid using abrasive cleaners or scrubbing too hard, as this can scratch the silver. Always use a soft cloth and gentle pressure.
Alternative Methods: Other Ways to Clean Silver
While I love the baking soda and aluminum foil method, there are other ways to clean silver. Here are a few alternatives:
* Silver Polish: Commercial silver polishes are effective at removing tarnish, but they can be abrasive and may contain harsh chemicals. Always follow the manufacturer’s instructions carefully.
* Toothpaste: A small amount of non-gel toothpaste can be used to gently polish silver. Be sure to rinse thoroughly and dry completely.
* Lemon Juice and Salt: A mixture of lemon juice and salt can also be used to clean silver. Apply the mixture to the silver, let it sit for a few minutes, and then rinse and dry.
Final Thoughts: Enjoy Your Sparkling Silver!
And there you have it! A simple, effective, and affordable way to clean your silver using baking soda. I hope you found this guide helpful. Now go forth and transform your tarnished treasures into sparkling beauties! Remember to always test a small area first, and enjoy the process. Happy cleaning!
Conclusion
So, there you have it! A simple, effective, and surprisingly satisfying way to breathe new life into your tarnished silver. Forget harsh chemicals and expensive polishing cloths; this baking soda method is a game-changer. We’ve shown you how to clean silver with baking soda, and the results speak for themselves. The transformation from dull and discolored to gleaming and gorgeous is truly remarkable, and the best part is, you probably already have everything you need sitting in your pantry.
Why is this DIY trick a must-try? Because it’s gentle on your precious silver items, yet incredibly powerful at removing tarnish. It’s also environmentally friendly, cost-effective, and frankly, a little bit magical to watch the tarnish disappear before your eyes. Think about all those beautiful silver pieces you’ve been neglecting – your grandmother’s silverware, that elegant tea set, or your favorite silver jewelry. They deserve to shine, and this method makes it easier than ever to restore them to their former glory.
Beyond the basic method, there are a few variations you can explore. For heavily tarnished items, you might want to increase the amount of baking soda or extend the soaking time. You can also add a small amount of salt to the mixture to boost its cleaning power. Experiment and see what works best for your specific silver items. Remember to always test a small, inconspicuous area first, especially if you’re dealing with antique or delicate pieces.
Ready to ditch the commercial silver cleaners and embrace this natural, effective solution? We wholeheartedly encourage you to give this DIY trick a try. You’ll be amazed at the results, and you’ll feel good knowing you’re using a safe and sustainable method to care for your silver.
But don’t just take our word for it! We want to hear about your experiences. Did this method work wonders for your silver? Did you try any variations? Share your tips, tricks, and before-and-after photos in the comments below. Let’s create a community of silver-cleaning enthusiasts and help each other keep our precious silver sparkling for years to come. Your feedback is invaluable and will help others discover the joy of this simple yet effective DIY cleaning solution. We are confident that once you try this method to clean silver with baking soda, you will never go back to store-bought cleaners.
Frequently Asked Questions (FAQs)
What kind of silver can I clean with baking soda?
This method is generally safe for most sterling silver, silver-plated items, and even some silver jewelry. However, it’s crucial to exercise caution with antique or delicate pieces, especially those with gemstones or intricate designs. Always test a small, inconspicuous area first to ensure the baking soda doesn’t damage the finish or loosen any settings. Avoid using this method on items with oxidized finishes (intentional darkening) as it may remove the oxidation. If you are unsure about a particular item, consult a professional jeweler or antique dealer.
How much baking soda and water should I use?
A good starting point is to use about 1 tablespoon of baking soda per cup of boiling water. You can adjust the ratio depending on the severity of the tarnish. For heavily tarnished items, you might want to use 2 tablespoons of baking soda per cup of water. The key is to ensure the baking soda is fully dissolved in the boiling water.
What kind of container should I use?
The container is very important. You need a non-reactive container, meaning it won’t react with the baking soda or aluminum foil. Glass, ceramic, or plastic containers are all good options. Avoid using metal containers other than the aluminum foil itself, as they can interfere with the chemical reaction. Make sure the container is large enough to fully submerge the silver items you’re cleaning.
How long should I soak the silver?
The soaking time will vary depending on the level of tarnish. Start by soaking the silver for 5 minutes and check the progress. If the tarnish is still present, continue soaking for another 5-10 minutes, checking periodically. Heavily tarnished items may require up to 30 minutes of soaking. Be careful not to over-soak, as prolonged exposure to the baking soda solution can potentially damage the silver.
Why do I need to use aluminum foil?
The aluminum foil is essential for the chemical reaction that removes the tarnish. When the silver item is submerged in the baking soda solution with the aluminum foil, a process called ion exchange occurs. The tarnish (silver sulfide) on the silver item reacts with the aluminum, causing the sulfur to transfer from the silver to the aluminum. This effectively reverses the tarnishing process and restores the silver’s shine. The aluminum foil acts as a sacrificial metal, attracting the tarnish away from the silver.
What if the tarnish doesn’t come off completely?
If some tarnish remains after soaking, you can gently rub the silver with a soft cloth or sponge. Avoid using abrasive materials, as they can scratch the silver. For stubborn tarnish, you can make a paste of baking soda and water and apply it directly to the affected areas. Gently rub the paste in a circular motion and then rinse thoroughly with water. You may need to repeat the process a few times to remove all the tarnish.
Can I clean silver jewelry with gemstones using this method?
Exercise extreme caution when cleaning silver jewelry with gemstones using this method. Some gemstones are porous and can be damaged by the baking soda solution. Avoid soaking jewelry with pearls, opals, turquoise, or other delicate stones. If you must clean jewelry with gemstones, try to avoid submerging the stones in the solution. Instead, use a cotton swab dipped in the baking soda solution to gently clean the silver around the stones. Rinse thoroughly with water and dry immediately. It’s always best to consult a professional jeweler for advice on cleaning delicate jewelry.
How do I prevent silver from tarnishing in the future?
To prevent silver from tarnishing, store it in a cool, dry place away from direct sunlight and humidity. Wrap each piece of silver in acid-free tissue paper or a tarnish-resistant cloth before storing it. You can also place a piece of chalk or activated charcoal in the storage container to absorb moisture and prevent tarnish. Avoid storing silver in rubber bands, plastic bags, or newspaper, as these materials can accelerate tarnishing. Regularly polishing your silver with a silver polishing cloth can also help prevent tarnish from building up.
Is it safe to use this method on all types of silver?
While generally safe, it’s always best to test a small, inconspicuous area first, especially with antique or delicate silver items. Avoid using this method on items with intentionally oxidized finishes, as it may remove the oxidation. If you’re unsure about a particular item, consult a professional jeweler or antique dealer.
Can I reuse the baking soda solution?
No, it’s best to use a fresh batch of baking soda solution each time you clean silver. The solution becomes less effective as it absorbs the tarnish from the silver. Reusing the solution may not effectively remove the tarnish and could potentially leave a residue on the silver.
What if my silver has intricate details or hard-to-reach areas?
For silver items with intricate details or hard-to-reach areas, use a soft-bristled brush, such as an old toothbrush, to gently scrub the areas after soaking. This will help remove tarnish that may be trapped in crevices. Be careful not to apply too much pressure, as you don’t want to damage the silver. Rinse thoroughly with water and dry immediately.
How do I dry the silver after cleaning?
After cleaning, rinse the silver thoroughly with warm water to remove any remaining baking soda residue. Dry the silver immediately with a soft, lint-free cloth. Avoid air-drying, as water spots can form on the surface. For intricate pieces, use a cotton swab to dry hard-to-reach areas. Once the silver is completely dry, you can polish it with a silver polishing cloth to enhance its shine.

Leave a Comment