

Cabbage growing secrets aren’t just for seasoned farmers anymore! Imagine stepping outside your back door and harvesting crisp, flavorful cabbage heads, bursting with freshness and ready to transform into delicious meals. Sounds dreamy, right? Well, it’s more achievable than you think! For centuries, cabbage has been a staple in diets around the world, from the hearty stews of Eastern Europe to the vibrant slaws of North America. Its resilience and nutritional value have made it a beloved crop, passed down through generations.
But let’s be honest, sometimes growing cabbage can feel like a bit of a mystery. Pests, diseases, and unpredictable weather can throw even experienced gardeners for a loop. That’s where these DIY tricks and hacks come in! I’m going to share some of my favorite, tried-and-true methods to help you unlock the full potential of your cabbage patch.
Whether you’re a complete beginner or a seasoned green thumb, these cabbage growing secrets will empower you to cultivate a thriving garden and enjoy the satisfaction of harvesting your own homegrown goodness. Forget those bland, store-bought cabbages – get ready to taste the difference that fresh, homegrown flavor makes! Let’s dive in and discover the secrets to a bountiful cabbage harvest!
Unlocking Cabbage Growing Secrets: From Seed to Supper!
Hey there, fellow garden enthusiasts! I’m so excited to share my tried-and-true methods for growing absolutely amazing cabbages. Forget those sad, wimpy heads you sometimes see at the grocery store. We’re talking crisp, flavorful, and satisfyingly large cabbages that you’ll be proud to serve. This guide is packed with everything I’ve learned over the years, so get ready to transform your cabbage game!
Choosing the Right Cabbage Variety
Before we even think about planting, let’s talk varieties. Not all cabbages are created equal! The best choice depends on your climate, growing season, and personal preferences.
* Early Varieties: These mature quickly (around 60-70 days) and are great for short growing seasons or succession planting. Examples include ‘Early Jersey Wakefield’ and ‘Golden Acre’.
* Mid-Season Varieties: These take a bit longer (70-85 days) and offer good size and flavor. ‘Copenhagen Market’ and ‘Savoy Ace’ are popular choices.
* Late Varieties: These are your big boys, taking 85+ days to mature. They’re perfect for fall harvests and storage. ‘Danish Ballhead’ and ‘January King’ are excellent options.
* Savoy Cabbages: Known for their crinkled leaves and mild flavor. ‘Savoy Ace’ is a reliable choice.
* Red Cabbages: Add a pop of color to your garden and kitchen! ‘Red Acre’ and ‘Ruby Perfection’ are beautiful and delicious.
My Personal Recommendation: I usually grow a mix of ‘Early Jersey Wakefield’ for early harvests and ‘Danish Ballhead’ for winter storage. It gives me a continuous supply of cabbage throughout the season!
Starting Cabbage Seeds Indoors (Recommended for Most Climates)
Starting seeds indoors gives you a head start, especially if you live in a colder climate with a shorter growing season. I highly recommend this method!
Materials You’ll Need:
* Cabbage seeds (of course!)
* Seed starting trays or small pots
* Seed starting mix (a light, sterile mix is crucial)
* Spray bottle with water
* Grow lights (optional, but highly recommended)
* Heat mat (optional, but helpful for germination)
Step-by-Step Instructions:
1. Prepare Your Seed Starting Trays: Fill your seed starting trays or pots with seed starting mix. Gently tap the trays to settle the mix.
2. Sow the Seeds: Make a small indentation (about ¼ inch deep) in the center of each cell or pot. Place 2-3 seeds in each indentation. This increases your chances of at least one seed germinating.
3. Cover the Seeds: Gently cover the seeds with a thin layer of seed starting mix.
4. Water Carefully: Use a spray bottle to thoroughly moisten the soil. Avoid overwatering, which can lead to damping off (a fungal disease that kills seedlings).
5. Provide Warmth and Light: Place the trays on a heat mat (if using) and under grow lights. If you don’t have grow lights, place them in a sunny window, but be aware that seedlings may become leggy (tall and weak) without sufficient light.
6. Maintain Moisture: Keep the soil consistently moist, but not soggy. Check the soil daily and mist with water as needed.
7. Thin the Seedlings: Once the seedlings have their first true leaves (the second set of leaves that appear after the initial seed leaves), thin them to one seedling per cell or pot. Choose the strongest, healthiest-looking seedling and gently snip off the others at the soil line. Don’t pull them out, as this can disturb the roots of the remaining seedling.
Transplanting Cabbage Seedlings Outdoors
This is a crucial step! Timing and proper technique are key to successful transplanting.
When to Transplant:
* Wait until the danger of frost has passed. Cabbage is relatively cold-hardy, but young seedlings are still vulnerable.
* The seedlings should be about 4-6 inches tall and have several sets of true leaves.
* Harden off the seedlings for about a week before transplanting. This means gradually exposing them to outdoor conditions to acclimate them to the sun, wind, and temperature changes. Start by placing them outside for a few hours each day, gradually increasing the time until they can stay outside all day and night.
Preparing the Garden Bed:
* Choose a sunny location with well-drained soil. Cabbage needs at least 6 hours of sunlight per day.
* Amend the soil with compost or well-rotted manure. Cabbage is a heavy feeder and needs nutrient-rich soil.
* Ensure the soil pH is between 6.0 and 7.0. You can test your soil pH with a soil testing kit.
* Space the seedlings 12-24 inches apart, depending on the variety. Smaller varieties can be planted closer together.
Transplanting Steps:
1. Water the Seedlings: Water the seedlings thoroughly in their trays or pots before transplanting. This helps to loosen the roots and makes them easier to remove.
2. Dig the Holes: Dig holes in the prepared garden bed that are slightly larger than the root balls of the seedlings.
3. Carefully Remove the Seedlings: Gently remove the seedlings from their trays or pots. Be careful not to damage the roots. If the roots are tightly bound, gently loosen them with your fingers.
4. Plant the Seedlings: Place the seedlings in the holes, making sure the top of the root ball is level with the soil surface.
5. Backfill with Soil: Fill the holes with soil and gently firm the soil around the seedlings.
6. Water Thoroughly: Water the seedlings thoroughly after transplanting.
7. Mulch: Apply a layer of mulch around the seedlings to help retain moisture, suppress weeds, and regulate soil temperature. I like to use straw or shredded leaves.
Caring for Your Cabbage Plants
Consistent care is essential for healthy cabbage growth.
* Watering: Cabbage needs consistent moisture, especially during head formation. Water deeply and regularly, especially during dry periods. Aim for about 1 inch of water per week.
* Fertilizing: Cabbage is a heavy feeder and benefits from regular fertilization. Side-dress the plants with a balanced fertilizer every 2-3 weeks. You can also use compost tea or fish emulsion.
* Weeding: Keep the garden bed free of weeds, which compete with the cabbage plants for nutrients and water.
* Pest Control: Cabbage is susceptible to several pests, including cabbage worms, cabbage loopers, and aphids. Inspect your plants regularly for signs of infestation.
* Cabbage Worms and Cabbage Loopers: These caterpillars can quickly decimate your cabbage plants. Handpicking them off the plants is an effective method for small infestations. You can also use Bacillus thuringiensis (Bt), a natural bacteria that kills caterpillars.
* Aphids: These tiny insects suck the sap from plants, causing them to weaken and become distorted. Spray aphids with a strong stream of water or use insecticidal soap.
* Cabbage Root Maggots: These pests attack the roots of cabbage plants, causing them to wilt and die. Prevent root maggots by using row covers or by placing cardboard collars around the base of the plants.
* Disease Control: Cabbage can be affected by several diseases, including black rot and clubroot.
* Black Rot: This bacterial disease causes yellowing and blackening of the leaves. Prevent black rot by using disease-free seeds and by practicing crop rotation.
* Clubroot: This fungal disease causes the roots to become swollen and distorted. Prevent clubroot by liming the soil to raise the pH to 7.0 or higher and by practicing crop rotation.
Harvesting Your Cabbage
The moment we’ve all been waiting for!
* When to Harvest: Harvest cabbage when the heads are firm and solid. The size of the head will vary depending on the variety.
* How to Harvest: Cut the head from the plant with a sharp knife, leaving a few outer leaves attached.
* Storage: Cabbage can be stored in a cool, dry place for several weeks. Late-season varieties like ‘Danish Ballhead’ are especially good for storage.
Troubleshooting Common Cabbage Growing Problems
Even with the best care, you might encounter some challenges. Here’s how to tackle them:
* Heads Not Forming: This can be caused by several factors, including insufficient sunlight, poor soil, or lack of water. Make sure your cabbage plants are getting at least 6 hours of sunlight per day, amend the soil with compost, and water regularly.
* Splitting Heads: This is often caused by uneven watering
Conclusion
So, there you have it – the ultimate guide to unlocking the secrets of thriving cabbage plants! We’ve explored simple yet incredibly effective DIY tricks that can transform your cabbage growing experience from frustrating to fulfilling. Forget battling pests, struggling with stunted growth, or watching your precious cabbages bolt before their time. These methods, born from years of gardening wisdom and practical experimentation, offer a natural and sustainable approach to cultivating healthy, delicious cabbages right in your own backyard.
Why is this a must-try? Because it empowers you to take control of your garden’s ecosystem. By understanding the specific needs of your cabbage plants and addressing them with these targeted DIY solutions, you’re not just growing vegetables; you’re fostering a thriving environment where your cabbages can flourish. You’ll witness firsthand the difference that proper soil preparation, strategic companion planting, and natural pest control can make. The result? Bigger, healthier, and tastier cabbages that you can proudly harvest and enjoy.
But the beauty of gardening lies in its adaptability. Feel free to experiment with variations on these techniques to suit your specific climate, soil conditions, and personal preferences. For instance, if you live in an area with particularly heavy cabbage white butterfly infestations, consider using a double layer of netting or introducing beneficial insects like parasitic wasps. If your soil is naturally acidic, you might need to amend it with more lime to achieve the ideal pH level for cabbage growth. You can also try different companion plants based on what grows well in your region. Marigolds and nasturtiums are great alternatives if you can’t find enough dill or rosemary.
And don’t be afraid to get creative with your DIY pest control solutions. Garlic spray is a classic, but you can also experiment with chili pepper spray or even a mixture of dish soap and water. The key is to observe your plants closely, identify any problems early on, and adapt your approach accordingly. Remember, every garden is unique, and what works for one gardener may not work for another.
Ultimately, the goal is to create a sustainable and enjoyable gardening experience. These DIY tricks are not just about growing bigger cabbages; they’re about connecting with nature, learning new skills, and enjoying the satisfaction of harvesting your own homegrown food.
We wholeheartedly encourage you to try these **cabbage growing secrets** in your own garden. We are confident that you’ll be amazed by the results. And most importantly, we want to hear about your experiences! Share your successes, your challenges, and any variations you’ve tried in the comments section below. Let’s build a community of cabbage enthusiasts who are passionate about growing healthy, delicious food using natural and sustainable methods. Your insights could help other gardeners overcome their challenges and achieve their own cabbage-growing dreams. So, get out there, get your hands dirty, and start growing the best cabbages you’ve ever tasted!
Frequently Asked Questions (FAQ)
What exactly makes these DIY tricks better than using commercial products?
DIY tricks for cabbage growing offer several advantages over commercial products. Firstly, they are often more cost-effective. Many of the ingredients you need, like kitchen scraps for compost or herbs for companion planting, are readily available at little to no cost. Secondly, they are environmentally friendly. By avoiding synthetic pesticides and fertilizers, you’re reducing your impact on the environment and promoting a healthier ecosystem in your garden. Thirdly, they are often safer for you and your family. You can be confident that you’re not exposing yourself to harmful chemicals when you’re harvesting and consuming your cabbages. Finally, DIY methods allow you to tailor your approach to your specific garden conditions and preferences, leading to better results in the long run.
How do I know if my soil is suitable for growing cabbages?
Cabbages thrive in well-drained, fertile soil with a pH between 6.0 and 7.0. The best way to determine if your soil is suitable is to conduct a soil test. You can purchase a soil testing kit at most garden centers or send a sample to a local agricultural extension office for professional analysis. The test will tell you the pH level of your soil, as well as the levels of essential nutrients like nitrogen, phosphorus, and potassium. If your soil is too acidic, you can amend it with lime to raise the pH. If it’s lacking in nutrients, you can add compost, manure, or other organic fertilizers. Good drainage is also crucial, so if your soil is heavy clay, consider adding organic matter like compost or peat moss to improve its structure.
What are the best companion plants for cabbages, and why?
Several plants make excellent companions for cabbages. Dill and rosemary are known to repel cabbage moths, which lay the eggs that hatch into cabbage worms. Marigolds and nasturtiums also deter many common cabbage pests. Planting clover or other legumes nearby can help fix nitrogen in the soil, providing a natural source of fertilizer for your cabbages. Onions and garlic can also help deter pests and improve the overall health of your cabbage plants. The key is to choose plants that offer complementary benefits, such as pest control, nutrient enhancement, or improved soil structure.
How do I deal with cabbage worms naturally?
Cabbage worms can be a major nuisance, but there are several natural ways to control them. Handpicking the worms off your plants is a simple and effective method, especially for small infestations. You can also use Bacillus thuringiensis (Bt), a naturally occurring bacterium that is toxic to cabbage worms but harmless to humans, pets, and beneficial insects. Bt is available in powder or liquid form and can be sprayed directly onto your cabbage plants. Another option is to use diatomaceous earth, a natural powder made from fossilized algae. Diatomaceous earth is abrasive to insects and will kill cabbage worms on contact.
My cabbages are bolting (going to seed). What can I do to prevent this?
Bolting is when a plant prematurely flowers and goes to seed, often due to stress. For cabbages, this is often caused by temperature fluctuations, especially sudden heat waves. To prevent bolting, choose cabbage varieties that are suited to your climate and plant them at the right time of year. Provide consistent watering and avoid letting the soil dry out completely. Mulching around your cabbage plants can help regulate soil temperature and retain moisture. If a heat wave is predicted, consider providing shade for your cabbages with shade cloth or by planting them in a partially shaded area.
How often should I water my cabbages?
Cabbages need consistent moisture to thrive, especially during hot, dry weather. Water deeply and regularly, aiming for about 1-1.5 inches of water per week. Check the soil moisture regularly and water when the top inch feels dry to the touch. Avoid overwatering, as this can lead to root rot. Mulching around your cabbage plants can help retain moisture and reduce the need for frequent watering.
When is the best time to harvest my cabbages?
Cabbages are typically ready to harvest when the heads are firm and feel solid to the touch. The exact time will depend on the variety and growing conditions, but most cabbages are ready to harvest 60-100 days after planting. To harvest, simply cut the head off the plant at the base with a sharp knife. You can leave the roots in the ground, as they may produce smaller side shoots that you can harvest later.
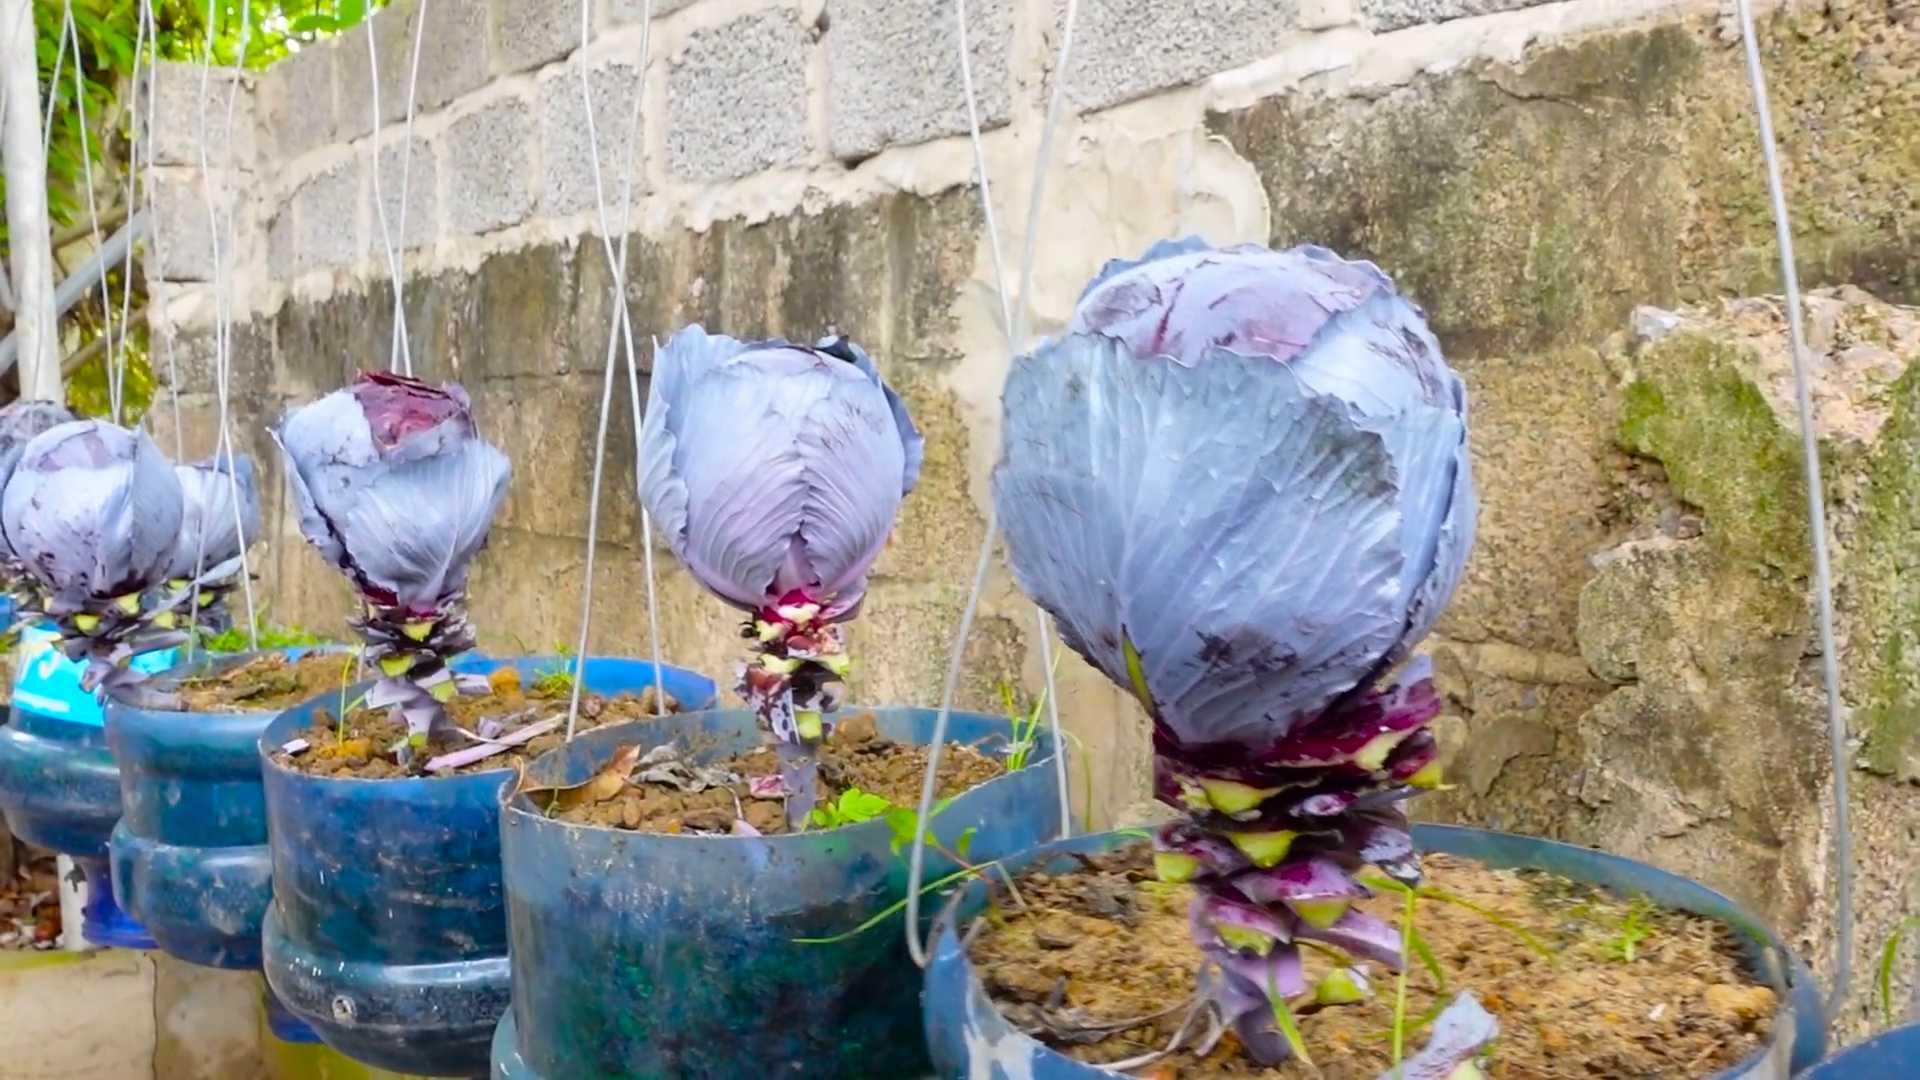
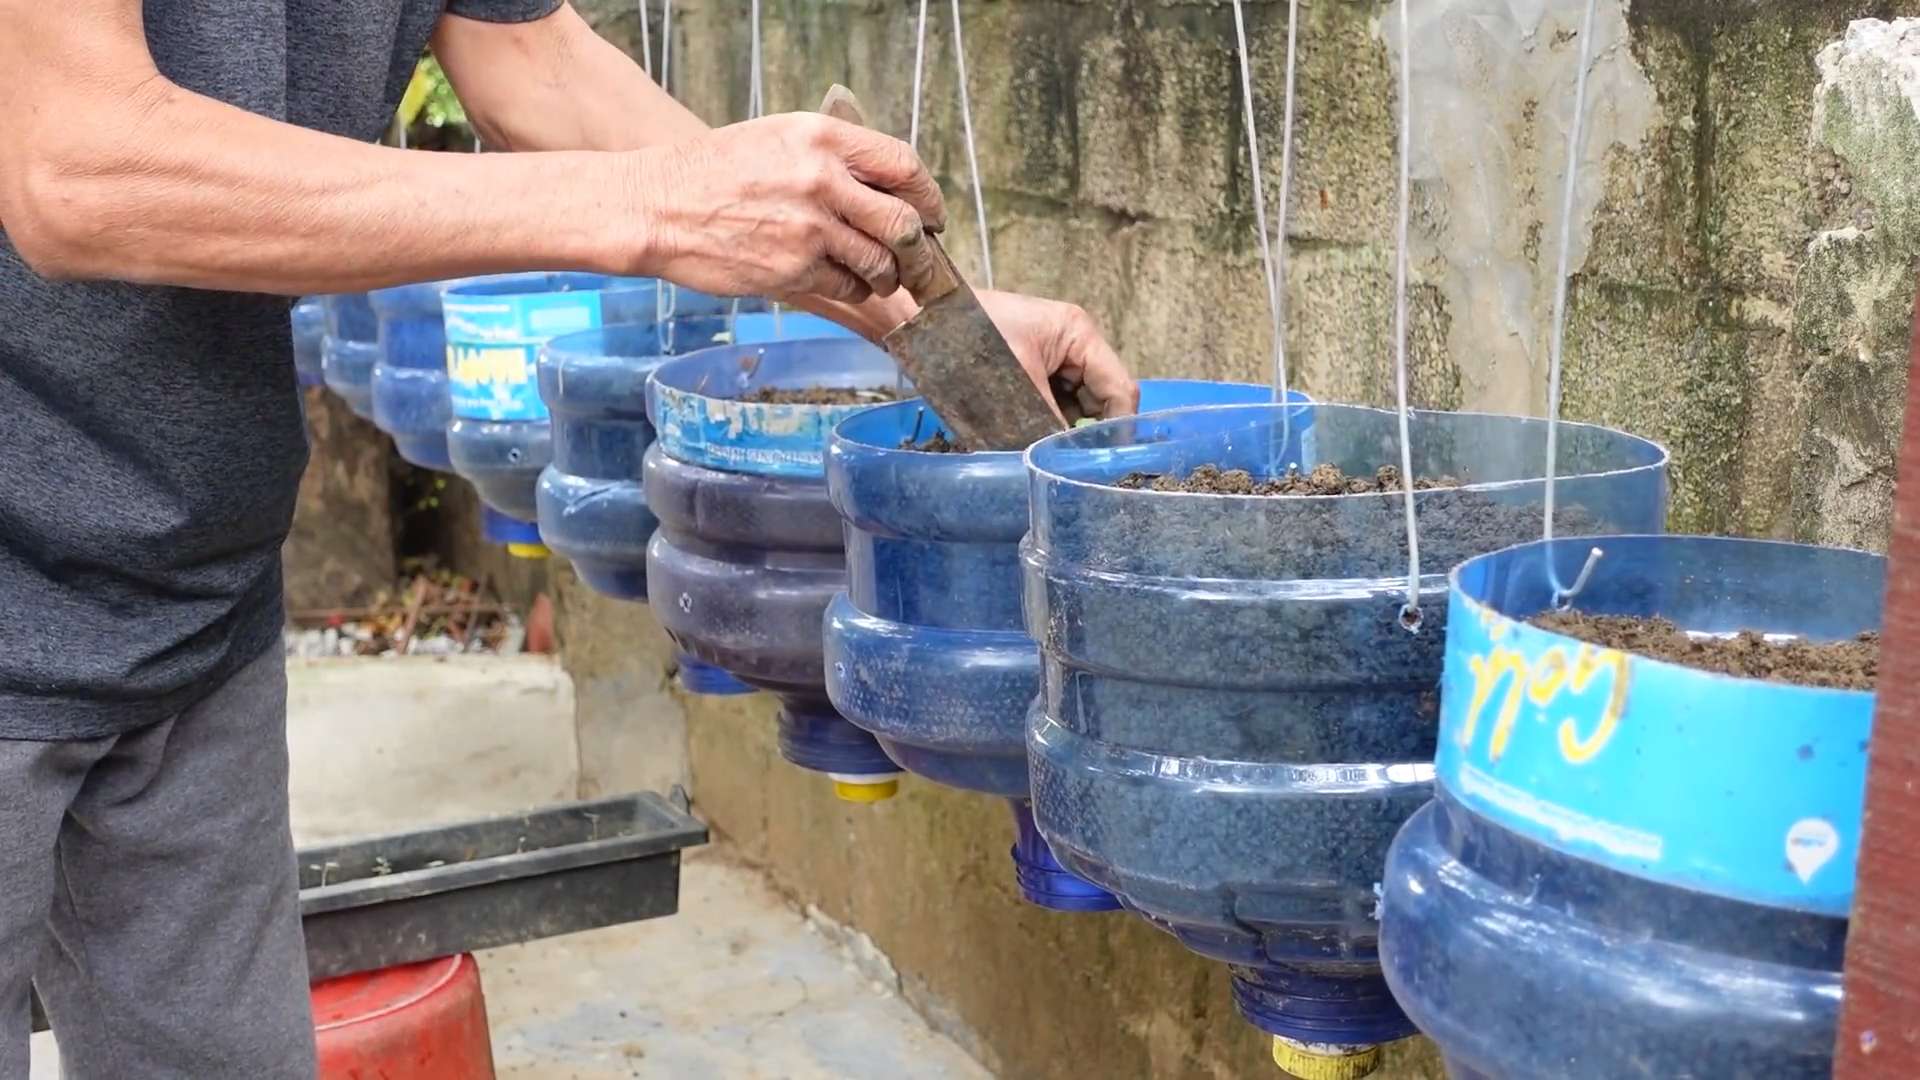
Can I grow cabbages in containers?
Yes, you can successfully grow cabbages in containers, but you’ll need to choose a large container (at least 12 inches in diameter) and use a high-quality potting mix. Container-grown cabbages will need more frequent watering and fertilization than those grown in the ground. Choose a sunny location for your container cabbages and monitor them closely for pests and diseases. Dwarf or compact cabbage varieties are particularly well-suited for container growing.
What are some common diseases that affect cabbages, and how can I prevent them?
Common cabbage diseases include clubroot, black rot, and downy mildew. Clubroot is a soilborne disease that causes swollen, distorted roots. Black rot is a bacterial disease that causes yellowing and blackening of the leaves. Downy mildew is a fungal disease that causes white or gray patches on the leaves. To prevent these diseases, choose disease-resistant cabbage varieties, practice crop rotation, and avoid overwatering. Ensure good air circulation around your plants and remove any infected leaves promptly. You can also use copper-based fungicides to control fungal diseases.
How can I store my harvested cabbages?
Harvested cabbages can be stored in a cool, humid place for several weeks. The ideal storage temperature is between 32°F and 40°F with high humidity. You can store cabbages in a root cellar, a refrigerator, or even a plastic bag in a cool garage. Remove any damaged or yellowing outer leaves before storing. Check your cabbages regularly and discard any that show signs of spoilage.
Leave a Comment