

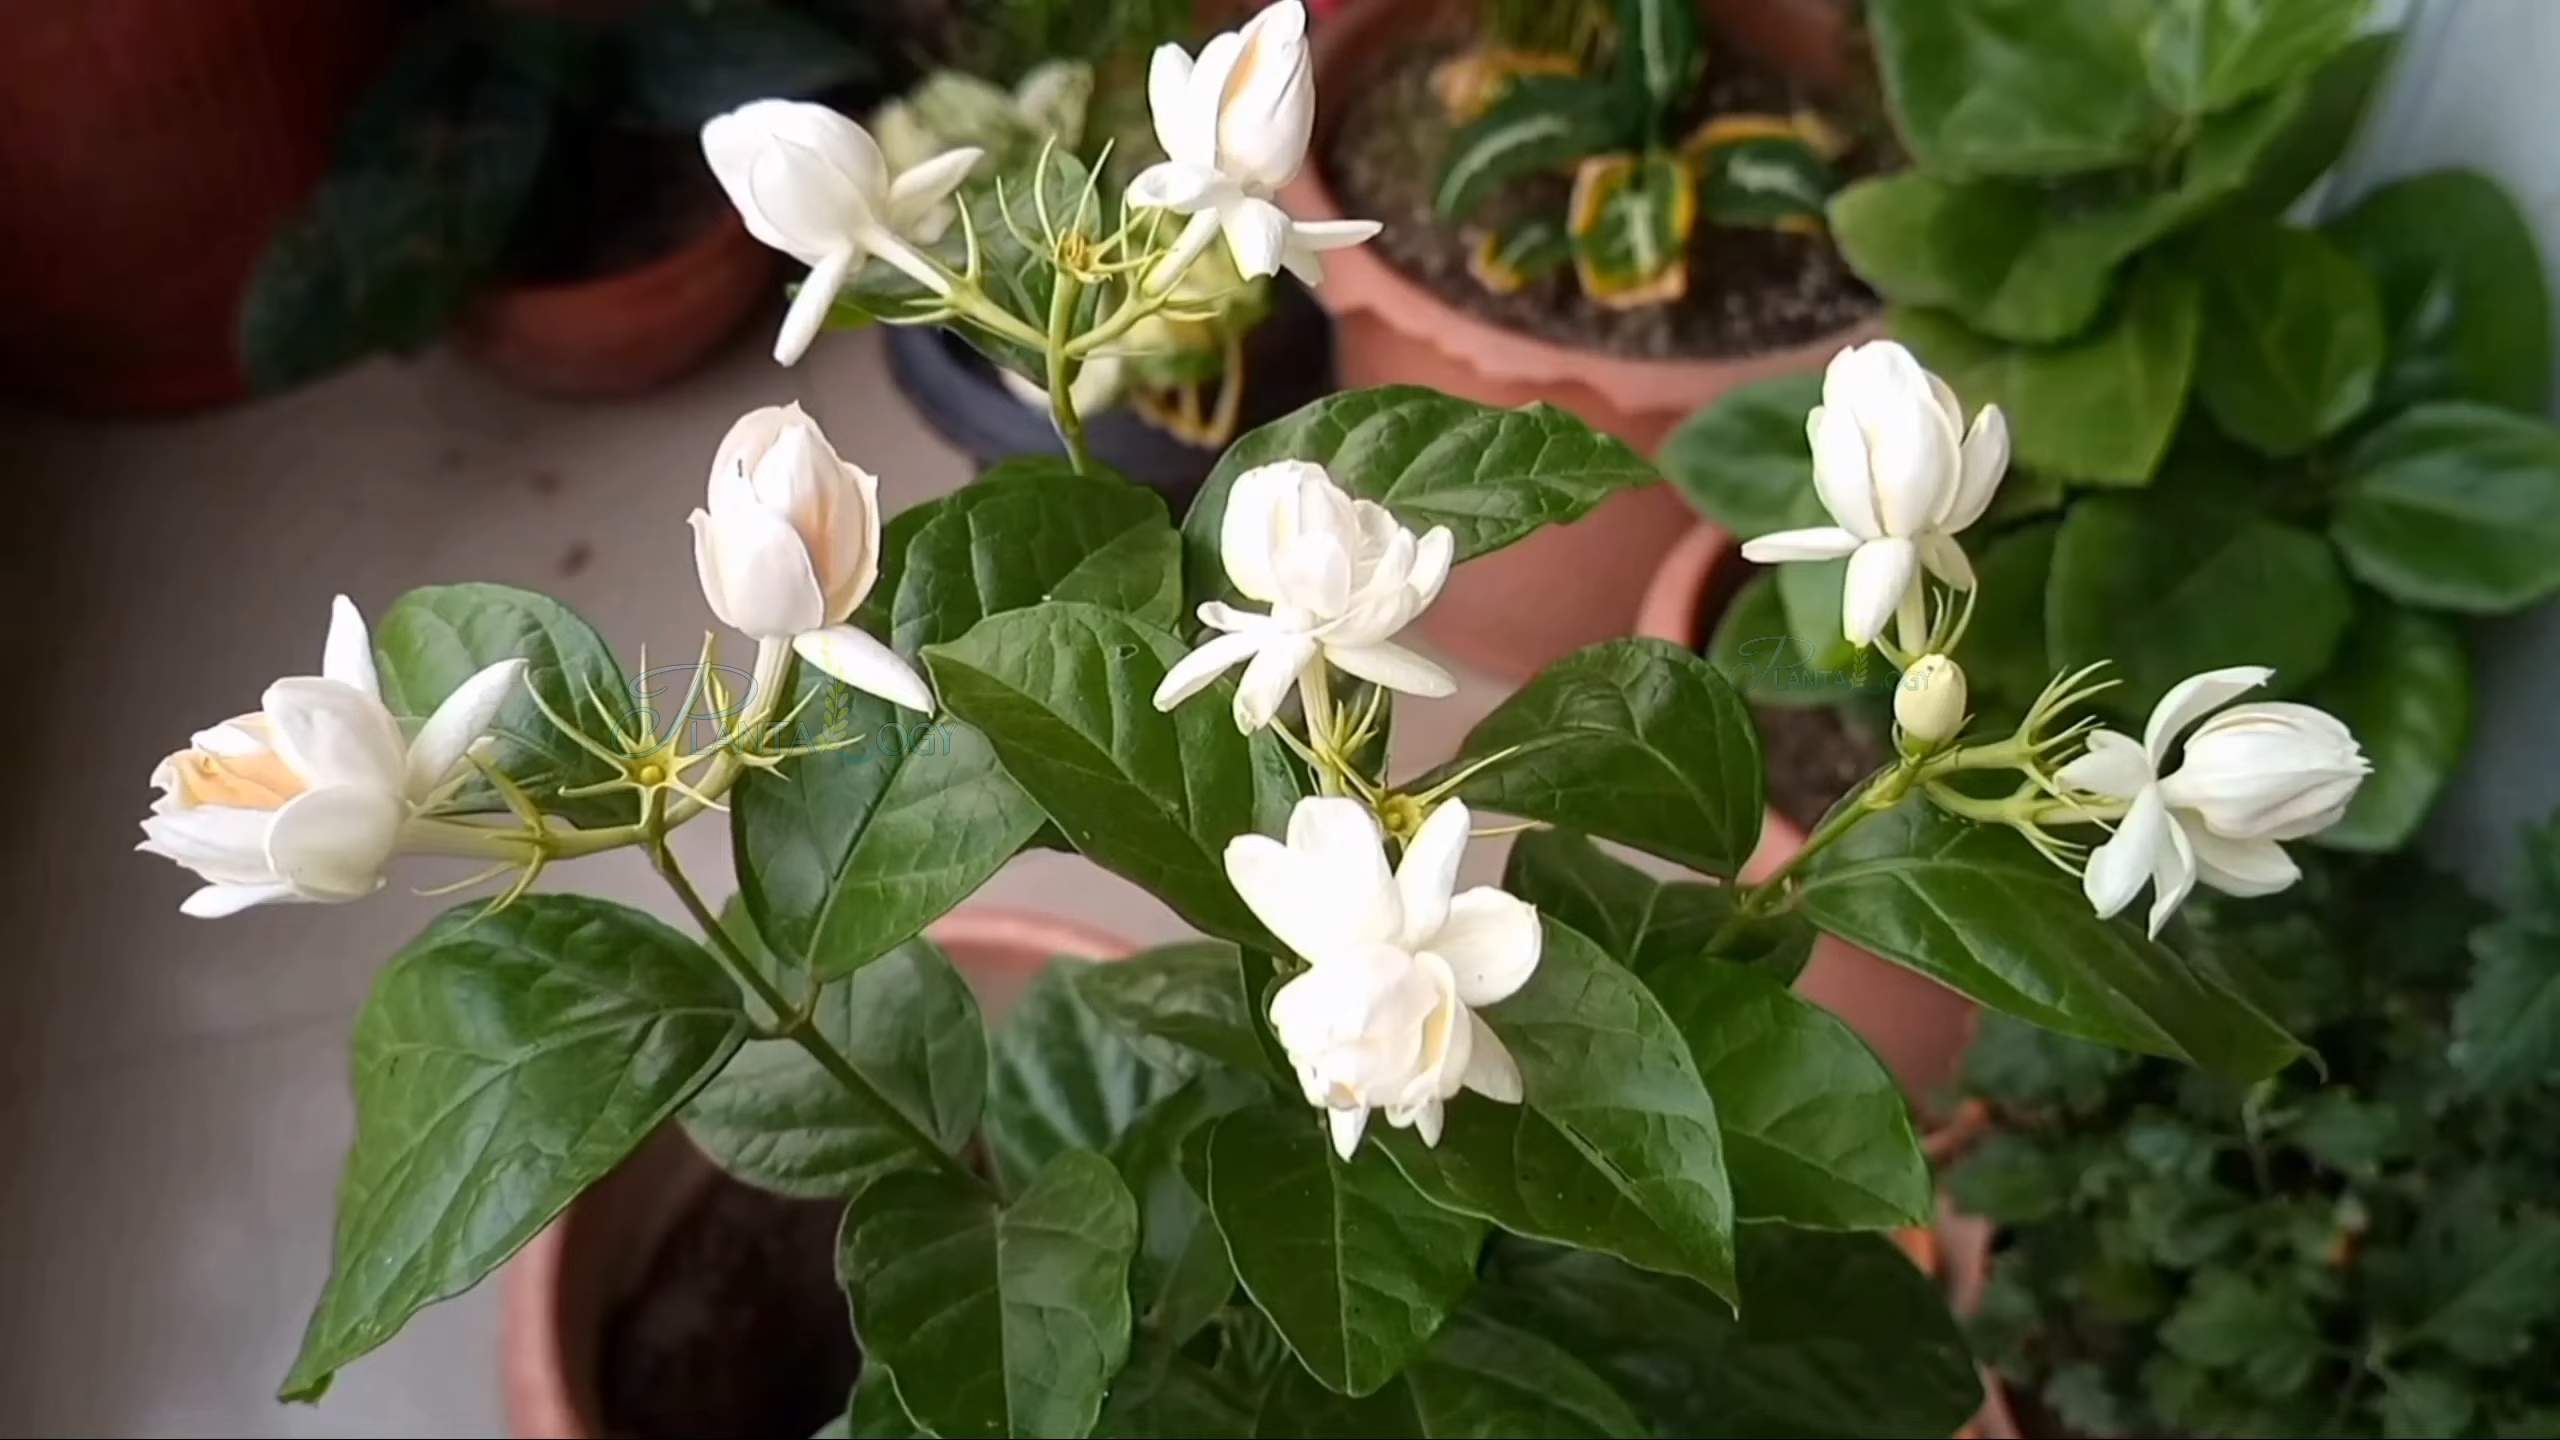
Arabian Jasmine Propagation and Care: Ever dreamt of filling your home with the intoxicating fragrance of Arabian Jasmine, but thought it was too difficult? I’m here to tell you it’s easier than you think! For centuries, Arabian Jasmine, also known as Sambac jasmine, has been cherished in various cultures, particularly in South and Southeast Asia, not just for its captivating scent but also for its use in teas, perfumes, and religious ceremonies. Its delicate white blossoms symbolize love, purity, and respect, making it a truly special plant to cultivate.
But why should you learn about Arabian Jasmine Propagation and Care? Well, imagine waking up every morning to the sweet, heady aroma of jasmine filling your home. Or picture gifting a friend a thriving jasmine plant, propagated with your own two hands! Beyond the sheer joy of nurturing a beautiful plant, propagating your own jasmine is a cost-effective way to expand your collection and share the beauty with others. Plus, mastering the art of jasmine care ensures your plant thrives, rewarding you with abundant blooms and a long, healthy life. In this article, I’ll share my favorite DIY tricks and hacks to make Arabian Jasmine propagation and care a breeze, even if you don’t have a green thumb!
Propagating Arabian Jasmine: A DIY Guide to Multiplying Your Fragrant Friends
Okay, so you’re smitten with your Arabian Jasmine (Jasminum sambac), and who wouldn’t be? That intoxicating fragrance is just heavenly! I totally get wanting more of these beauties around. The good news is, propagating Arabian Jasmine is totally doable at home, and I’m going to walk you through it step-by-step. We’ll cover everything from taking cuttings to nurturing those baby plants into thriving jasmine bushes. Let’s get started!
Choosing Your Propagation Method
There are a few ways to propagate Arabian Jasmine, but we’re going to focus on stem cuttings, as it’s the most reliable and easiest method for home gardeners.
* Stem Cuttings: This involves taking a cutting from a healthy stem and encouraging it to root. It’s the method we’ll be diving into today.
Gathering Your Supplies
Before we even think about snipping, let’s make sure we have everything we need. This will make the whole process smoother and increase our chances of success.
* Sharp, Clean Pruning Shears or Knife: Sterilize these with rubbing alcohol to prevent the spread of disease. Trust me, a clean cut is crucial!
* Rooting Hormone (Optional, but Recommended): This powder or gel helps stimulate root growth. I find it significantly improves the success rate.
* Small Pots or Containers: Choose pots with drainage holes. Size depends on the size of your cuttings, but something around 3-4 inches in diameter is usually perfect.
* Well-Draining Potting Mix: A mix specifically formulated for seedlings or cuttings is ideal. You can also make your own by combining equal parts perlite, vermiculite, and peat moss (or coco coir).
* Clear Plastic Bag or Humidity Dome: This will help create a humid environment, which is essential for rooting.
* Spray Bottle with Water: For misting the cuttings.
* Watering Can or Gentle Hose: For watering the newly potted cuttings.
* Labels: To keep track of when you planted your cuttings.
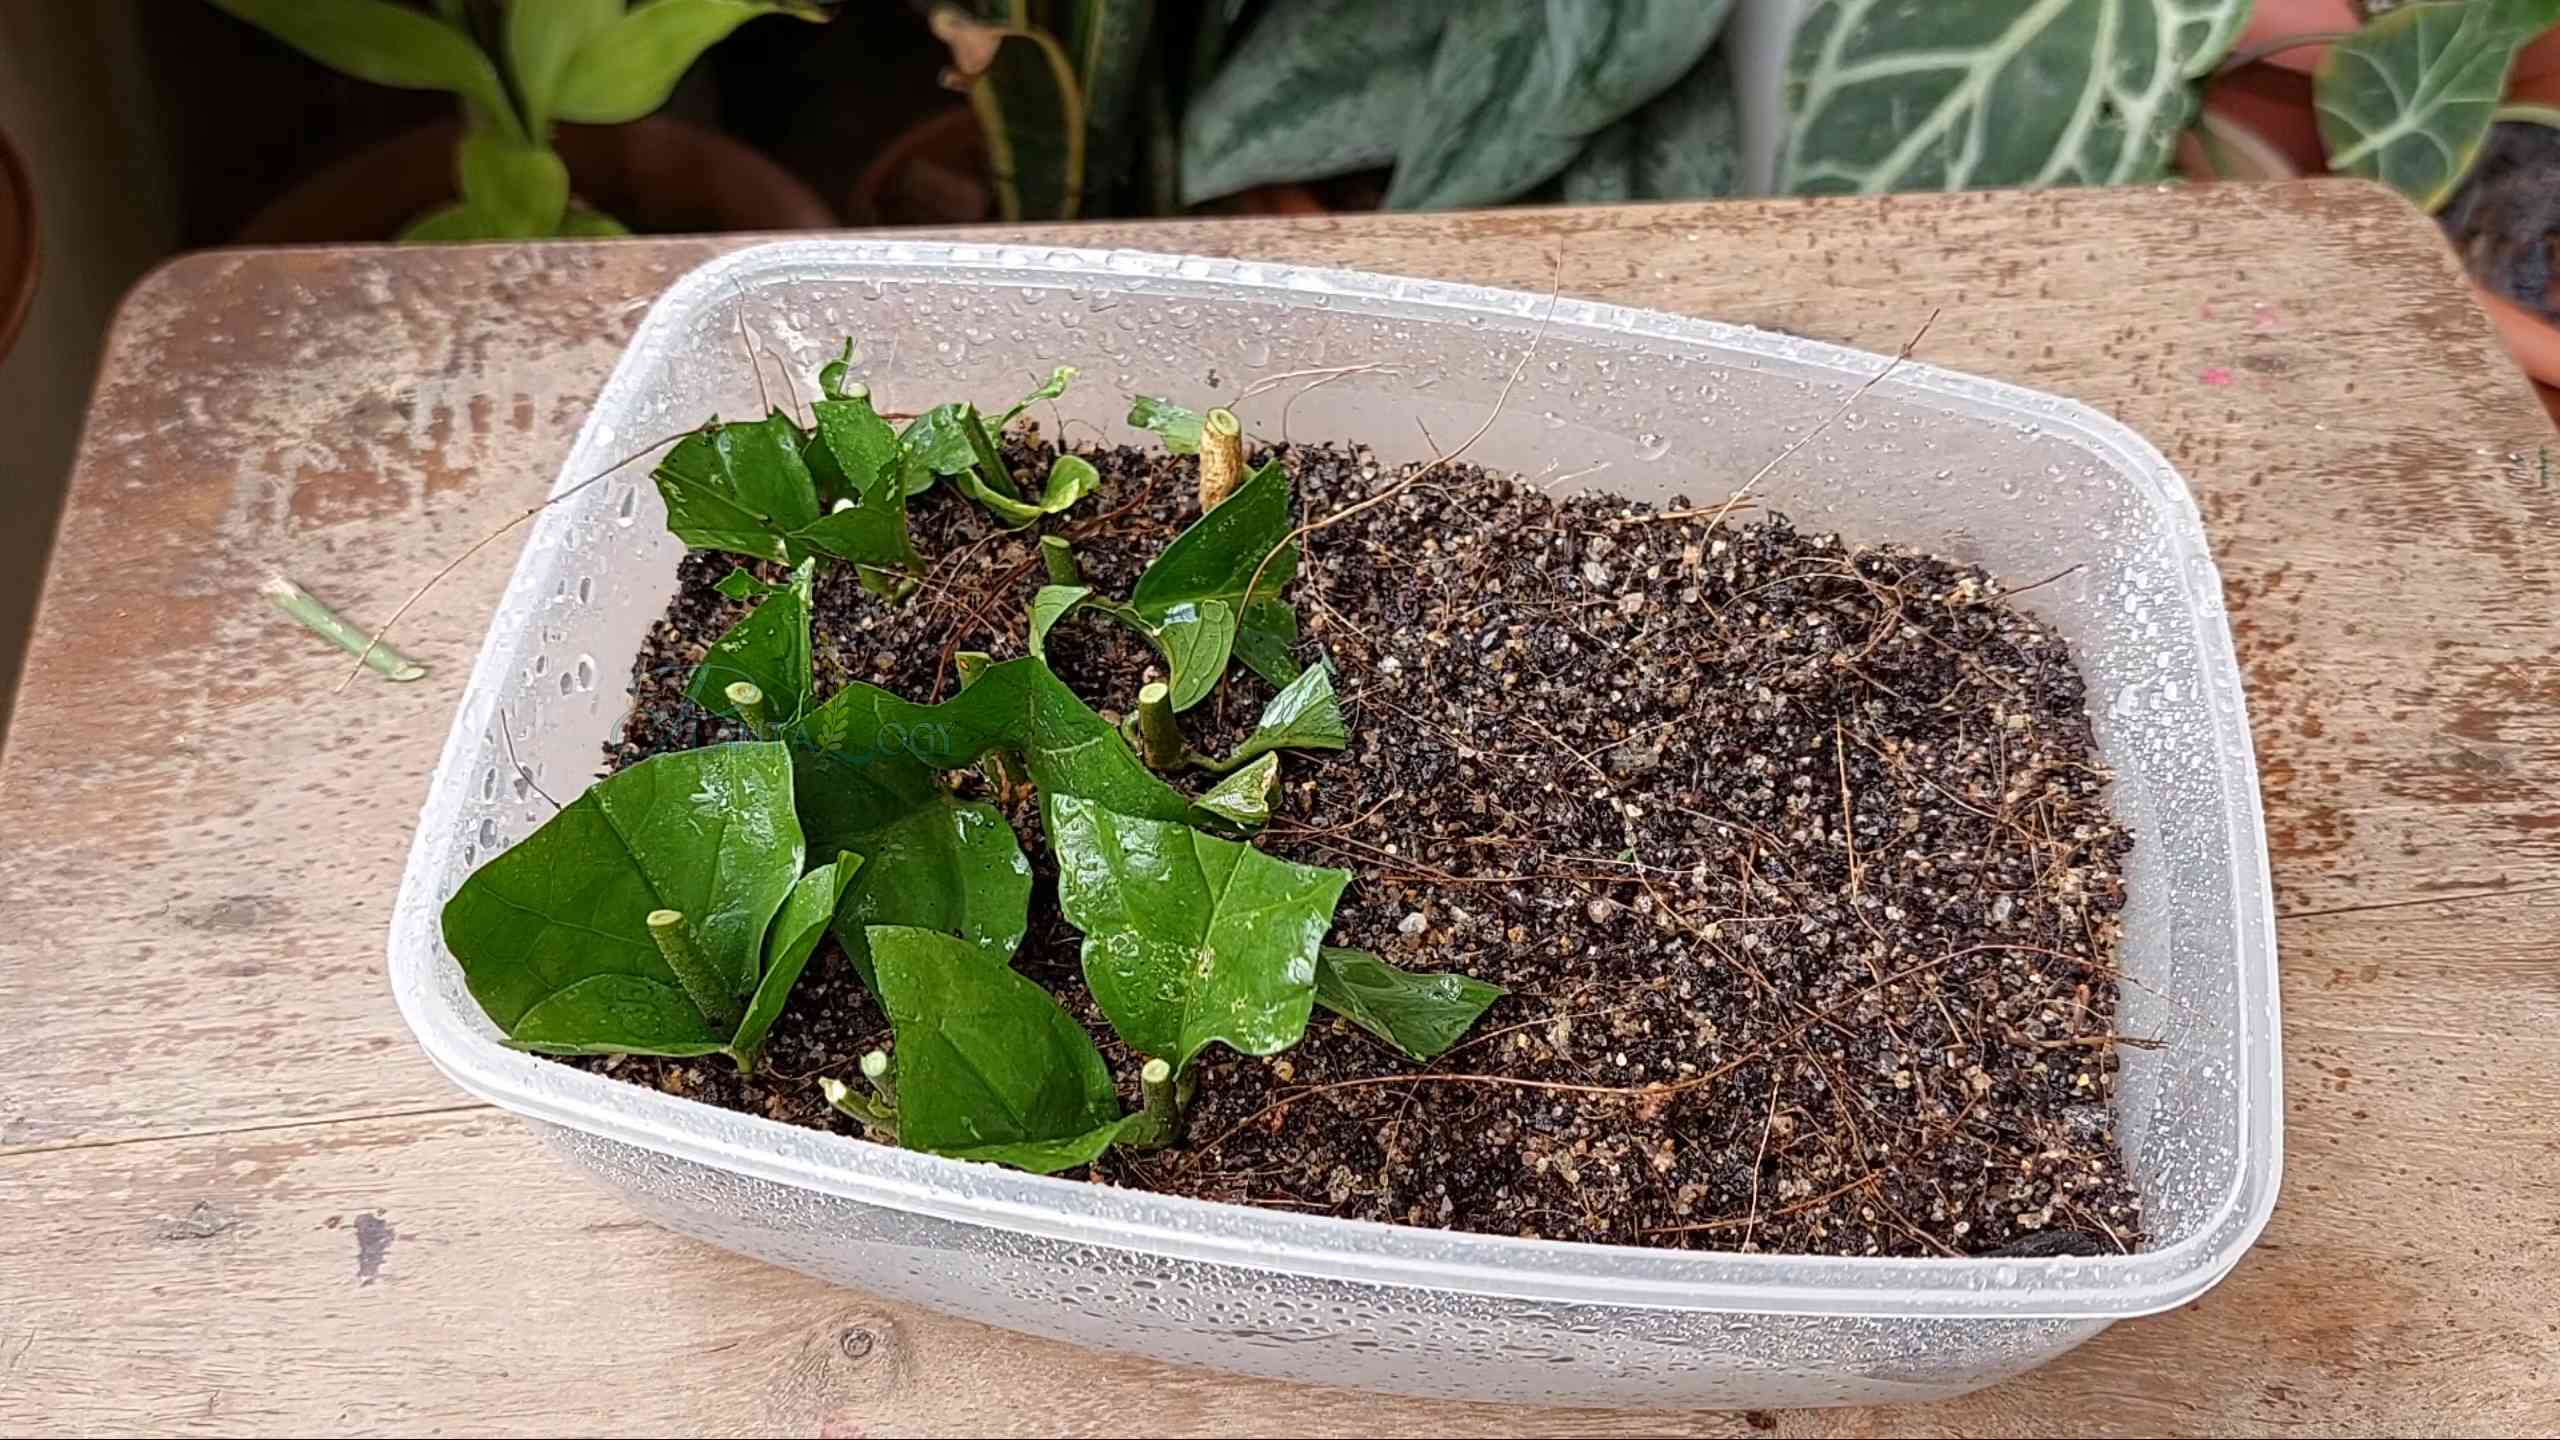
Taking the Cuttings
This is where the magic begins! Timing is important, so aim to take cuttings in spring or early summer when the plant is actively growing.
1. Select a Healthy Stem: Look for a stem that is about 4-6 inches long, with several leaves. It should be from the current year’s growth (meaning it’s green and flexible, not woody and brown). Avoid stems with flowers or buds, as the plant will focus its energy on flowering rather than rooting.
2. Make the Cut: Using your sterilized pruning shears or knife, make a clean cut just below a leaf node (the point where a leaf grows from the stem). A 45-degree angle cut is often recommended, but a straight cut works fine too.
3. Remove Lower Leaves: Remove the leaves from the bottom 1-2 inches of the cutting. This prevents them from rotting when they’re buried in the soil and encourages root growth in that area.
4. Optional: Wound the Stem: Gently scrape the bottom inch of the stem with your knife. This can encourage root formation.
5. Apply Rooting Hormone: If using rooting hormone, moisten the bottom of the cutting slightly and dip it into the powder or gel. Tap off any excess.
Planting the Cuttings
Now that we have our prepared cuttings, it’s time to get them planted!
1. Prepare the Potting Mix: Moisten the potting mix with water until it’s damp but not soggy.
2. Fill the Pots: Fill your pots with the moistened potting mix, leaving about an inch of space at the top.
3. Make a Hole: Use a pencil or your finger to create a hole in the center of the potting mix, deep enough to accommodate the bottom 1-2 inches of the cutting.
4. Insert the Cutting: Gently insert the cutting into the hole, making sure the bottom leaves are above the soil line.
5. Gently Firm the Soil: Gently press the soil around the cutting to secure it in place.
6. Water the Cutting: Water the cutting gently to settle the soil.
7. Create a Humid Environment: Place the pot inside a clear plastic bag or under a humidity dome. This will help retain moisture and create a humid environment that encourages rooting. If using a plastic bag, make sure it doesn’t touch the leaves of the cutting. You can use skewers or chopsticks to prop it up.
Caring for Your Cuttings
This is where patience comes in! Rooting can take several weeks, so don’t get discouraged if you don’t see results immediately.
1. Provide Bright, Indirect Light: Place the cuttings in a location that receives bright, indirect light. Avoid direct sunlight, as this can scorch the leaves. An east-facing window is often ideal.
2. Maintain Humidity: Keep the humidity high by keeping the cuttings covered with the plastic bag or humidity dome. Open the bag or dome for a few minutes every day to allow for air circulation and prevent mold growth.
3. Water Regularly: Check the potting mix regularly and water when the top inch feels dry. Be careful not to overwater, as this can lead to root rot. Misting the cuttings with water can also help maintain humidity.
4. Be Patient: Rooting can take anywhere from 4-8 weeks, or even longer depending on the conditions. You’ll know the cuttings have rooted when you see new growth emerging from the top of the plant. You can also gently tug on the cutting; if it resists, it has likely rooted.
Transplanting Your Rooted Cuttings
Once your cuttings have rooted, it’s time to transplant them into larger pots.
1. Choose a Larger Pot: Select a pot that is a few inches larger in diameter than the current pot.
2. Prepare the Potting Mix: Use a well-draining potting mix similar to what you used for the cuttings.
3. Gently Remove the Cutting: Carefully remove the rooted cutting from its current pot. Be gentle to avoid damaging the roots.
4. Plant the Cutting: Place the cutting in the center of the new pot and fill in around it with potting mix.
5. Water Thoroughly: Water the newly transplanted cutting thoroughly to settle the soil.
6. Provide Proper Care: Place the newly transplanted cutting in a location that receives bright, indirect light and water regularly.
General Care for Your Arabian Jasmine
Now that you have your own Arabian Jasmine plants, here’s a quick rundown on how to keep them happy and thriving:
* Light: Arabian Jasmine loves bright, indirect light. A few hours of direct morning sun is okay, but avoid harsh afternoon sun.
* Water: Water regularly, allowing the top inch of soil to dry out between waterings. Avoid overwatering, as this can lead to root rot.
* Humidity: Arabian Jasmine prefers high humidity. You can increase humidity by misting the plant regularly, placing it on a pebble tray filled with water, or using a humidifier.
* Temperature: Arabian Jasmine prefers temperatures between 60-75°F (15-24°C).
* Fertilizer: Feed your Arabian Jasmine with a balanced fertilizer every 2-4 weeks during the growing season (spring and summer).
* Pruning: Prune your Arabian Jasmine after flowering to encourage bushier growth. You can also prune to remove any dead or damaged stems.
* Pests and Diseases: Keep an eye out for common pests like aphids, spider mites, and mealybugs. Treat any infestations promptly with insecticidal soap or neem oil. Arabian Jasmine is also susceptible to root rot if overwatered.
Troubleshooting
Sometimes, things don’t go exactly as planned. Here are a few common issues you might encounter and how to address them:
* Cuttings Not Rooting: This could be due to several factors, including low humidity, insufficient light, or poor-quality cuttings. Make sure you’re providing the cuttings with the right conditions and that you’re using healthy, vigorous stems. Try using rooting hormone to improve your chances of success.
* Cuttings Rotting: This is usually caused by overwatering or poor drainage. Make sure the potting mix is well-draining and that you’re not watering too frequently. Remove any rotting leaves or stems immediately.
* Leaves Turning Yellow: This could be a sign of overwatering, underwatering, or nutrient deficiency. Check the soil moisture and adjust your watering accordingly. If the leaves are yellowing all over, try fertilizing the plant with a balanced fertilizer.
* Pests: Regularly inspect your plants for pests and treat any infestations promptly.
Enjoy Your New Jasmine Plants!
And there you have it! You’ve successfully
Conclusion
So, there you have it! Propagating Arabian Jasmine doesn’t have to be an intimidating endeavor. By following these simple steps, you can unlock the secrets to multiplying your fragrant jasmine collection and enjoy the intoxicating aroma of these beautiful blooms throughout your home or garden. This DIY propagation method is a must-try for any plant enthusiast, offering a cost-effective and deeply rewarding way to expand your green space.
Why is this method so compelling? Firstly, it allows you to create new plants from existing ones, saving you money compared to purchasing new jasmine plants from a nursery. Secondly, it’s a fantastic way to share the beauty and fragrance of Arabian Jasmine with friends and family. Imagine gifting a rooted cutting to a loved one, knowing you nurtured it from a small piece of your own plant! Finally, and perhaps most importantly, propagating Arabian Jasmine is incredibly satisfying. Witnessing a tiny cutting develop roots and grow into a thriving plant is a testament to your green thumb and a source of immense pride.
Don’t be afraid to experiment with variations on this method. For example, you could try using different rooting hormones to see which yields the best results for you. Some gardeners swear by honey as a natural rooting agent, while others prefer commercial hormone powders or gels. You can also experiment with different types of potting mix. While a well-draining mix is crucial, you might find that adding a bit of perlite or vermiculite improves drainage and aeration even further. Another variation is to try propagating in water. Simply place the cuttings in a glass of water, ensuring that the leaves are above the waterline, and wait for roots to develop. Once the roots are an inch or two long, you can transplant the cuttings into potting mix.
The key to successful Arabian Jasmine propagation is patience and attention to detail. Don’t get discouraged if your first attempt isn’t perfect. Like any skill, propagation takes practice. Keep experimenting, keep learning, and keep enjoying the process.
We strongly encourage you to try this DIY trick for propagating your Arabian Jasmine. It’s a simple, effective, and rewarding way to expand your plant collection and share the beauty of these fragrant flowers with others. Once you’ve successfully propagated your Arabian Jasmine, we’d love to hear about your experience! Share your tips, tricks, and photos in the comments below. Let’s create a community of Arabian Jasmine enthusiasts and help each other grow! We are confident that with a little effort, you’ll be enjoying the sweet scent of your own propagated Arabian Jasmine plants in no time. Happy growing!
Frequently Asked Questions (FAQ)
What is the best time of year to propagate Arabian Jasmine?
The best time to propagate Arabian Jasmine is during the spring or early summer. This is when the plant is actively growing, and cuttings are more likely to root successfully. The warmer temperatures and longer daylight hours provide ideal conditions for root development. However, with proper care and attention, you can attempt propagation at other times of the year, although success rates may be lower. If propagating during the fall or winter, provide supplemental light and warmth to encourage rooting.
What type of cuttings should I take for propagation?
The best cuttings for propagation are semi-hardwood cuttings, which are stems that are neither too soft and green nor too hard and woody. These cuttings should be about 4-6 inches long and have several leaves. Remove the lower leaves to prevent them from rotting in the rooting medium. Choose healthy, disease-free stems from a vigorous plant. Avoid taking cuttings from stems that are flowering or have recently flowered, as these may be less likely to root.
What kind of rooting medium should I use?
A well-draining rooting medium is essential for successful Arabian Jasmine propagation. A mixture of perlite and peat moss is a popular choice, as it provides good aeration and moisture retention. You can also use a commercial rooting mix specifically designed for cuttings. Avoid using garden soil, as it can be too heavy and may contain pathogens that can harm the cuttings. Ensure the rooting medium is moist but not waterlogged.
How long does it take for Arabian Jasmine cuttings to root?
It typically takes 4-8 weeks for Arabian Jasmine cuttings to root, depending on the environmental conditions and the health of the cuttings. Keep the cuttings in a warm, humid environment and check them regularly for root development. You can gently tug on the cuttings to see if they have rooted. If you feel resistance, it means that roots have formed. Once the cuttings have developed a good root system, you can transplant them into individual pots.
How do I care for the cuttings while they are rooting?
While the cuttings are rooting, it’s important to keep the rooting medium consistently moist but not waterlogged. You can mist the cuttings regularly to increase humidity. Place the cuttings in a warm, bright location, but avoid direct sunlight, which can scorch the leaves. You can also use a humidity dome or plastic bag to create a humid environment. Be sure to vent the dome or bag regularly to prevent fungal growth.
What if my Arabian Jasmine cuttings don’t root?
Not all cuttings will root successfully, so don’t be discouraged if some of them fail. There are several reasons why cuttings may not root, including poor cutting selection, improper rooting medium, insufficient humidity, or fungal diseases. If your cuttings are not rooting, try adjusting the environmental conditions or using a different rooting medium. You can also try using a rooting hormone to encourage root development.
Can I propagate Arabian Jasmine from seeds?
While it is possible to propagate Arabian Jasmine from seeds, it is a much slower and less reliable method than propagation from cuttings. Seeds can be difficult to germinate, and the resulting plants may not be true to type. Propagation from cuttings is the preferred method for most gardeners.
How do I know when to transplant the rooted cuttings?
You can transplant the rooted cuttings into individual pots once they have developed a good root system, typically after 4-8 weeks. The roots should be at least an inch or two long. Use a well-draining potting mix and choose pots that are slightly larger than the root ball. Water the newly transplanted cuttings thoroughly and place them in a bright, indirect light location.
What kind of care do newly transplanted Arabian Jasmine plants need?
Newly transplanted Arabian Jasmine plants need consistent moisture and bright, indirect light. Water them regularly, allowing the soil to dry slightly between waterings. Fertilize them with a balanced fertilizer every few weeks during the growing season. Protect them from extreme temperatures and drafts. As the plants grow, you can gradually acclimate them to more direct sunlight.
My Arabian Jasmine isn’t flowering. What can I do?
Several factors can contribute to a lack of flowering in Arabian Jasmine, including insufficient light, improper fertilization, and lack of pruning. Ensure your plant is receiving at least 4-6 hours of direct sunlight per day. Fertilize it regularly with a fertilizer that is high in phosphorus, which promotes flowering. Prune the plant after flowering to encourage new growth and more blooms. Also, ensure the plant is not stressed by extreme temperatures or lack of water.
Leave a Comment