

Grow Bitter Melon Easily and unlock a world of homegrown goodness! Have you ever dreamt of harvesting your own vibrant, knobbly bitter melons, bursting with flavor and packed with health benefits? I know I have! But the thought of cultivating this unique vegetable can sometimes feel a little daunting. That’s where this DIY guide comes in – your secret weapon to a thriving bitter melon patch, even if you’re a beginner gardener.
Bitter melon, also known as karela or bitter gourd, boasts a rich history, deeply rooted in Asian and African cultures. For centuries, it’s been celebrated not only for its distinctive taste but also for its medicinal properties. From traditional remedies to culinary delights, this remarkable fruit has earned its place as a staple in many households.
But let’s be honest, growing bitter melon can sometimes feel like a challenge. From germination woes to pest problems, there are a few hurdles to overcome. That’s why I’ve compiled a collection of tried-and-true DIY tricks and hacks that will simplify the process and maximize your yield. Imagine the satisfaction of serving up a delicious, homegrown bitter melon stir-fry, knowing you nurtured it from seed to table. This guide will empower you to grow bitter melon easily, save money, and enjoy the freshest, most flavorful produce right from your backyard. So, grab your gardening gloves, and let’s get started!
Growing Bitter Melon Like a Pro: A DIY Guide
Hey there, fellow gardening enthusiasts! I’m so excited to share my tried-and-true method for growing bitter melon, also known as bitter gourd or karela. It might sound intimidating, but trust me, with a little patience and these simple steps, you’ll be harvesting your own bitter melons in no time. I’ve broken down the process into easy-to-follow sections, so let’s get started!
Preparing for Success: Seeds and Soil
Before we even think about planting, we need to make sure we have the right foundation. This means selecting good seeds and preparing the soil.
* Choosing the Right Seeds: Look for seeds from a reputable source. I prefer to buy organic seeds whenever possible. You can also save seeds from a previous harvest, but make sure the melon was fully ripe. The seeds should be plump and dark brown. Avoid pale or shriveled seeds.
* Seed Germination (Optional but Recommended): To give your bitter melon a head start, I highly recommend germinating the seeds indoors. This increases your chances of success, especially if you live in a cooler climate.
* Preparing the Soil: Bitter melon thrives in well-drained, fertile soil. I like to amend my garden soil with plenty of compost and aged manure. This provides essential nutrients and improves drainage. If you’re growing in containers, use a high-quality potting mix.
Step-by-Step Planting Guide
Now for the fun part – getting those seeds into the ground!
1. Germinating Seeds (If you chose to germinate):
* Soak the seeds in warm water for 24 hours. This helps soften the seed coat and encourages germination.
* Wrap the soaked seeds in a damp paper towel and place them in a plastic bag or container.
* Keep the bag in a warm place (around 80-85°F or 27-29°C). I usually put mine on top of the refrigerator.
* Check the seeds daily and keep the paper towel moist.
* The seeds should sprout in 3-7 days.
2. Preparing the Planting Site:
* Choose a sunny location that receives at least 6-8 hours of direct sunlight per day. Bitter melon loves the sun!
* If you’re planting directly in the ground, loosen the soil to a depth of at least 12 inches.
* Incorporate compost and aged manure into the soil.
* If you’re using containers, make sure they are at least 12 inches in diameter and have drainage holes.
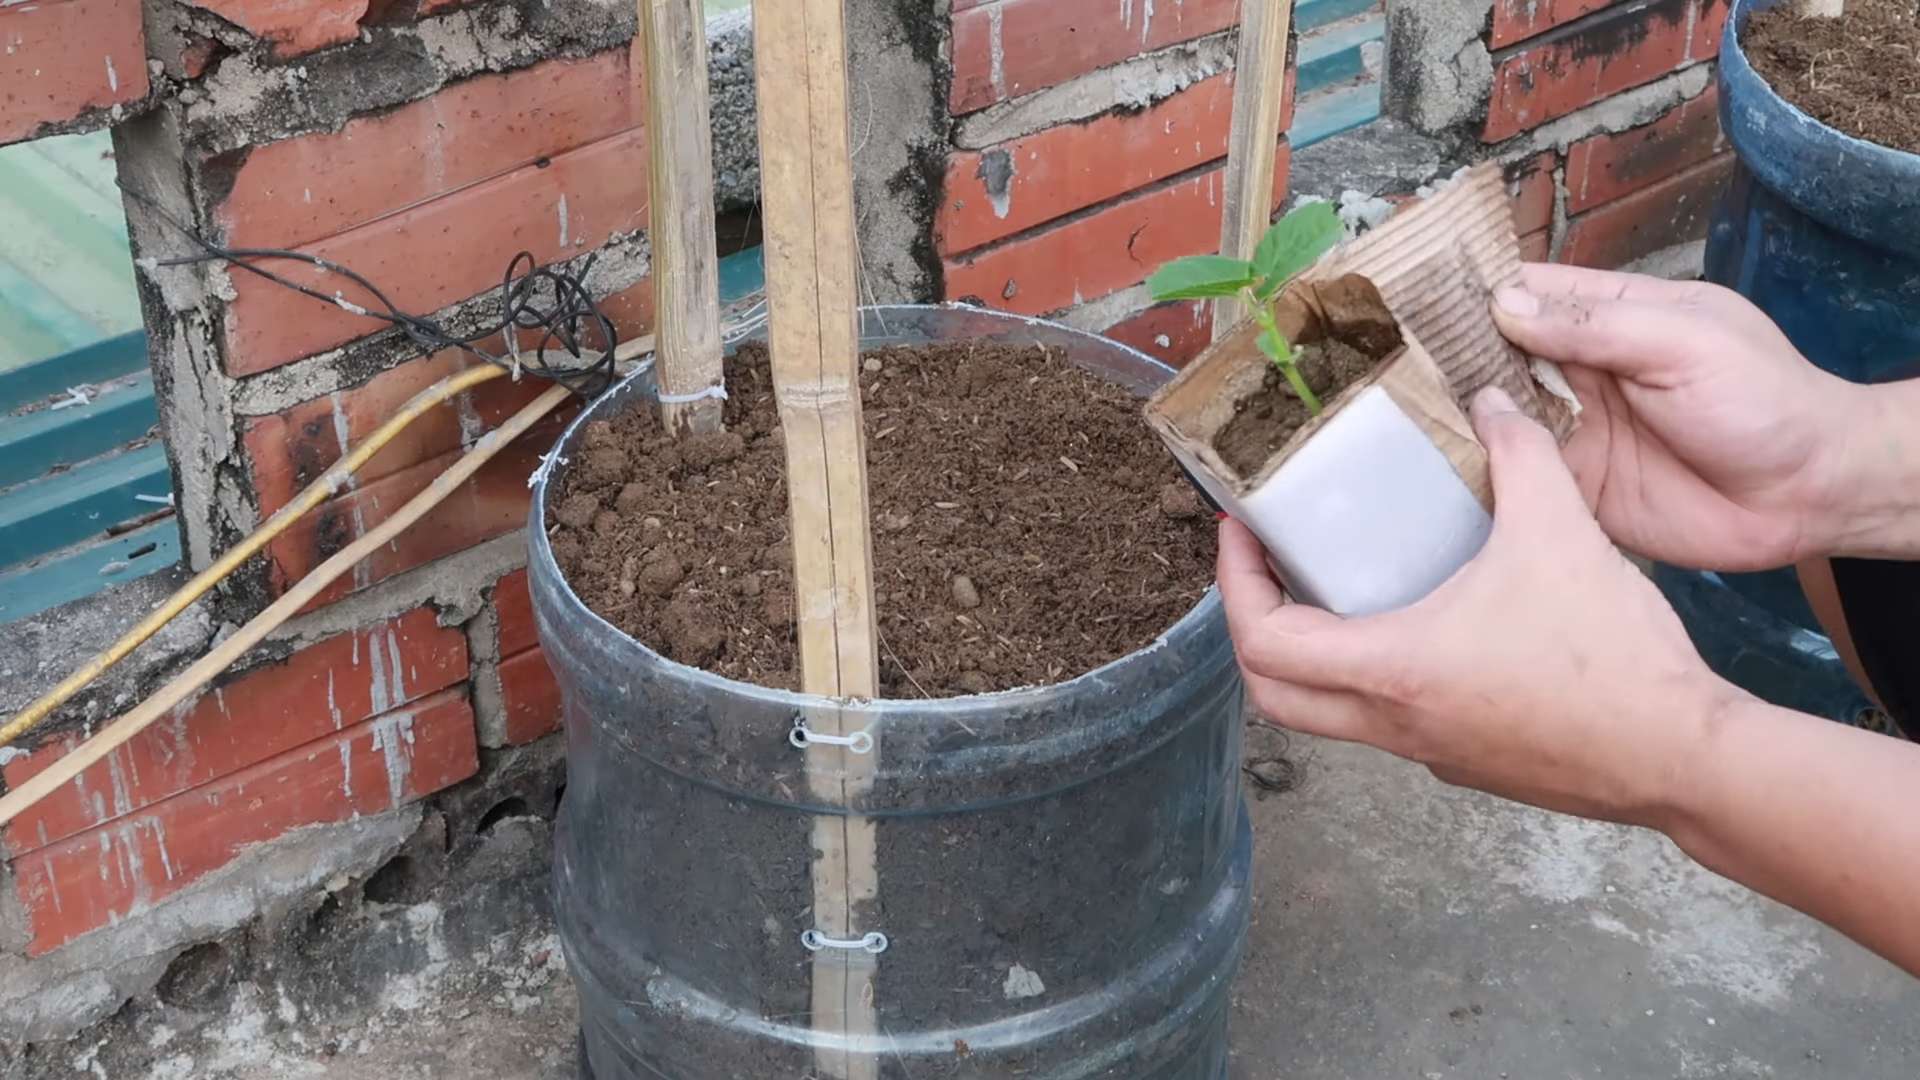
3. Planting the Seeds or Seedlings:
* If you germinated the seeds, gently transplant the seedlings into the prepared soil or containers. Plant them about 1 inch deep.
* If you’re planting seeds directly, sow them about 1 inch deep and 12-18 inches apart.
* Water the soil thoroughly after planting.
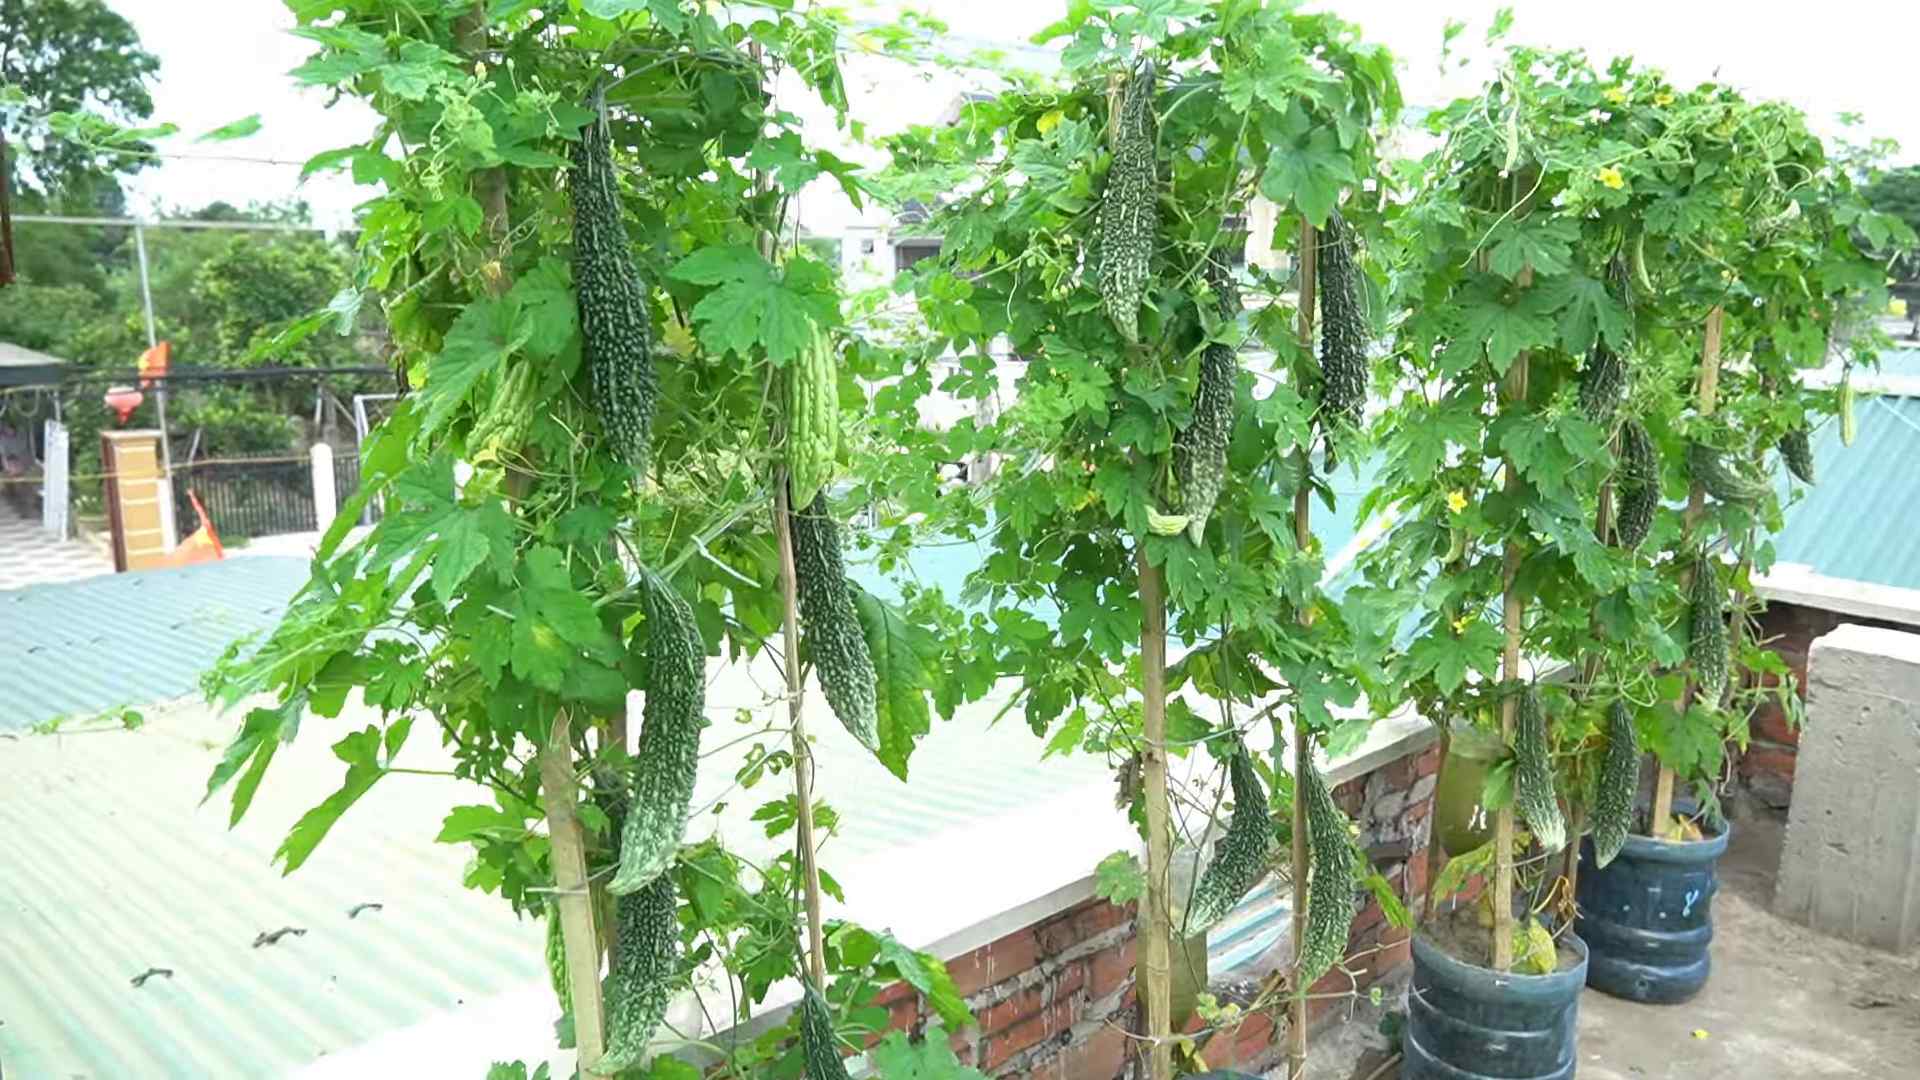
4. Providing Support:
* Bitter melon is a vine, so it needs a trellis or other support to climb on. I use a sturdy trellis made of wood or metal. You can also use a fence or even a strong tomato cage.
* Install the trellis near the planting site before the vines start to grow. This will prevent you from disturbing the roots later on.
* As the vines grow, gently train them to climb the trellis. You can use plant ties or twine to secure them.
Nurturing Your Bitter Melon Plants
Once your bitter melon plants are established, it’s important to provide them with the care they need to thrive.
* Watering: Water regularly, especially during hot, dry weather. Keep the soil consistently moist, but avoid overwatering, which can lead to root rot. I usually water deeply every few days, depending on the weather.
* Fertilizing: Feed your bitter melon plants every 2-3 weeks with a balanced fertilizer. I like to use a liquid fertilizer diluted to half strength. You can also use a slow-release granular fertilizer.
* Weeding: Keep the area around your plants free of weeds. Weeds compete with your bitter melon for nutrients and water. I like to hand-pull weeds or use a hoe. Mulching can also help suppress weeds.
* Pruning: Pruning can help improve air circulation and encourage fruit production. Remove any yellowing or dead leaves. You can also pinch back the tips of the vines to encourage branching.
* Pest and Disease Control: Keep an eye out for pests and diseases. Common pests include aphids, spider mites, and squash bugs. Common diseases include powdery mildew and downy mildew. I prefer to use organic pest control methods, such as insecticidal soap or neem oil. For diseases, I use a copper fungicide.
Dealing with Common Problems
Even with the best care, you might encounter some problems while growing bitter melon. Here are a few common issues and how to address them:
* Poor Germination: If your seeds aren’t germinating, make sure they are fresh and from a reputable source. Also, ensure the soil is warm enough. You can use a heat mat to warm the soil.
* Yellowing Leaves: Yellowing leaves can be a sign of overwatering, underwatering, or nutrient deficiency. Check the soil moisture and adjust your watering accordingly. Fertilize with a balanced fertilizer.
* Lack of Fruit: Lack of fruit can be caused by several factors, including poor pollination, lack of sunlight, or nutrient deficiency. Make sure your plants are getting enough sunlight and fertilizer. You can also hand-pollinate the flowers by transferring pollen from the male flowers to the female flowers with a small brush.
* Pest Infestations: If you notice pests on your plants, take action immediately. Spray with insecticidal soap or neem oil. You can also try hand-picking the pests off the plants.
* Disease Problems: If you notice signs of disease, such as powdery mildew or downy mildew, treat your plants with a fungicide. Make sure to follow the instructions on the fungicide label.
Harvesting Your Bitter Melon
The moment we’ve all been waiting for! Harvesting your own homegrown bitter melon is incredibly rewarding.
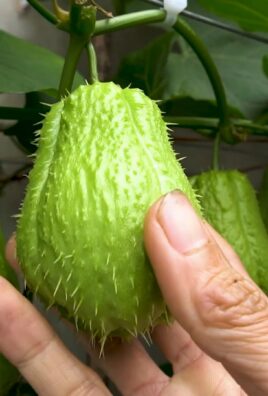
* When to Harvest: Bitter melon is typically ready to harvest about 2-3 months after planting. The fruits should be firm and green, but not too hard. They should also be about 6-8 inches long.
* How to Harvest: Use a sharp knife or pruning shears to cut the bitter melon from the vine. Leave a small stem attached to the fruit.
* Storing Bitter Melon: Bitter melon can be stored in the refrigerator for up to a week. Wrap it in a plastic bag to prevent it from drying out.
Tips and Tricks for a Bountiful Harvest
Here are a few extra tips and tricks I’ve learned over the years to maximize my bitter melon harvest:
* Succession Planting: Plant new seeds every few weeks to extend your harvest season.
* Companion Planting: Plant bitter melon with companion plants like beans, peas, and corn. These plants can help improve soil fertility and attract beneficial insects.
* Hand-Pollination: If you’re not seeing a lot of fruit, try hand-pollinating the flowers. This is especially helpful in areas with low bee activity.
* Regular Harvesting: Harvest the fruits regularly to encourage the plant to produce more.
* Don’t Be Afraid to Experiment: Every garden is different, so don’t be afraid to experiment with different techniques to see what works best for you.
Understanding Bitter Melon Varieties
There are several varieties of bitter melon, each with its own unique characteristics. Knowing the different types can help you choose the best one for your garden and your taste preferences.
* Chinese Bitter Melon: This variety is typically longer and smoother than other types. It has a milder flavor and is often used in stir-fries.
* Indian Bitter Melon: This variety is shorter and more bumpy than the Chinese type. It has a more intense bitter flavor and is often used in curries.
* Japanese Bitter Melon (Goya): This variety is similar to the Indian type but is slightly smaller and more rounded. It is a staple ingredient in Okinawan cuisine.
* Hybrid Varieties: There are also many hybrid varieties available that offer a combination of traits from different types.
Culinary Uses of Bitter Melon
Bitter melon is a versatile vegetable that can be used in a variety of dishes. While its bitter flavor might be off-putting to some, it can be tamed with proper preparation.
* Stir-Fries: Bitter melon is a popular ingredient in stir-fries. It pairs well with other vegetables, meats, and sauces.
* Curries: Bitter melon is often used in curries, especially in Indian cuisine. The spices in the curry help to balance out the bitterness.
* Soups: Bitter melon can be added to soups for a unique flavor.
Conclusion
So, there you have it! Growing bitter melon easily at home is not just a possibility; it’s a rewarding reality within your reach. We’ve explored a simple yet effective DIY trick that bypasses common germination hurdles and sets your bitter melon plants up for vigorous growth. This isn’t just about saving money; it’s about connecting with your food, understanding the growth cycle, and enjoying the unparalleled satisfaction of harvesting something you nurtured from seed.
Why is this DIY trick a must-try? Because it addresses the often-temperamental germination process of bitter melon seeds head-on. The scarification and pre-soaking method softens the tough outer shell, allowing moisture to penetrate and trigger germination more reliably. This means less wasted seed, faster sprouting, and a higher success rate overall. Think of it as giving your bitter melon seeds a head start in the race to become healthy, productive vines.
But the beauty of gardening lies in experimentation! Feel free to adapt this method to your specific needs and preferences. For instance, if you live in a particularly dry climate, you might consider extending the soaking time by a few hours. Or, if you’re using older seeds, you could add a diluted seaweed solution to the soaking water to provide an extra boost of nutrients. Another variation involves using a heat mat to maintain a consistent soil temperature during germination, especially beneficial in cooler climates. You can also try different types of growing mediums. While we recommended a well-draining potting mix, some gardeners have had success with coco coir or a blend of compost and perlite. The key is to observe your plants closely and adjust your approach as needed.
Consider companion planting to further enhance your bitter melon’s growth. Marigolds can deter pests, while basil can improve the overall health of the plant. Trellising is also crucial for bitter melon, as it’s a climbing vine. A sturdy trellis will provide support and allow for better air circulation, reducing the risk of fungal diseases.
Don’t be intimidated if you’re new to gardening. This DIY trick is designed to be accessible to everyone, regardless of their experience level. The steps are straightforward, and the materials are readily available. The most important ingredient is patience. Remember that gardening is a journey, not a destination. There will be successes and setbacks along the way, but each experience is a learning opportunity.
We wholeheartedly encourage you to try this DIY trick for growing bitter melon easily. We’re confident that you’ll be pleasantly surprised by the results. And more importantly, we want to hear about your experience! Share your photos, tips, and challenges in the comments section below. Let’s build a community of bitter melon enthusiasts and learn from each other. Your insights could help other gardeners overcome obstacles and achieve their own bitter melon growing dreams. So, grab your seeds, gather your supplies, and get ready to embark on a rewarding gardening adventure. Happy growing!
Frequently Asked Questions (FAQ)
What is scarification and why is it important for bitter melon seeds?
Scarification is the process of weakening the seed coat to allow water to penetrate more easily, thus promoting germination. Bitter melon seeds have a particularly tough outer shell, which can hinder water absorption and delay or prevent sprouting. By gently nicking or filing the seed coat, we create a pathway for moisture to reach the embryo inside, significantly improving germination rates. Without scarification, you might find that many of your bitter melon seeds simply won’t sprout, leading to wasted time and resources.
How much should I scarify the bitter melon seeds?
The goal is to gently weaken the seed coat, not to damage the embryo inside. Use a fine-grit sandpaper or a nail file to lightly abrade the seed coat on one side, away from the “eye” (the small indentation where the root will emerge). You should see a slight change in color or texture where you’ve filed, but avoid filing too deeply. A few gentle strokes are usually sufficient. Over-scarification can damage the seed and prevent germination.
How long should I soak the scarified bitter melon seeds?
We recommend soaking the scarified bitter melon seeds in lukewarm water for 12-24 hours. This allows the seeds to fully hydrate and further softens the seed coat. Change the water once or twice during the soaking period to prevent the growth of bacteria. Soaking for longer than 24 hours can sometimes lead to seed rot, so it’s best to stick to the recommended timeframe.
What type of soil is best for growing bitter melon?
Bitter melon thrives in well-draining soil that is rich in organic matter. A good potting mix specifically formulated for vegetables is ideal. You can also amend your garden soil with compost, aged manure, or other organic materials to improve its fertility and drainage. Avoid heavy clay soils, as they can become waterlogged and hinder root growth. The ideal pH for bitter melon is between 6.0 and 6.8.
How much sunlight does bitter melon need?
Bitter melon requires at least 6-8 hours of direct sunlight per day to thrive. Choose a sunny location in your garden or on your patio where the plants will receive ample sunlight throughout the growing season. If you’re growing bitter melon indoors, you may need to supplement with grow lights to provide sufficient light. Insufficient sunlight can lead to weak growth, reduced flowering, and smaller fruit.
How often should I water bitter melon plants?
Water bitter melon plants regularly, especially during hot and dry weather. The soil should be kept consistently moist, but not waterlogged. Water deeply whenever the top inch of soil feels dry to the touch. Avoid overhead watering, as this can promote fungal diseases. Drip irrigation or soaker hoses are excellent options for delivering water directly to the roots.
What kind of fertilizer should I use for bitter melon?
Bitter melon benefits from regular fertilization throughout the growing season. Use a balanced fertilizer (e.g., 10-10-10) at planting time, and then switch to a fertilizer that is higher in phosphorus and potassium (e.g., 5-10-10) once the plants begin to flower and fruit. Follow the instructions on the fertilizer label carefully to avoid over-fertilizing, which can damage the plants. You can also supplement with organic fertilizers such as compost tea or fish emulsion.
How do I control pests and diseases on bitter melon plants?
Bitter melon can be susceptible to various pests and diseases, including aphids, spider mites, squash bugs, and powdery mildew. Regularly inspect your plants for signs of infestation or disease, and take action promptly. Insecticidal soap, neem oil, and horticultural oil can be effective for controlling many common pests. For fungal diseases, ensure good air circulation around the plants and avoid overhead watering. You can also use a fungicide if necessary. Companion planting with marigolds or basil can help deter pests naturally.
When can I harvest bitter melon?
Bitter melon is typically ready to harvest about 2-3 months after planting. The fruits should be firm and green, with a slightly waxy coating. The size of the fruit will vary depending on the variety. Harvest bitter melon before it turns orange or yellow, as this indicates that it is overripe and will become more bitter. Use a sharp knife or pruners to cut the fruit from the vine, leaving a short stem attached.
Can I grow bitter melon in containers?
Yes, bitter melon can be successfully grown in containers, provided that the containers are large enough (at least 15-20 gallons) and have adequate drainage. Use a high-quality potting mix and provide a sturdy trellis for the vines to climb. Container-grown bitter melon may require more frequent watering and fertilization than plants grown in the ground. Choose a sunny location for your containers and protect them from strong winds.
Leave a Comment