

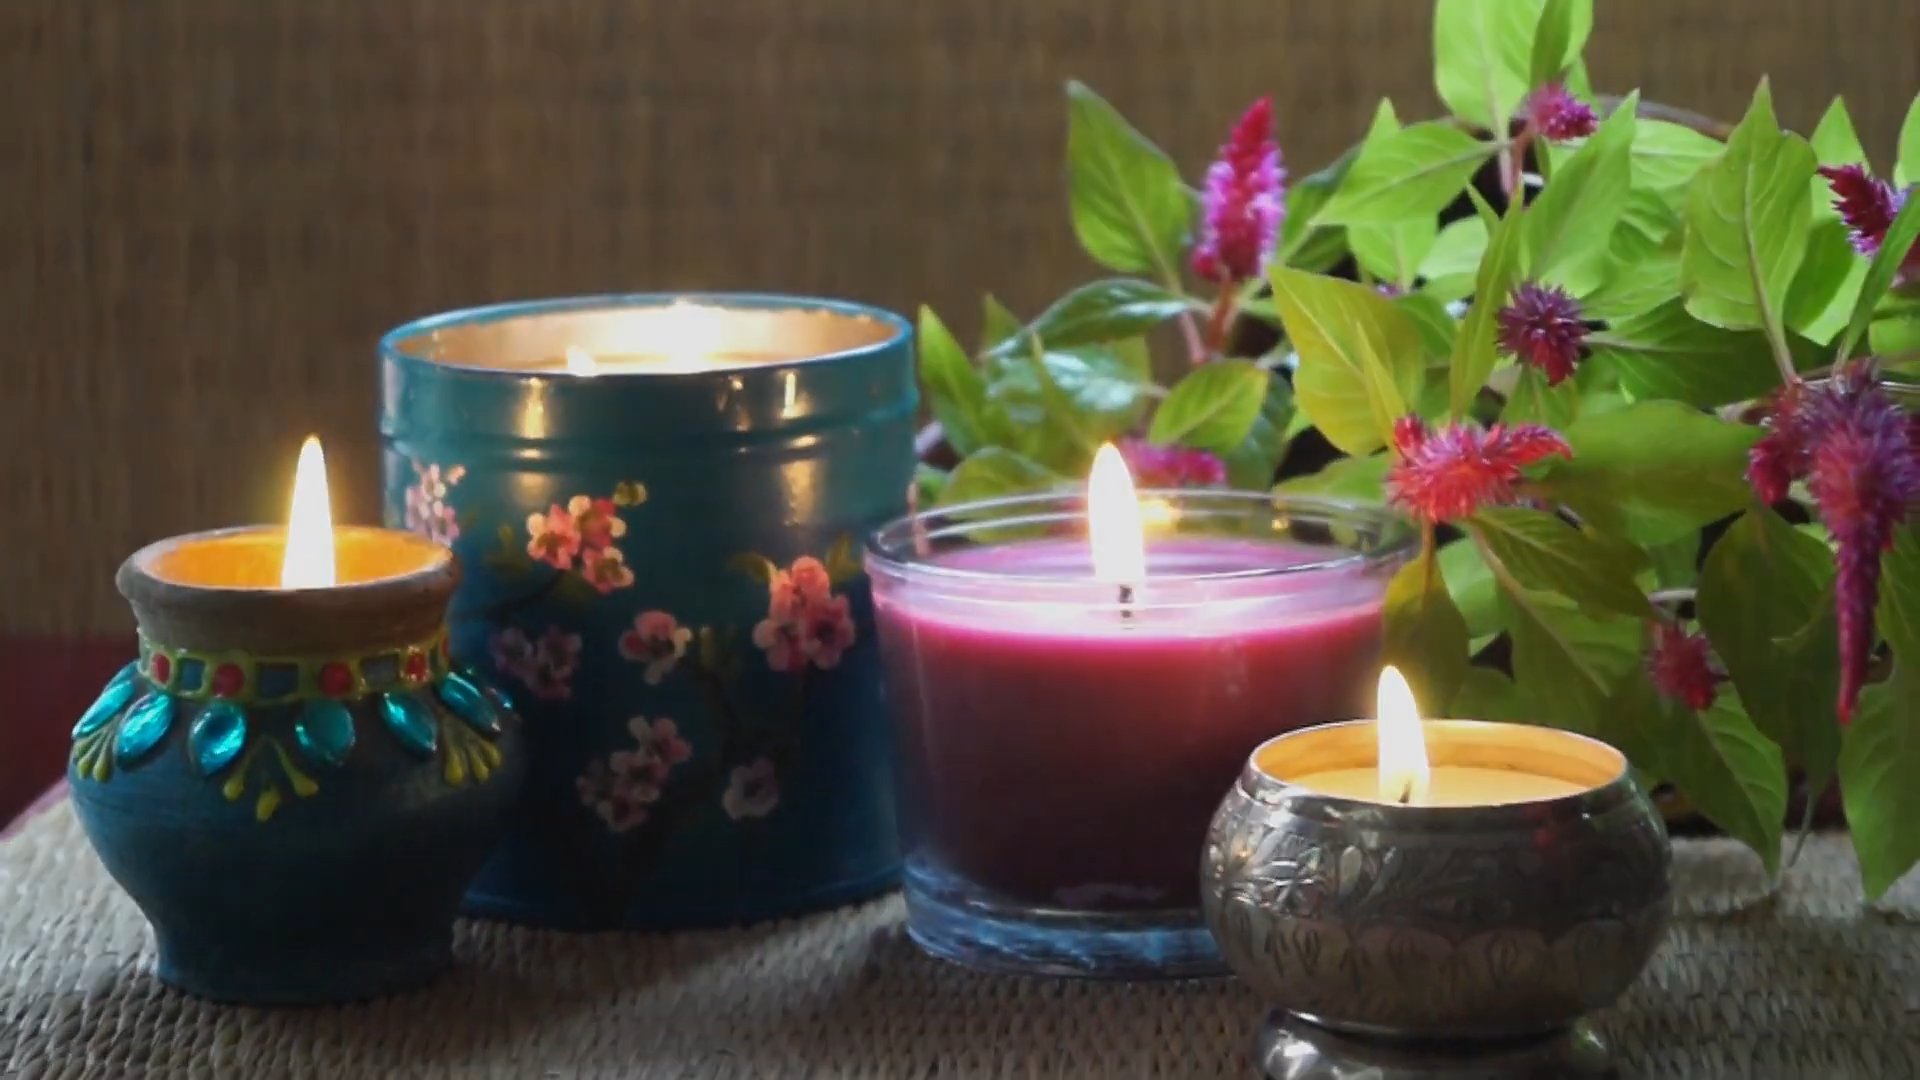
DIY Handmade Candles Tutorial: Light up your life, literally, with the enchanting art of crafting your own candles! Have you ever wondered how to create that perfect ambiance with a scent that’s uniquely yours? Or perhaps you’re searching for a heartfelt, personalized gift that truly shines? Well, you’ve come to the right place!
Candle making boasts a rich history, dating back to ancient civilizations where candles were essential sources of light. From tallow dips in ancient Egypt to beeswax creations in Rome, candles have illuminated homes and hearts for centuries. Today, while electricity reigns supreme, the allure of a flickering flame remains undiminished.
In this comprehensive DIY Handmade Candles Tutorial, I’ll guide you through the simple steps to create beautiful, fragrant candles from the comfort of your own home. Forget those mass-produced, generic candles – with a few basic supplies and a dash of creativity, you can craft unique pieces that reflect your personal style and fill your space with delightful aromas. Plus, making your own candles is a fantastic way to relax, de-stress, and tap into your inner artist. Who knows, you might even discover a new passion! So, gather your supplies, and let’s embark on this illuminating journey together!
DIY Handmade Candles: A Beginner’s Guide to Creating Cozy Ambiance
Hey there, candle enthusiasts! Ever wanted to create your own signature scent and fill your home with the warm glow of handmade candles? Well, you’ve come to the right place! I’m going to walk you through the entire process, step-by-step, so you can craft beautiful, fragrant candles that are perfect for gifting or just treating yourself. Let’s get started!
Gathering Your Supplies
Before we dive into the melting and pouring, let’s make sure we have everything we need. This is crucial for a smooth and enjoyable candle-making experience.
* Wax: Soy wax is my personal favorite because it’s natural, burns cleanly, and holds fragrance well. You can also use beeswax, paraffin wax, or coconut wax, each with its own unique properties. For this tutorial, we’ll focus on soy wax.
* Wicks: Choose the right wick size based on the diameter of your container. Too small, and your candle will tunnel (burn down the center, leaving wax on the sides). Too large, and you’ll get a smoky flame and excessive heat. Pre-waxed wicks with metal tabs are super convenient.
* Fragrance Oils or Essential Oils: This is where you get to personalize your candles! Experiment with different scents to create your own unique blends. Make sure to use oils specifically designed for candle making.
* Containers: Jars, tins, teacups – the possibilities are endless! Just make sure your container is heat-safe and clean.
* Double Boiler or Heat-Safe Bowl and Saucepan: We’ll use this to melt the wax safely.
* Thermometer: A candy thermometer or digital thermometer is essential for monitoring the wax temperature.
* Pouring Pitcher: A heat-safe pouring pitcher with a spout will make pouring the wax into your containers much easier.
* Wick Stickers or Glue Dots: To secure the wicks to the bottom of your containers.
* Wooden Skewers or Chopsticks: To center the wicks and keep them upright while the wax cools.
* Scale: For accurately measuring the wax and fragrance oil.
* Paper Towels: For easy cleanup.
* Optional: Dye chips or liquid dyes (for adding color), dried flowers or herbs (for decoration).
Preparing Your Workspace and Containers
Organization is key! A clean and well-prepared workspace will make the whole process much more enjoyable.
1. Protect Your Surface: Cover your work area with newspaper or a silicone mat to protect it from spills.
2. Clean Your Containers: Make sure your containers are clean and dry. Wipe them out with a clean cloth to remove any dust or debris.
3. Attach the Wicks: Center a wick in each container and secure it to the bottom using a wick sticker or a small dab of hot glue. Press firmly to ensure it’s securely attached.
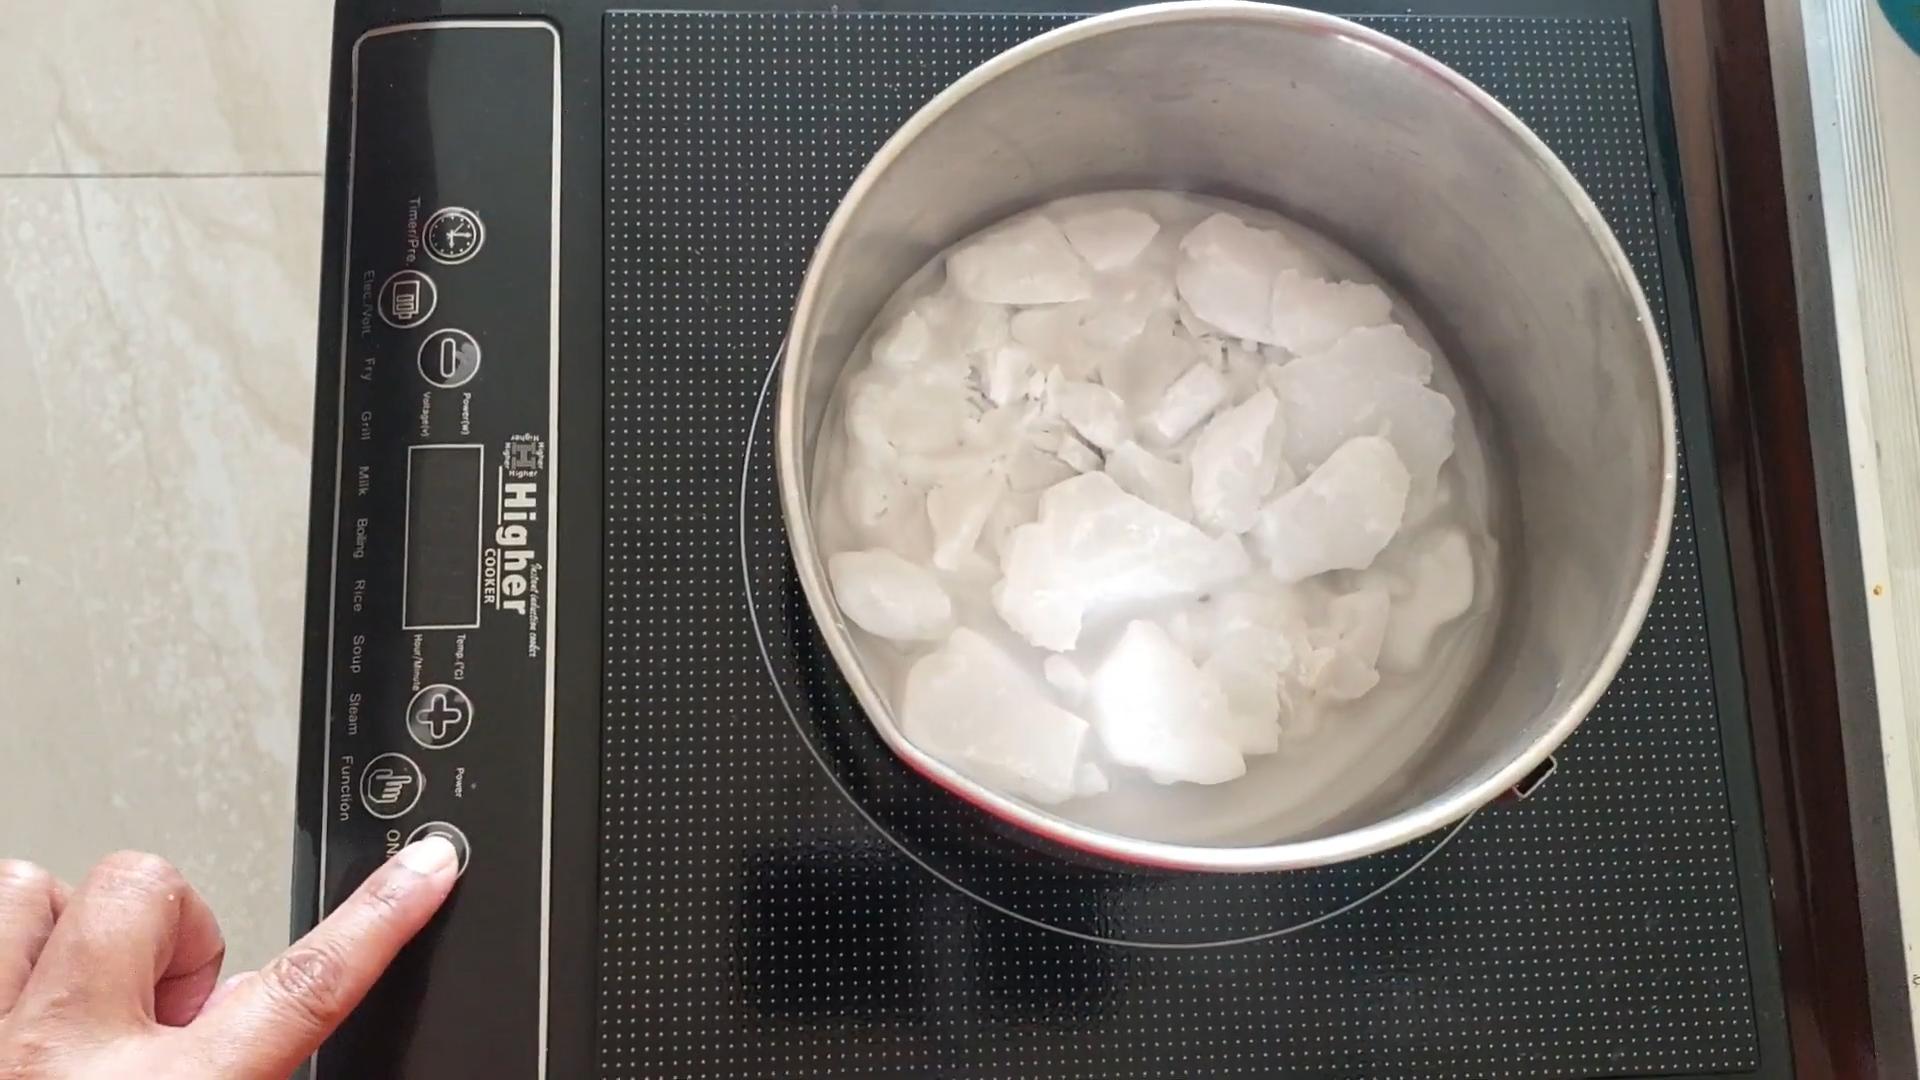
4. Prepare Your Double Boiler: Fill the saucepan with a few inches of water and bring it to a simmer. Place the heat-safe bowl on top of the saucepan, making sure the bottom of the bowl doesn’t touch the water.
Melting the Wax
This is where the magic begins! Patience is key here – don’t rush the melting process.
1. Weigh the Wax: Use your scale to weigh out the desired amount of wax. The amount you need will depend on the size and number of containers you’re using. A good rule of thumb is to fill your container with water, then weigh the water. That weight in grams is approximately the amount of wax you’ll need.
2. Add Wax to the Double Boiler: Place the wax flakes or pellets into the heat-safe bowl.
3. Melt the Wax Slowly: Allow the wax to melt slowly and evenly over low heat, stirring occasionally with a heat-resistant spatula or spoon.
4. Monitor the Temperature: Use your thermometer to monitor the wax temperature. Soy wax should be heated to around 185°F (85°C). Avoid overheating the wax, as this can affect its performance.
5. Remove from Heat: Once the wax is completely melted and has reached the desired temperature, remove the bowl from the heat.
Adding Fragrance and Color (Optional)
Now for the fun part – creating your signature scent!
1. Let the Wax Cool Slightly: Allow the wax to cool slightly before adding the fragrance oil. This helps prevent the fragrance from evaporating too quickly. Aim for a temperature around 175°F (80°C).
2. Add Fragrance Oil: Add the fragrance oil to the melted wax. A typical fragrance load is around 6-10% of the total wax weight. So, if you have 100 grams of wax, you would add 6-10 grams of fragrance oil.
3. Stir Gently: Stir the fragrance oil into the wax gently but thoroughly for about two minutes to ensure it’s evenly distributed. Avoid stirring too vigorously, as this can create air bubbles.
4. Add Dye (Optional): If you’re using dye chips or liquid dyes, add them to the melted wax and stir until the color is evenly distributed. Start with a small amount of dye and add more until you achieve the desired color.
Pouring the Wax
This is where precision comes in handy! A steady hand and a good pouring pitcher will help you avoid spills and create smooth, even candles.
1. Pour Slowly and Steadily: Carefully pour the scented wax into your prepared containers, leaving about half an inch of space at the top.
2. Center the Wicks: Use wooden skewers or chopsticks to center the wicks and keep them upright while the wax cools. You can lay the skewers across the top of the container, with the wick sandwiched in between.
3. Let the Candles Cool and Harden: Allow the candles to cool and harden completely at room temperature. This can take several hours, or even overnight. Avoid moving the candles while they’re cooling, as this can cause cracks or uneven surfaces.
Finishing Touches
Almost there! A few final steps to make your candles look professional and polished.
1. Trim the Wicks: Once the candles are completely cool and hardened, trim the wicks to about ¼ inch. This will help prevent smoking and ensure a clean burn.
2. Check for Sinkholes: Sometimes, sinkholes can form in the center of the candle as it cools. If you notice any sinkholes, you can gently reheat the surface of the candle with a heat gun or hairdryer and pour a small amount of melted wax into the hole to fill it.
3. Clean the Containers: Wipe down the outside of the containers with a clean cloth to remove any wax residue.
4. Add Labels (Optional): Add labels to your candles with the scent name, your brand name (if you have one), and any other relevant information.
5. Decorate (Optional): You can add dried flowers, herbs, or other decorative elements to the top of your candles for a personal touch. Just make sure the decorations are not flammable and won’t interfere with the burning process.
Troubleshooting Tips
Even with the best instructions, sometimes things don’t go exactly as planned. Here are a few common problems and how to fix them:
* Tunneling: If your candle is burning down the center and leaving wax on the sides, it means your wick is too small. Next time, use a larger wick size. You can also try burning the candle for longer periods of time (3-4 hours) to allow the wax to melt all the way to the edges.
* Smoking: If your candle is smoking, it means your wick is too large. Trim the wick to ¼ inch and make sure there are no drafts in the room.
* Weak Scent: If your candle doesn’t have a strong scent, you may not have added enough fragrance oil. Next time, try increasing the fragrance load to 8-10%. Also, make sure you’re using high-quality fragrance oils specifically designed for candle making.
* Frosting: Frosting is a white, crystalline coating that can sometimes form on soy wax candles. It’s a natural phenomenon and doesn’t affect the performance of the candle. Some people even like the look of it! To minimize frosting, try pouring the wax at a slightly lower temperature and avoiding rapid temperature changes.
* Wet Spots: Wet spots are areas where the wax has pulled away from the container. They’re also a common occurrence with soy wax and don’t affect the performance of the candle. To minimize wet spots, try preheating your containers before pouring the wax.
Safety First!
Candle making is a fun and rewarding hobby, but it’s important to prioritize safety.
* Never leave a burning candle unattended.
* Keep candles away from flammable materials.
* Keep candles out of
Conclusion
So, there you have it! Crafting your own DIY handmade candles is not just a fun project; it’s a gateway to creating a personalized ambiance, a thoughtful gift-giving solution, and a sustainable way to reuse materials. Forget those mass-produced, generic candles from the store. With a little effort and creativity, you can design candles that perfectly reflect your style and scent preferences.
Why is this DIY trick a must-try? Because it empowers you to control every aspect of your candle, from the type of wax and fragrance to the container and overall aesthetic. You can tailor the scent to match the season – think warm cinnamon and clove for winter or refreshing citrus and lavender for summer. You can choose eco-friendly waxes like soy or beeswax, avoiding the potentially harmful chemicals found in some paraffin candles. And you can upcycle old jars, teacups, or even seashells into unique and charming candle holders.
Beyond the Basics: Variations and Inspiration
The possibilities are truly endless when it comes to DIY handmade candles. Here are a few ideas to spark your creativity:
* Layered Candles: Create visually stunning candles by layering different colors and scents. Allow each layer to cool slightly before adding the next to prevent mixing.
* Embedded Candles: Incorporate dried flowers, herbs, or even small crystals into your candles for a touch of natural beauty.
* Scented Wax Melts: Use the same techniques to create wax melts for your favorite warmer. This is a great way to use up leftover wax or experiment with different fragrance combinations.
* Citronella Candles: Make your own outdoor citronella candles to keep mosquitoes at bay during summer evenings.
* Coffee Bean Candles: Add coffee beans to your candle for a rich, aromatic experience.
* Coloring Your Candles: Use candle dye to create candles in any color you desire.
Ready to Ignite Your Creativity?
We encourage you to give this DIY handmade candles tutorial a try. It’s a rewarding experience that allows you to express your creativity and create something truly special. Don’t be afraid to experiment with different waxes, scents, and containers to find what works best for you.
Once you’ve created your masterpiece, we’d love to see it! Share your photos and experiences in the comments below. Let us know what scents you used, what challenges you faced, and what tips you have for other candle makers. Together, we can inspire each other and create a community of passionate DIY candle enthusiasts. So, gather your supplies, light a creative fire, and get ready to make some beautiful and fragrant DIY handmade candles!
Frequently Asked Questions (FAQ)
Q: What type of wax is best for making DIY handmade candles?
A: The best type of wax depends on your preferences and priorities. Soy wax is a popular choice because it’s natural, renewable, and burns cleanly. It also holds fragrance well. Beeswax is another natural option that offers a subtle honey scent and a longer burn time. Paraffin wax is the most affordable option, but it’s derived from petroleum and may release some soot when burned. Coconut wax is a newer option that’s known for its excellent scent throw and clean burn. Experiment with different waxes to find the one you like best.
Q: Where can I buy candle-making supplies?
A: Candle-making supplies are readily available at craft stores, online retailers, and even some specialty candle supply shops. Look for waxes, wicks, fragrance oils, dyes, and containers. When buying fragrance oils, make sure they are specifically designed for candles and are safe to burn.
Q: How do I choose the right wick size for my candle?
A: Choosing the right wick size is crucial for a well-burning candle. A wick that’s too small will result in tunneling (where the wax only melts in the center), while a wick that’s too large will produce a large flame and excessive soot. Wick size depends on the diameter of your candle container and the type of wax you’re using. Most candle supply retailers offer wick size charts that can help you choose the appropriate wick for your project. It’s always a good idea to test your candle with a small batch before making a large batch.
Q: How much fragrance oil should I add to my candles?
A: The amount of fragrance oil you add to your candles depends on the type of wax you’re using and the strength of the fragrance oil. A general guideline is to use 6-10% fragrance oil by weight. For example, if you’re using 1 pound (16 ounces) of wax, you would add 0.96 to 1.6 ounces of fragrance oil. Always check the fragrance oil manufacturer’s recommendations for the maximum usage rate.
Q: How do I prevent my candles from tunneling?
A: Tunneling occurs when the wax only melts in the center of the candle, leaving a ring of unmelted wax around the edges. To prevent tunneling, make sure you’re using the correct wick size for your container. Also, allow the candle to burn long enough for the entire surface of the wax to melt completely to the edges of the container each time you light it. This is especially important during the first burn.
Q: How do I fix a candle that’s already tunneling?
A: If your candle is already tunneling, there are a few things you can try. One option is to use a heat gun or hair dryer to gently melt the wax around the edges of the candle. Another option is to wrap the candle in aluminum foil, leaving a small opening at the top, and let it burn for a few hours. The foil will trap the heat and help melt the wax around the edges.
Q: Can I use essential oils instead of fragrance oils in my candles?
A: Yes, you can use essential oils in your candles, but there are a few things to keep in mind. Essential oils are more volatile than fragrance oils, so they may not have as strong of a scent throw. Also, some essential oils can be flammable, so it’s important to use them in moderation and choose oils that are safe for candle making.
Q: How do I clean up spilled candle wax?
A: Spilled candle wax can be easily cleaned up with a few simple steps. First, let the wax cool and harden. Then, use a dull knife or scraper to gently remove the wax from the surface. If there’s any residue left, you can try ironing it with a clean cloth. Place a clean cloth over the wax and iron it on low heat. The heat will melt the wax, which will then be absorbed by the cloth.
Q: How long should I let my candles cure before burning them?
A: It’s recommended to let your candles cure for at least 24-48 hours before burning them. This allows the fragrance oil to fully bind with the wax, resulting in a stronger and more consistent scent throw. Some candle makers even recommend curing candles for up to a week for optimal results.
Q: Are there any safety precautions I should take when making candles?
A: Yes, safety is paramount when making candles. Always work in a well-ventilated area and keep flammable materials away from your work space. Use a double boiler or a heat-safe container placed in a pot of simmering water to melt the wax. Never heat the wax directly on the stove, as it can be flammable. Use a thermometer to monitor the temperature of the wax and avoid overheating it. Always extinguish candles before leaving the room or going to sleep. Keep candles out of reach of children and pets.

Leave a Comment