

DIY fruit crate closet: Ever feel like your clothes are staging a rebellion, overflowing from every corner of your room? I know I have! Forget those expensive, cookie-cutter storage solutions. We’re diving headfirst into a charming and practical project that will not only tame your wardrobe chaos but also add a touch of rustic flair to your space.
Fruit crates, with their humble beginnings as vessels for transporting nature’s bounty, have a surprisingly rich history. From bustling farmers’ markets to family kitchens, these wooden boxes have been a symbol of resourcefulness and simple living for generations. Now, we’re giving them a stylish second act!
In today’s world of fast furniture and disposable goods, embracing DIY projects like this DIY fruit crate closet is more important than ever. It’s a chance to reduce waste, unleash your creativity, and create something truly unique that reflects your personality. Plus, let’s be honest, who doesn’t love the satisfaction of saying, “I made that!”? This project is perfect for anyone looking to maximize space, add character to their home, and save money. So, grab your tools, and let’s transform those humble fruit crates into a stunning and functional closet that you’ll be proud to show off!
DIY Fruit Crate Closet: Rustic Charm Meets Organized Storage
Okay, so you’re tired of your clothes overflowing, and you’re craving a unique storage solution that screams personality? I get it! Forget those boring, mass-produced closets. We’re diving into a fun and surprisingly easy DIY project: building a closet from fruit crates! This project is not only budget-friendly but also adds a rustic, charming touch to any room. Plus, it’s totally customizable to fit your space and needs. Let’s get started!
Materials You’ll Need:
Before we jump in, let’s gather our supplies. This is crucial for a smooth and enjoyable building experience.
* Fruit Crates: The star of the show! Decide how many you need based on the size of your desired closet. Look for sturdy, wooden crates. You can often find them at farmers’ markets, craft stores, or even online. I recommend having a few extra on hand just in case.
* Sandpaper: Medium and fine grit. We want those crates smooth to the touch.
* Wood Stain or Paint: Choose a color that complements your room’s decor. I personally love a weathered gray stain for a rustic vibe, but the possibilities are endless!
* Paintbrushes or Rags: For applying the stain or paint. Rags work great for staining, giving a more even and textured look.
* Wood Screws: Different lengths will be needed depending on the thickness of your crates.
* Drill: Essential for screwing the crates together securely.
* Measuring Tape: To ensure everything is level and aligned.
* Level: Absolutely crucial for a stable and functional closet.
* Safety Glasses: Protect your eyes from sawdust and splinters. Safety first!
* Work Gloves: To protect your hands.
* Optional:
* Wood Glue: For extra reinforcement.
* Casters (Wheels): If you want a mobile closet.
* Shelf Liners: To protect your clothes and the inside of the crates.
* Decorative Hardware: Knobs, pulls, or labels to personalize your closet.
* Clothes Rod: If you want to hang clothes.
* Clothes Rod Brackets: To hold the clothes rod.
* Polyurethane or Varnish: For sealing and protecting the finished product.
Preparing the Fruit Crates: The Foundation of Your Closet
This is where we transform those rough crates into something beautiful and functional.
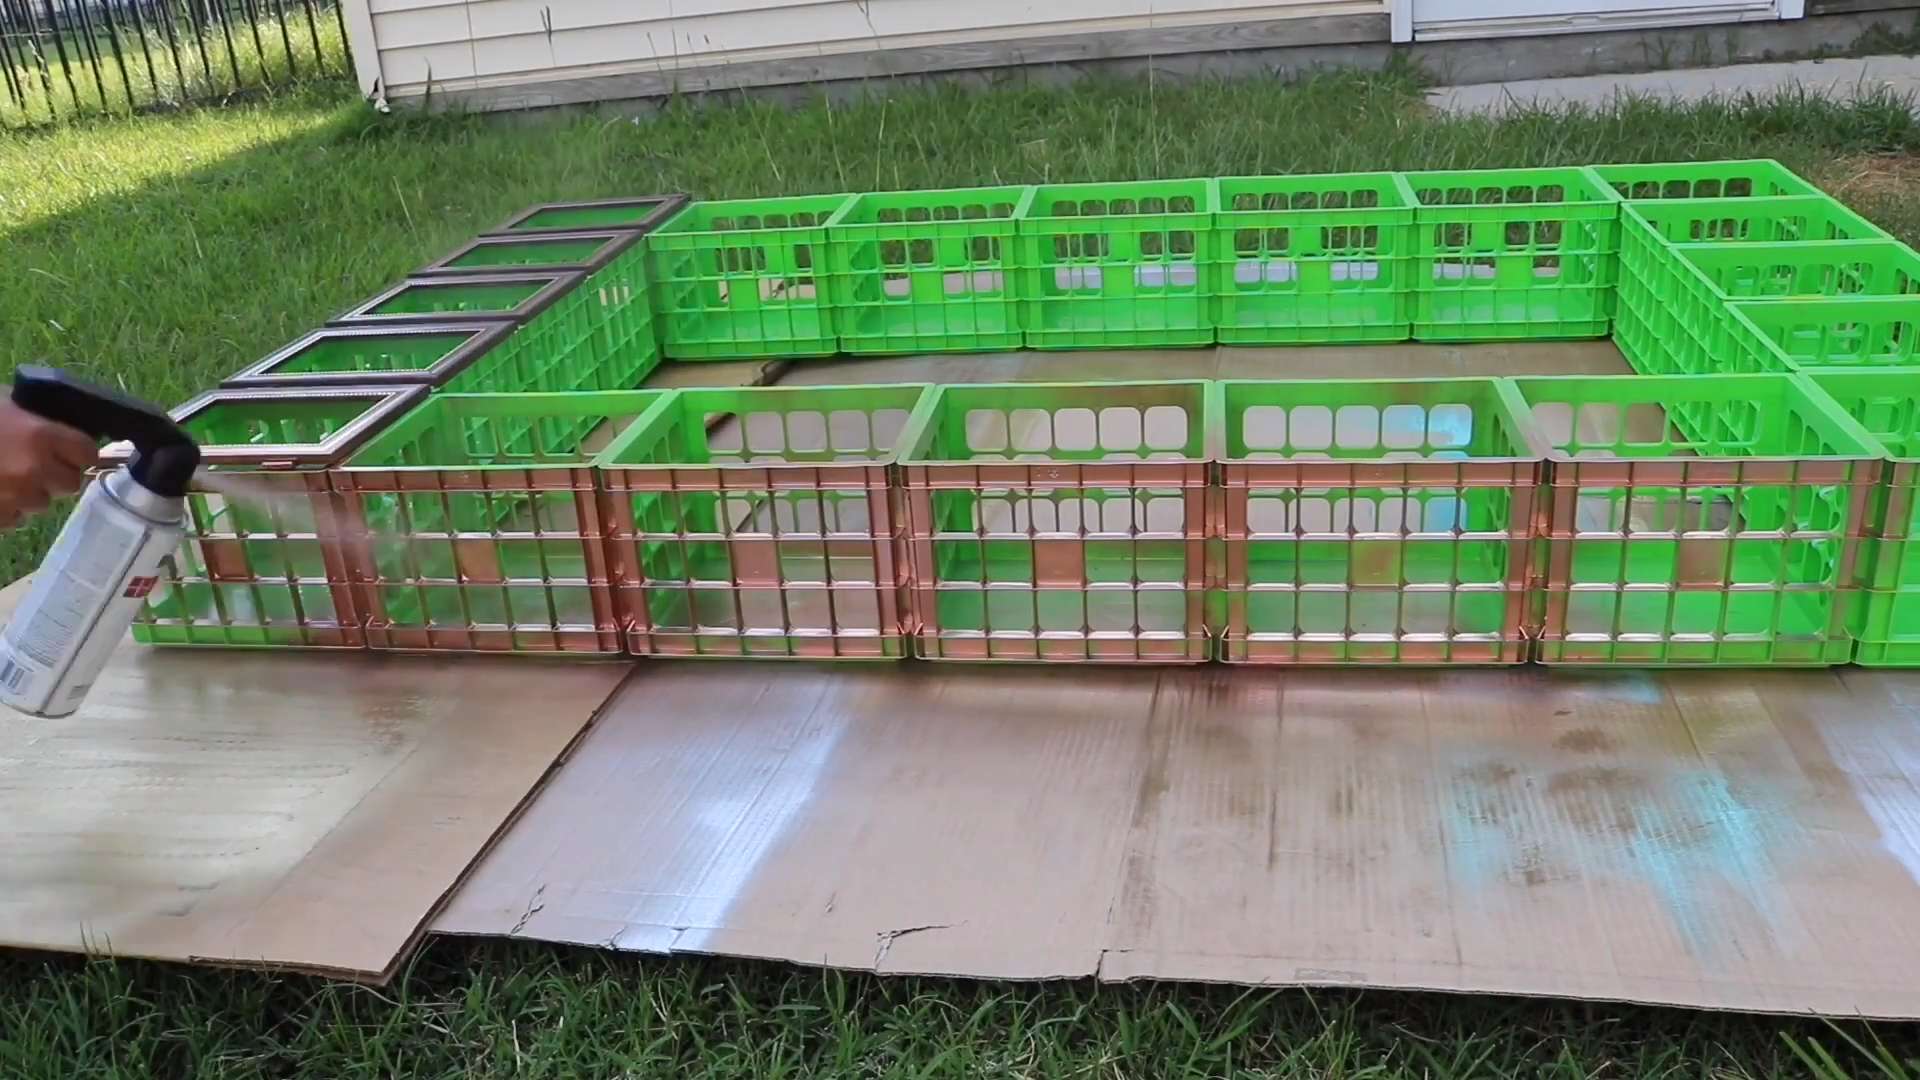
1. Sanding: This is probably the most tedious part, but trust me, it’s worth it! Start with medium-grit sandpaper to remove any rough edges, splinters, or imperfections. Then, switch to fine-grit sandpaper for a smooth finish. Pay extra attention to the edges and corners. I like to use a sanding block for a more even pressure.
2. Cleaning: After sanding, wipe down the crates with a damp cloth to remove all the sawdust. This will ensure the stain or paint adheres properly. Let them dry completely before moving on.
3. Staining or Painting: Now for the fun part! If you’re staining, apply the stain evenly with a rag or brush, following the grain of the wood. Wipe off any excess stain after a few minutes. For painting, apply thin, even coats, allowing each coat to dry completely before applying the next. I usually do two coats for full coverage. Remember to work in a well-ventilated area!
4. Sealing (Optional): If you want to protect your stained or painted crates from scratches and moisture, apply a coat of polyurethane or varnish. This will also give them a nice sheen. Follow the manufacturer’s instructions for application and drying time.
Assembling the Closet: Bringing Your Vision to Life
Now that our crates are prepped and pretty, it’s time to build our closet!
1. Planning Your Layout: Before you start screwing things together, take some time to plan your layout. Consider the size of your space and the amount of storage you need. Will you stack the crates vertically, horizontally, or a combination of both? Do you want a single tower or multiple sections? Sketch out your design on paper to help you visualize the finished product.
2. Connecting the Crates: This is where the drill comes in handy. Start by placing two crates side-by-side or on top of each other, depending on your desired layout. Use wood screws to connect them securely. Pre-drilling pilot holes will prevent the wood from splitting. I recommend using wood glue in addition to screws for extra strength. Clamp the crates together while the glue dries.
3. Building the Structure: Continue connecting the crates according to your planned layout. Make sure to check the level frequently to ensure your closet is stable and even. If you’re building a tall structure, consider anchoring it to the wall for added safety.
4. Adding Casters (Optional): If you want a mobile closet, attach casters to the bottom of the crates. Make sure the casters are heavy-duty enough to support the weight of the closet and its contents.
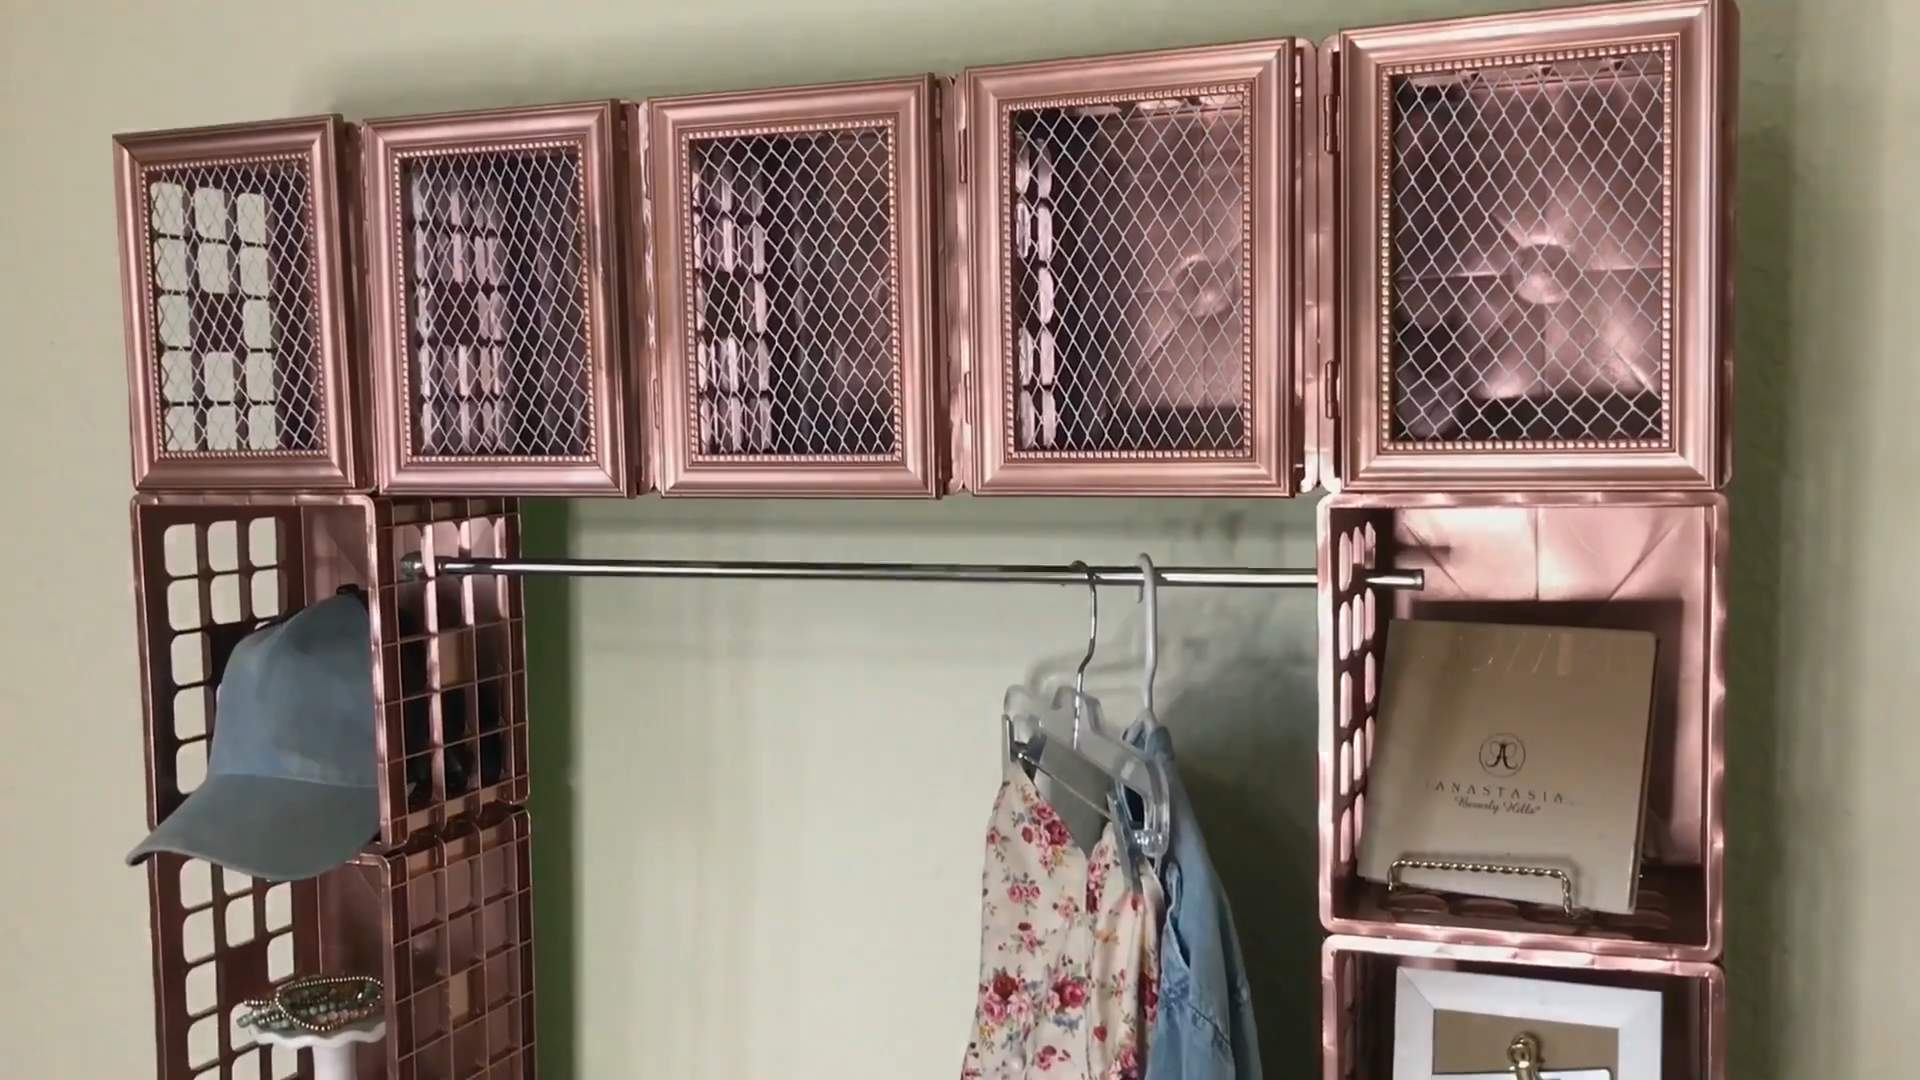
5. Installing a Clothes Rod (Optional): If you want to hang clothes, install clothes rod brackets inside one or more of the crates. Make sure the brackets are securely attached to the wood. Then, insert the clothes rod.
Finishing Touches: Personalizing Your Closet
Now that the basic structure is complete, it’s time to add those personal touches that will make your closet truly unique.
1. Shelf Liners: Line the inside of the crates with shelf liners to protect your clothes and the wood. You can use adhesive shelf liners or simply cut pieces of fabric to fit.
2. Decorative Hardware: Add knobs, pulls, or labels to the crates to personalize your closet. This is a great way to add a pop of color or tie in with your room’s decor.
3. Organizing Your Clothes: Now for the best part: filling your new closet with your clothes! Organize your clothes by type, color, or season to make it easy to find what you’re looking for. Use baskets or bins to store smaller items like socks, underwear, and accessories.
4. Adding Lighting (Optional): Consider adding some lighting to your closet to make it easier to see your clothes. You can use battery-operated LED lights or install a more permanent lighting fixture.
Tips and Tricks for Success:
* Choose Quality Crates: The sturdier the crates, the more durable your closet will be.
* Don’t Be Afraid to Experiment: This is your project, so feel free to get creative with the design and finishing touches.
* Take Your Time: Rushing through the process can lead to mistakes. Enjoy the process and take your time to do it right.
* Ask for Help: If you’re struggling with any part of the project, don’t be afraid to ask a friend or family member for help.
* Embrace Imperfection: Remember, this is a rustic project, so don’t worry too much about perfection. The imperfections are part of the charm!
* Consider the Weight: Be mindful of how much weight each crate can hold, especially if you’re planning on storing heavy items. Distribute the weight evenly to prevent the crates from collapsing.
* Safety First: Always wear safety glasses and work gloves when working with power tools and wood.
Alternative Ideas and Customizations:
* Add a Backing: For a more finished look, you can add a backing to your closet using plywood or beadboard.
* Create Drawers: You can create drawers by adding drawer slides to the inside of the crates.
* Build a Shoe Rack: Use smaller crates or pieces of wood to build a shoe rack inside your closet.
* Incorporate Other Materials: Get creative and incorporate other materials like metal pipes, fabric, or rope into your design.
* Make it a Bookshelf: This same technique can be used to create a unique and rustic bookshelf.
I hope this guide has inspired you to create your own DIY fruit crate closet! It’s a fun, rewarding project that will add a touch of rustic charm to your home while providing much-needed storage. Happy building!
Conclusion
So, there you have it! Transforming humble fruit crates into a stylish and functional closet is not just a budget-friendly solution; it’s a statement. It’s a statement about your creativity, your commitment to sustainability, and your unique personal style. This DIY fruit crate closet project is more than just storage; it’s about breathing new life into discarded materials and creating something beautiful and practical for your home.
Why is this a must-try? Because it’s incredibly versatile. Whether you’re dealing with a small apartment, a walk-in closet that needs organization, or a child’s room overflowing with toys, fruit crates offer a customizable solution. You can stack them high, arrange them wide, paint them vibrant colors, or leave them with their rustic charm. The possibilities are truly endless.
Consider these variations to personalize your fruit crate closet even further:
* Add Fabric Backing: Staple fabric to the back of each crate for a more polished look and to prevent small items from falling out. Choose a fabric that complements your room’s decor.
* Incorporate Wheels: Attach casters to the bottom crates to create a mobile storage unit that can be easily moved around. This is especially useful for kids’ rooms or playrooms.
* Create Shelves: Cut pieces of wood to fit inside the crates to create shelves for smaller items like shoes, accessories, or folded clothes.
* Paint or Stain: Give your crates a fresh look with paint or stain. Choose colors that match your existing decor or create a bold statement with contrasting hues. You can also use stencils to add patterns or designs.
* Add Doors: For a more concealed storage solution, consider adding small doors to some of the crates. You can use hinges and latches to create functional doors that keep your belongings hidden.
* Mix and Match: Combine fruit crates with other storage solutions, such as hanging rods or drawers, to create a truly customized closet system.
* Labeling: Use labels to organize your belongings and make it easier to find what you’re looking for. You can use chalkboard labels, adhesive labels, or even paint directly onto the crates.
But the real magic of this project lies in its simplicity. You don’t need to be a master carpenter to create a stunning fruit crate closet. With a few basic tools, some creativity, and a little elbow grease, you can transform ordinary crates into an extraordinary storage solution.
We wholeheartedly encourage you to give this DIY project a try. It’s a rewarding experience that will not only declutter your space but also add a touch of personality to your home. And most importantly, don’t forget to share your creations with us! We’d love to see how you’ve personalized your fruit crate closet and what creative solutions you’ve come up with. Share your photos and stories on social media using #FruitCrateClosetDIY. Let’s inspire each other to create beautiful and sustainable homes, one crate at a time. This project is a testament to the fact that you don’t need to spend a fortune to have a stylish and organized space. Embrace the challenge, unleash your creativity, and transform your home with this amazing DIY project.
Frequently Asked Questions
What kind of fruit crates should I use?
The best fruit crates to use are sturdy wooden ones. You can often find them at farmers’ markets, produce stores, or even online. Look for crates that are in good condition, without any major cracks or damage. Avoid crates that have been treated with harsh chemicals or pesticides. If you’re unsure, ask the seller about the crate’s history. You can also purchase new wooden crates from craft stores or online retailers. These are often more uniform in size and appearance, which can be helpful if you’re looking for a more polished look.
How do I clean the fruit crates before using them?
Cleaning the fruit crates is essential to remove any dirt, debris, or residue. Start by brushing off any loose dirt with a stiff brush. Then, wash the crates with warm soapy water. You can use a mild dish soap or a specialized wood cleaner. Rinse the crates thoroughly with clean water and allow them to dry completely in the sun or a well-ventilated area. If the crates have any stubborn stains or odors, you can try using a solution of vinegar and water. For mold or mildew, use a solution of bleach and water, but be sure to wear gloves and eye protection and rinse thoroughly.
Do I need to sand the fruit crates?
Sanding the fruit crates is optional, but it can help to create a smoother surface and remove any splinters. If you’re planning to paint or stain the crates, sanding is highly recommended. Use a medium-grit sandpaper to sand the crates, paying attention to any rough edges or splinters. Wipe the crates down with a damp cloth to remove any sanding dust before painting or staining. If you prefer a more rustic look, you can skip the sanding step altogether.
What kind of paint or stain should I use?
The type of paint or stain you use will depend on the look you’re trying to achieve. For a more modern look, you can use a latex paint in a solid color. For a more rustic look, you can use a wood stain or a chalk paint. If you’re using paint, be sure to prime the crates first to ensure that the paint adheres properly. If you’re using stain, apply it in thin, even coats and wipe off any excess. Always follow the manufacturer’s instructions for application and drying times. Consider using a sealant or varnish to protect the painted or stained surface from scratches and wear.
How do I assemble the fruit crate closet?
Assembling the fruit crate closet is relatively simple. You can stack the crates on top of each other, side by side, or in any configuration that suits your needs. To secure the crates together, you can use screws, nails, or wood glue. If you’re using screws or nails, be sure to pre-drill holes to prevent the wood from splitting. If you’re using wood glue, clamp the crates together until the glue is dry. You can also use metal brackets or corner braces to reinforce the joints. For added stability, consider attaching the closet to the wall using wall anchors.
How do I make the closet more stable?
Stability is key for a functional and safe closet. To enhance stability, consider these tips:
* Secure the Crates: Use screws, nails, or wood glue to firmly attach the crates to each other.
* Wall Anchors: Attach the closet to the wall using wall anchors, especially if you’re stacking the crates high.
* Leveling: Ensure that the crates are level by using shims or adjustable feet.
* Base Support: Place the bottom crates on a solid, level surface.
* Weight Distribution: Distribute the weight evenly throughout the closet to prevent it from tipping over.
Can I use this DIY fruit crate closet in a small space?
Absolutely! One of the best things about this DIY project is its adaptability to small spaces. You can customize the size and configuration of the closet to fit your specific needs. Use fewer crates to create a smaller closet, or stack them vertically to maximize space. Consider using smaller crates or cutting larger crates in half to fit tight corners. The key is to be creative and think outside the box.
How much weight can each fruit crate hold?
The weight capacity of each fruit crate will depend on the type of wood, the construction, and the condition of the crate. As a general rule, a sturdy wooden fruit crate can hold up to 50 pounds. However, it’s always best to err on the side of caution and avoid overloading the crates. Distribute the weight evenly throughout the closet to prevent any one crate from bearing too much load. If you’re storing heavy items, consider reinforcing the crates with additional supports.
Where can I find inspiration for my fruit crate closet design?
The internet is a treasure trove of inspiration for DIY projects. Browse Pinterest, Instagram, and home decor blogs for ideas on how to style your fruit crate closet. Look for images of closets that use similar materials or have a similar aesthetic to what you’re trying to achieve. Don’t be afraid to experiment and put your own personal touch on the design. Consider the overall style of your home and choose colors, finishes, and accessories that complement your existing decor.


Leave a Comment