

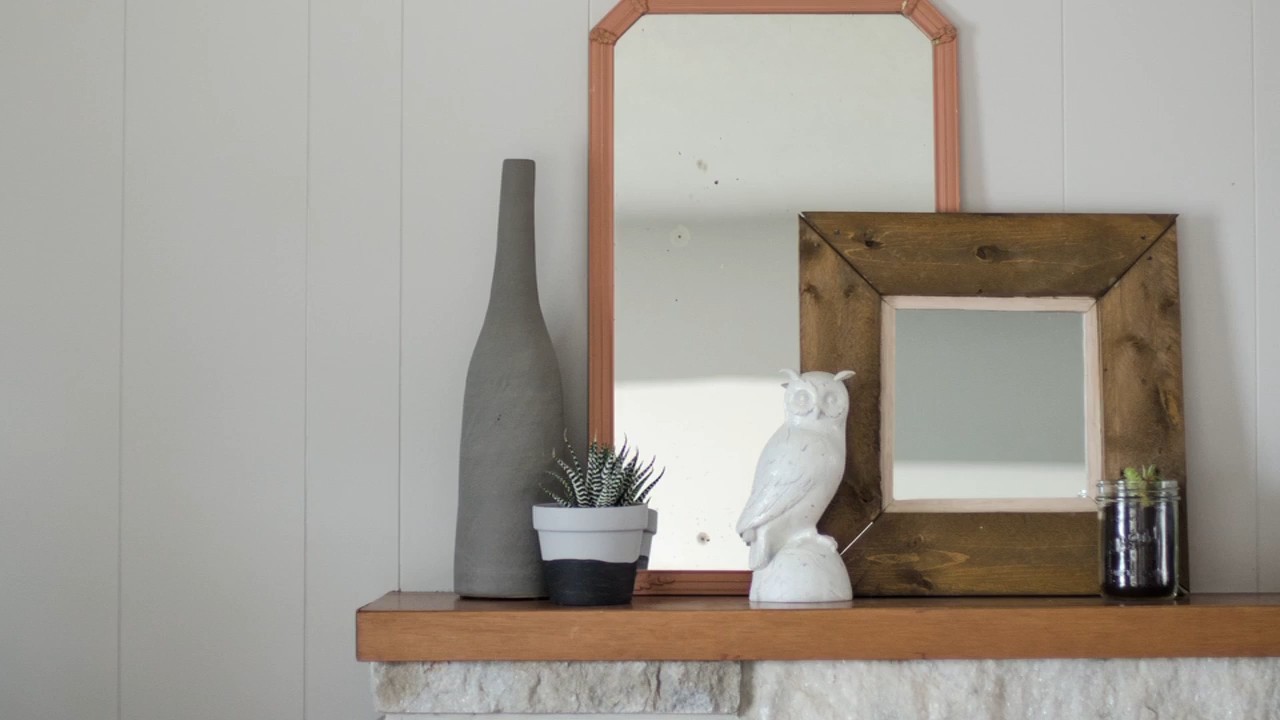
DIY Pallet Wood Mirror: Transform your space with rustic charm! Have you ever looked at a plain mirror and thought, “This needs some personality!”? I know I have! That’s where the magic of upcycling comes in. This DIY project isn’t just about creating a functional piece; it’s about adding a touch of unique, handcrafted style to your home using readily available materials.
Pallet wood, often discarded, has a rich history of resourcefulness. From its humble beginnings in shipping and storage, it has been embraced by DIY enthusiasts worldwide for its versatility and rustic appeal. Think of it as giving a second life to something that would otherwise end up in a landfill – talk about eco-chic!
Why do you need this DIY Pallet Wood Mirror in your life? Well, beyond its aesthetic appeal, it’s a fantastic way to save money on home decor. Store-bought mirrors with similar rustic frames can be quite pricey. Plus, crafting your own allows you to customize the size, shape, and finish to perfectly match your existing decor. I’m going to show you how to create a stunning mirror that will not only reflect your image but also your creativity and resourcefulness. Let’s get started!
“`html
DIY Pallet Wood Mirror: Rustic Charm for Your Home
Hey there, fellow DIY enthusiasts! Today, I’m super excited to share a project that’s close to my heart: crafting a beautiful and unique mirror using reclaimed pallet wood. This project is not only budget-friendly but also adds a touch of rustic charm to any room. Plus, it’s a fantastic way to give old pallets a new lease on life!
Materials You’ll Need
Before we dive in, let’s gather all the necessary materials. Trust me, having everything organized beforehand will make the process much smoother.
* **Pallet Wood:** Obviously! You’ll need at least one pallet, depending on the size of the mirror you want to create. Look for pallets that are in good condition, free from excessive damage or rot.
* **Mirror:** Choose a mirror that suits your style and the size of your frame. You can find mirrors at most home improvement stores or even repurpose one from an old piece of furniture.
* **Safety Glasses:** Safety first! Protect your eyes from flying debris.
* **Work Gloves:** Protect your hands from splinters and rough wood.
* **Measuring Tape:** Essential for accurate measurements.
* **Pencil:** For marking your cuts.
* **Circular Saw or Hand Saw:** For cutting the pallet wood. A circular saw will make the job faster, but a hand saw works just fine too.
* **Sander or Sandpaper:** To smooth out the rough edges of the pallet wood.
* **Wood Glue:** For securely attaching the frame pieces.
* **Clamps:** To hold the frame pieces together while the glue dries.
* **Wood Screws (optional):** For added reinforcement.
* **Drill (optional):** If you’re using wood screws.
* **Wood Stain or Paint (optional):** To customize the look of your frame.
* **Polyurethane or Varnish (optional):** To protect the wood and give it a finished look.
* **Mirror Mounting Clips or Construction Adhesive:** To secure the mirror to the frame.
* **Backing Material (optional):** Plywood or cardboard to cover the back of the mirror.
* **Staple Gun (optional):** If you’re using backing material.
* **D-Rings and Wire (optional):** For hanging the mirror.
Preparing the Pallet Wood
This is a crucial step, so take your time and be careful!
1. **Disassemble the Pallet:** Carefully disassemble the pallet using a pry bar or hammer. Be mindful of nails and staples. Remove them completely to avoid any accidents later on. I usually wear gloves during this step to protect my hands.
2. **Inspect the Wood:** Examine each piece of wood for any signs of damage, rot, or excessive wear. Discard any pieces that are not suitable for your project.
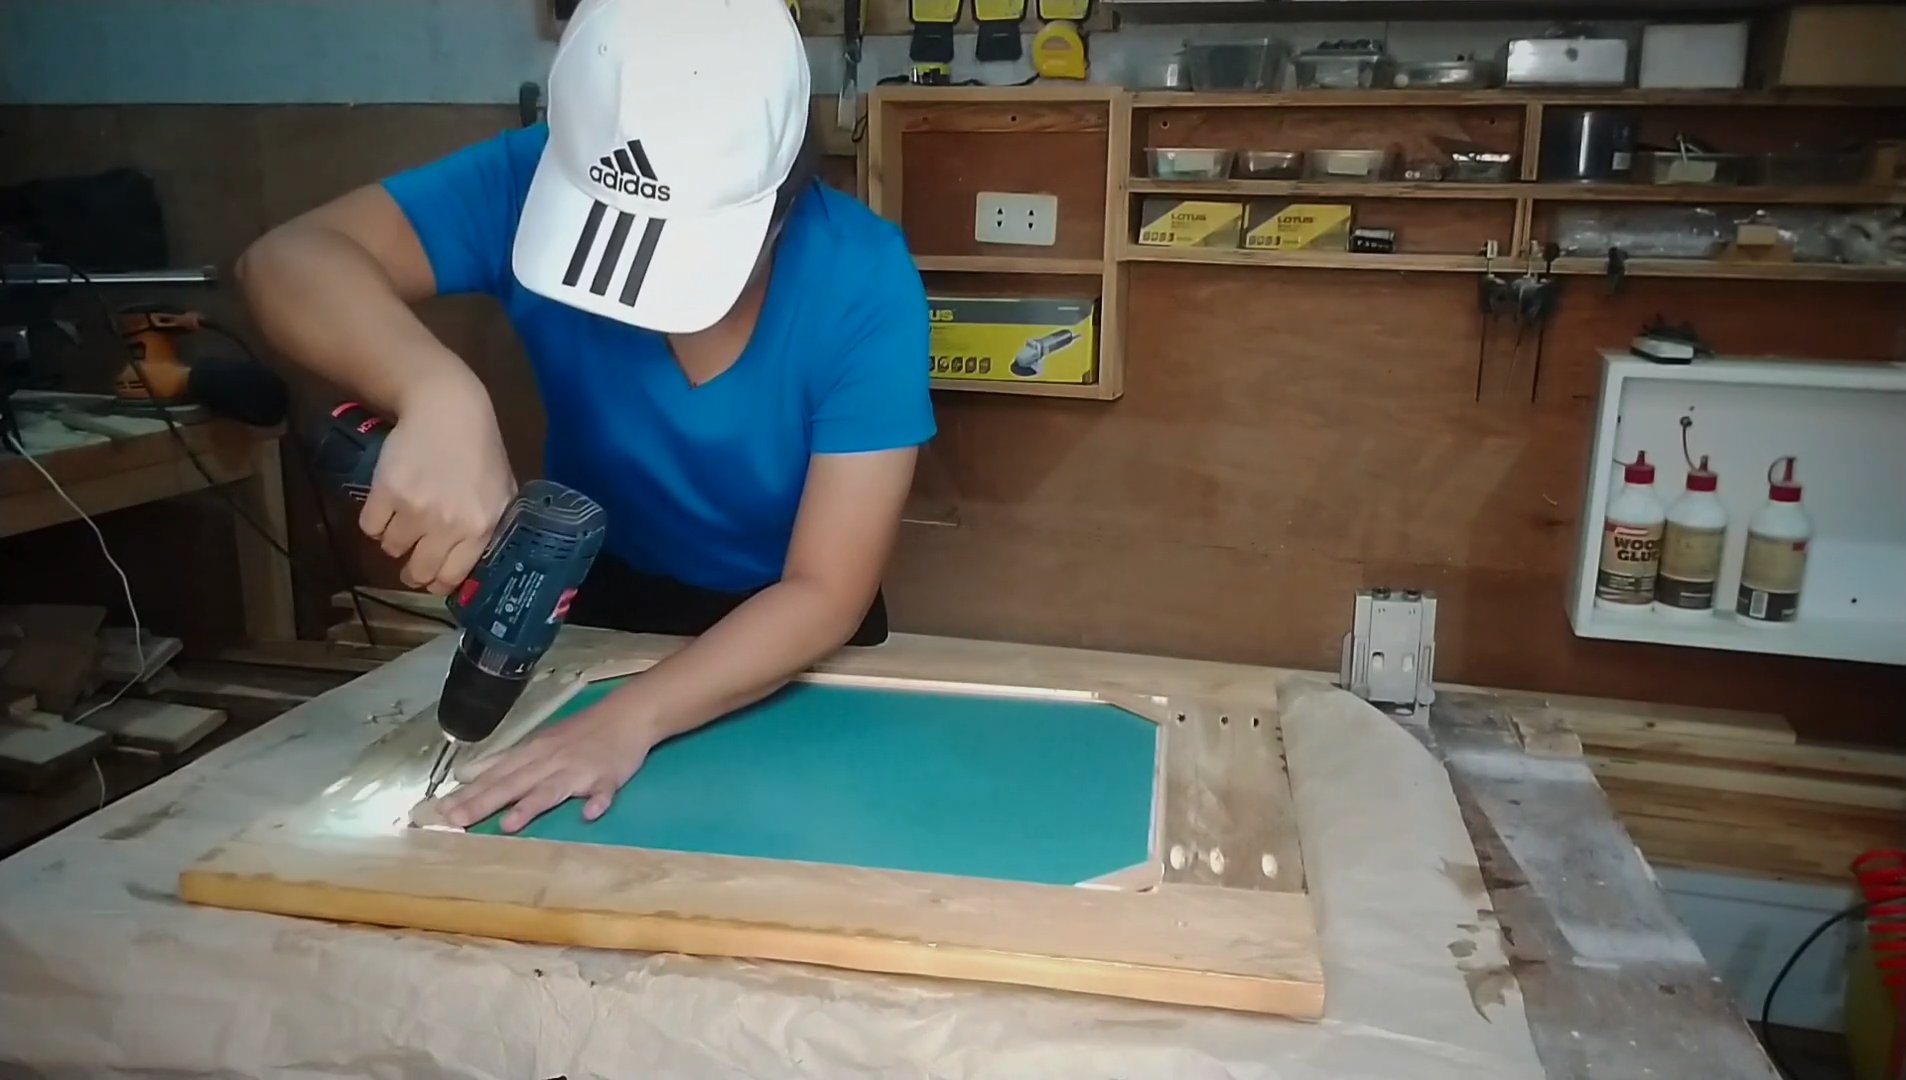
3. **Cut the Wood to Size:** Measure and cut the pallet wood to the desired lengths for your mirror frame. You’ll need four pieces: two for the top and bottom, and two for the sides. Make sure the corners are cut at a 45-degree angle for a clean, mitered look. I like to use a miter saw for this, but a hand saw and miter box will work just as well.
4. **Sand the Wood:** Sand all the pieces of wood to smooth out any rough edges and splinters. Start with a coarse grit sandpaper (80-grit) and gradually move to a finer grit (120-grit or 220-grit) for a smooth finish. This step is important for both aesthetics and safety!
Assembling the Mirror Frame
Now for the fun part – putting it all together!
1. **Dry Fit the Frame:** Before applying any glue, dry fit the frame pieces together to ensure they fit properly. Make any necessary adjustments at this stage.
2. **Apply Wood Glue:** Apply a generous amount of wood glue to the mitered edges of the frame pieces.
3. **Clamp the Frame:** Carefully clamp the frame pieces together, ensuring that the corners are aligned. Use corner clamps if you have them, as they will help to keep the corners square. If you don’t have corner clamps, you can use regular clamps and a square to ensure the corners are at a 90-degree angle.
4. **Add Screws (Optional):** For added reinforcement, you can drive wood screws through the corners of the frame. Pre-drill pilot holes to prevent the wood from splitting.
5. **Let the Glue Dry:** Allow the glue to dry completely according to the manufacturer’s instructions. This usually takes at least 24 hours.
Finishing the Frame
This is where you can really personalize your mirror!
1. **Sand Again (Optional):** Once the glue is dry, you can lightly sand the frame again to smooth out any imperfections.
2. **Stain or Paint the Frame (Optional):** If you want to stain or paint the frame, now is the time to do it. Choose a stain or paint that complements your décor. Apply the stain or paint according to the manufacturer’s instructions. I personally love using a dark walnut stain to enhance the rustic look of the pallet wood.
3. **Apply a Protective Finish (Optional):** To protect the wood and give it a finished look, apply a coat of polyurethane or varnish. This will also make the frame easier to clean.
Securing the Mirror
Almost there!
1. **Clean the Mirror:** Clean the mirror thoroughly with glass cleaner to remove any fingerprints or smudges.
2. **Attach the Mirror to the Frame:** There are a few different ways to attach the mirror to the frame. You can use mirror mounting clips, construction adhesive, or a combination of both.
* **Mirror Mounting Clips:** Position the mirror within the frame and secure it with mirror mounting clips. Make sure the clips are evenly spaced around the perimeter of the mirror.
* **Construction Adhesive:** Apply a bead of construction adhesive to the back of the mirror, near the edges. Carefully position the mirror within the frame and press it firmly into place. Use clamps or weights to hold the mirror in place while the adhesive dries.
3. **Add Backing (Optional):** To protect the back of the mirror and prevent dust from getting in, you can add a backing made of plywood or cardboard. Cut the backing to size and attach it to the back of the frame using staples or small nails.
Hanging the Mirror
The final step!
1. **Attach D-Rings and Wire (Optional):** If you want to hang the mirror on a wall, attach D-rings to the back of the frame, near the top. Thread wire through the D-rings and secure it tightly.
2. **Hang the Mirror:** Carefully hang the mirror on a wall using a sturdy hook or nail. Make sure the hook or nail is strong enough to support the weight of the mirror.
And there you have it! A beautiful, handcrafted pallet wood mirror that will add a touch of rustic charm to your home. I hope you enjoyed this DIY project as much as I did. Happy crafting!
“`
Conclusion
So, there you have it! Transforming reclaimed pallet wood into a stunning, rustic mirror is not only achievable but also incredibly rewarding. This DIY pallet wood mirror project is more than just a craft; it’s a statement piece, a conversation starter, and a testament to your creativity and resourcefulness. Forget those mass-produced, cookie-cutter mirrors you see everywhere. This is about creating something unique, something that reflects your personality and adds a touch of warmth and character to your home.
Why is this DIY trick a must-try? Because it’s sustainable, budget-friendly, and allows you to unleash your inner artist. You’re giving discarded materials a new lease on life, saving money compared to buying a similar mirror from a store, and crafting a piece that is truly one-of-a-kind. The imperfections in the wood, the variations in color and texture – these are not flaws, but rather the very elements that make your mirror special.
But the fun doesn’t stop there! Feel free to experiment with different stains, paints, and finishes to achieve your desired look. Want a more modern aesthetic? Try a sleek, dark stain and a minimalist frame design. Prefer a farmhouse vibe? Opt for a whitewashed finish and incorporate some decorative elements like metal accents or rope. You could even add small shelves to the frame for displaying plants or trinkets. Consider incorporating different sizes of pallet wood to create a more dynamic and textured frame. Don’t be afraid to get creative and personalize your DIY pallet wood mirror to perfectly complement your existing décor.
Another variation could involve incorporating mosaic tiles into the pallet wood frame. This adds a pop of color and visual interest, transforming your mirror into a true work of art. You could also experiment with different shapes for the mirror itself – a round mirror within a square pallet wood frame, for example, can create a striking contrast.
The possibilities are endless! The most important thing is to have fun and let your imagination guide you. This project is not about perfection; it’s about embracing the beauty of imperfection and creating something that you’re proud of.
We wholeheartedly encourage you to give this DIY pallet wood mirror project a try. It’s a fantastic way to spend a weekend, de-stress, and create something beautiful for your home. And once you’ve completed your masterpiece, we’d love to see it! Share your creations with us on social media using #DIYPalletMirror and inspire others to embark on their own creative journeys. We can’t wait to see what you come up with! Let’s transform discarded pallet wood into stunning reflections of our creativity, one mirror at a time.
Frequently Asked Questions
What kind of pallet wood should I use?
The best pallet wood for this project is heat-treated (HT) pallet wood. Avoid pallets marked with “MB” as they have been treated with methyl bromide, a harmful pesticide. Look for pallets that are clean, dry, and free of excessive splinters or damage. Hardwood pallets are generally more durable and aesthetically pleasing, but softwood pallets can also work well. Remember to always wear gloves and eye protection when handling pallet wood.
How do I safely disassemble a pallet?
Disassembling a pallet can be tricky, but there are a few methods you can use. A reciprocating saw with a metal-cutting blade is often the most efficient way to cut through the nails or screws holding the pallet together. You can also use a pry bar and hammer to carefully separate the boards, but this can be more time-consuming and may result in some splitting or damage to the wood. There are also specialized pallet buster tools available that are designed to make disassembly easier and safer. Always wear safety glasses and gloves when disassembling pallets.
Do I need to treat the pallet wood before using it?
Yes, it’s highly recommended to treat the pallet wood before using it for your mirror frame. This will help to protect the wood from moisture, pests, and decay. You can use a wood preservative or sealant to treat the wood. Apply the treatment according to the manufacturer’s instructions, and allow it to dry completely before proceeding with your project. This step is crucial for ensuring the longevity of your DIY pallet wood mirror.
What type of adhesive should I use to attach the mirror to the frame?
Use a mirror adhesive specifically designed for attaching mirrors to wood. Construction adhesive is not recommended as it can damage the mirror’s backing. Apply the adhesive in thin, even beads to the back of the mirror, and then carefully press it onto the pallet wood frame. Use clamps or weights to hold the mirror in place while the adhesive dries completely, following the manufacturer’s instructions for drying time.
How do I hang the finished mirror?
There are several ways to hang your finished mirror. You can attach D-rings to the back of the frame and use picture wire to hang it on a nail or hook. Alternatively, you can use heavy-duty sawtooth hangers or mounting brackets. Make sure to choose hardware that is appropriate for the weight of the mirror and the type of wall you’re hanging it on. For heavier mirrors, it’s best to use wall anchors to ensure that the mirror is securely mounted.
Can I use different types of wood besides pallet wood?
Absolutely! While this project focuses on using pallet wood, you can certainly use other types of reclaimed wood or even new lumber. Reclaimed barn wood, driftwood, or even old fence posts can all be used to create a unique and rustic mirror frame. If you’re using new lumber, consider using a wood stain or aging techniques to give it a more weathered and rustic look.
How do I clean and maintain my DIY pallet wood mirror?
To clean your mirror, use a glass cleaner and a soft cloth. Avoid using abrasive cleaners or scouring pads, as these can scratch the mirror’s surface. To clean the pallet wood frame, use a damp cloth to wipe away any dust or dirt. You can also apply a wood polish or wax to protect the wood and enhance its natural beauty. Regularly dusting the frame will help to keep it looking its best.
What if I don’t have access to pallet wood?
If you don’t have access to pallet wood, you can often find it for free or at a low cost from local businesses, construction sites, or online marketplaces. You can also check with local recycling centers or waste management facilities. Alternatively, you can purchase reclaimed wood from a lumberyard or home improvement store.
How can I customize the size and shape of the mirror?
You can customize the size and shape of the mirror to fit your specific needs and preferences. You can purchase a mirror of the desired size and shape from a glass shop or online retailer. Alternatively, you can cut a larger mirror to size using a glass cutter. Be sure to wear safety glasses and gloves when cutting glass, and follow the manufacturer’s instructions for using the glass cutter.
What are some other decorative elements I can add to my pallet wood mirror?
There are many ways to add decorative elements to your pallet wood mirror to personalize it and make it your own. You can add metal accents, rope, shells, mosaic tiles, or even small plants to the frame. You can also use stencils or paint to add designs or patterns to the wood. Get creative and experiment with different materials and techniques to create a truly unique and eye-catching mirror.

Leave a Comment