

DIY plastic wash basin coffee table – sounds a bit crazy, right? But trust me, you’re about to discover a surprisingly chic and budget-friendly way to add a unique touch to your living space! I know, I know, a wash basin as a coffee table? But hear me out! For centuries, resourceful people have been repurposing everyday objects, turning the mundane into the magnificent. Think of the pioneers who used old wagon wheels as fences or the artisans who transformed discarded metal into stunning sculptures. This DIY project taps into that same spirit of ingenuity and creativity.
In today’s world, where sustainability and affordability are more important than ever, finding clever ways to upcycle is a total game-changer. Instead of tossing that old plastic wash basin into the landfill, we can give it a new life as a stylish and functional coffee table. Plus, let’s be honest, furniture can be expensive! This DIY plastic wash basin coffee table project is not only eco-friendly but also a fantastic way to save some serious cash. I’m going to show you how to transform a simple plastic wash basin into a conversation-starting piece that will have all your friends asking, “Where did you get that?!” Get ready to unleash your inner DIY guru and create something truly special!
Transforming a Plastic Wash Basin into a Chic Coffee Table
Hey there, fellow DIY enthusiasts! Today, I’m super excited to share a fun and surprisingly easy project: turning an old plastic wash basin into a stylish and functional coffee table. You might be thinking, “A wash basin? Really?” But trust me, with a little creativity and elbow grease, you can create a unique piece that will definitely be a conversation starter. Plus, it’s a fantastic way to upcycle something that might otherwise end up in a landfill. Let’s get started!
Materials You’ll Need
Before we dive in, let’s gather all the necessary materials. This will make the process smoother and prevent any frustrating mid-project runs to the hardware store.
* Plastic Wash Basin: Choose one that’s sturdy and the right size for your desired coffee table. I recommend a thicker plastic for better durability.
* Wooden Table Legs: You can find these at most hardware stores or online. Consider the height and style you want for your table. I went with hairpin legs for a modern look.
* Wood Screws: Make sure they’re the right length for attaching the legs to the basin without poking through.
* Drill: Essential for creating pilot holes and attaching the legs.
* Screwdriver: To tighten the screws securely.
* Sandpaper: For smoothing any rough edges on the basin.
* Primer: To prepare the plastic surface for painting.
* Paint: Choose a color that complements your decor. I used a matte black spray paint for a sleek finish.
* Clear Coat (Optional): For added protection and durability.
* Measuring Tape: To ensure accurate leg placement.
* Pencil or Marker: For marking drill points.
* Safety Glasses: Always protect your eyes!
* Dust Mask: To avoid inhaling paint fumes.
* Drop Cloth or Newspaper: To protect your work surface.
* Optional: Decorative elements like stencils, paint pens, or mosaic tiles to personalize your table.
Preparing the Wash Basin
This step is crucial for ensuring a smooth and long-lasting finish. We need to clean, sand, and prime the basin before we can add any color.
1. Clean the Basin Thoroughly: Start by washing the wash basin with soap and water to remove any dirt, grime, or residue. Make sure it’s completely dry before moving on to the next step.
2. Sand the Surface: Use sandpaper to lightly sand the entire surface of the basin. This will create a slightly rough texture that will help the primer adhere better. Focus on any rough edges or imperfections. Wipe away any sanding dust with a damp cloth.
3. Apply Primer: In a well-ventilated area, apply a thin, even coat of primer to the entire basin. This is a really important step because plastic can be tricky to paint. The primer helps the paint stick and prevents it from peeling or chipping later on. Let the primer dry completely according to the manufacturer’s instructions. I usually wait at least 24 hours.
Painting the Wash Basin
Now comes the fun part – adding color! Choose a paint that you love and that complements your home decor.
1. Apply the First Coat of Paint: In a well-ventilated area, apply a thin, even coat of paint to the primed basin. Use smooth, consistent strokes to avoid drips or streaks. I prefer spray paint for this project because it provides a nice, even finish.
2. Let it Dry: Allow the first coat of paint to dry completely. Again, follow the manufacturer’s instructions for drying time. Patience is key here!
3. Apply Additional Coats (If Necessary): Depending on the color and coverage of your paint, you may need to apply a second or even third coat. Make sure each coat is completely dry before applying the next.
4. Apply Clear Coat (Optional): If you want to add extra protection and durability to your coffee table, apply a clear coat after the paint is completely dry. This will help prevent scratches and scuffs. Let the clear coat dry according to the manufacturer’s instructions.
Attaching the Table Legs
This is where your wash basin really starts to look like a coffee table! Accurate leg placement is essential for stability and aesthetics.
1. Measure and Mark Leg Placement: Turn the painted wash basin upside down. Use a measuring tape to determine the desired placement of the table legs. Make sure they are evenly spaced around the perimeter of the basin. Use a pencil or marker to mark the drill points for each leg. I usually aim for about 4-6 inches from the edge of the basin, depending on its size.
2. Drill Pilot Holes: Using a drill, create pilot holes at each marked point. The pilot holes should be slightly smaller than the diameter of the wood screws you’ll be using. This will make it easier to screw in the legs and prevent the plastic from cracking.
3. Attach the Legs: Align each table leg with the corresponding pilot holes. Use a screwdriver to securely attach the legs to the basin with wood screws. Make sure the screws are tight, but don’t overtighten them, as this could damage the plastic.
4. Check for Stability: Once all the legs are attached, carefully turn the coffee table right side up. Check for stability and make sure the table doesn’t wobble. If it does, you may need to adjust the legs or add shims to level it out.
Adding Decorative Touches (Optional)
Now that you have a functional coffee table, you can personalize it with decorative touches to match your style. Here are a few ideas:
* Stencils: Use stencils and paint to add patterns or designs to the surface of the table.
* Paint Pens: Use paint pens to draw intricate details or add lettering.
* Mosaic Tiles: Glue mosaic tiles to the surface of the table for a colorful and textured look.
* Decoupage: Decoupage images or patterns onto the table using Mod Podge.
* Rope Detailing: Glue rope around the edge of the basin for a nautical or rustic feel.
Alternative Leg Attachment Method: Epoxy Resin
If you’re looking for an even stronger and more seamless way to attach the legs, consider using epoxy resin. This method requires a bit more preparation, but the results are incredibly durable.
1. Prepare the Leg Mounting Surfaces: Lightly sand the areas on the basin where the legs will be attached. Also, sand the top of the table legs where they will contact the basin. This will provide a better surface for the epoxy to bond to.
2. Clean the Surfaces: Thoroughly clean both the basin and the legs with isopropyl alcohol to remove any dust, grease, or residue.
3. Mix the Epoxy Resin: Carefully follow the manufacturer’s instructions for mixing the epoxy resin. Be sure to use the correct ratio of resin to hardener.
4. Apply the Epoxy: Apply a generous amount of epoxy resin to the top of each table leg and to the corresponding area on the basin.
5. Position the Legs: Carefully position the legs onto the basin, ensuring they are evenly spaced and aligned correctly.
6. Secure the Legs (Temporary): Use clamps or weights to hold the legs in place while the epoxy cures. This is crucial to prevent them from shifting during the curing process.
7. Allow to Cure: Allow the epoxy resin to cure completely according to the manufacturer’s instructions. This may take several hours or even overnight.
8. Remove Clamps: Once the epoxy is fully cured, remove the clamps or weights. The legs should now be securely attached to the basin.
Troubleshooting Tips
Even with the best planning, things can sometimes go awry. Here are a few common issues and how to fix them:
* Paint Peeling: If the paint is peeling, it’s likely due to poor surface preparation. Make sure you sand and prime the basin properly before painting.
* Legs Wobbling: If the legs are wobbling, try adjusting them or adding shims to level the table. You can also try tightening the screws or using a stronger adhesive.
* Cracked Plastic: If the plastic cracks while drilling, try using a smaller drill bit and applying less pressure. You can also reinforce the area with epoxy resin.
* Uneven Paint Finish: If the paint finish is uneven, try sanding it lightly and applying another coat of paint. Make sure you’re using smooth, consistent strokes.
Final Thoughts
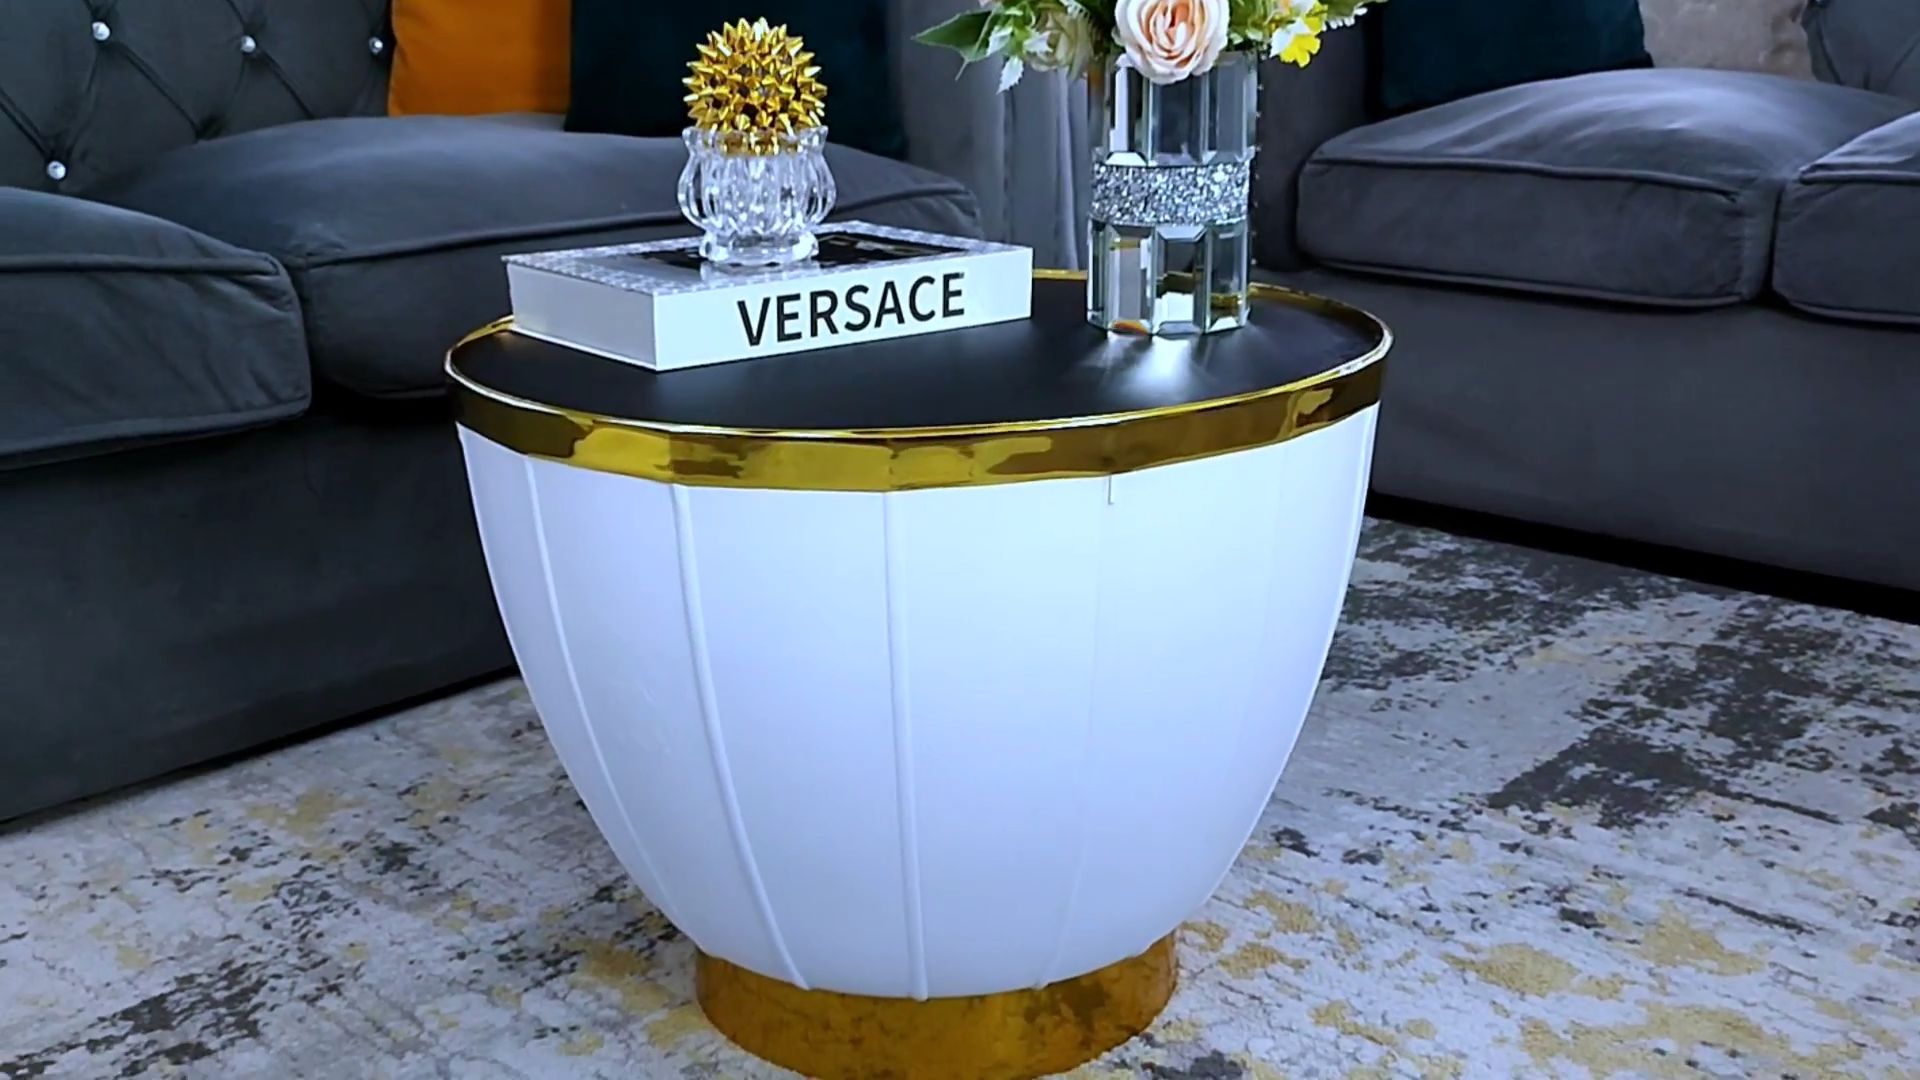
And there you have it! A stylish and unique coffee table made from a repurposed plastic wash basin. I love how this project combines creativity, sustainability, and functionality. It’s a great way to add a personal touch to your home decor while also reducing waste. I hope you enjoyed this tutorial and feel inspired to try it yourself. Don’t be afraid to experiment with different colors, patterns, and decorative elements to create a coffee table that truly reflects your style. Happy DIY-ing!
Conclusion
So, there you have it! Transforming an old plastic wash basin into a stylish and functional coffee table is not just a clever upcycling project; it’s a statement. It’s a statement about sustainability, creativity, and the power of DIY. In a world increasingly focused on reducing waste and embracing unique design, this project allows you to contribute to both.
Why is this DIY plastic wash basin coffee table a must-try? Because it’s incredibly affordable. Instead of spending a fortune on a new coffee table, you’re repurposing something you likely already have or can acquire for next to nothing. It’s also surprisingly easy. The steps are straightforward, and the materials are readily available. Even if you’re a beginner when it comes to DIY projects, you can confidently tackle this one.
Beyond the practical benefits, this project offers a fantastic opportunity for personalization. The possibilities are endless! Consider painting the basin in a bold, vibrant color to make it a focal point in your living room. Or, opt for a more subtle, neutral tone to blend seamlessly with your existing decor. You could even use stencils or decoupage techniques to add intricate patterns and designs.
For the tabletop, think beyond just a simple wooden circle. Explore different materials like reclaimed wood for a rustic feel, a piece of tempered glass for a modern look, or even a mosaic tile design for a touch of artistry. If you’re feeling particularly ambitious, you could incorporate a lazy Susan into the tabletop for added functionality.
And don’t forget about the legs! While hairpin legs are a popular choice, consider other options like vintage table legs, industrial pipe fittings, or even repurposed wooden spindles. The choice of legs can dramatically alter the overall aesthetic of your coffee table.
This project isn’t just about creating a coffee table; it’s about unleashing your creativity and expressing your personal style. It’s about taking something ordinary and transforming it into something extraordinary. It’s about proving that you don’t need to spend a lot of money to have a beautiful and functional home.
We wholeheartedly encourage you to give this DIY project a try. Gather your materials, unleash your inner artist, and create a one-of-a-kind coffee table that you’ll be proud to show off. And most importantly, don’t forget to share your creations with us! We’d love to see your unique interpretations of this project. Post photos of your finished coffee table on social media using #DIYWashBasinTable and tag us so we can admire your handiwork and share it with our community. Let’s inspire each other to embrace creativity and sustainability, one DIY project at a time. This is more than just a coffee table; it’s a conversation starter, a testament to your resourcefulness, and a beautiful addition to your home. So, what are you waiting for? Get started today!
Frequently Asked Questions (FAQs)
Q: What kind of plastic wash basin is best for this project?
A: Ideally, you want a sturdy, thick plastic wash basin. Avoid flimsy or brittle plastic, as it may not be able to support the weight of the tabletop and anything you place on it. Look for basins made from durable materials like polypropylene or polyethylene. The size of the basin will depend on the desired size of your coffee table. A larger basin will result in a larger table. Also, consider the shape of the basin. A round or oval basin is generally easier to work with, but a square or rectangular basin can also be used for a more modern look.
Q: Where can I find a suitable tabletop?
A: There are several options for finding a tabletop. You can purchase a pre-made wooden tabletop from a home improvement store or online retailer. Alternatively, you can create your own tabletop from scratch using plywood or reclaimed wood. If you’re using reclaimed wood, be sure to sand it down and seal it properly to protect it from moisture and wear. You can also explore alternative materials like tempered glass, mosaic tiles, or even a large serving tray. The key is to choose a tabletop that is the right size and shape for your wash basin and that complements your overall design aesthetic.
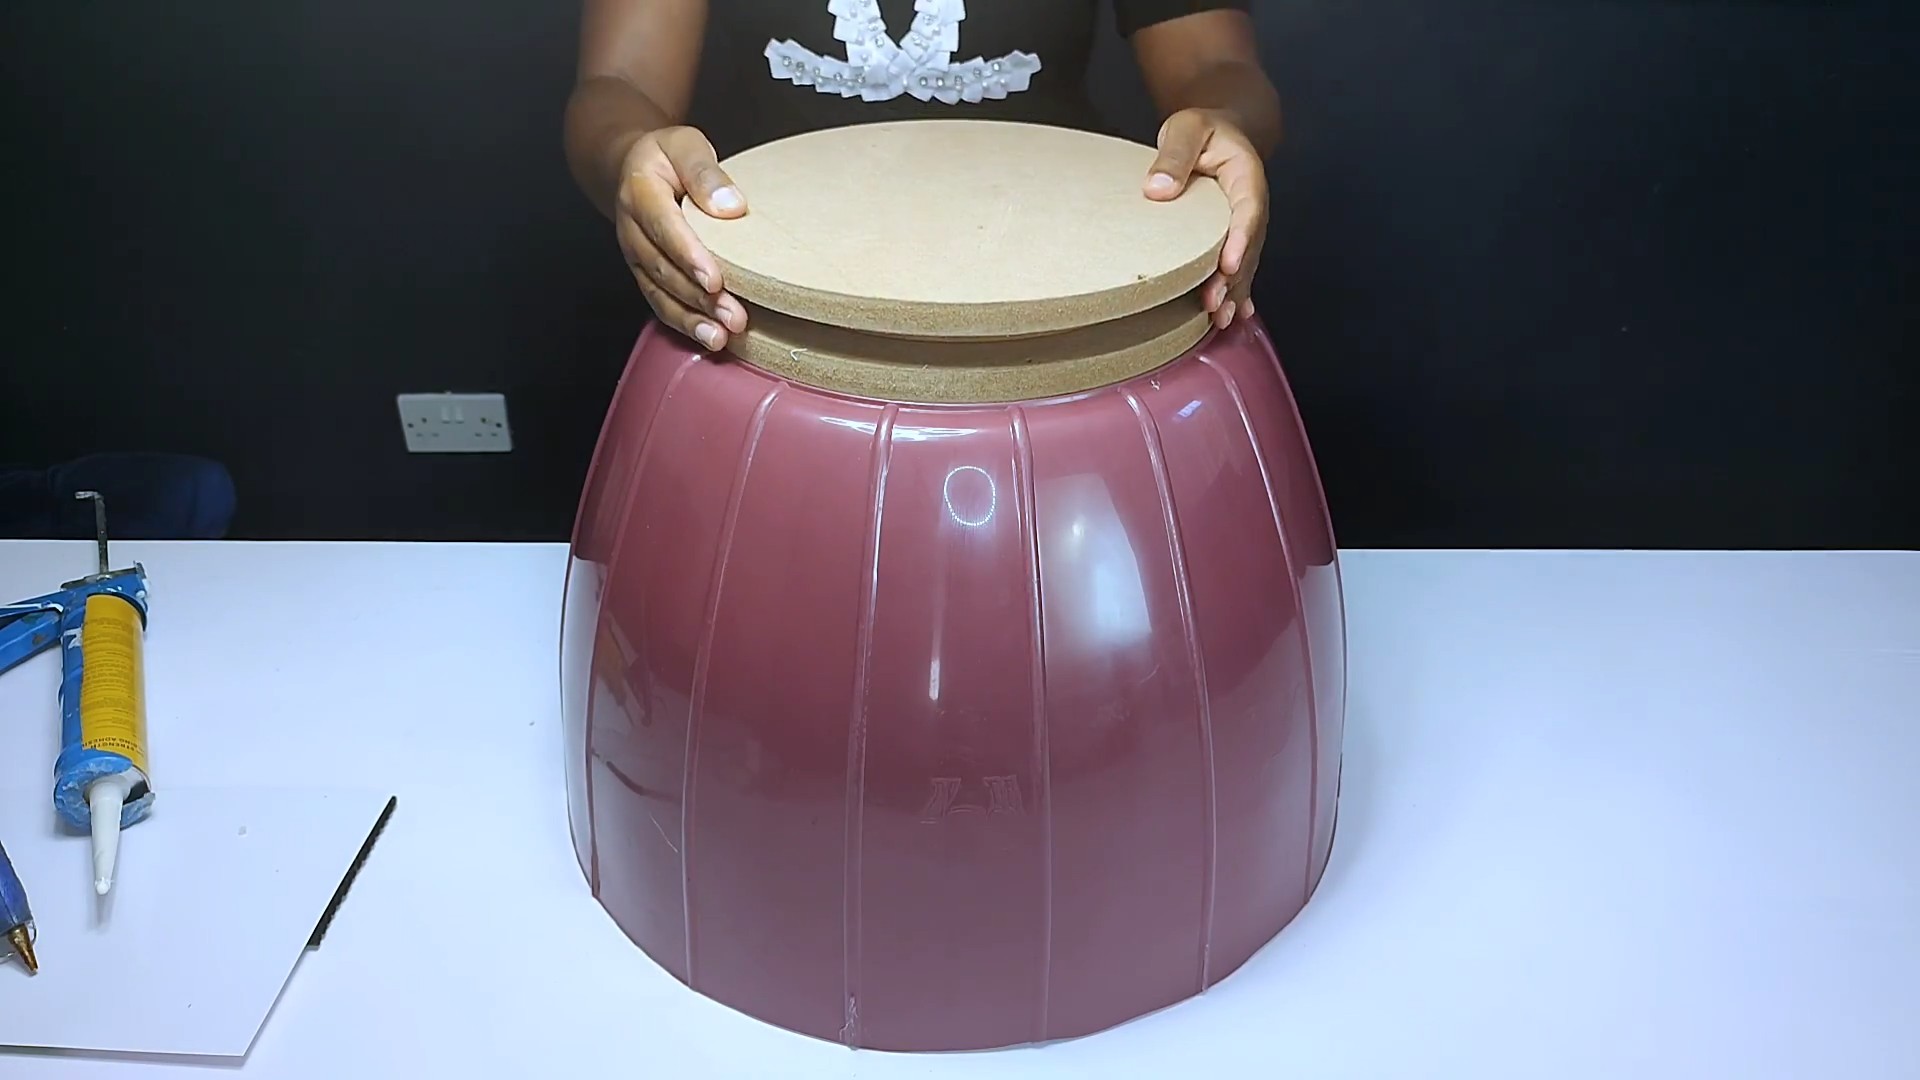
Q: How do I attach the tabletop to the wash basin?
A: The best method for attaching the tabletop to the wash basin will depend on the materials you’re using. For a wooden tabletop, you can use construction adhesive or screws. If using adhesive, be sure to choose a strong, waterproof adhesive that is suitable for bonding plastic and wood. If using screws, pre-drill pilot holes to prevent the plastic from cracking. For a glass tabletop, you’ll need to use a specialized adhesive that is designed for bonding glass to other materials. You may also want to consider using rubber bumpers or spacers to protect the glass from scratches and to provide a more secure fit.
Q: What type of legs should I use for my coffee table?
A: The choice of legs is a matter of personal preference and will depend on the overall style you’re aiming for. Hairpin legs are a popular choice for their mid-century modern aesthetic. You can find them in a variety of sizes and finishes. Other options include vintage table legs, industrial pipe fittings, or repurposed wooden spindles. Consider the height of the legs when making your selection. A standard coffee table height is around 16-18 inches, but you can adjust the height to suit your needs.
Q: How do I attach the legs to the wash basin?
A: The method for attaching the legs will depend on the type of legs you’re using. For hairpin legs, you can use screws or bolts. Pre-drill pilot holes in the plastic basin to prevent cracking. For pipe fittings, you can use flanges that attach to the basin with screws. For vintage table legs or wooden spindles, you may need to create a wooden base or platform that attaches to the basin and provides a secure mounting surface for the legs. Be sure to use strong, durable fasteners to ensure that the legs are securely attached to the basin.
Q: Can I add storage to my coffee table?
A: Absolutely! One of the great things about this DIY project is that you can customize it to suit your needs. You can add storage by incorporating baskets or bins inside the wash basin. You can also attach shelves or drawers to the sides of the basin. Get creative and think about how you can maximize the storage potential of your coffee table.
Q: How do I clean and maintain my DIY plastic wash basin coffee table?
A: Cleaning your coffee table is easy. Simply wipe it down with a damp cloth and mild soap. Avoid using harsh chemicals or abrasive cleaners, as they can damage the plastic or the tabletop. For wooden tabletops, be sure to apply a sealant or finish to protect the wood from moisture and stains. Regularly dust the legs and any other decorative elements to keep your coffee table looking its best.
Q: What if my wash basin has holes in it?
A: If your wash basin has holes in it, you can easily patch them up using plastic epoxy or a similar sealant. Be sure to clean the area around the hole thoroughly before applying the sealant. Allow the sealant to dry completely before proceeding with the rest of the project. You can also cover the holes with decorative elements like stickers, paint, or fabric.
Q: Can I use this project for outdoor use?
A: Yes, you can use this project for outdoor use, but you’ll need to take a few precautions. Choose a plastic wash basin that is UV-resistant to prevent it from fading or cracking in the sun. Use a waterproof sealant to protect the tabletop and legs from moisture. Consider using outdoor-rated hardware and fasteners to prevent rust and corrosion. And be sure to bring the coffee table indoors during extreme weather conditions.


Leave a Comment