

Eggshell Bioplastic Bowl DIY: Ever wondered if you could transform your breakfast leftovers into something beautiful and functional? I’m here to tell you, you absolutely can! For centuries, humans have sought ways to repurpose materials, driven by necessity and ingenuity. Think of ancient civilizations using clay for pottery or resourceful communities weaving baskets from discarded reeds. This DIY project taps into that same spirit of resourcefulness, giving a modern, eco-friendly twist to an age-old practice.
In today’s world, where sustainability is more crucial than ever, finding creative ways to reduce waste is essential. That’s where this Eggshell Bioplastic Bowl DIY comes in. Imagine reducing your plastic consumption and creating a unique, biodegradable bowl all at once! Not only is it a fantastic way to upcycle those eggshells you’d normally toss, but it also offers a fun and educational activity for the whole family. Plus, who wouldn’t love a conversation-starting piece that showcases your commitment to a greener lifestyle? Let’s dive in and discover how to turn humble eggshells into a stunning and sustainable creation!
DIY Eggshell Bioplastic Bowl: A Sustainable and Creative Project
Hey there, fellow DIY enthusiasts! Today, I’m super excited to share a project that’s not only fun and creative but also eco-friendly: making a bioplastic bowl from eggshells! Yes, you read that right. We’re turning those seemingly useless eggshells into a sturdy and beautiful bowl. This project is a fantastic way to reduce waste, learn about bioplastics, and create something unique for your home. Let’s dive in!
Materials You’ll Need
Before we get started, let’s gather all the necessary materials. Trust me, having everything ready will make the process much smoother.
* Eggshells: Lots of them! Aim for at least 20-30 eggshells, depending on the size of the bowl you want to create. The more, the merrier!
* Cornstarch: This acts as our binding agent. You’ll need about 1/4 cup.
* Glycerin: This adds flexibility to the bioplastic. You’ll need about 2 tablespoons. You can find this at most pharmacies or online.
* White Vinegar: This helps break down the eggshells and create a smoother mixture. You’ll need about 1/4 cup.
* Water: For mixing and cleaning.
* Food Coloring (Optional): If you want to add some color to your bowl, grab your favorite food coloring.
* Mixing Bowls: You’ll need a couple of bowls for mixing the ingredients.
* Blender or Food Processor: To grind the eggshells into a fine powder. A coffee grinder can also work in a pinch.
* Baking Sheet: To dry the bioplastic.
* Parchment Paper: To line the baking sheet and prevent sticking.
* Bowl Mold: This is crucial for shaping your bowl. You can use a regular bowl, a silicone mold, or even a balloon!
* Spatula or Spoon: For mixing and spreading the bioplastic mixture.
* Sandpaper (Optional): For smoothing any rough edges after drying.
* Protective Gloves: To protect your hands, especially when working with vinegar.
* Dust Mask: To avoid inhaling eggshell dust when grinding.
Preparing the Eggshells
This is a crucial step, so pay close attention! We need to make sure the eggshells are clean and properly prepared for the bioplastic mixture.
1. Clean the Eggshells: After using eggs, rinse the shells thoroughly with water. Remove any remaining egg membrane. This is important to prevent any unpleasant odors or bacterial growth.
2. Boil the Eggshells: Place the cleaned eggshells in a pot of boiling water for about 10-15 minutes. This will further sanitize them and help remove any lingering bacteria.
3. Dry the Eggshells: Spread the boiled eggshells on a clean towel or baking sheet and let them air dry completely. This might take a few hours, or you can speed it up by placing them in a low-temperature oven (around 200°F or 93°C) for about 30 minutes. Make sure they are completely dry before moving on to the next step.
4. Grind the Eggshells: Once the eggshells are dry, it’s time to grind them into a fine powder. Put on your dust mask! Place the eggshells in a blender, food processor, or coffee grinder and grind them until they reach a powder-like consistency. The finer the powder, the smoother your bioplastic will be.
5. Sift the Eggshell Powder (Optional): For an even smoother texture, you can sift the eggshell powder through a fine-mesh sieve. This will remove any larger pieces that might have escaped the grinding process.
Making the Bioplastic Mixture
Now for the fun part: creating the bioplastic mixture! This is where the magic happens.
1. Combine Dry Ingredients: In a mixing bowl, combine the eggshell powder and cornstarch. Mix them well to ensure they are evenly distributed.
2. Add Wet Ingredients: In a separate bowl, mix together the glycerin, white vinegar, and water. If you’re using food coloring, add it to this mixture as well.
3. Combine Wet and Dry Ingredients: Gradually add the wet ingredients to the dry ingredients, mixing continuously with a spatula or spoon. Make sure to incorporate all the dry ingredients and avoid any lumps. The mixture should have a thick, paste-like consistency.
4. Cook the Mixture: Pour the mixture into a saucepan and heat it over medium heat, stirring constantly. This is important to prevent burning. Continue stirring until the mixture thickens and becomes translucent. This should take about 5-10 minutes. You’ll notice the mixture becoming more like a gel.
5. Remove from Heat: Once the mixture has thickened and become translucent, remove it from the heat and let it cool slightly for a few minutes.
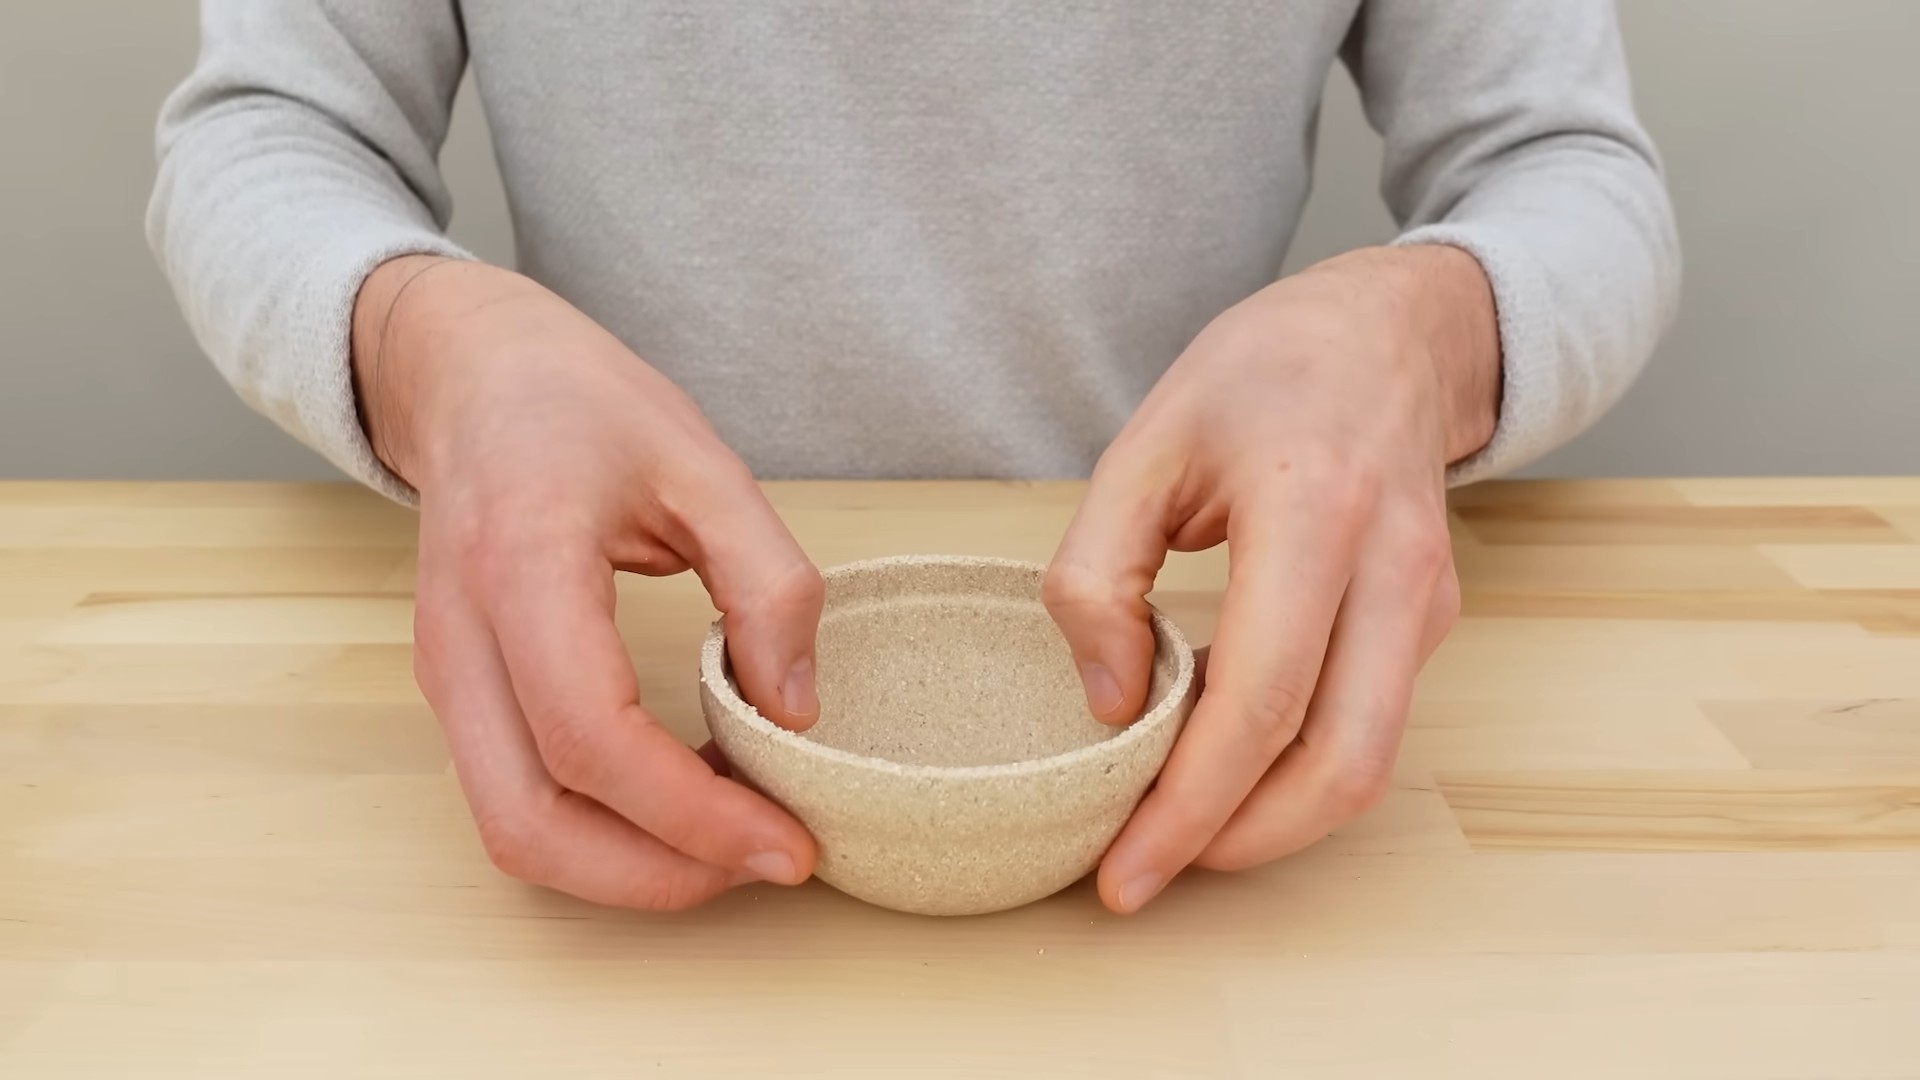
Shaping the Bowl
This is where your creativity comes into play! Choose your bowl mold and get ready to shape your bioplastic masterpiece.
1. Prepare the Mold: Line your bowl mold with parchment paper. This will prevent the bioplastic from sticking to the mold and make it easier to remove the finished bowl. If you’re using a balloon, inflate it to the desired size and place it in a bowl to keep it stable.
2. Apply the Bioplastic Mixture: Using a spatula or spoon, carefully spread the bioplastic mixture evenly over the inside of the bowl mold or the surface of the balloon. Make sure to create a consistent thickness throughout the bowl. The thicker the layer, the sturdier your bowl will be. I recommend aiming for at least 1/4 inch thickness.
3. Smooth the Surface: Use your fingers or the back of a spoon to smooth the surface of the bioplastic. This will give your bowl a more polished look.
4. Add Decorations (Optional): If you want to add any decorations to your bowl, now is the time to do it. You can press small objects like beads, seeds, or dried flowers into the surface of the bioplastic.
5. Let it Dry: This is the most crucial step! Allow the bioplastic to dry completely. This can take anywhere from 24 to 72 hours, depending on the thickness of the mixture and the humidity of your environment. You can speed up the drying process by placing the bowl in a low-temperature oven (around 150°F or 65°C) for a few hours. However, be careful not to overheat it, as this can cause the bioplastic to crack.
Finishing Touches
Once the bioplastic is completely dry, it’s time to remove it from the mold and add any finishing touches.
1. Remove from Mold: Carefully peel the parchment paper away from the bioplastic bowl. If you used a balloon, deflate it and gently remove it from the bowl.
2. Sand the Edges (Optional): If the edges of the bowl are rough or uneven, you can use sandpaper to smooth them down. Start with a coarse grit sandpaper and gradually move to a finer grit for a smoother finish.
3. Seal the Bowl (Optional): To make your bowl more water-resistant, you can seal it with a food-safe sealant. This will also help protect the bioplastic from moisture and prevent it from degrading over time.
4. Admire Your Creation: Congratulations! You’ve successfully created a bioplastic bowl from eggshells. Now you can use it to hold small items, display decorative objects, or simply admire your handiwork.
Tips and Troubleshooting
Here are a few extra tips and troubleshooting suggestions to help you along the way:
* Eggshell Preparation is Key: Make sure the eggshells are thoroughly cleaned, boiled, and dried before grinding. This will prevent any unpleasant odors or bacterial growth.
* Grind Finely: The finer the eggshell powder, the smoother your bioplastic will be.
* Stir Constantly: When cooking the bioplastic mixture, stir constantly to prevent burning.
* Drying Time: Be patient! The drying time can vary depending on the thickness of the mixture and the humidity of your environment.
* Cracking: If your bioplastic cracks during drying, it could be due to overheating or drying too quickly. Try drying it at a lower temperature or in a more humid environment.
* Mold: If you notice any mold growth on your bioplastic, discard it immediately. This is usually caused by insufficient cleaning of the eggshells.
* Experiment with Colors: Don’t be afraid to experiment with different food colorings to create unique and vibrant bowls.
* Different Molds: Try using different types of molds to create bowls of various shapes and sizes.
* Durability: Remember that bioplastic is not as durable as traditional plastic. Avoid using your bowl for heavy or sharp objects.
* Storage:

Conclusion
So, there you have it! Transforming humble eggshells into a surprisingly durable and eco-friendly bioplastic bowl is not just a fun science experiment; it’s a tangible step towards reducing plastic waste and embracing sustainable living. This Eggshell Bioplastic Bowl DIY project offers a unique opportunity to witness the potential of repurposing materials that would otherwise end up in landfills.
But why is this DIY trick a must-try? Beyond the environmental benefits, it’s an incredibly rewarding process. You’re not just following a recipe; you’re engaging in a creative endeavor that yields a functional and aesthetically pleasing object. Imagine the satisfaction of serving snacks or displaying small items in a bowl you crafted from discarded eggshells! It’s a conversation starter, a testament to your resourcefulness, and a small but significant contribution to a more sustainable future.
The beauty of this project also lies in its adaptability. Feel free to experiment with different natural dyes to create bowls in a spectrum of colors. Beetroot juice can yield a lovely pink hue, turmeric powder a vibrant yellow, and spinach juice a subtle green. You can also incorporate dried flowers or herbs into the mixture for added texture and visual appeal. Consider adding a few drops of essential oils during the mixing process to infuse your bowl with a pleasant aroma. Lavender, chamomile, or citrus oils would be excellent choices.
For a more robust bowl, you can try adding a small amount of natural fiber, such as shredded paper or cotton, to the eggshell mixture. This will provide additional reinforcement and prevent cracking. Experiment with different ratios to find the perfect balance between strength and flexibility.
Don’t be afraid to get creative with the mold you use. While a simple bowl shape is a great starting point, you can also use cookie cutters or other molds to create unique and intricate designs. Just remember to line the mold with parchment paper or plastic wrap to prevent the bioplastic from sticking.
We understand that venturing into DIY projects can sometimes feel daunting, but we assure you that this Eggshell Bioplastic Bowl DIY is surprisingly straightforward. The key is to be patient and follow the instructions carefully. Don’t be discouraged if your first attempt isn’t perfect. Like any skill, crafting bioplastic bowls takes practice.
We are confident that you’ll find this DIY project both enjoyable and educational. So, gather your eggshells, unleash your creativity, and embark on this exciting journey of sustainable crafting. We can’t wait to see what you create!
We wholeheartedly encourage you to try this Eggshell Bioplastic Bowl DIY project and share your experiences with us. Post photos of your creations on social media using #EggshellBioplasticBowlDIY and tag us so we can admire your ingenuity. Let’s inspire others to embrace sustainable living, one eggshell bowl at a time! Your feedback and insights will help us refine the process and make it even more accessible for everyone. Together, we can make a difference.
Frequently Asked Questions (FAQ)
What kind of eggs work best for this project?
Any type of chicken eggshell will work for this Eggshell Bioplastic Bowl DIY. Brown or white eggs are equally suitable. The most important thing is to thoroughly clean and dry the eggshells before using them. Make sure to remove any remaining egg membrane, as this can affect the quality of the bioplastic. Duck eggs can also be used, but they may require slightly different drying times due to their thicker shells.
How finely should I grind the eggshells?
The finer the eggshell powder, the smoother the final bioplastic bowl will be. Aim for a consistency similar to that of flour or cornstarch. You can use a coffee grinder, food processor, or mortar and pestle to grind the eggshells. If using a coffee grinder or food processor, pulse the eggshells in short bursts to avoid overheating the motor. Be sure to wear a mask to avoid inhaling the fine eggshell dust.
What type of binder is best to use?
While the recipe typically calls for a specific type of binder, you can experiment with other natural binders. Cornstarch is a common and readily available option. You can also try using tapioca starch or potato starch. The key is to find a binder that creates a smooth and consistent paste when mixed with water and eggshell powder. Experiment with different ratios to find the perfect consistency for your desired bowl.
How long does it take for the bioplastic bowl to dry completely?
Drying time can vary depending on the humidity and temperature of your environment. Generally, it takes at least 24-48 hours for the bioplastic bowl to dry completely. To speed up the drying process, you can place the bowl in a warm, dry place, such as near a radiator or in a dehydrator set to a low temperature. Avoid placing the bowl in direct sunlight, as this can cause it to crack. The bowl is fully dry when it feels hard and rigid to the touch.
How durable is the eggshell bioplastic bowl?
While the eggshell bioplastic bowl is surprisingly durable, it’s important to remember that it’s not as strong as traditional plastic. It’s best suited for holding lightweight items, such as snacks, jewelry, or small trinkets. Avoid using it to hold heavy or sharp objects, as this can cause it to crack or break. The bowl is also not waterproof, so avoid using it to hold liquids.
Can I paint or decorate the finished bowl?
Absolutely! Once the bioplastic bowl is completely dry, you can paint it with acrylic paints, decorate it with markers, or embellish it with beads, sequins, or other decorative elements. Be sure to use non-toxic paints and adhesives. You can also apply a sealant to protect the paint and make the bowl more durable. Get creative and personalize your bowl to match your style and décor.
Is the eggshell bioplastic bowl food-safe?
While the ingredients used in this Eggshell Bioplastic Bowl DIY are generally considered food-safe, it’s important to note that the bowl itself is not certified for food contact. Therefore, it’s best to avoid using it to serve food directly. You can use it to hold pre-packaged snacks or to display food items that are wrapped in paper or plastic.
How do I clean the eggshell bioplastic bowl?
To clean the eggshell bioplastic bowl, simply wipe it down with a damp cloth. Avoid using harsh chemicals or abrasive cleaners, as these can damage the surface of the bowl. If necessary, you can use a mild soap and water solution. Be sure to dry the bowl thoroughly after cleaning to prevent mold or mildew growth.
What can I do with leftover eggshell bioplastic mixture?
If you have leftover eggshell bioplastic mixture, you can store it in an airtight container in the refrigerator for up to 24 hours. However, it’s best to use the mixture as soon as possible, as it may start to dry out or harden over time. You can also use the leftover mixture to create smaller bowls or other decorative objects.
How can I make the bioplastic bowl more water-resistant?
While the eggshell bioplastic bowl is not naturally waterproof, you can make it more water-resistant by applying a sealant. There are several types of sealants that you can use, such as beeswax, varnish, or polyurethane. Be sure to choose a sealant that is non-toxic and food-safe if you plan to use the bowl to hold food items. Apply the sealant according to the manufacturer’s instructions.

Leave a Comment