

DIY Concrete Candle Holders: Ever feel like your home decor is missing that certain *je ne sais quoi*? Something that screams “stylish” and “unique,” but also whispers “I made this with my own two hands”? Well, you’re in the right place! Forget those mass-produced, cookie-cutter candle holders you see everywhere. We’re diving into the world of DIY and crafting stunning concrete candle holders that will elevate your space and impress your guests.
Concrete, believe it or not, has a rich history in design, dating back to ancient Roman architecture. Think of the Pantheon – a testament to the enduring beauty and versatility of this material! While we’re not building architectural marvels today, we *are* harnessing that same raw, industrial chic to create something beautiful and functional for our homes.
Why DIY concrete candle holders, you ask? Because they’re incredibly versatile! They can be customized to fit any aesthetic, from minimalist modern to rustic farmhouse. Plus, let’s be honest, there’s a certain satisfaction that comes from creating something yourself. In this article, I’ll guide you through the process step-by-step, making it easy and fun to create your own unique pieces. You’ll save money, unleash your creativity, and add a personal touch to your home. So, grab your supplies, and let’s get crafting!
DIY Concrete Candle Holders: A Step-by-Step Guide
Hey there, fellow DIY enthusiasts! I’m super excited to share this project with you – making your own concrete candle holders. They’re surprisingly easy to create, incredibly stylish, and add a touch of modern industrial chic to any space. Plus, they make fantastic gifts! I’ll walk you through every step, so even if you’ve never worked with concrete before, you’ll be crafting beautiful candle holders in no time.
Materials You’ll Need
Before we dive in, let’s gather our supplies. Here’s what you’ll need:
* **Cement Mix:** I recommend a rapid-setting cement mix for quicker results, but any cement mix will work. Just adjust the drying time accordingly.
* **Fine Sand:** This helps to create a smoother, more refined concrete finish.
* **Water:** For mixing the concrete.
* **Molds:** This is where you can get creative! I’ve used a variety of molds, including:
* Plastic containers (yogurt cups, small bowls, etc.)
* Silicone molds (baking molds, ice cube trays)
* Cardboard boxes (lined with plastic)
* Even old tin cans!
* **Inner Molds (for creating the candle space):** These should be smaller than your outer molds. Think:
* Smaller plastic cups
* Test tubes
* Votive candle holders themselves (wrapped in plastic wrap for easy removal)
* PVC pipe cut to size
* **Cooking Spray or Mold Release:** This is crucial for easy removal of the concrete from the molds.
* **Mixing Container:** A bucket, large bowl, or even an old plastic tub will do.
* **Mixing Tool:** A trowel, sturdy spoon, or even a garden trowel works great.
* **Sandpaper (various grits):** For smoothing out any rough edges. I usually start with a coarser grit (like 80 or 120) and work my way up to a finer grit (like 220 or 320).
* **Sealer (optional):** A concrete sealer will protect your candle holders from stains and moisture.
* **Safety Gear:**
* Gloves: Concrete can be harsh on your skin.
* Dust Mask: Protect your lungs from cement dust.
* Eye Protection: Safety glasses or goggles are a must.
* **Weight (to hold down inner molds):** Rocks, pebbles, or even coins work well.
* **Measuring Cups/Spoons:** For accurate mixing.
Mixing the Concrete
This is a crucial step, so pay close attention! The right consistency is key to a strong and beautiful candle holder.
1. **Prepare Your Workspace:** Lay down some newspaper or a drop cloth to protect your work surface. Trust me, concrete can get messy!
2. **Put on Your Safety Gear:** Gloves, dust mask, and eye protection are essential.
3. **Combine Dry Ingredients:** In your mixing container, combine the cement mix and fine sand. I usually use a ratio of 2 parts cement mix to 1 part sand, but you can experiment to find what works best for you. Mix thoroughly until the ingredients are evenly distributed.
4. **Add Water Gradually:** Slowly add water to the dry mixture, mixing continuously. The goal is to achieve a consistency similar to thick oatmeal or peanut butter. You want it to be pourable but not too runny. Add water a little at a time to avoid overwatering.
5. **Mix Thoroughly:** Use your mixing tool to ensure there are no dry clumps. Mix for several minutes until the concrete is smooth and consistent.
6. **Test the Consistency:** To test the consistency, scoop up some of the concrete and let it fall back into the container. It should hold its shape slightly but still be pourable. If it’s too dry, add a little more water. If it’s too wet, add a little more cement mix and sand (in the same ratio).
Creating the Candle Holders
Now for the fun part! This is where your creativity can really shine.
1. **Prepare Your Molds:** Lightly coat the inside of your outer molds with cooking spray or mold release. This will make it much easier to remove the concrete later.
2. **Pour the Concrete:** Carefully pour the concrete mixture into your outer molds, filling them about halfway.
3. **Tap and Vibrate:** Gently tap the molds on your work surface to release any air bubbles that may be trapped in the concrete. You can also use a vibrator (like a power sander without sandpaper) to help remove air bubbles. Just hold it against the mold for a few seconds.
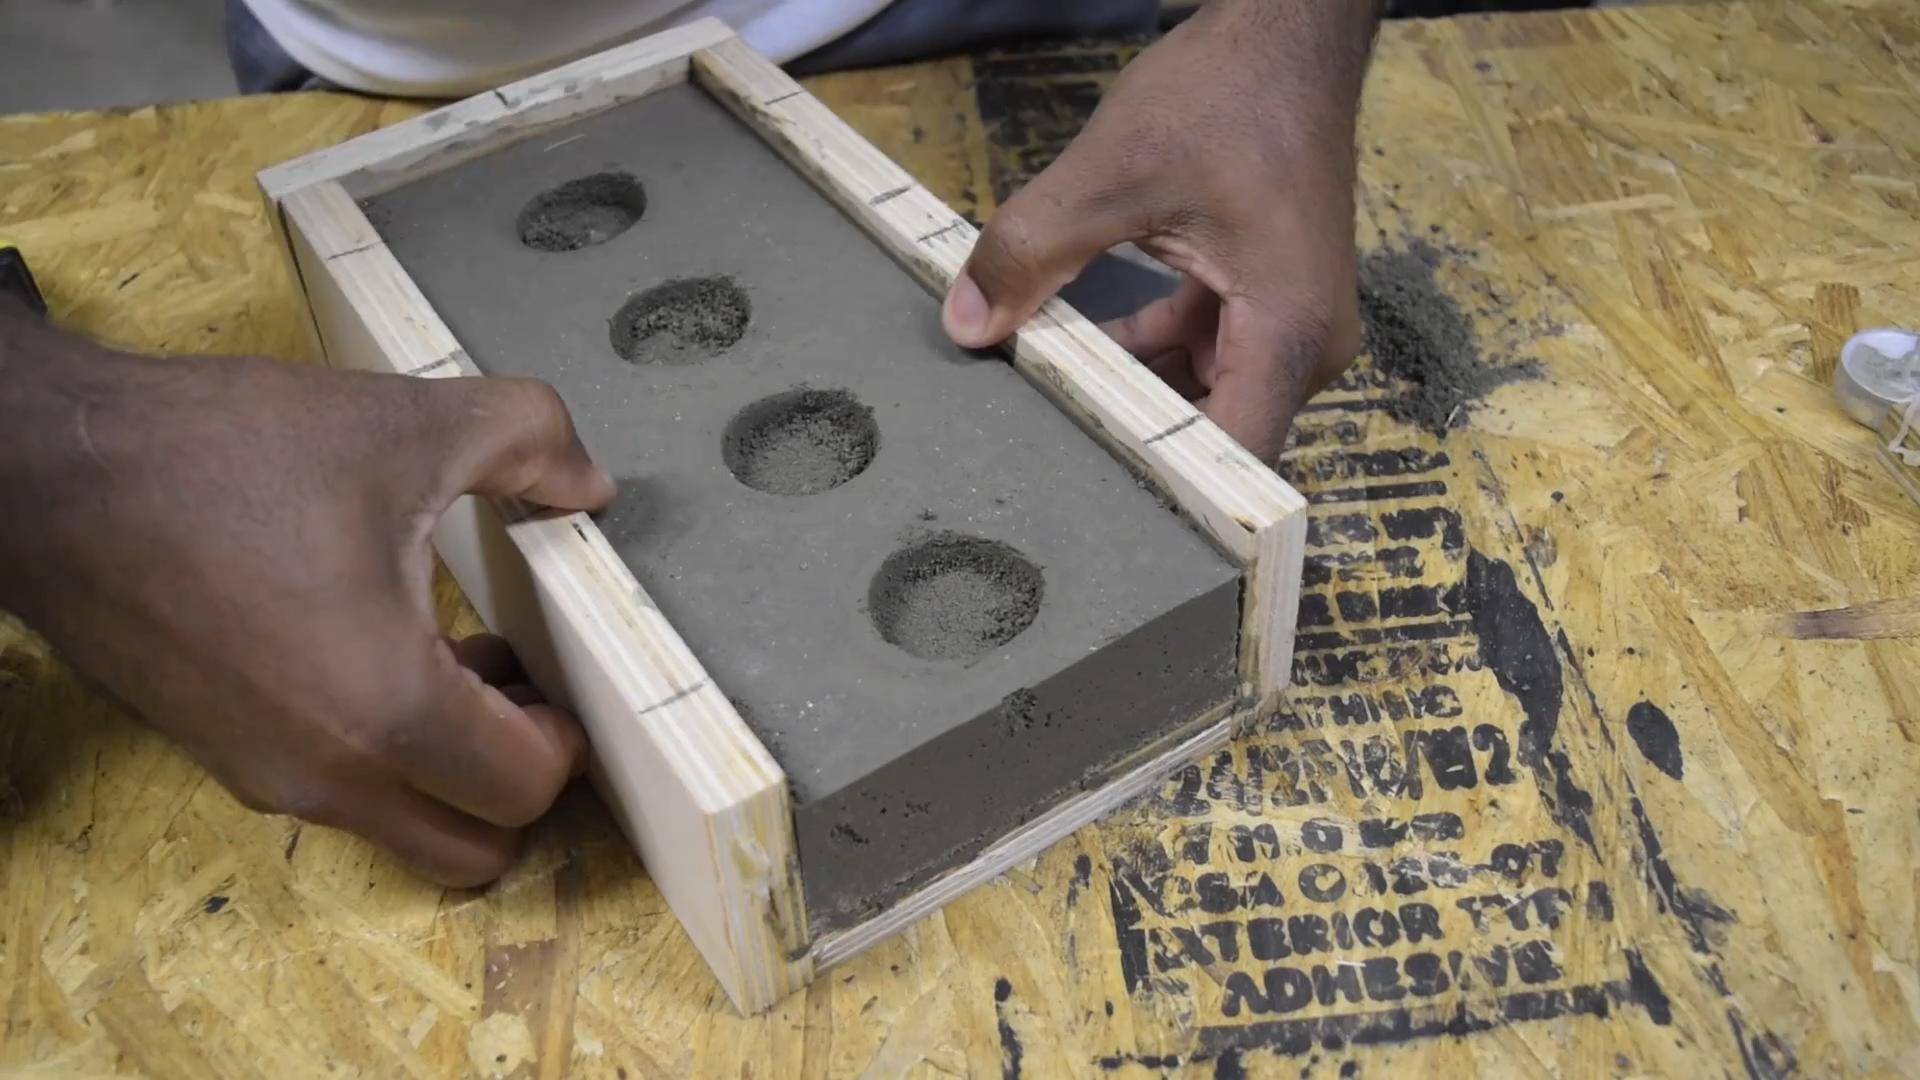
4. **Insert Inner Molds:** Center your inner molds within the outer molds and gently press them down into the concrete. Make sure they are deep enough to create a good-sized cavity for your candles.
5. **Add Weight to Inner Molds:** Place rocks, pebbles, or coins into the inner molds to prevent them from floating up as the concrete dries. This is especially important for lighter inner molds.
6. **Fill Remaining Space:** Carefully pour the remaining concrete mixture around the inner molds, filling the outer molds to the desired level.
7. **Tap and Vibrate Again:** Repeat the tapping and vibrating process to remove any remaining air bubbles.
8. **Level the Surface:** Use a trowel or straight edge to smooth and level the top surface of the concrete.
Drying and Demolding
Patience is key here! Don’t rush the drying process, or you risk cracking your candle holders.
1. **Let the Concrete Cure:** Allow the concrete to cure for at least 24-48 hours, or according to the instructions on your cement mix. Keep the molds in a cool, dry place away from direct sunlight.
2. **Demold Carefully:** Once the concrete is fully cured, carefully remove the inner molds. You may need to gently twist or tap them to loosen them. If they’re stuck, try using a heat gun or hairdryer to warm the plastic slightly.
3. **Remove Outer Molds:** Carefully remove the outer molds. Again, you may need to gently twist or tap them. If they’re stuck, try using a heat gun or hairdryer. If you used plastic molds, you can sometimes cut them away with scissors or a utility knife. Be careful not to damage the concrete!
Finishing Touches
This is where you can really personalize your candle holders and give them a professional look.
1. **Sanding:** Use sandpaper to smooth out any rough edges or imperfections. Start with a coarser grit (like 80 or 120) and work your way up to a finer grit (like 220 or 320). Sand in a circular motion, applying gentle pressure.
2. **Cleaning:** Wipe down the candle holders with a damp cloth to remove any dust from sanding.
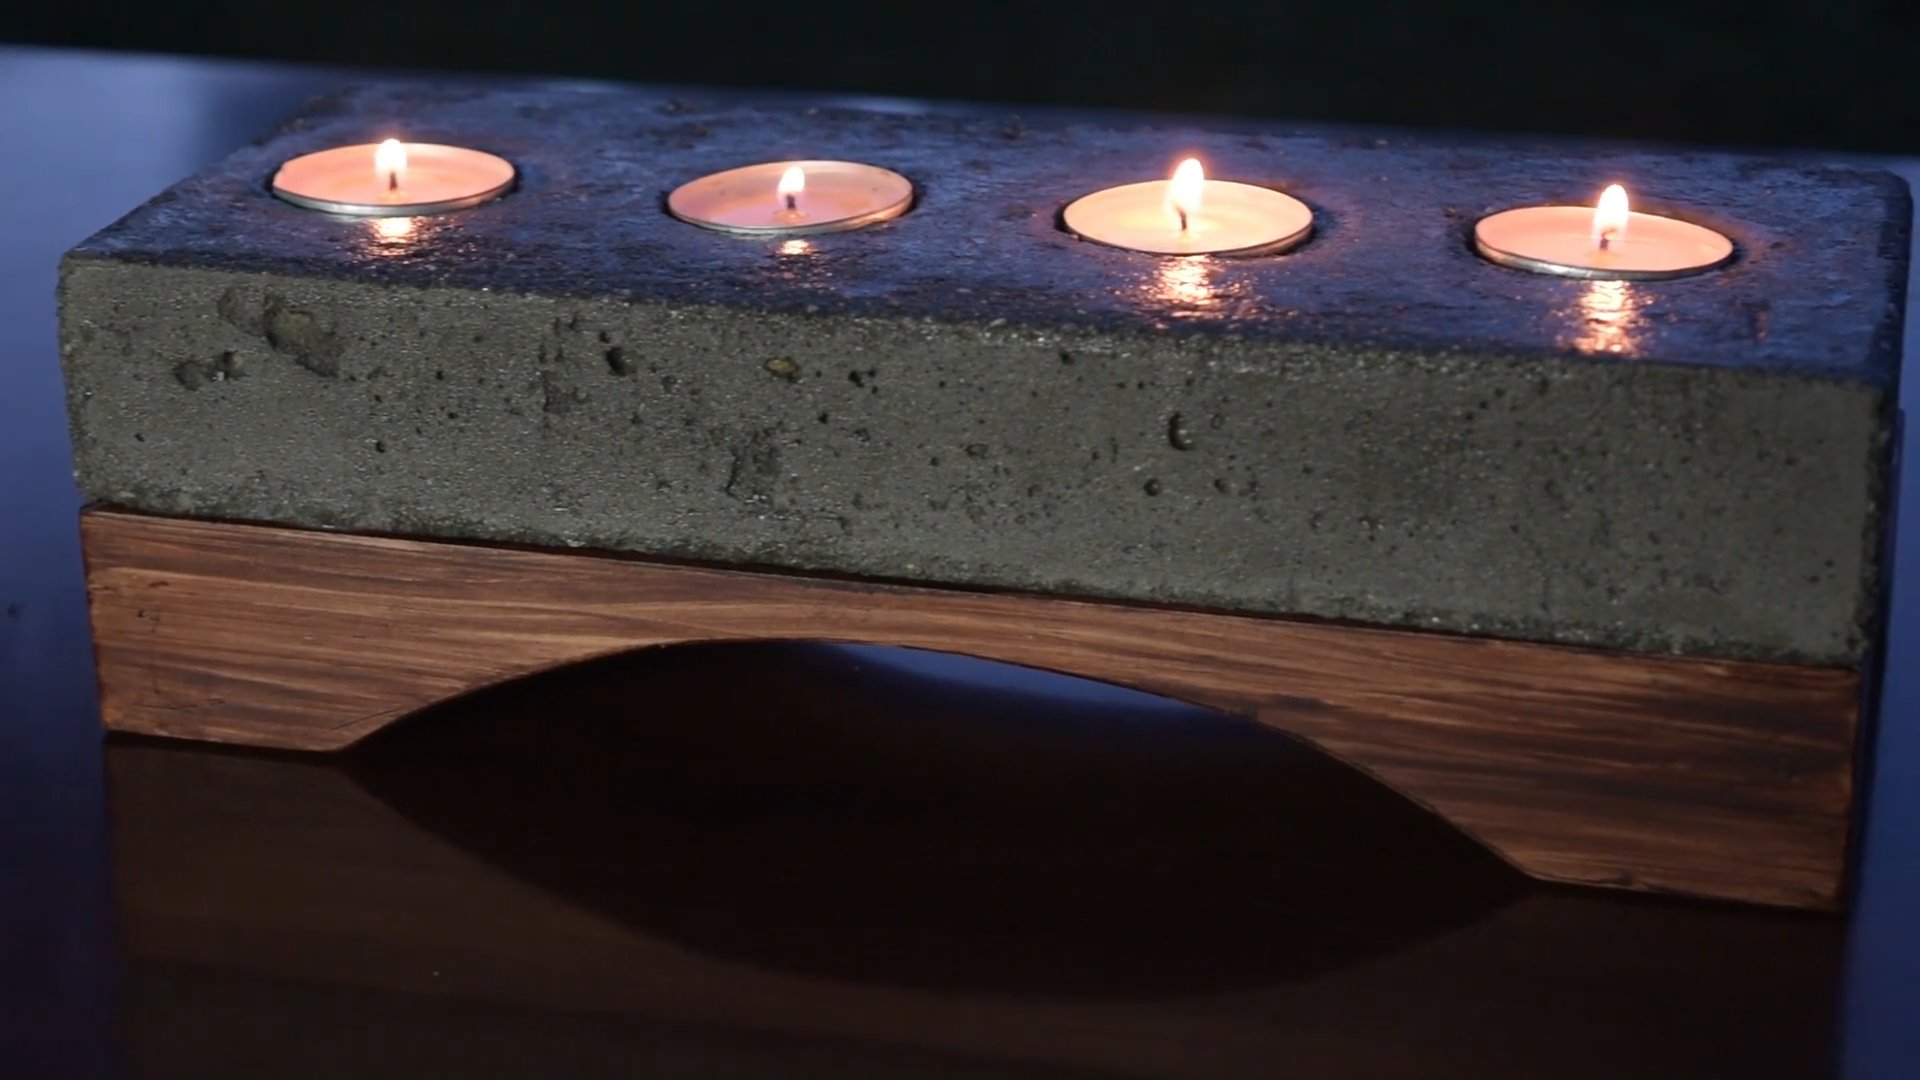
3. **Sealing (Optional):** If you want to protect your candle holders from stains and moisture, apply a concrete sealer according to the manufacturer’s instructions. This will also give them a slightly glossy finish.
4. **Adding Details (Optional):** You can add decorative details to your candle holders, such as:
* Painting them with acrylic paints
* Adding metallic leaf
* Embedding small objects (like shells or stones) into the concrete
* Stamping designs onto the surface
5. **Adding Felt Pads (Optional):** Attach felt pads to the bottom of your candle holders to protect your furniture from scratches.
Tips and Tricks
Here are a few extra tips to help you achieve the best results:
* **Experiment with Molds:** Don’t be afraid to try different types of molds. The possibilities are endless!
* **Add Pigment:** You can add concrete pigment to the mix to create colored candle holders.
* **Control Air Bubbles:** Vibrating the molds is the best way to remove air bubbles.
* **Cure Properly:** Proper curing is essential for strong and durable candle holders.
* **Don’t Overwater:** Overwatering the concrete mix will weaken it.
* **Safety First:** Always wear safety gear when working with concrete.
* **Have Fun!** This is a creative project, so enjoy the process!
Troubleshooting
* **Cracking:** Cracking can occur if the concrete dries too quickly or if it’s not mixed properly. Make sure to cure the concrete slowly and evenly, and avoid overwatering the mix.
* **Air Bubbles:** Air bubbles are a common problem with concrete. Vibrating the molds is the best way to remove them.
* **Difficult Demolding:** If you’re having trouble removing the concrete from the molds, try using a heat gun or hairdryer to warm the plastic slightly. You can also try tapping the molds gently with a hammer.
* **Rough Edges:** Rough edges can be easily smoothed out with sandpaper.
I hope you enjoyed this tutorial! I can’t wait to see what you create. Happy crafting!
Conclusion
So, there you have it! Crafting your own DIY concrete candle holders is not just a fun weekend project; it’s a gateway to personalized home décor that reflects your unique style. We’ve walked you through the simple steps, highlighting the affordability and creative freedom this project unlocks. Forget those mass-produced, generic candle holders you see everywhere. With a little cement, some imagination, and our easy-to-follow guide, you can create stunning, one-of-a-kind pieces that will elevate any space.
Why is this a must-try? Because it’s empowering! You’re not just buying something; you’re *making* something. You’re transforming raw materials into beautiful objects that bring warmth and ambiance to your home. And the best part? No two candle holders will ever be exactly alike. Each one will be a testament to your creativity and craftsmanship.
But don’t stop there! The possibilities are endless. Experiment with different molds – think geometric shapes, vintage teacups, or even repurposed plastic containers. Add color pigments to the concrete mix for a vibrant pop, or embed small stones, shells, or glass beads for a touch of sparkle. Consider using different types of cement, such as white cement for a brighter, more modern look. You could even try adding essential oils to the concrete mix for a subtly scented candle holder.
For a rustic touch, leave the concrete unsealed and embrace its natural imperfections. For a more polished look, seal the finished candle holders with a concrete sealant to protect them from stains and moisture. You can also paint them with acrylic paints or use stencils to create intricate designs.
Think about the size and shape of your candles when choosing your molds. Taper candles look elegant in tall, slender holders, while pillar candles need a wider, more stable base. Votive candles can be nestled in small, shallow holders.
This DIY project is also incredibly versatile. These concrete candle holders make fantastic gifts for friends and family. They’re perfect for adding a touch of warmth to your own home, whether you’re creating a cozy atmosphere for a romantic dinner or simply enjoying a relaxing evening by the fire. They can be used indoors or outdoors, adding a touch of industrial chic to your patio or garden.
We are confident that you’ll find this DIY project both rewarding and enjoyable. It’s a chance to unleash your inner artist, create something beautiful, and add a personal touch to your home décor. So, gather your materials, roll up your sleeves, and get ready to create some stunning DIY concrete candle holders.
We can’t wait to see what you create! Share your finished candle holders with us on social media using #DIYConcreteCandleHolders. We’re eager to see your unique designs and hear about your experience. Happy crafting!
Frequently Asked Questions (FAQ)
What kind of cement should I use for DIY concrete candle holders?
The best type of cement for this project is a rapid-setting cement mix or a fine-grade concrete mix. These mixes are readily available at most hardware stores and are designed for small projects like this. Rapid-setting cement will cure faster, allowing you to demold your candle holders sooner. Fine-grade concrete will give you a smoother finish. Avoid using coarse concrete mixes, as they may result in a rough and uneven surface. Portland cement can also be used, but it requires a longer curing time.
How do I prevent air bubbles in my concrete candle holders?
Air bubbles can be a common issue when working with concrete. To minimize them, thoroughly mix your concrete according to the manufacturer’s instructions, ensuring there are no lumps. After pouring the concrete into your molds, gently tap the sides of the molds to release any trapped air bubbles. You can also use a toothpick or small stick to poke around the edges of the mold to dislodge any bubbles. Another technique is to use a vibratory sander (without sandpaper) against the mold to help the air bubbles rise to the surface.
How long does it take for the concrete to dry?
The drying time depends on the type of cement you use and the ambient temperature and humidity. Rapid-setting cement can be demolded in as little as 24 hours, while regular concrete may take 48-72 hours to fully cure. It’s crucial to allow the concrete to dry completely before removing it from the molds to prevent cracking or damage. Check the manufacturer’s instructions for specific drying times.
How do I seal my concrete candle holders?
Sealing your concrete candle holders is essential to protect them from stains, moisture, and wear and tear. Use a concrete sealant specifically designed for indoor or outdoor use, depending on where you plan to display your candle holders. Apply the sealant according to the manufacturer’s instructions, typically with a brush or roller. Allow the sealant to dry completely before using your candle holders. You may need to apply multiple coats for optimal protection.
What if my concrete candle holder cracks?
Cracking can sometimes occur in concrete, especially if it dries too quickly or is exposed to extreme temperature changes. If you notice a small crack, you can try to repair it with a concrete patching compound. Apply the compound to the crack, smooth it out, and allow it to dry completely. For larger cracks, you may need to consider reinforcing the candle holder with wire mesh or fiberglass fibers during the initial casting process.
Can I add color to my concrete mix?
Yes, you can easily add color to your concrete mix using concrete pigments or dyes. These are available in a wide range of colors and can be found at most hardware stores or online retailers. Add the pigment to the dry concrete mix before adding water, and mix thoroughly to ensure even distribution of color. Start with a small amount of pigment and gradually add more until you achieve the desired color intensity. Remember that the color will appear lighter when the concrete is dry.
What kind of molds can I use for DIY concrete candle holders?
You can use a variety of molds for this project, depending on the shape and size you want to achieve. Silicone molds are a popular choice because they are flexible and easy to demold. Plastic containers, such as yogurt cups or plastic bowls, can also be used. You can even get creative and use vintage teacups, cardboard boxes, or any other container that can hold the concrete mix. Just make sure the mold is sturdy enough to withstand the weight of the concrete. If you’re using a mold that isn’t naturally non-stick, consider lining it with plastic wrap or applying a mold release agent to prevent the concrete from sticking.
How do I clean my concrete candle holders?
To clean your concrete candle holders, simply wipe them down with a damp cloth. For stubborn stains, you can use a mild detergent or a concrete cleaner. Avoid using harsh chemicals or abrasive cleaners, as they can damage the sealant or the concrete itself. If you spill wax on your candle holder, carefully scrape it off with a plastic scraper or a dull knife. You can also try melting the wax with a hairdryer and then wiping it away with a cloth.
Are concrete candle holders safe to use?
Yes, concrete candle holders are generally safe to use, but it’s important to take certain precautions. Always place your candle holders on a heat-resistant surface to protect your furniture. Never leave burning candles unattended. Keep candle holders away from flammable materials, such as curtains or paper. If you’re using tea lights, make sure the candle holder is deep enough to contain the flame. Regularly check your candle holders for cracks or damage, and discontinue use if you notice any problems.


Leave a Comment