

Grow Gourds at Home – ever dreamt of transforming your backyard into a whimsical wonderland, bursting with unique shapes and vibrant colors? I know I have! Gourds, with their fascinating history and incredible versatility, offer just that. From crafting charming birdhouses to creating stunning autumnal decorations, the possibilities are endless when you learn to grow these fascinating fruits yourself.
For centuries, gourds have held a special place in cultures around the world. Used as tools, containers, and even musical instruments, they represent resourcefulness and creativity. Think about it – our ancestors relied on these natural wonders for survival! Now, we can tap into that same ingenuity and bring a touch of history to our own gardens.
But why should you bother learning to grow gourds at home? Well, beyond their historical significance and decorative appeal, growing your own gourds is incredibly rewarding. Imagine the satisfaction of nurturing a tiny seed into a magnificent, uniquely shaped gourd. Plus, it’s a fantastic way to connect with nature, reduce your carbon footprint, and add a personal touch to your home décor. This DIY guide will equip you with all the essential tricks and hacks to successfully cultivate these captivating plants, even if you’re a complete beginner. So, let’s get our hands dirty and embark on this exciting gardening adventure together!
Growing Gourds: A Comprehensive DIY Guide
Hey there, fellow gardening enthusiasts! I’m so excited to share my experience and knowledge on growing gourds. It’s a rewarding process that yields unique and beautiful creations you can use for decoration, crafting, or even musical instruments! This guide will walk you through everything you need to know, from seed to stunning gourd.
Choosing Your Gourd Variety
Before we get our hands dirty, let’s talk about the different types of gourds you can grow. This is important because different gourds have different needs and uses.
* Ornamental Gourds: These are the small, colorful gourds you often see in fall decorations. They come in a variety of shapes, sizes, and colors. They’re generally easy to grow and dry.
* Luffa Gourds: Also known as sponge gourds, these are grown for their fibrous interior, which makes excellent natural sponges. They require a long growing season and plenty of support.
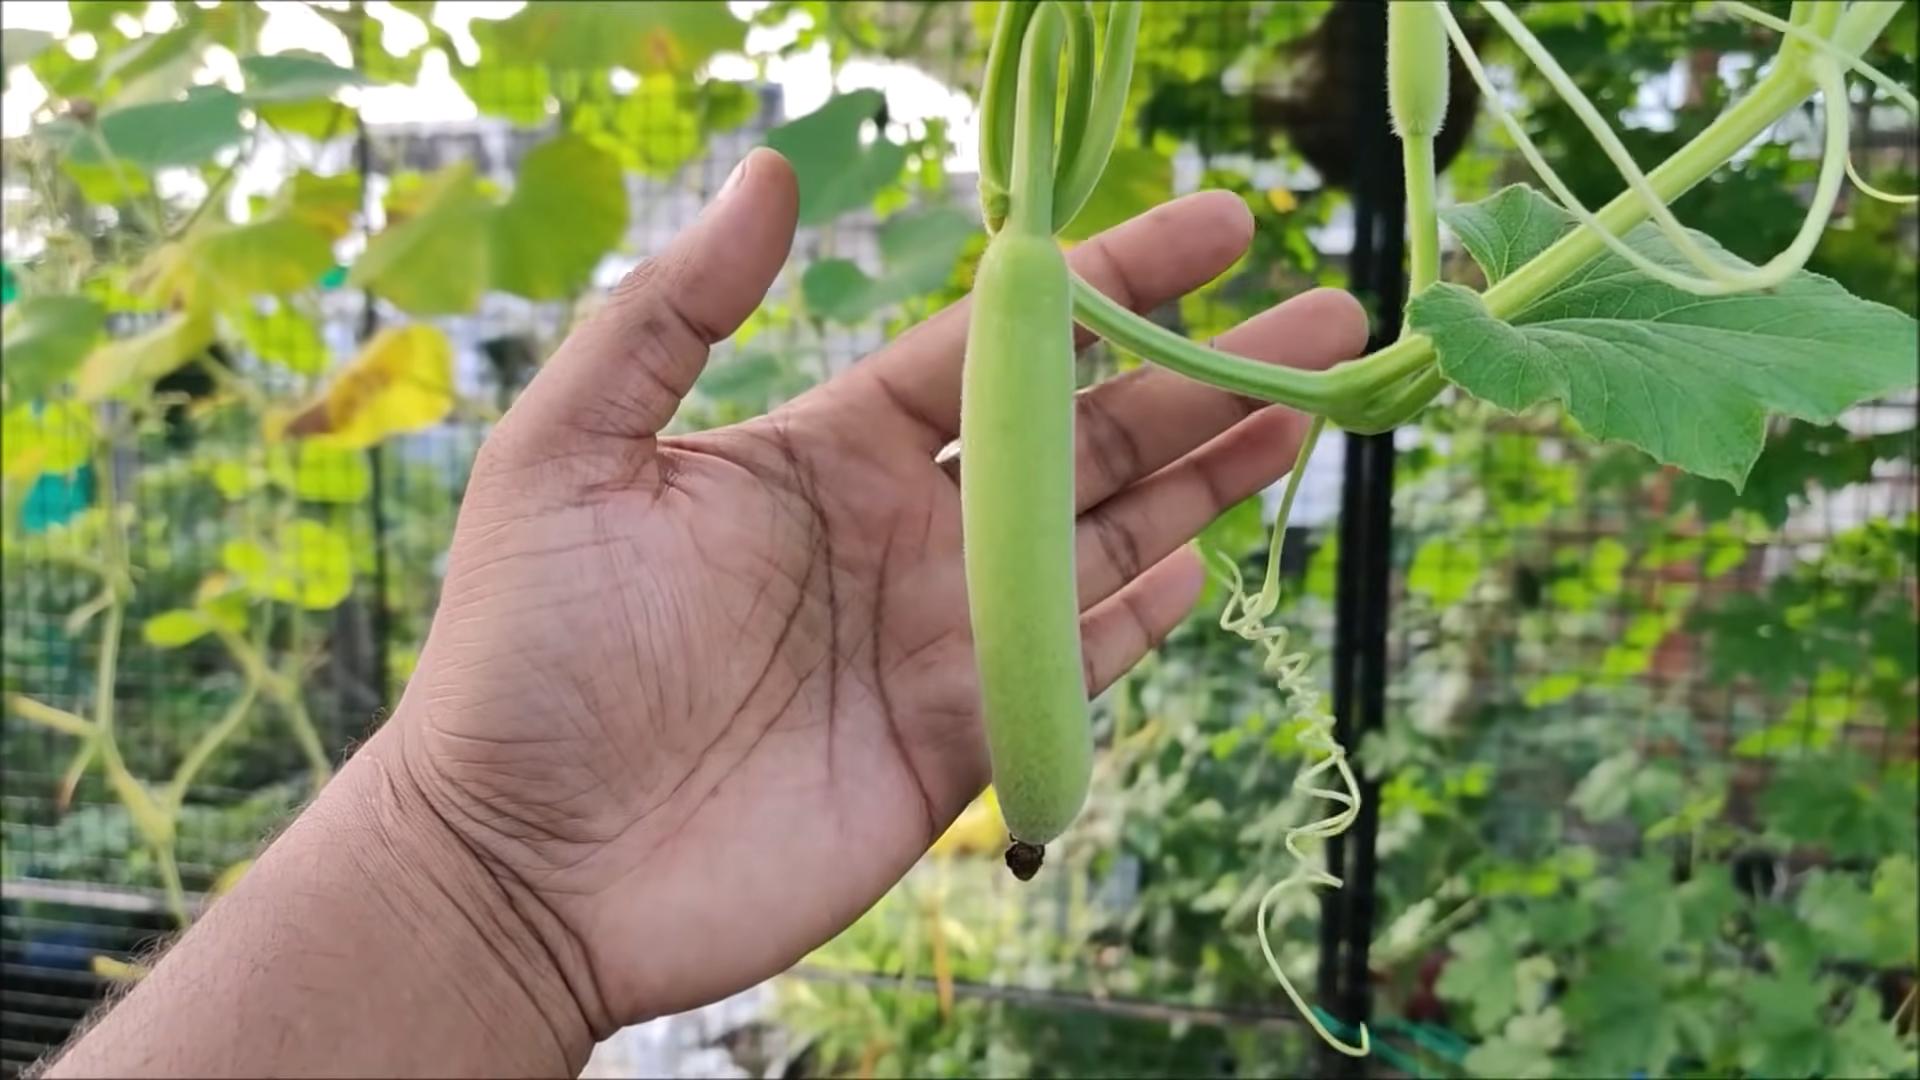
* Bottle Gourds: These are the classic gourds used for making birdhouses, dippers, and other functional items. They come in various shapes, including the classic bottle shape, as well as dipper and kettle shapes.
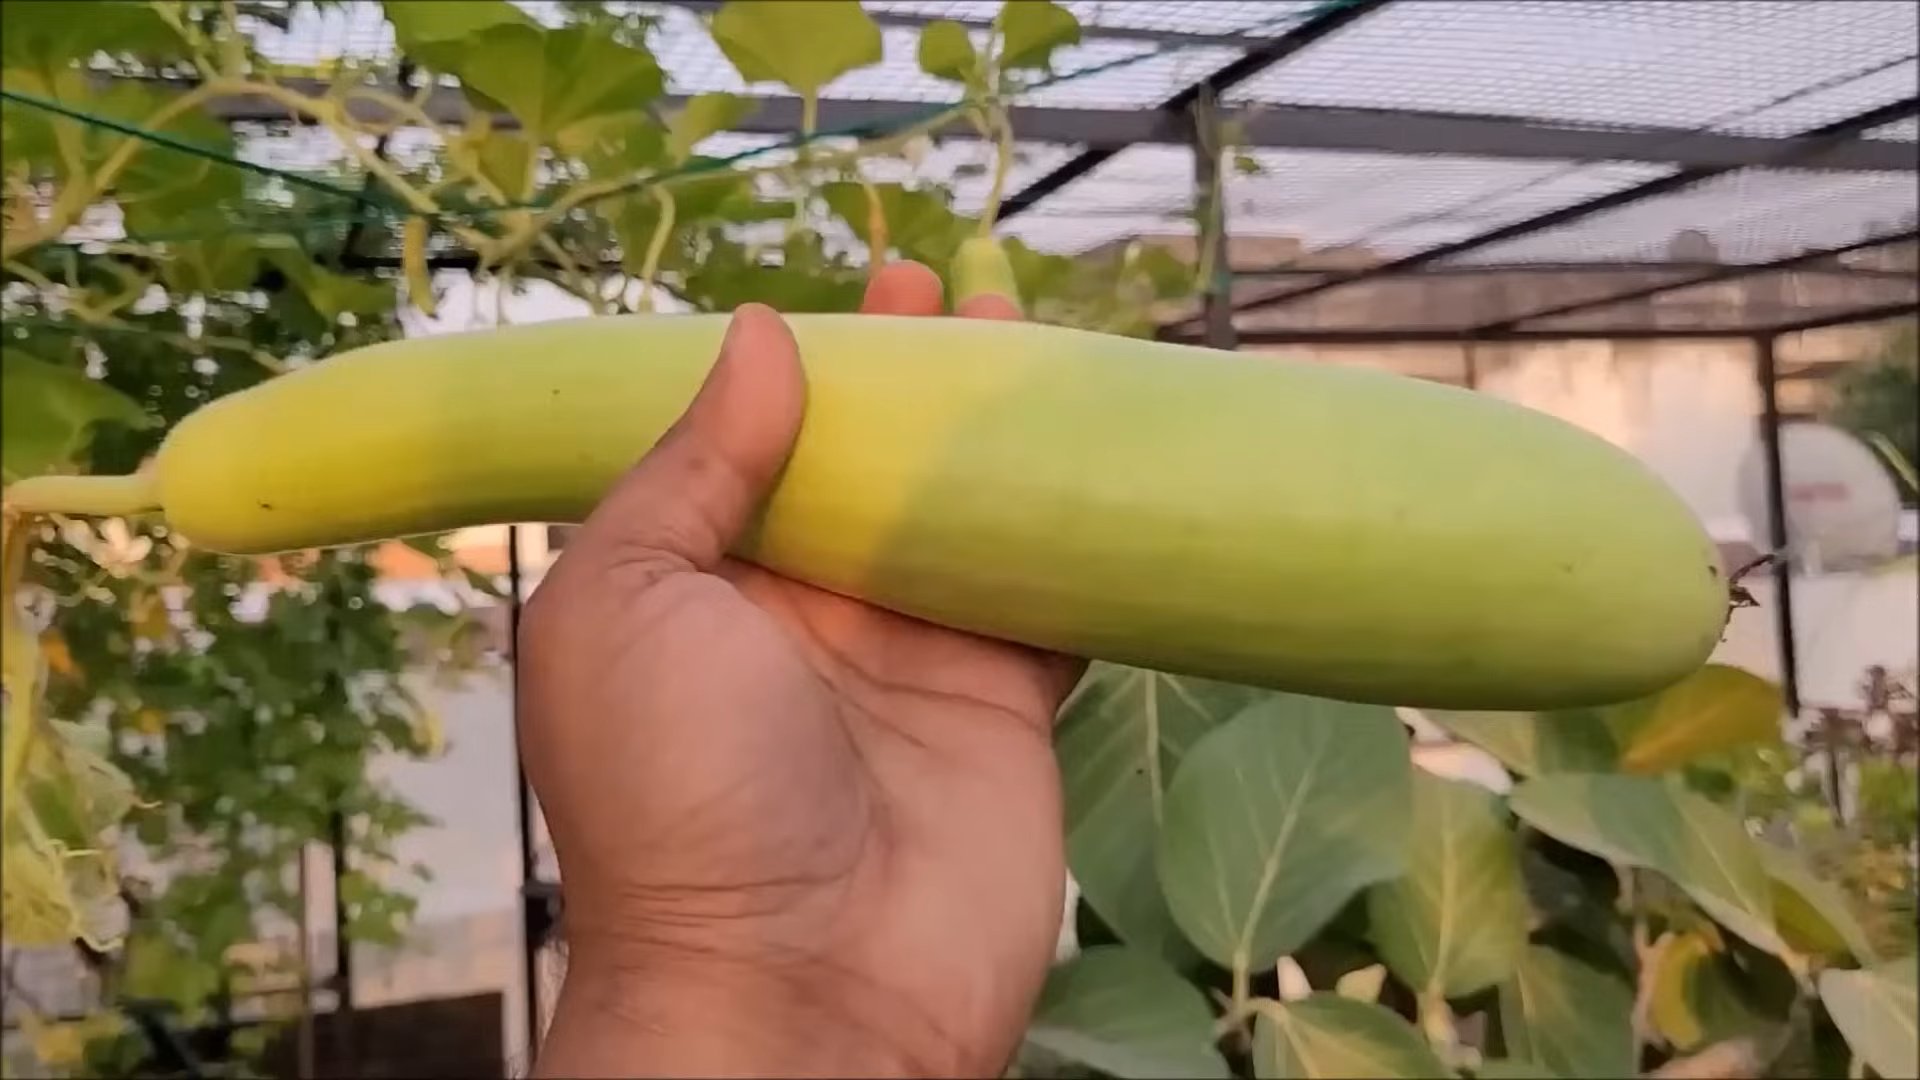
* Snake Gourds: These long, slender gourds are edible when young and can grow to impressive lengths. They require strong support and a warm climate.
I personally love growing a mix of ornamental and bottle gourds for variety. Consider your climate, space, and intended use when making your choice.
Getting Started: Planting Your Gourd Seeds
Now for the fun part! Let’s get those seeds in the ground.
1. Timing is Key: Gourds need a long growing season (typically 100-180 days), so start your seeds indoors about 4-6 weeks before the last expected frost. If you live in a warm climate with a long growing season, you can direct sow the seeds after the last frost.
2. Soaking the Seeds: To improve germination, soak your gourd seeds in warm water for 24-48 hours before planting. This helps soften the hard outer shell. I usually put them in a small bowl on my kitchen counter.
3. Starting Seeds Indoors:
* Fill seed trays or small pots with a good quality seed-starting mix.
* Plant the seeds about 1 inch deep.
* Water gently to moisten the soil.
* Place the trays in a warm location (around 70-80°F) or use a heat mat.
* Keep the soil consistently moist but not waterlogged.
* Once the seedlings emerge, provide them with plenty of light. A sunny windowsill or grow lights work well.
4. Hardening Off Seedlings: Before transplanting your seedlings outdoors, you need to “harden them off.” This gradually acclimates them to outdoor conditions.
* Start by placing the seedlings outdoors in a sheltered location for a few hours each day, gradually increasing the time over a week or two.
* Protect them from strong winds and direct sunlight initially.
5. Preparing the Garden Bed: Gourds need well-drained soil that is rich in organic matter.
* Choose a sunny location that receives at least 6-8 hours of sunlight per day.
* Amend the soil with compost or well-rotted manure to improve drainage and fertility.
* Gourds are heavy feeders, so consider adding a slow-release fertilizer to the soil.
6. Transplanting Seedlings:
* Once the danger of frost has passed and the soil has warmed up, transplant your seedlings into the garden.
* Space the plants according to the variety. Ornamental gourds can be spaced 2-3 feet apart, while larger gourds like bottle gourds need 4-6 feet of space.
* Dig a hole slightly larger than the root ball of the seedling.
* Gently remove the seedling from the pot and place it in the hole.
* Backfill with soil and water thoroughly.
Providing Support: Trellising Your Gourds
Many gourd varieties, especially luffa and bottle gourds, are vines and need support to grow properly. Trellising not only saves space but also improves air circulation and prevents the gourds from rotting on the ground.
* Choosing a Trellis: There are many options for trellising gourds. You can use a sturdy fence, a wooden trellis, a metal arch, or even a DIY structure made from bamboo or branches. The trellis should be strong enough to support the weight of the mature gourds.
* Installing the Trellis: Install the trellis before or shortly after transplanting the seedlings. Make sure it is securely anchored in the ground.
* Training the Vines: As the gourd vines grow, gently guide them onto the trellis. You may need to tie them to the trellis with twine or plant ties.
I’ve had great success using cattle panels bent into an arch shape. They’re sturdy and provide ample support for even the heaviest gourds.
Caring for Your Gourds: Watering, Fertilizing, and Pest Control
Proper care is essential for healthy gourd plants and a bountiful harvest.
1. Watering: Gourds need consistent moisture, especially during hot, dry weather. Water deeply and regularly, especially when the fruits are developing. Avoid overhead watering, which can lead to fungal diseases. Drip irrigation is an excellent option.
2. Fertilizing: Gourds are heavy feeders and benefit from regular fertilization. Use a balanced fertilizer or a fertilizer specifically formulated for vegetables. Follow the instructions on the fertilizer package. I like to use a liquid seaweed fertilizer every few weeks.
3. Pest Control: Gourds can be susceptible to various pests, including squash bugs, squash vine borers, and cucumber beetles.
* Squash Bugs: Handpick squash bugs and their eggs from the plants. You can also use insecticidal soap or neem oil.
* Squash Vine Borers: These pests can be devastating to gourd plants. Wrap the base of the stems with aluminum foil or netting to prevent the borers from entering. You can also inject Bacillus thuringiensis (Bt) into the stems to kill the borers.
* Cucumber Beetles: These beetles can transmit diseases to gourd plants. Use row covers to protect young plants. You can also use insecticidal soap or neem oil.
4. Disease Control: Gourds can also be susceptible to fungal diseases, such as powdery mildew and downy mildew.
* Powdery Mildew: This disease appears as a white powdery coating on the leaves. Improve air circulation by pruning the plants. You can also use a fungicide.
* Downy Mildew: This disease causes yellow spots on the leaves. Improve air circulation and avoid overhead watering. You can also use a fungicide.
Regularly inspect your plants for pests and diseases and take action promptly to prevent problems from spreading.
Harvesting and Curing Your Gourds
Harvesting and curing are crucial steps in preparing your gourds for long-term use.
1. Harvesting:
* Harvest ornamental gourds when they are fully mature and the stems have dried and turned brown.
* Harvest luffa gourds when they are fully mature and the skin has turned brown and dry.
* Harvest bottle gourds when they are fully mature and the stems have dried and turned brown. The gourds should feel hard and lightweight.
* Use a sharp knife or pruning shears to cut the gourds from the vine, leaving a few inches of stem attached.
2. Curing: Curing is the process of drying the gourds to prevent them from rotting.
* Clean the gourds with a damp cloth to remove any dirt or debris.
* Place the gourds in a well-ventilated area, such as a garage or shed.
* Elevate the gourds on racks or pallets to allow air to circulate around them.
* Turn the gourds regularly to ensure even drying.
* The curing process can take several weeks or even months, depending on the size and thickness of the gourds.
* Discard any gourds that show signs of rot or mold.
3. Cleaning and Finishing: Once the gourds are fully cured, you can clean and finish them.
* Wash the gourds with soap and water to remove any remaining dirt or debris.
* Scrub the gourds with a scouring pad or steel wool to remove the outer skin.
* Sand the gourds to smooth the surface.
* You can then paint, stain, or decorate the gourds as desired.
Troubleshooting Common Gourd Growing Problems
Even with the best care, you might encounter some challenges. Here are a few common problems and how to address them:
* Poor Germination: If your seeds aren’t germinating, make sure the soil is warm enough and consistently moist. Soaking the seeds beforehand can
Conclusion
So, there you have it! Growing gourds at home is not only achievable, but it’s also a deeply rewarding experience that connects you with nature and provides you with unique, decorative, and even functional items. Forget the mass-produced, generic decorations – imagine adorning your home with gourds you nurtured from seed to harvest. The satisfaction is unparalleled.
This isn’t just about planting a seed and hoping for the best. It’s about understanding the gourd’s needs, providing the right environment, and witnessing the miracle of growth firsthand. It’s about learning a new skill, embracing patience, and reaping the benefits of your hard work. And the best part? You don’t need acres of land or a green thumb of legend to succeed. With a little planning, preparation, and the tips outlined above, you can transform your backyard, balcony, or even a sunny windowsill into a thriving gourd patch.
But the journey doesn’t end with the harvest. Once your gourds are cured and dried, the real fun begins! Unleash your creativity and transform them into birdhouses, bowls, dippers, musical instruments, or stunning works of art. Paint them, carve them, burn designs into them – the possibilities are endless. Consider adding natural elements like twigs, leaves, or seeds to further enhance their rustic charm. You can even experiment with different finishes, from glossy varnishes to matte sealants, to achieve the desired look and protect your creations for years to come.
For a unique twist, try growing different varieties of gourds. Bottle gourds, dipper gourds, snake gourds, and ornamental gourds each offer their own distinct shapes, sizes, and textures, providing a diverse palette for your crafting endeavors. You could even try grafting different gourd varieties onto a single plant for a truly unique and eye-catching display.
Don’t be intimidated by the process. While growing gourds at home requires some effort, it’s a relatively straightforward and forgiving activity. The key is to start small, learn from your mistakes, and most importantly, have fun! Embrace the challenges, celebrate the successes, and enjoy the journey of bringing these fascinating plants to life.
We wholeheartedly encourage you to give this DIY project a try. It’s a fantastic way to connect with nature, learn new skills, and create beautiful, one-of-a-kind items for your home and garden. And once you’ve experienced the joy of growing your own gourds, we’d love to hear about it! Share your experiences, tips, and photos with us in the comments below. Let’s create a community of gourd enthusiasts and inspire others to embark on this rewarding adventure. Let us know what kind of gourd growing success you have!
Frequently Asked Questions (FAQ)
What is the best time of year to plant gourd seeds?
The ideal time to plant gourd seeds is after the last frost, when the soil has warmed up to at least 65°F (18°C). Gourds require a long growing season, typically 90-120 days, so starting them indoors 4-6 weeks before the last frost can give them a head start. If you live in a region with a short growing season, consider choosing faster-maturing varieties.
How much space do gourds need to grow?
Gourds are vigorous vines that require ample space to spread. Allow at least 4-6 feet between plants and rows. If you’re growing them on a trellis, ensure it’s sturdy enough to support the weight of the mature vines and gourds. Consider the mature size of the specific gourd variety you’re growing, as some can be significantly larger than others.
What kind of soil is best for growing gourds?
Gourds thrive in well-drained, fertile soil that is rich in organic matter. Amend your soil with compost or aged manure before planting to improve its drainage and nutrient content. A slightly acidic to neutral soil pH (6.0-7.0) is ideal. Avoid heavy clay soils, as they can become waterlogged and hinder root development.
How often should I water my gourd plants?
Gourds need consistent moisture, especially during hot, dry weather. Water deeply and regularly, aiming to keep the soil consistently moist but not waterlogged. Avoid overhead watering, as it can promote fungal diseases. Mulching around the plants can help retain moisture and suppress weeds. Check the soil moisture regularly by sticking your finger about an inch into the soil. If it feels dry, it’s time to water.
Do gourds need fertilizer?
Yes, gourds benefit from regular fertilization, especially during their active growth phase. Use a balanced fertilizer (e.g., 10-10-10) at planting time and then side-dress with a nitrogen-rich fertilizer every 4-6 weeks. Avoid over-fertilizing, as it can lead to excessive vine growth at the expense of fruit production. Consider using organic fertilizers like compost tea or fish emulsion for a more sustainable approach.
How do I prevent pests and diseases from affecting my gourds?
Monitor your gourd plants regularly for signs of pests and diseases. Common pests include squash bugs, squash vine borers, and aphids. Use insecticidal soap or neem oil to control these pests. To prevent diseases, ensure good air circulation around the plants, avoid overhead watering, and practice crop rotation. If you notice any signs of fungal diseases, such as powdery mildew or downy mildew, treat them promptly with a fungicide.
When is the best time to harvest gourds?
Gourds are typically harvested in the fall, after the vines have died back and the gourds have fully matured. The gourds should be hard and dry to the touch, and the stems should be brown and brittle. Leave a few inches of stem attached to the gourd when harvesting. Avoid harvesting gourds that are damaged or bruised, as they are more susceptible to rotting.
How do I cure and dry gourds?
Curing and drying gourds is essential for preserving them and preventing them from rotting. Clean the gourds with a mild soap and water solution and then dry them thoroughly. Place them in a well-ventilated area, such as a garage or shed, and allow them to dry for several weeks or months. Turn the gourds regularly to ensure even drying. The gourds are fully cured when they are lightweight and the seeds rattle inside.
Can I eat gourds?
While some gourds are edible when young and tender, most ornamental gourds are not suitable for consumption. Edible gourds, such as bottle gourds and snake gourds, are often used in Asian and African cuisine. However, it’s important to properly identify the gourd variety before consuming it, as some gourds can be toxic. Always cook gourds thoroughly before eating them.
How can I decorate my dried gourds?
The possibilities for decorating dried gourds are endless! You can paint them, carve them, burn designs into them, or embellish them with beads, shells, or other decorative elements. Use acrylic paints, wood stains, or varnishes to add color and protect the surface. Consider using stencils or templates to create intricate designs. Let your creativity guide you and have fun experimenting with different techniques.

Leave a Comment